
AI SEO All-in-One: SEO and GEO suite for Shopware 6
Google finds your shop, ChatGPT never mentions it. This plugin checks both in one run, fills empty meta fields from templates and turns the findings into a to-do list.
On this page
- Introduction
- What you get out of this plugin
- Who is this plugin for?
- Installation
- Getting started
- Settings
- General
- Meta data and templates
- Indexing control (pagination and filters)
- Structured data (JSON-LD)
- AI visibility (GEO)
- Grounding pages (fact pages)
- Internal linking
- Redirects and 404 pages
- Audits
- External services
- Monitoring thresholds and alerts
- Data retention
- How to use the features
- How to read the cockpit
- How to work through your to-dos
- How to approve AI suggestions
- How to run an audit and read the findings
- How to fill meta fields from templates
- How to link automatically inside your shop
- How to create fact pages
- How to maintain redirects and missing addresses
- How to control technical SEO
- How to set up the AI
- How to check your visibility in AI answers
- How to schedule recurring runs
- How to work directly on an article
- Troubleshooting
- The AI SEO area does not appear in the menu
- Nothing happens although everything looks switched on
- The AI produces no suggestions
- A redirect does not apply
- The audit aborts or takes a very long time
- Fact pages are not reachable in the shop
- FAQ
- For administrators and technical details
- System requirements
- Data storage
- Outbound connections
- Permissions
- Background processing
- Installation from the command line
Introduction
AI SEO All-in-One checks, improves and monitors two things at the same time: how your shop performs in Google, and how well AI assistants such as ChatGPT, Perplexity or Gemini understand and quote it.
What you get out of this plugin
- Two scores for your shop, one for classic search and one for findability in AI answers, including their trend over time.
- Empty meta titles and meta descriptions filled from templates across the whole catalogue instead of typed one by one.
- Text suggestions written by an AI that you approve first, through your own account and with a daily budget.
- Every address that runs into nothing in your shop, listed with one click to turn it into a redirect.
- Structured data output, published fact pages and control over which AI crawlers may read your shop.
- A to-do list to work through instead of a report to read.
Who is this plugin for?
For shop owners and editors with a grown assortment where meta field maintenance never quite catches up, and for anyone who wants to know whether their shop appears in AI answers at all. For a shop with thirty well maintained articles this plugin is oversized.
Installation
After purchase the plugin is available in your administration straight away, there is nothing to download.
-
Log in to your Shopware administration.
-
Open Extensions → My extensions.
-
Click Install in the row AI SEO All-in-One.
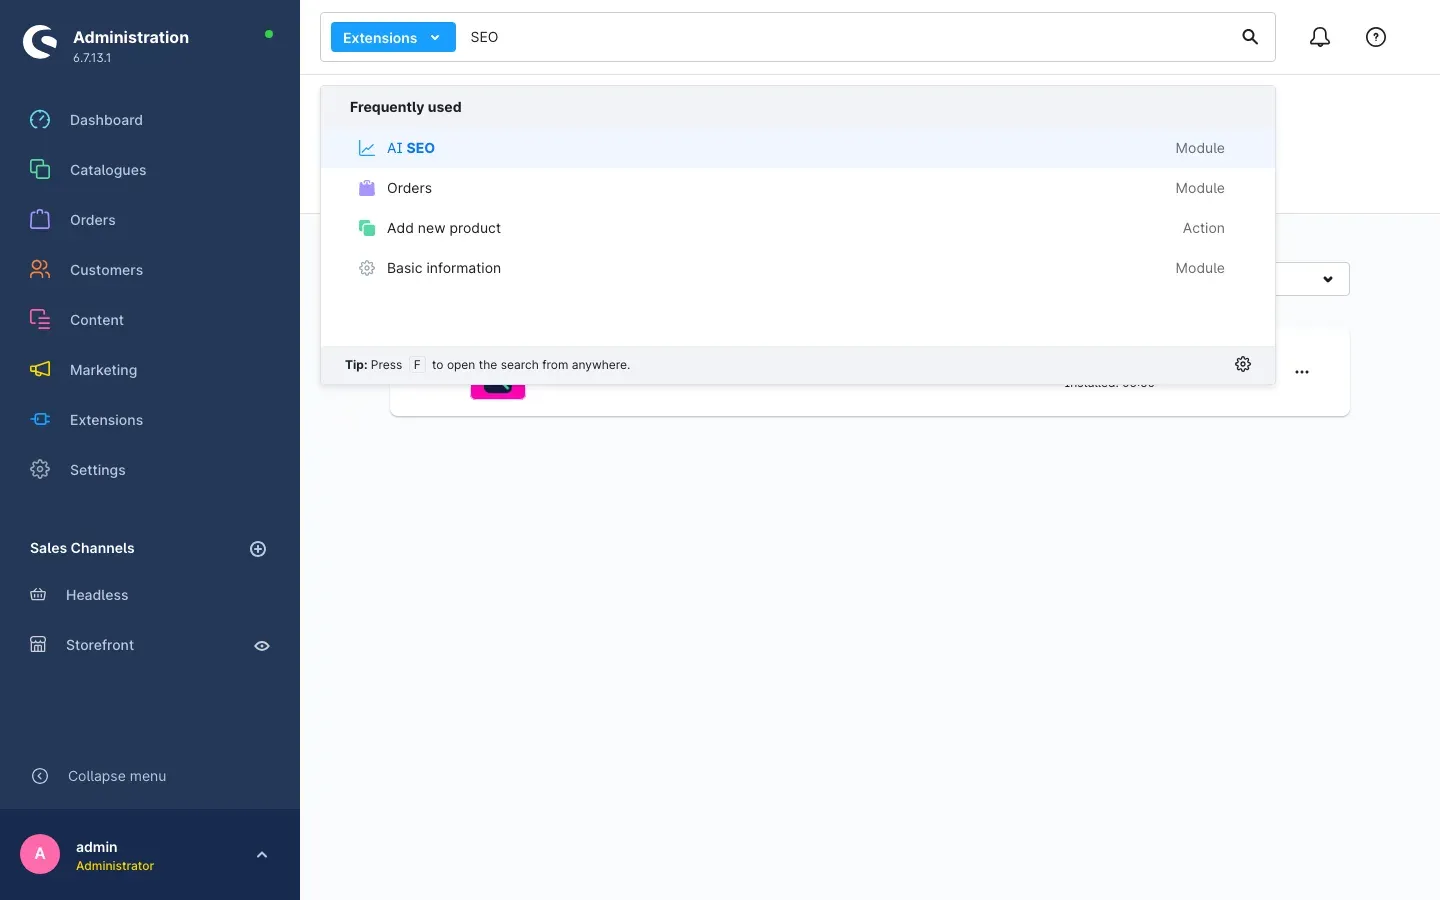 Fig. 1: The plugin in the list of your own extensions
 -
Activate the plugin with the switch next to the entry. Done.
If the plugin does not appear in the list, your Shopware account is not yet connected to this shop. You do that in the same place, under Extensions → My extensions.
Getting started
After activation you find the new area under Marketing → AI SEO.
-
Open the settings: go to Extensions → My extensions, click the three dots in the plugin row and choose Configure.
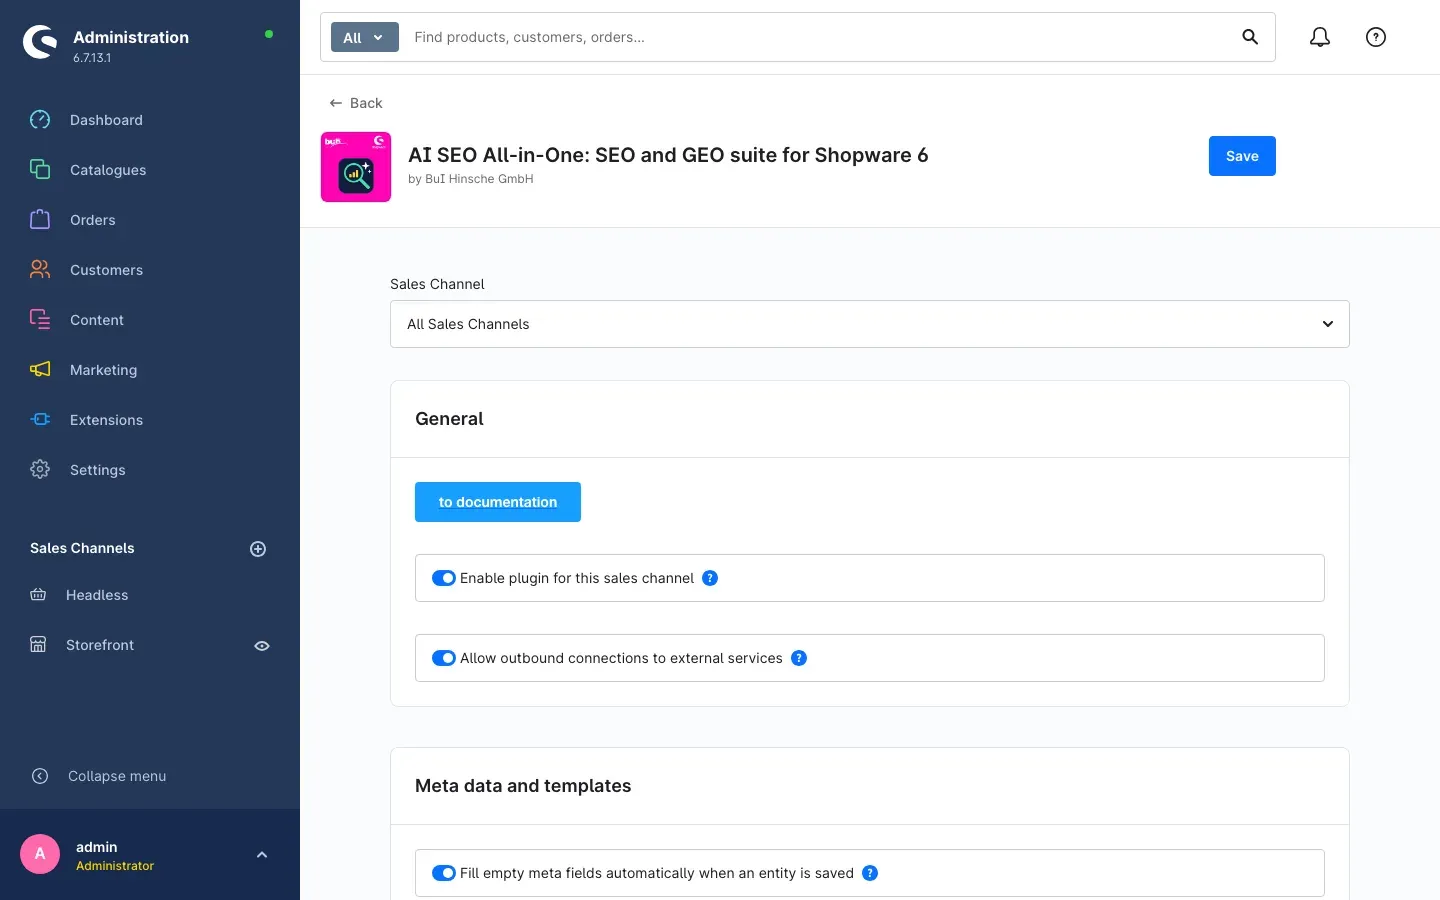 Fig. 2: The configuration starts with the General card
 -
Pick a sales channel: the sales channel selector sits at the top of the configuration page. Every setting below applies to the channel chosen there. If you run several shops, you configure them one by one.
-
Run the setup: open Marketing → AI SEO. On the cockpit the card Setup not finished yet takes you through four steps via Open setup.
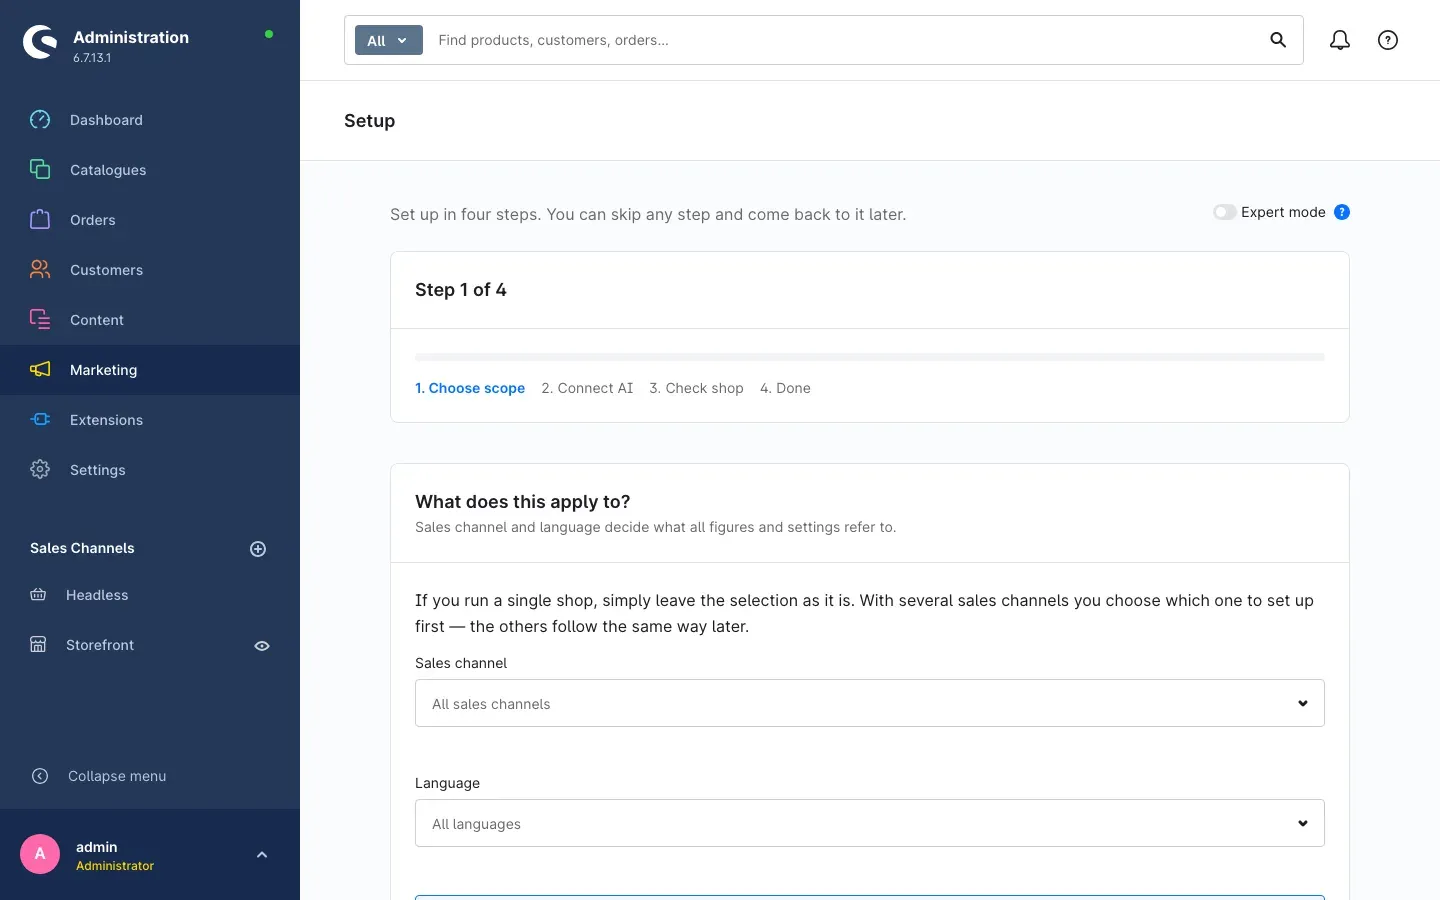 Fig. 3: The assistant walks you through the setup in four steps
 -
Start the first audit: the assistant offers you the first run. It delivers your baseline and the first to-do list. The AI step is explicitly optional.
-
Look at the result: back on Marketing → AI SEO the cockpit shows both scores and, under What is next, the three items that pay off most right now.
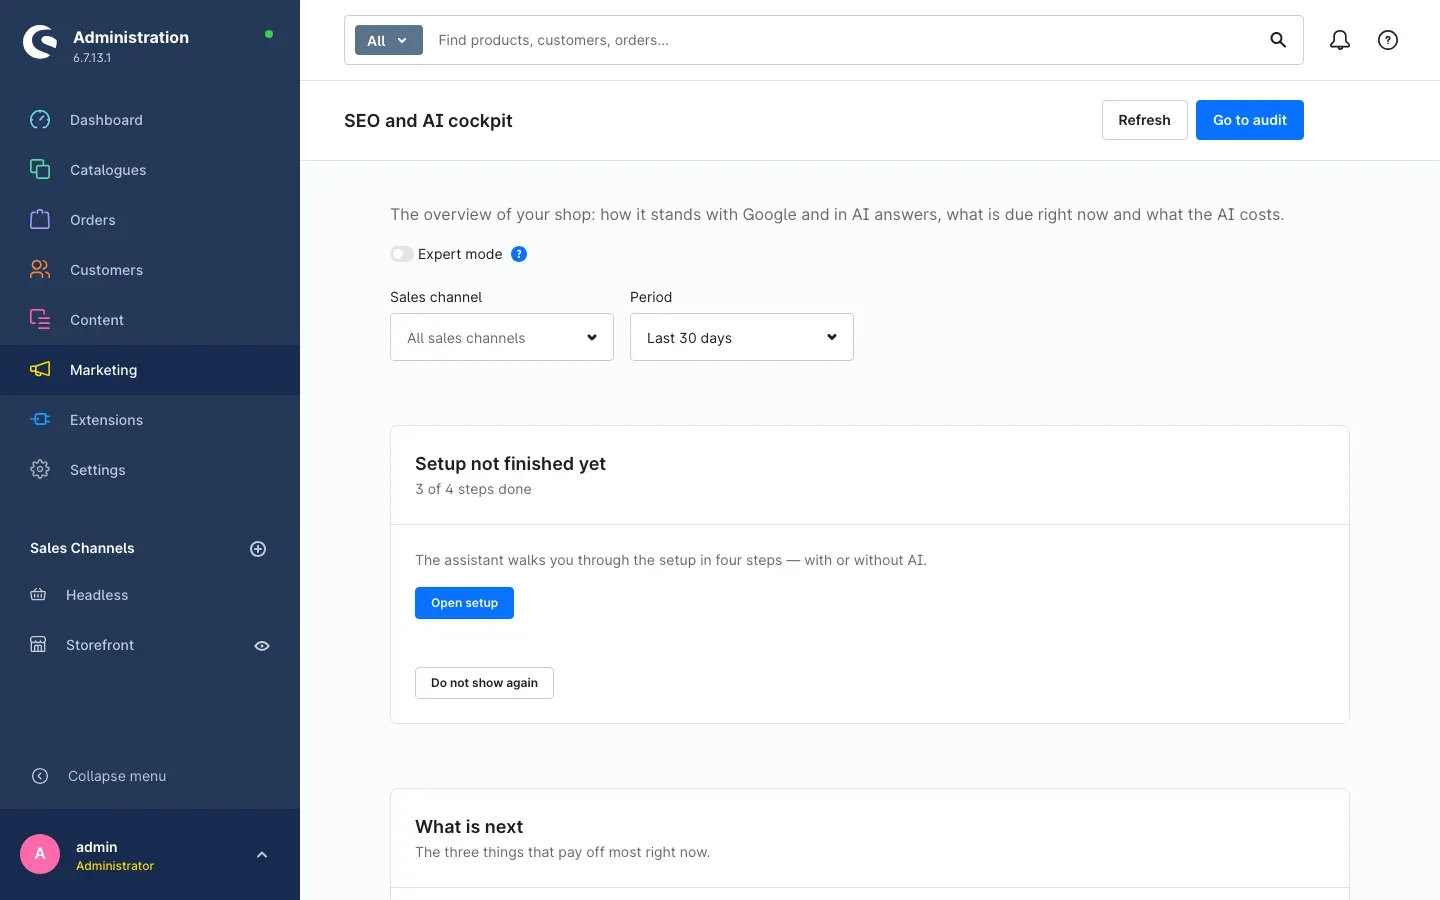 Fig. 4: The SEO and AI cockpit as your entry point
Settings
You find the settings under Extensions → My extensions, then the three dots in the plugin row and Configure. They are grouped into twelve cards and always apply to the sales channel selected at the top.
At the very top of the first card sits the to documentation button. It opens this manual in your browser, in the language of your administration.
General
Enable plugin for this sales channel is the main switch. Turned off, the plugin stays completely quiet in this channel without you having to uninstall it. It is on by default.
Allow outbound connections to external services is the second main switch and is off by default. As long as it is off, no record leaves your server, even if you enable an individual service further down.
What this is good for: you can install the plugin and look around in peace before anything phones home.
Meta data and templates
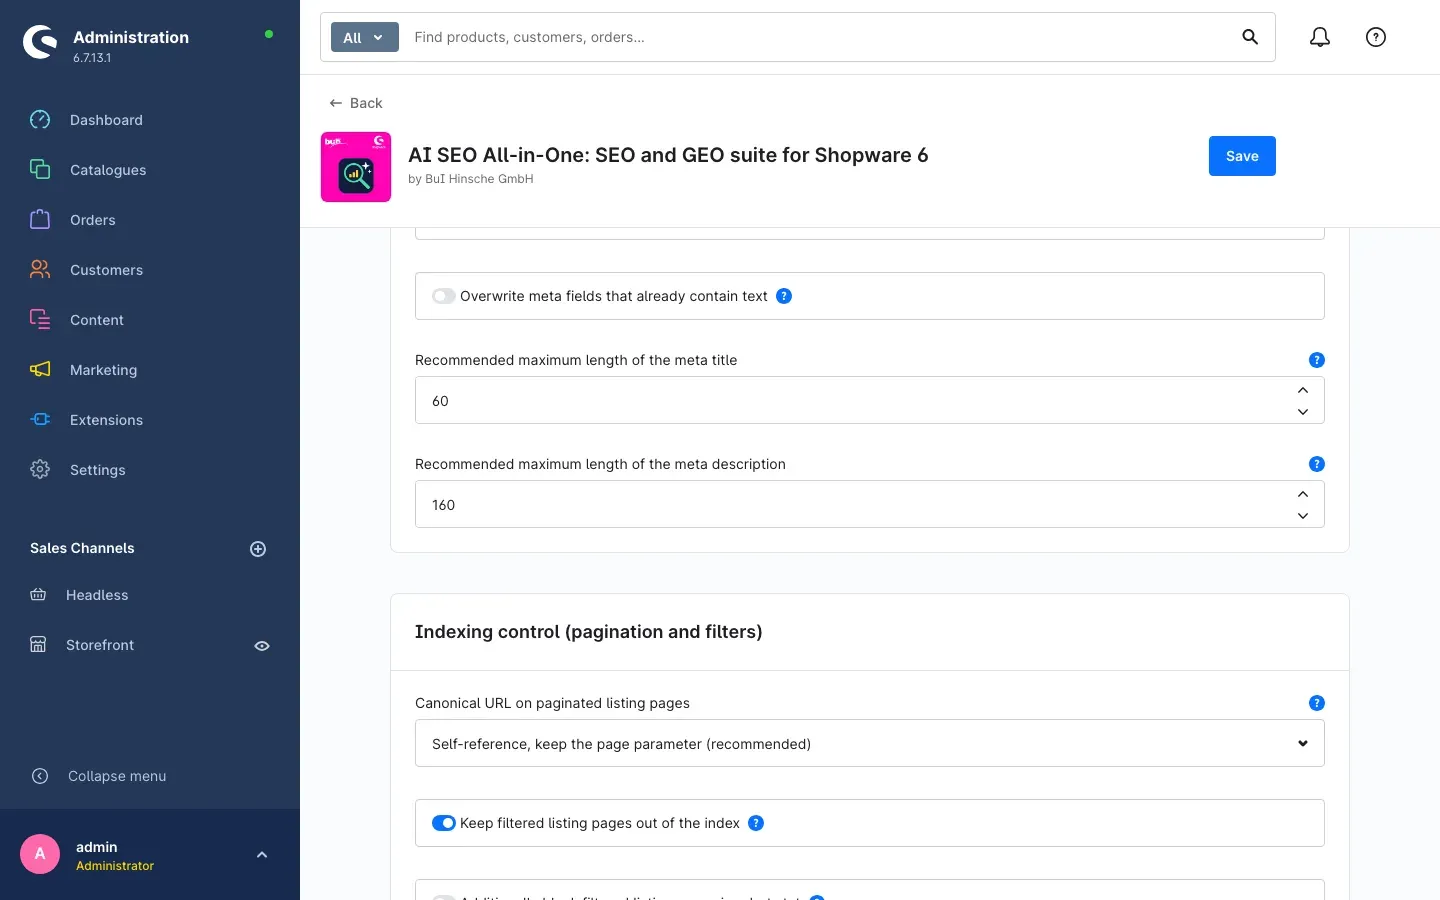 Fig. 5: Settings around meta fields and templates
Fill empty meta fields automatically when an entity is saved makes sure a product, category or landing page picks up the template on save whenever the field is empty. This is the most comfortable route for catalogues that keep growing from an ERP system.
Overwrite meta fields that already contain text also touches text that is already there. Leave it off unless you deliberately want to unify a grown set of texts.
Recommended maximum length of the meta title and Recommended maximum length of the meta description drive the length indicator in the interface and the scoring in the audit. The defaults of 60 and 160 characters match what Google usually displays.
Indexing control (pagination and filters)
Canonical URL on paginated listing pages decides what pages 2, 3 and 4 of a category point to as the original. The default lets every page point at itself, which is the safe choice for most shops.
Keep filtered listing pages out of the index stops every combination of colour, size and price range from becoming its own search result. It is on by default.
Additionally block filtered listing pages in robots.txt goes one step further and keeps search engines from fetching them at all. Use it only if your shop produces very many filter combinations.
Structured data (JSON-LD)
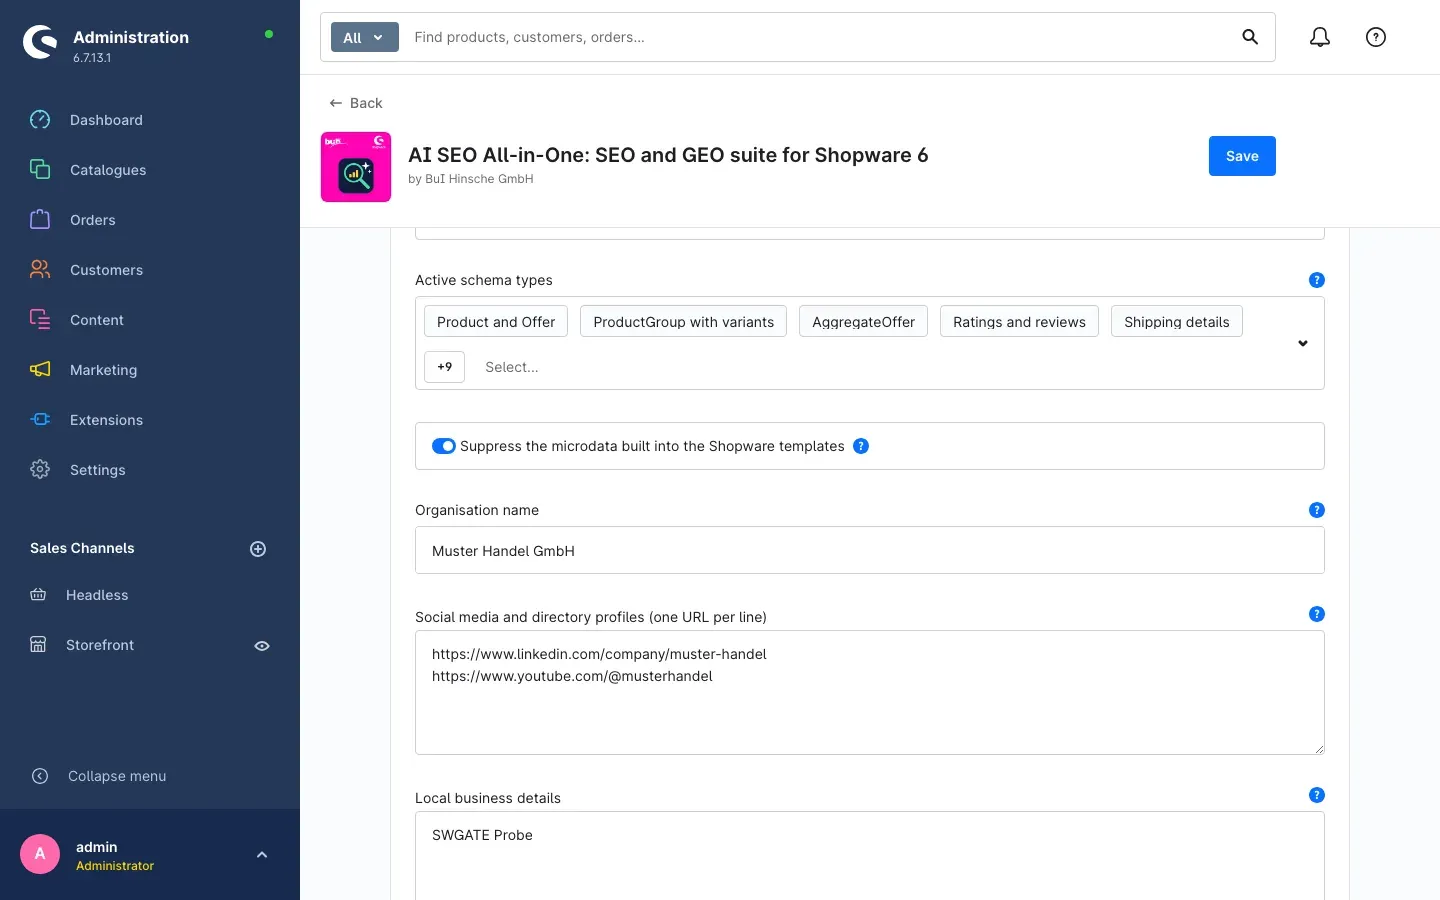 Fig. 6: Structured data and organisation details
Output structured data enables the machine readable details that Google needs for rich results and that AI systems need to understand your pages. Under Active schema types you choose what is written out, from product and offer through shipping and returns to breadcrumbs and FAQ.
Suppress the microdata built into the Shopware templates prevents two descriptions of the same thing from sitting side by side in your source code. This is on by default.
Organisation name, Social media and directory profiles (one URL per line) and Local business details fill in the facts about your company. They appear on every page and are often the only place where an AI system learns who is behind the shop.
AI visibility (GEO)
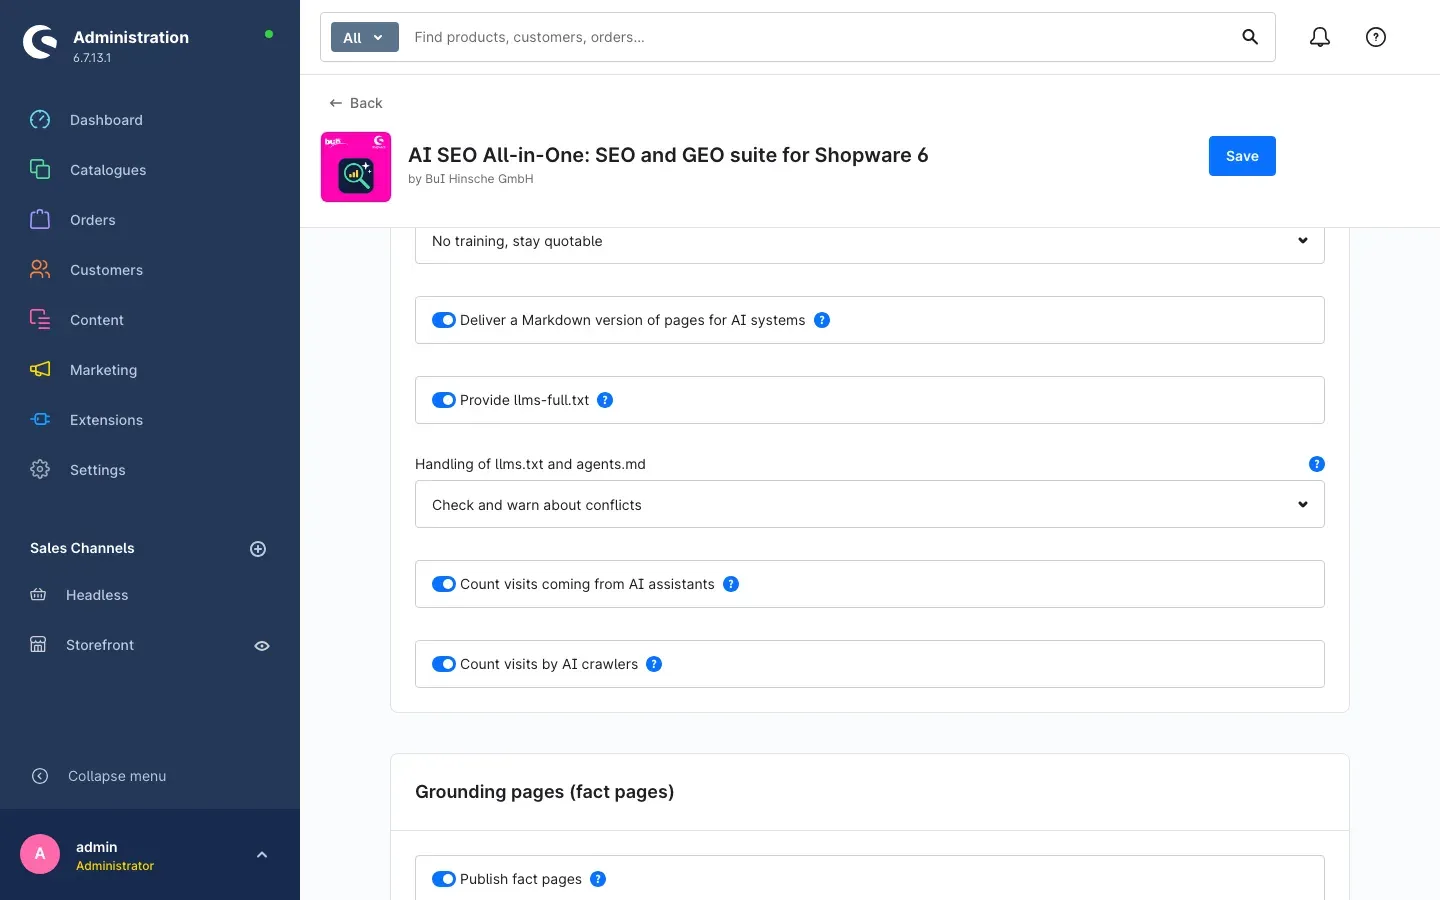 Fig. 7: The settings around AI systems
AI crawler policy writes the rules for AI bots into your robots.txt. You have four options: do not touch robots.txt, maximum visibility, no training while staying quotable, or block AI bots entirely. The third option is the interesting one for most shops: your assortment does not feed model training but still appears in AI answers.
Deliver a Markdown version of pages for AI systems additionally provides every product and category page as a reduced text version. AI systems then do not have to guess their way through layout and scripts.
Provide llms-full.txt creates a collected file with the most important content of your shop that AI systems can read in one go.
Handling of llms.txt and agents.md decides whether the plugin only validates existing files of that kind or writes them itself.
Count visits coming from AI assistants and Count visits by AI crawlers collect the numbers you later see in the cockpit. Both work without personal data and without any external connection.
Grounding pages (fact pages)
Publish fact pages releases the pages you maintain in the Fact pages area. Path segment of the fact pages decides under which word they appear in the shop. Review interval (days) sets after how many days the plugin reminds you to check them. Publish the overview page adds a page that lists all fact pages.
Internal linking
Apply linking rules to descriptions enables automatic linking. Maximum number of automatic links per page and Maximum number of links per keyword and page keep a text from turning into a wall of links. The defaults of five and one are deliberately conservative.
Redirects and 404 pages
Apply redirect rules activates the redirects you maintain in the area of the same name. Record pages that were not found logs every address that runs into nothing. Suggest the most similar existing address and Minimum similarity for a suggestion (percent) control whether and from which match the plugin proposes a target. Answer deleted products with 410 Gone tells search engines clearly that an article is gone for good instead of letting them keep knocking.
Audits
Run scheduled audits lets the audit run on a schedule. Minimum number of words before a text counts as thin, Similarity from which two texts count as duplicates (percent) and Report products deeper than (clicks from the start page) decide how strict the check is. Number of records per audit batch sets how large the chunks are that a run works through. On small servers a lower value helps.
External services
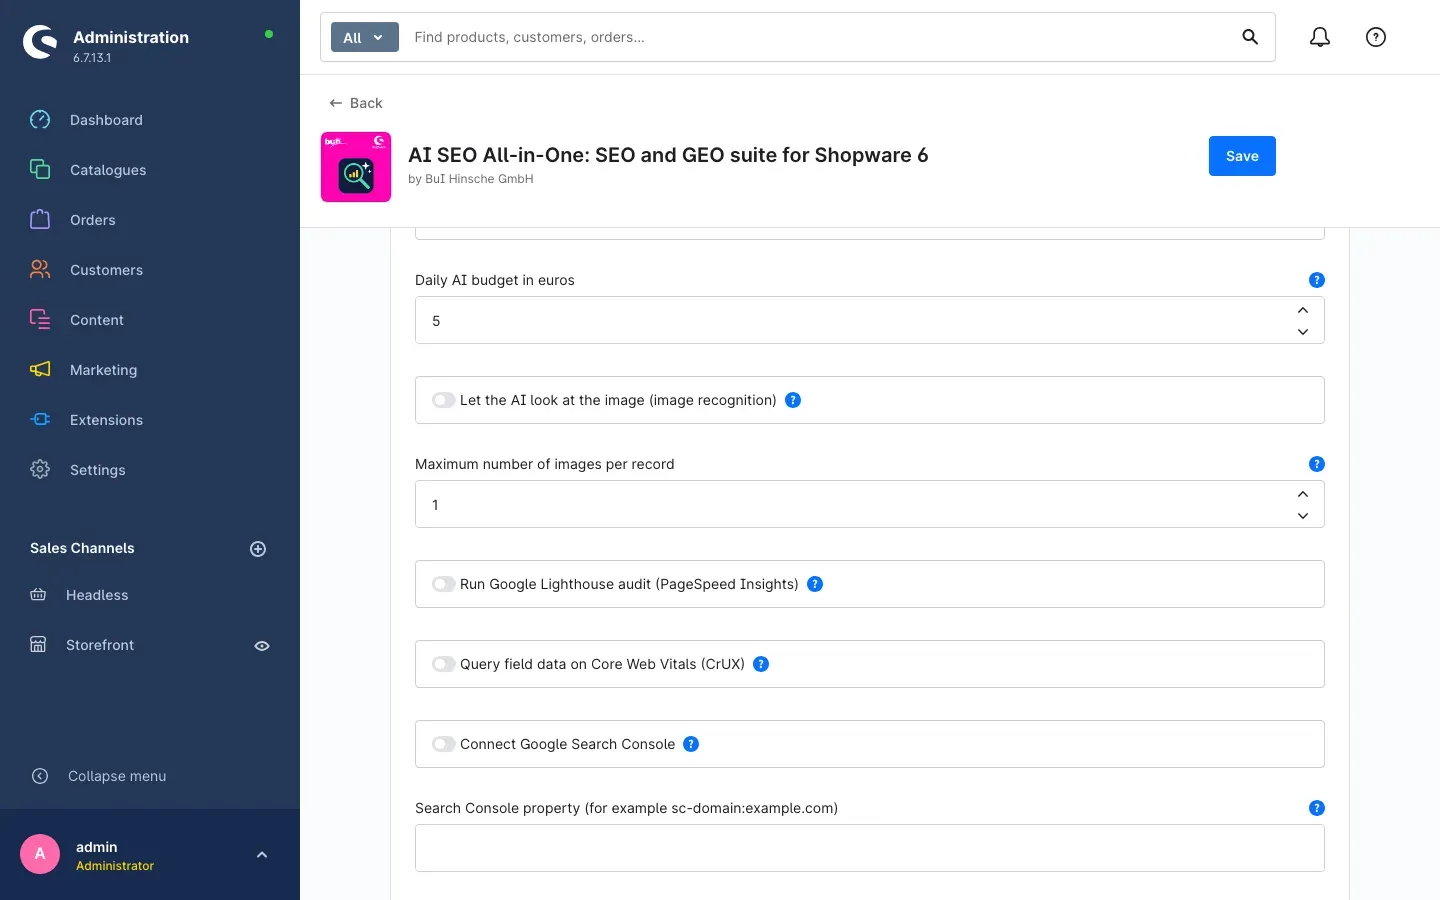 Fig. 8: Every external service has its own switch
Everything on this card is off by default and additionally needs the main switch from the General card.
Use AI providers enables the text suggestions. Daily AI budget in euros caps the cost per day. Let the AI look at the image (image recognition) and Maximum number of images per record allow the AI to derive alternative texts from the actual image, which costs more than pure text work.
Run Google Lighthouse audit (PageSpeed Insights) and Query field data on Core Web Vitals (CrUX) fetch performance values for your pages. Connect Google Search Console and Search Console property (for example sc-domain:example.com) link your shop to your own search data, Query the indexing status of pages at Google adds the indexing state of individual addresses.
Test whether AI assistants name your shop enables the visibility check you maintain in the AI visibility area. Every question costs one call at your AI provider.
Report changed addresses via IndexNow and IndexNow key actively announce changes to participating search engines instead of waiting for the next crawler visit.
Monitoring thresholds and alerts
Turn measured values into to-dos decides whether poor measurements automatically become tasks. With the switch off you still see the numbers, but no task comes out of them.
Below it you set the limit for each number: Lighthouse performance score below which a to-do is created and Lighthouse SEO score below which a to-do is created for the two scores from the performance test, Largest Contentful Paint in seconds, above which a to-do is created, Cumulative Layout Shift above which a to-do is created and Interaction to Next Paint in milliseconds, above which a to-do is created for the three Core Web Vitals, Impressions without a single click, from which a to-do is created and Drop in average position from which a to-do is created for the Search Console figures, and Score points lost between two runs, from which a to-do is created so that a decline does not slip past you.
Check that your own pages are actually reachable and Redirect hops from which a chain is reported surface addresses that are only reachable via detours, or not at all.
Data retention
Here you set the retention in days per data type: Keep visit statistics for (days), Keep 404 records for (days), Keep audit runs and findings for (days), Keep AI usage records for (days), Keep closed tasks for (days), Keep settled AI suggestions for (days), Keep indexing status for (days) and Keep AI visibility results for (days).
A cleanup routine honours these periods and deletes whatever is older. Shorter periods keep the database small, longer ones give you more history to compare against.
How to use the features
All areas live under Marketing → AI SEO. The menu carries five entries: the overview, To-dos and approvals, Content and templates, Redirects and 404, Technical SEO and AI settings.
How to read the cockpit
What this gives you: one glance is enough to know where your shop stands and what comes next.
Fig. 9: Sales channel, period and the key tiles
At the top you pick Sales channel and Period. Every number below refers to that selection. The Expert mode switch reveals additional tiles and tabs that you do not need day to day.
The tile What is next names the three things that pay off most right now, each with a button that jumps straight to the right place. Go to audit in the top right takes you to the full audit.
How to work through your to-dos
What this gives you: instead of a report you get a list that you work through from top to bottom.
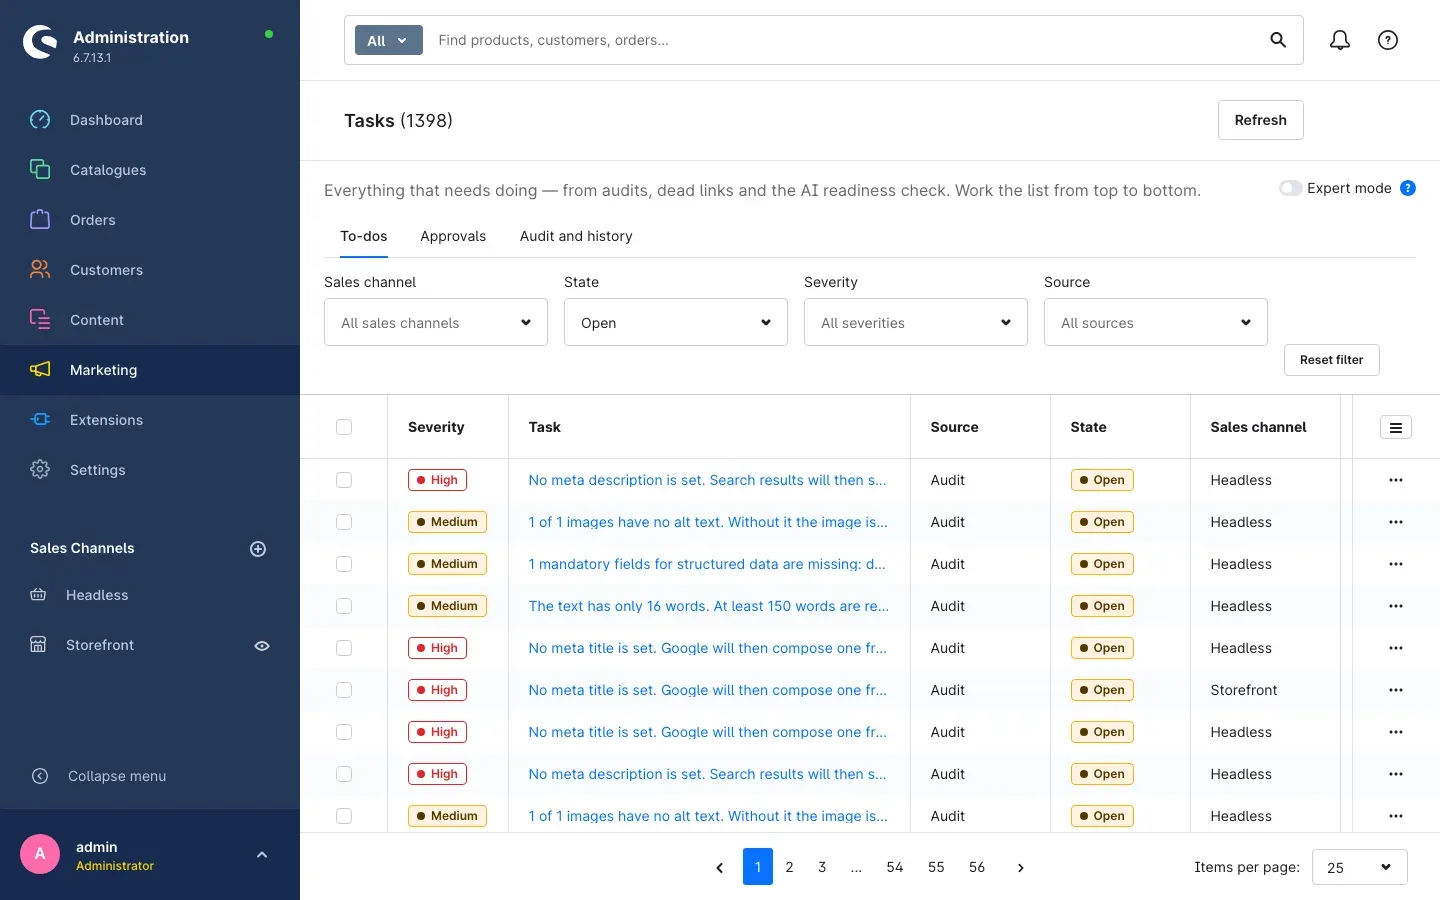 Fig. 10: To-dos with severity, source and state
- Go to Marketing → AI SEO → To-dos and approvals. The To-dos tab is preselected.
- Narrow the list down with Sales channel, State, Severity and Source. By default you see the open tasks.
- Click the text of a task to jump to the affected record.
- Use the checkboxes and the bulk action to change the state of several tasks at once.
Tip: work through the tasks with severity High first. They cost you the most visibility.
How to approve AI suggestions
What this gives you: the AI proposes text, but nothing reaches your catalogue unasked.
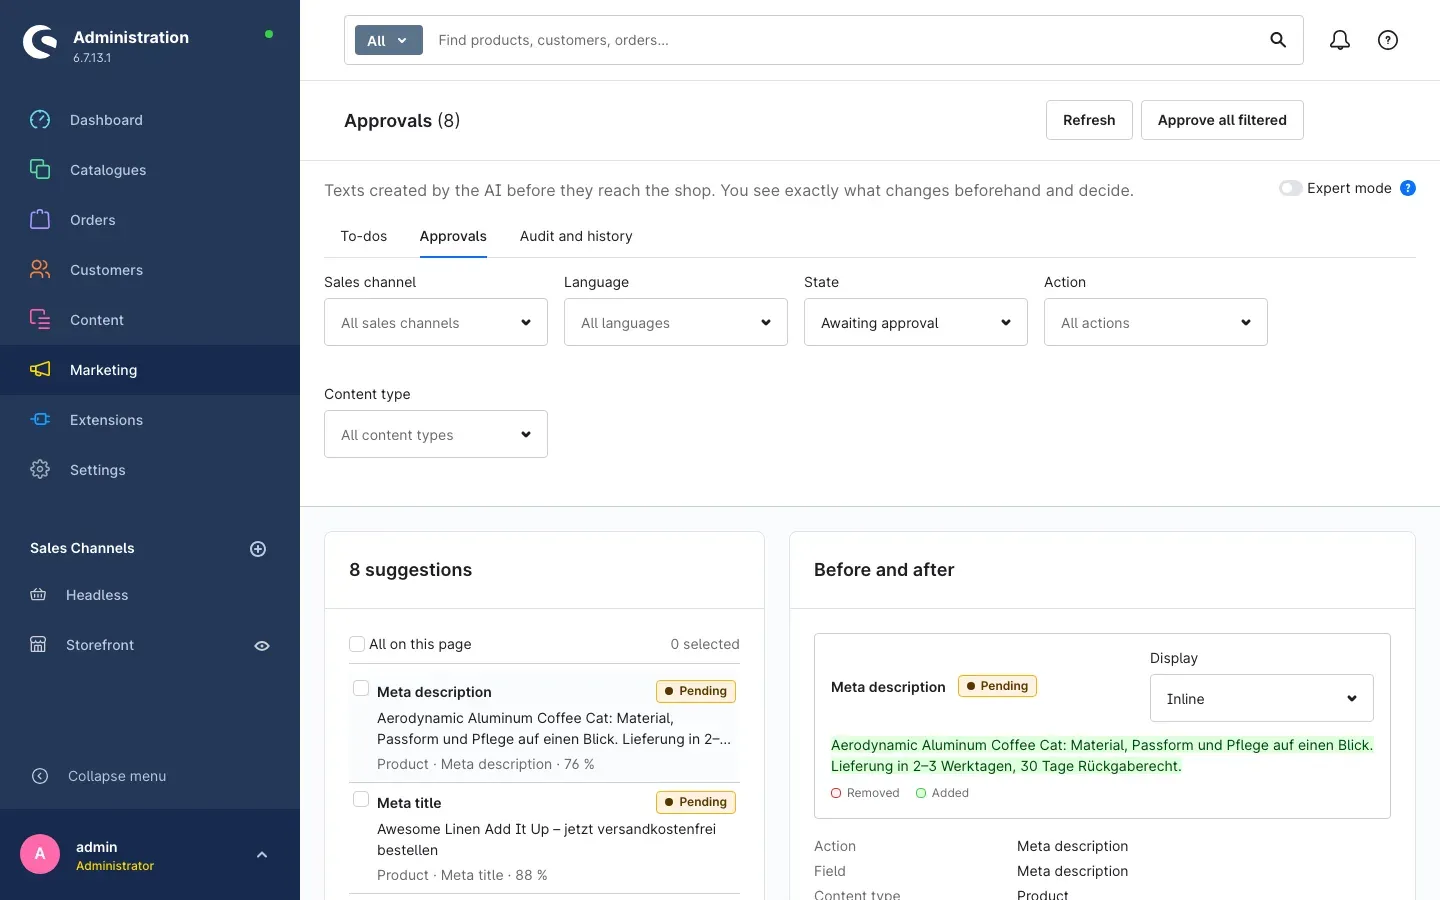 Fig. 11: Suggestions compared to the current text
- Go to Marketing → AI SEO → To-dos and approvals and switch to the Approvals tab.
- Narrow down by state, task and record type.
- Clicking a row shows the comparison between the current and the suggested text.
- Approve or Reject the suggestion. Accepted suggestions can be undone as long as the previous text is still available.
- Use the checkboxes to approve several suggestions together.
Important: if you enable Apply result without approval for a task in the AI settings, the text is written immediately. That option is off by default.
How to run an audit and read the findings
What this gives you: two scores with a trend and a list of concrete findings instead of a gut feeling.
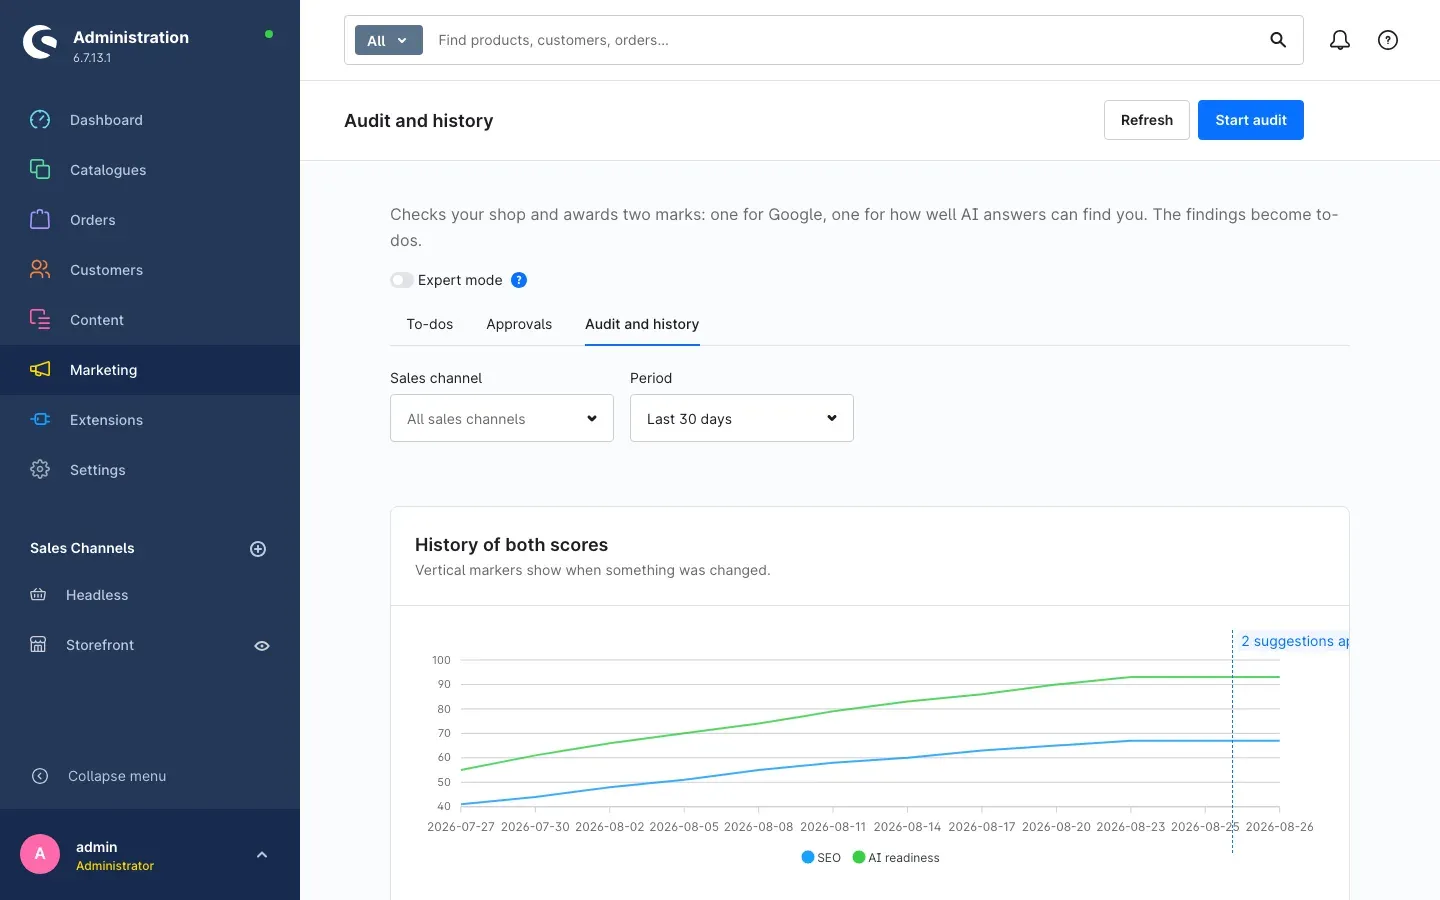 Fig. 12: The trend of both scores
- Go to Marketing → AI SEO → To-dos and approvals and switch to the Audit and history tab.
- Click Start audit in the top right. The run works in batches and can be stopped at any time.
- The history shows both scores over time. Vertical markers show when something was changed.
- Under Findings you filter by Axis and Severity. SEO stands for classic search, AI readiness for findability by AI assistants.
- Jump to record and Open page in shop take you straight to the cause.
How to fill meta fields from templates
What this gives you: consistent meta details for the whole catalogue without touching every article.
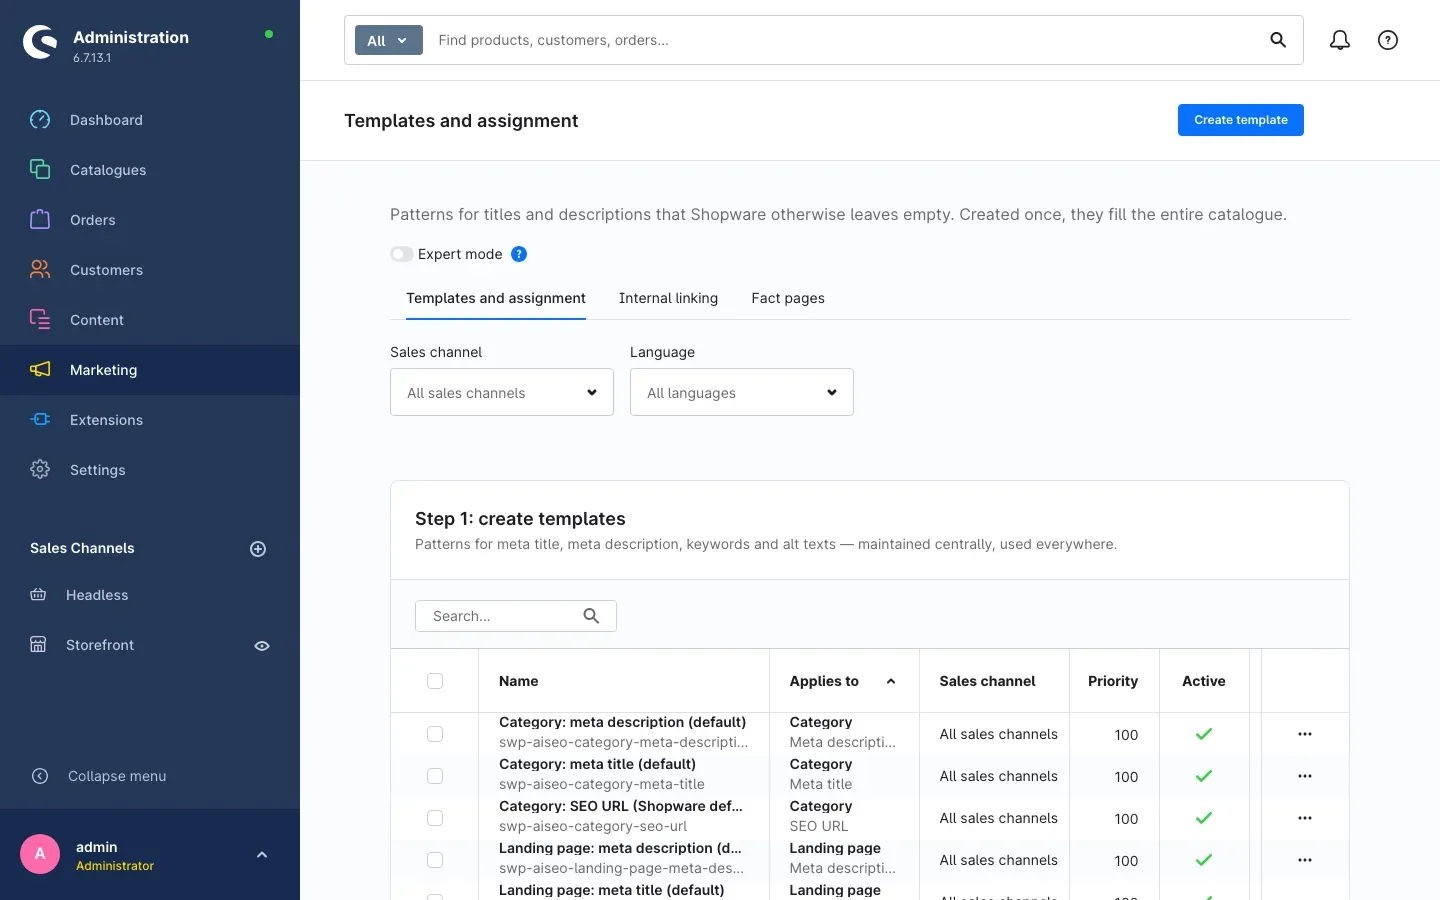 Fig. 13: Templates, assignment and bulk generation in three steps
- Go to Marketing → AI SEO → Content and templates. The Templates and assignment page guides you in three steps.
- Step 1: create templates. Click the create button and enter a name, what it applies to, the target field and the pattern. A pattern is a sentence with placeholders, for example for article name and manufacturer. Language and sales channel limit where the template applies, the priority decides between several matching templates.
- Step 2: assign a template. Define which template applies to which entity type and target field. Category and inheritance let one assignment cover a whole branch of the category tree.
- Step 3: fill the existing records. Pick the entity type and target fields and start the dry run first. It shows you what would come out without writing anything. Only then start the real run.
Important: Overwrite fields that already contain text replaces existing text. Without that option, manually maintained text stays untouched.
How to link automatically inside your shop
What this gives you: important pages receive links out of description texts without anyone placing links by hand.
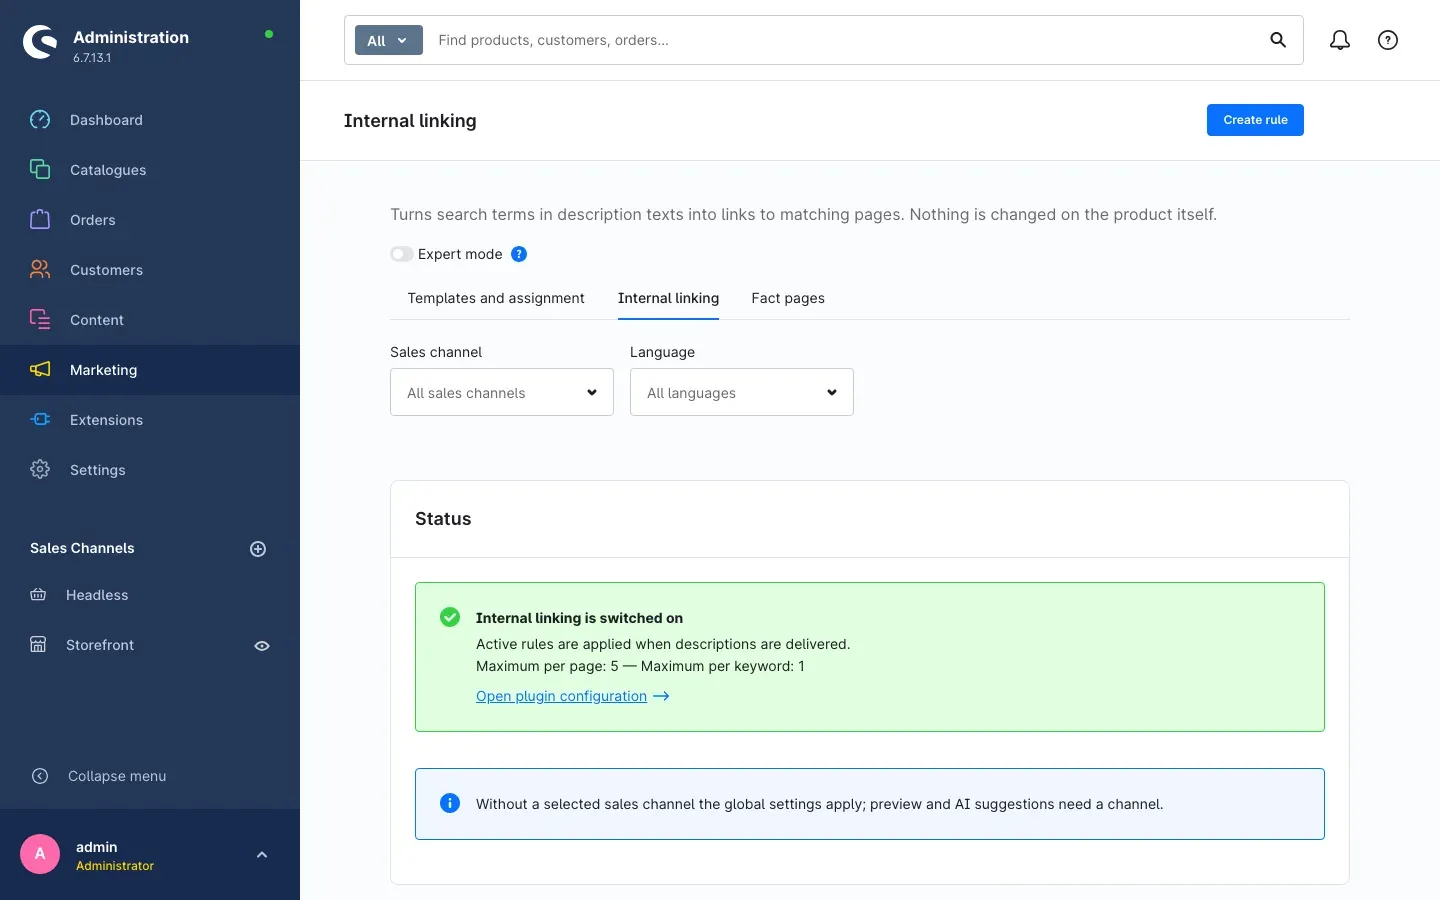 Fig. 14: Rules for automatic linking
- Go to Marketing → AI SEO → Content and templates and switch to Internal linking.
- Create a rule: a keyword and the target it should link to. As a target you can pick a product, a category, a landing page or a free address.
- The cap per page and the priority control how often a rule applies and which one wins when rules overlap.
- The preview shows which passages would be affected before the rule goes live.
How to create fact pages
What this gives you: short, strictly structured pages with verifiable facts. Exactly the format AI systems quote from.
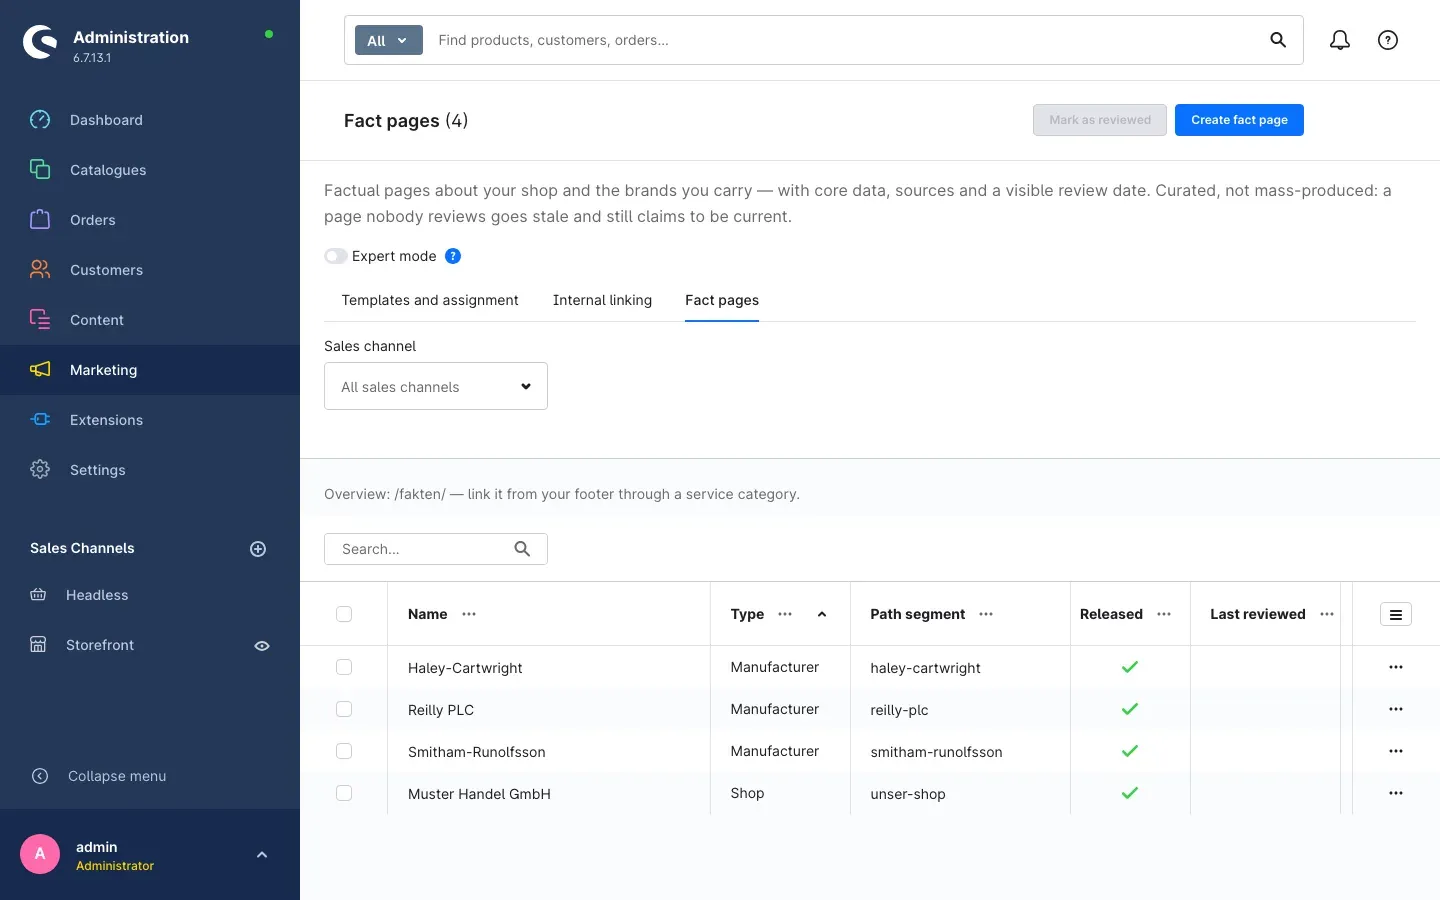 Fig. 15: Overview of the fact pages you created
- Go to Marketing → AI SEO → Content and templates and switch to Fact pages.
- Click Create fact page. Start with your shop: legal entity, founding year, assortment focus, shipping and return facts. Manufacturer pages only pay off after that.
- Fill in the sections: a definition in one or two sentences, the core data as rows of label and value, what sets you apart from other sellers, any number of further sections, and the sources.
- Suggest from shop data fills the core data with what Shopware already knows about your shop.
- Save and open the page via Open page in the shop.
- After the review interval set in the configuration the plugin reminds you. Confirm the facts with Mark as reviewed.
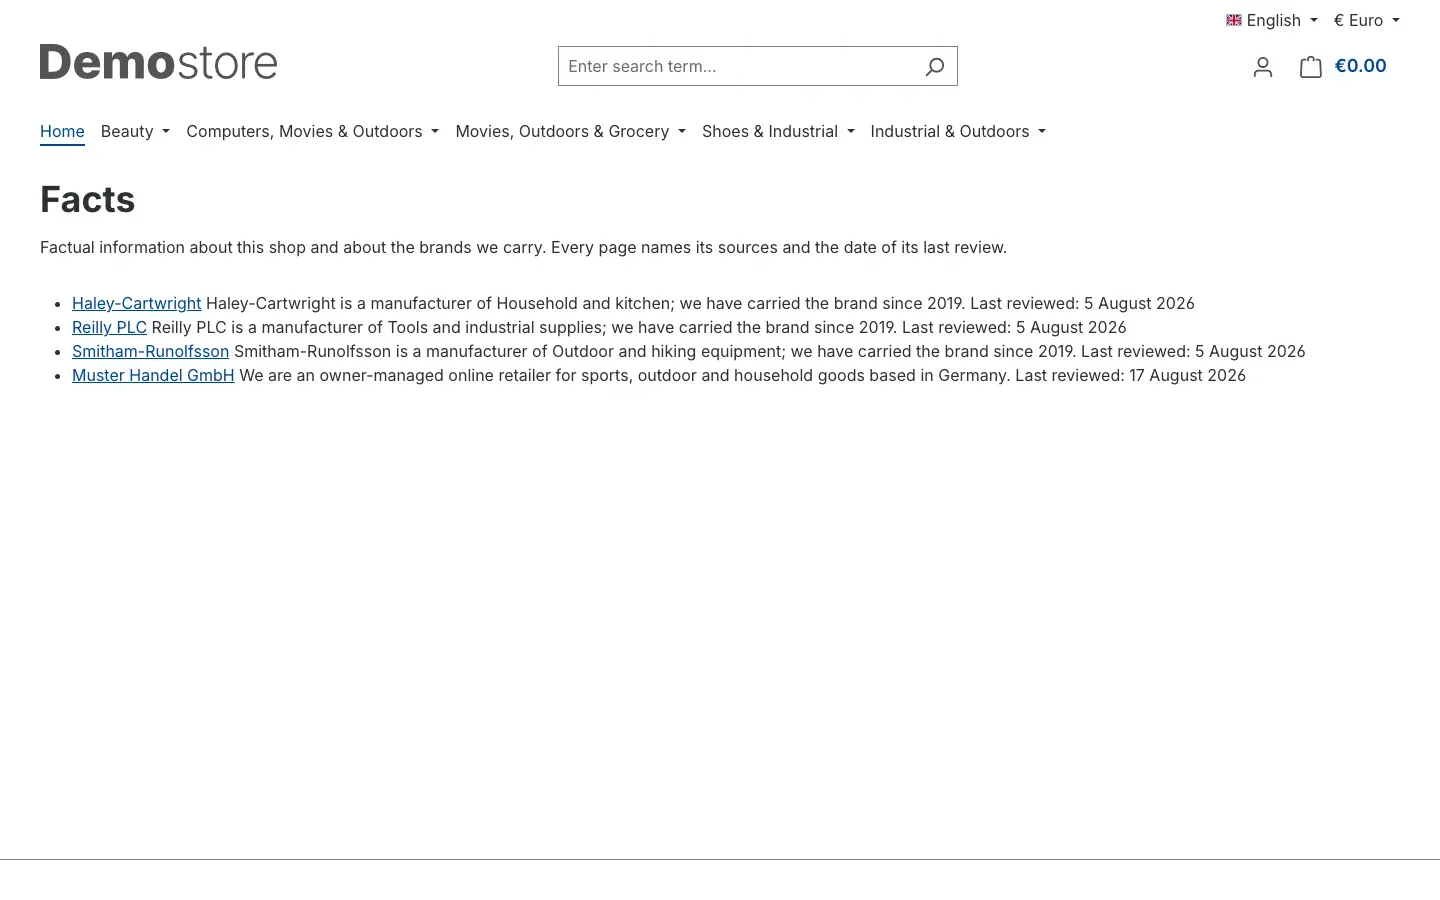 Fig. 16: The overview page in the shop
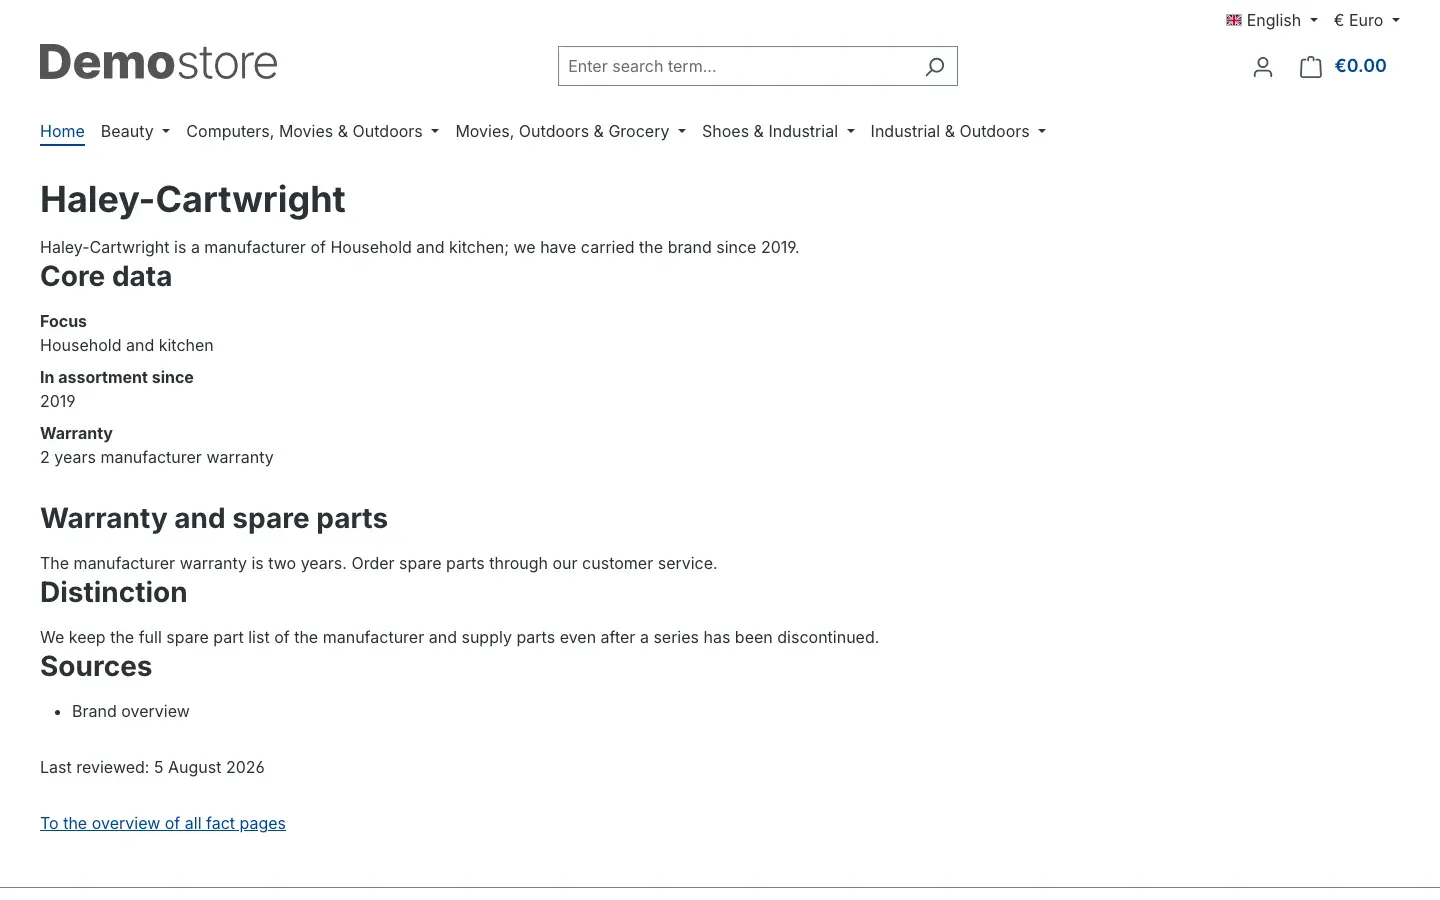 Fig. 17: A single fact page as your customers and AI systems see it
Tip: link the overview page from a service category in your shop footer so that it gets found.
How to maintain redirects and missing addresses
What this gives you: no visitor lands on an error page without you knowing about it.
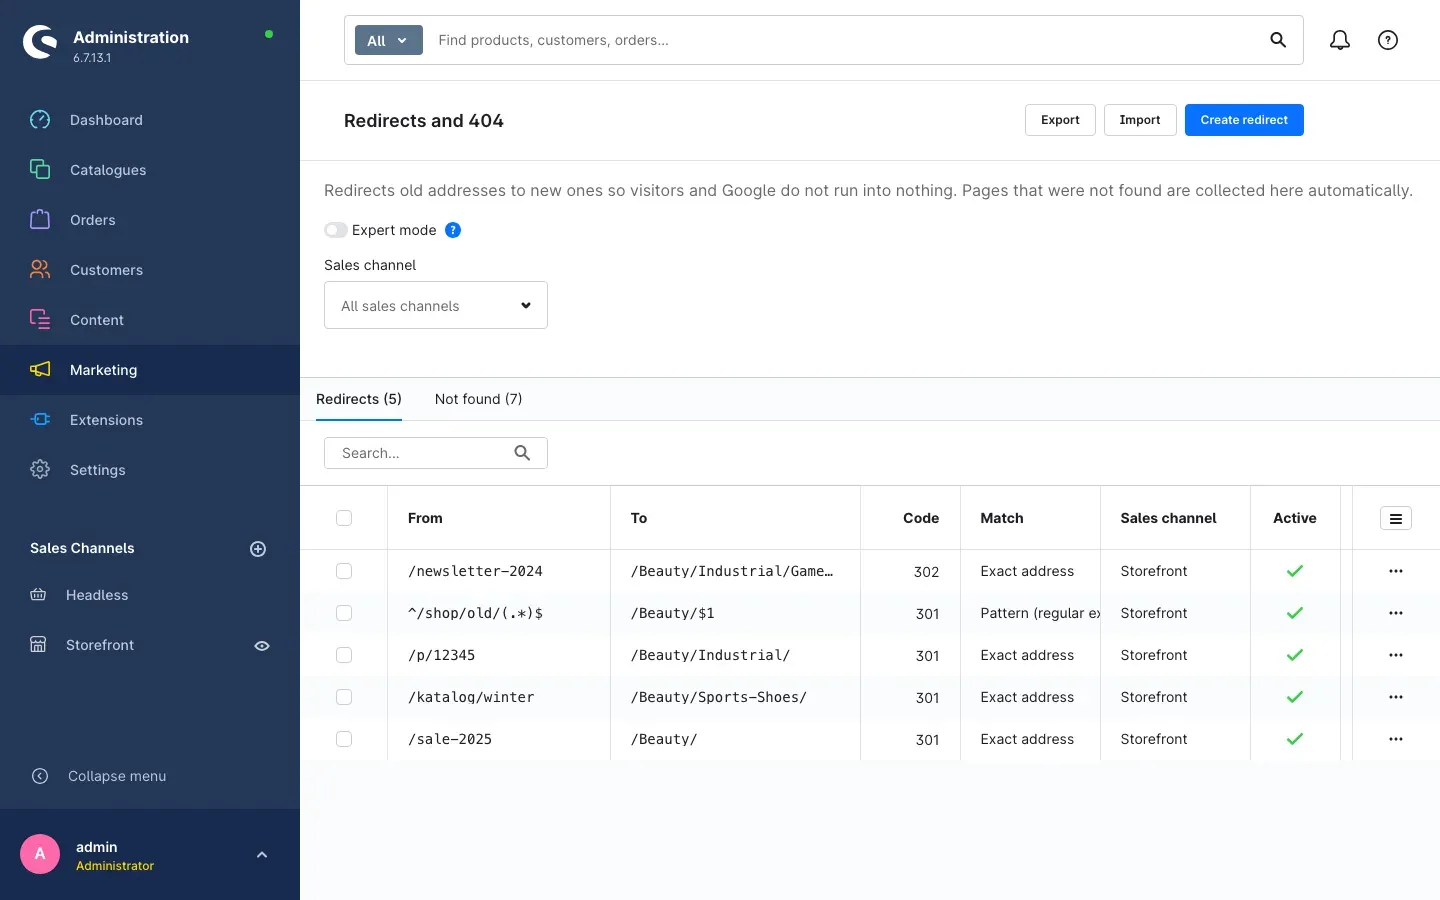 Fig. 18: Redirects with hit counts
- Go to Marketing → AI SEO → Redirects and 404.
- On the Redirects tab you create a rule with the create button. You enter the old address, the target and the status code. A rule can match one address exactly or many as a pattern.
- On save the plugin checks whether a rule shadows another, forms a chain or runs in a circle.
- On the Not found tab you see every address that ran into nothing, with a hit count and a suggestion. A few clicks turn it into a real redirect. If the page is gone for good, answer with 410.
- Import brings in many redirects at once, for example after a relaunch. The file is validated first and only applied after your confirmation. Export downloads the current set.
How to control technical SEO
What this gives you: every setting that search engines and AI systems read, in one place, with direct feedback on what it does.
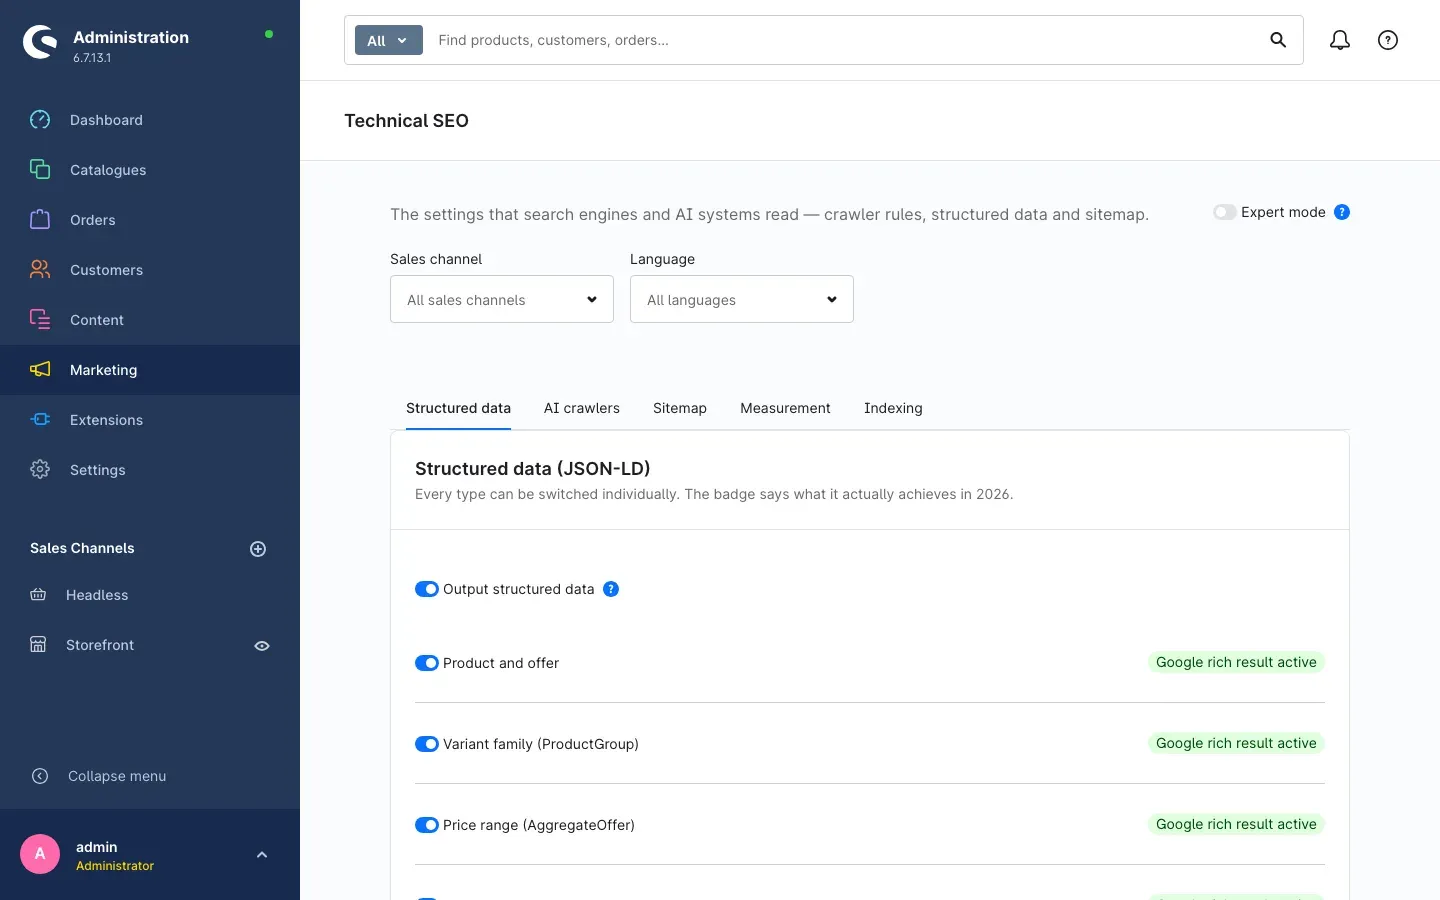 Fig. 19: Structured data with a note on the effect
- Go to Marketing → AI SEO → Technical SEO.
- Pick Sales channel and Language at the top.
- On the Structured data tab you switch every type individually. The badge next to each entry tells you what it actually achieves today.
- On the AI crawlers tab you see which rules from your chosen policy end up in robots.txt.
- The remaining tabs are Sitemap, Measurement and Indexing. In expert mode SEO URLs, URL rules, hreflang, llms.txt and IndexNow are added.
How to set up the AI
What this gives you: text suggestions from your own AI account, with a clear cost limit.
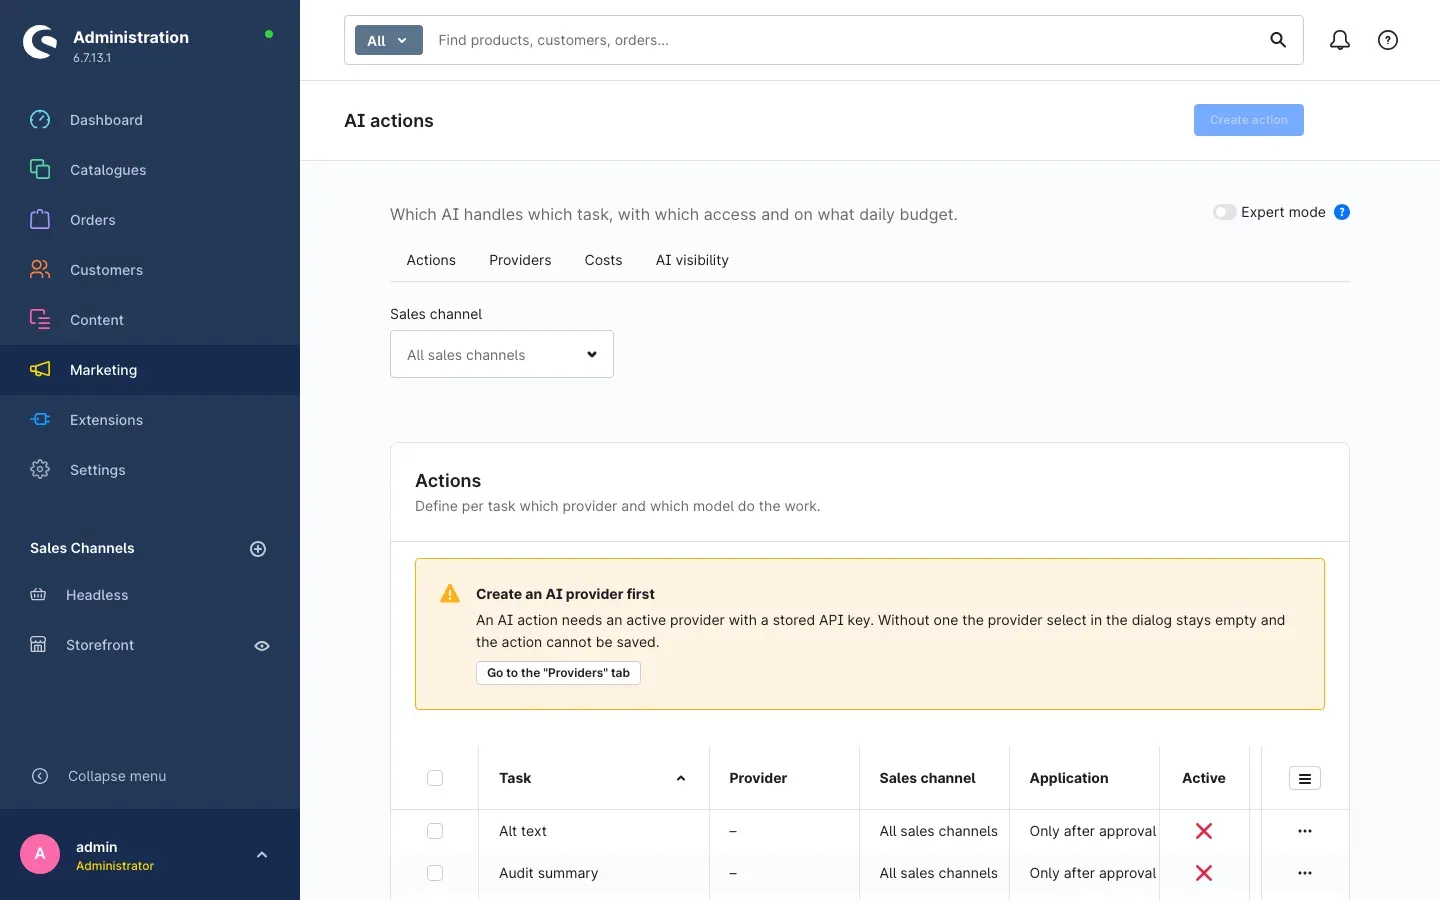 Fig. 20: Actions, providers and costs in one area
- Go to Marketing → AI SEO → AI settings.
- On the Providers tab create your account: name, provider, base URL and your API key. The key is stored encrypted and never displayed again. The connection test tells you whether the account works.
- On the Actions tab decide per task which provider and which model should work. Tasks are for example meta title, meta description, alternative text or FAQ suggestions.
- On the Prompts tab you store the system and user prompt per task. Every save creates a new version, so you can always go back.
- In the prompt workshop you try a prompt on a real record before it goes into daily use.
- The Costs tab shows what the AI cost per day and how much of the daily budget is left.
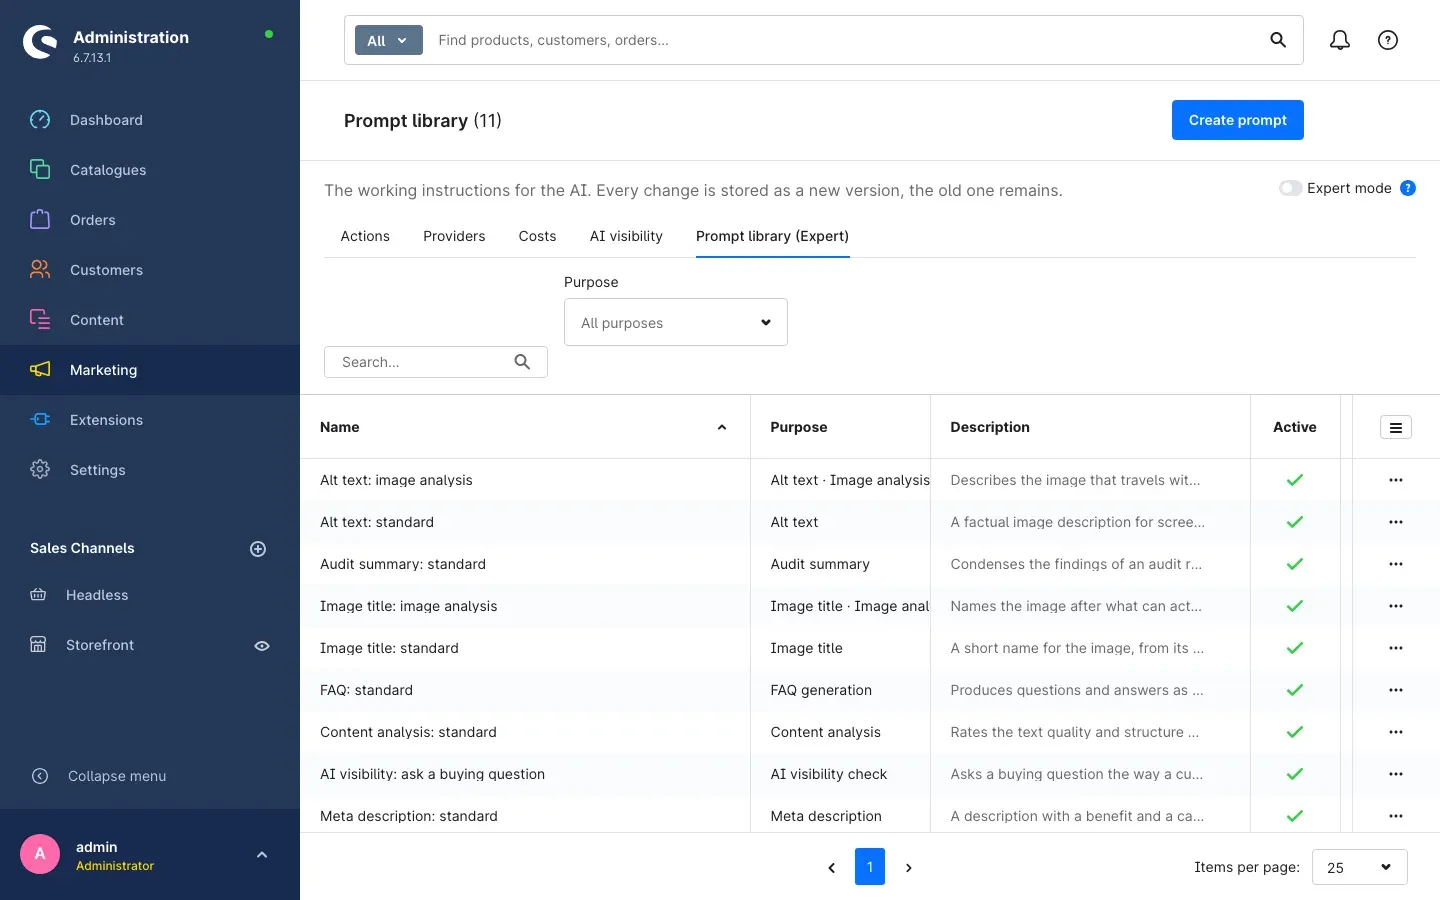 Fig. 21: The prompt library with your saved prompts
Important: billing runs directly between you and your AI provider. The daily budget in the plugin stops the calls once it is reached.
How to check your visibility in AI answers
What this gives you: you see whether AI assistants name your shop, and if not, who gets named instead.
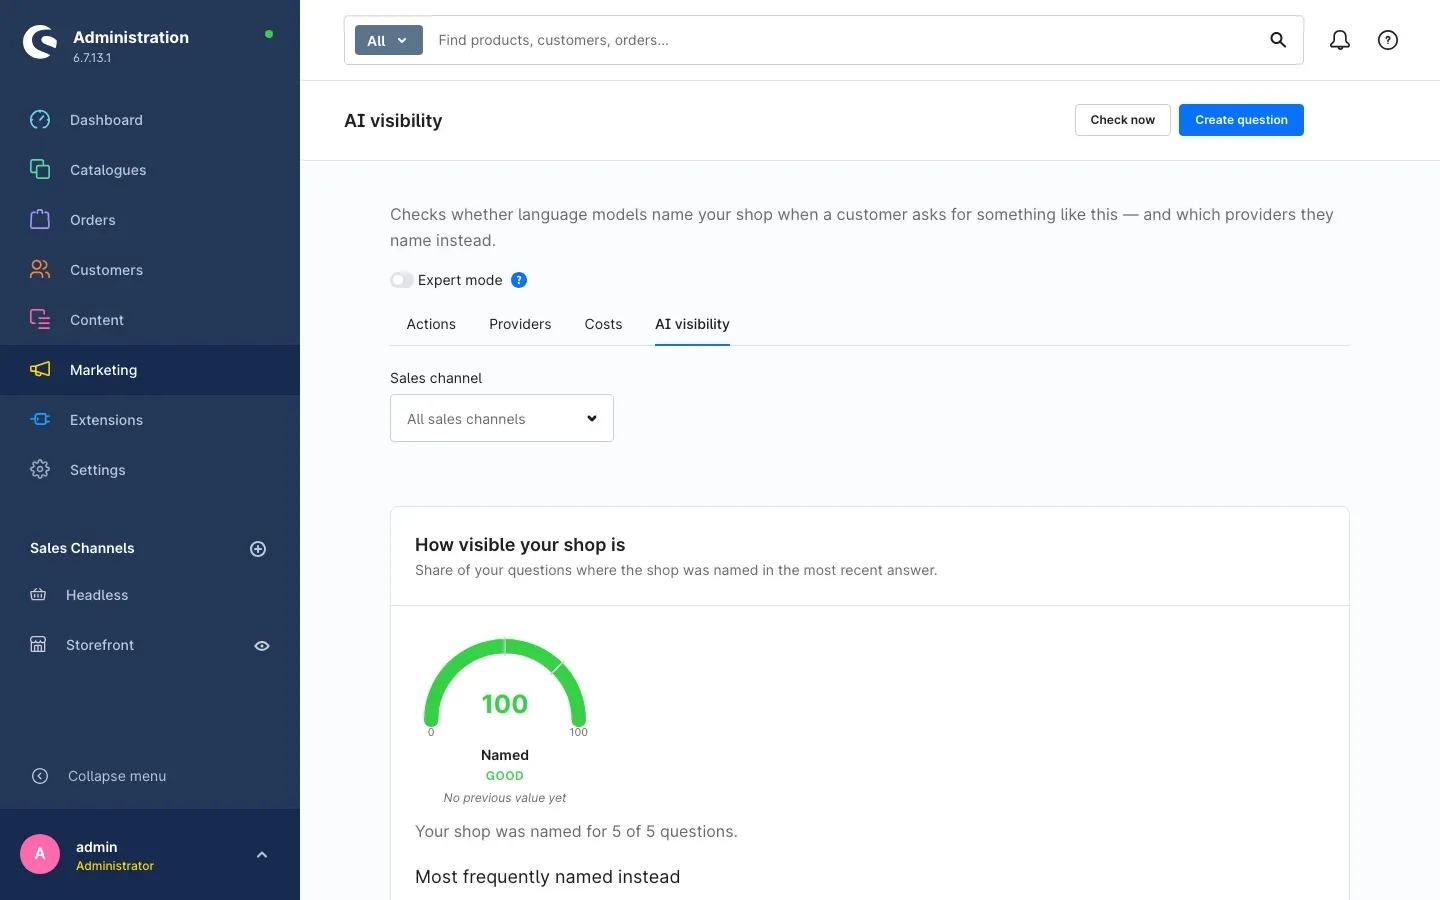 Fig. 22: Buying questions and their results
- Go to Marketing → AI SEO → AI settings and switch to AI visibility.
- Click Create question and phrase a typical buying question the way a customer would ask it. Deliberately leave out your shop name, otherwise the model simply picks it up.
- Market groups questions by target market, for example de, at or nl.
- Start the check with Check now or leave it to the schedule.
- Under Results you see per run whether your shop was named, in which position, and which competitors appeared instead. The value lies in the trend, not in the single row.
Important: every question costs one call at your AI provider. Two to five questions are enough to start with.
How to schedule recurring runs
What this gives you: audits and measurements happen by themselves, and you only step in when there are findings.
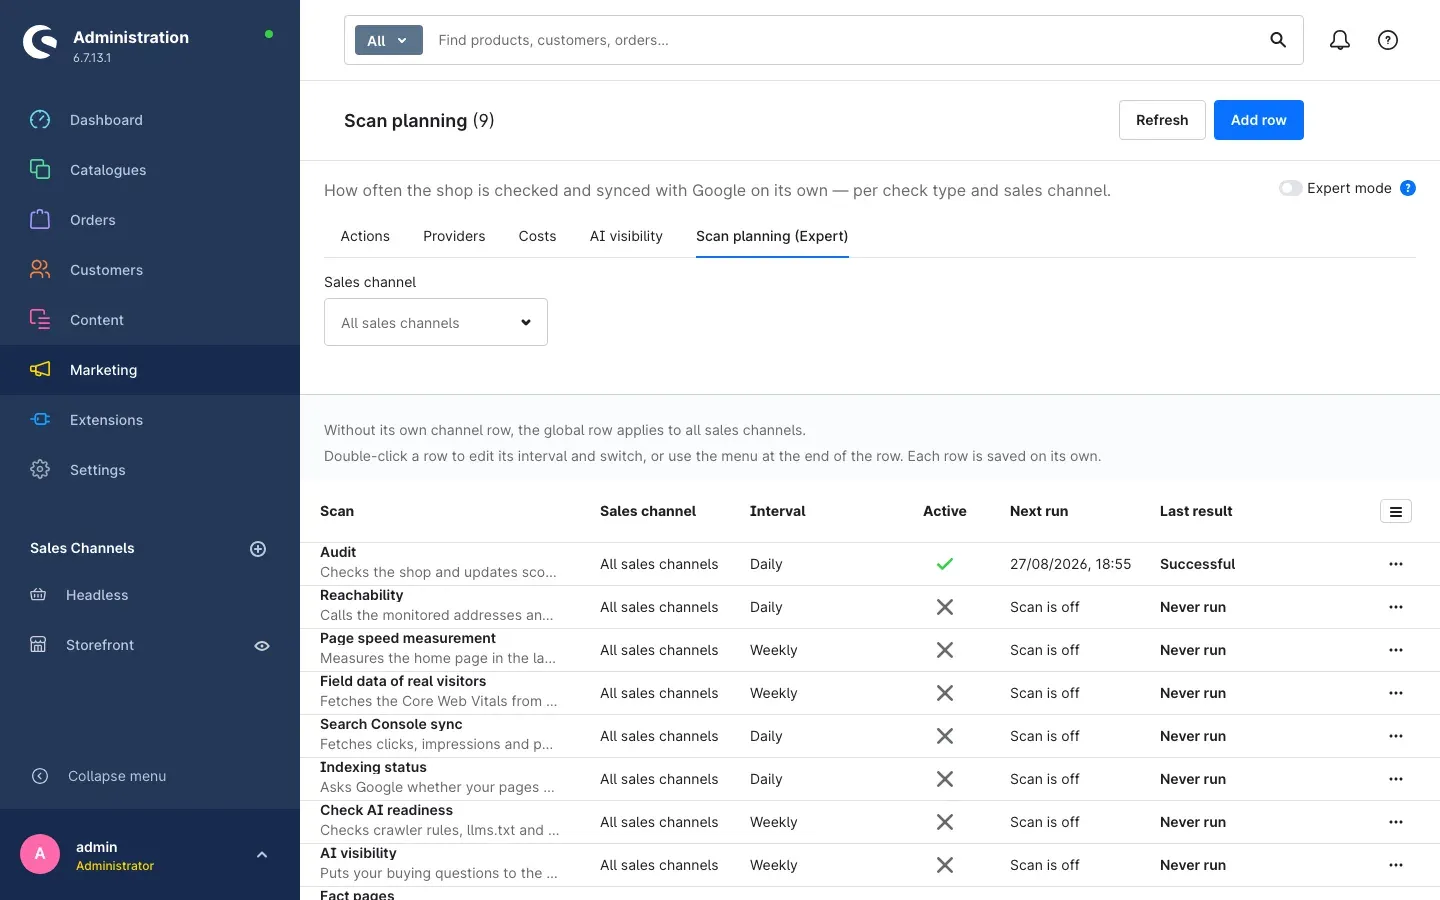 Fig. 23: Schedules per scan type and sales channel
- Go to Marketing → AI SEO → AI settings and switch to Scan planning. The area is visible in expert mode.
- Set an interval per scan type and sales channel. There are presets for the common cases.
- If a scan type needs external access, the row says so and links to the right place.
- The table shows the state and the next run for every row.
How to work directly on an article
What this gives you: you maintain the important details where you already are, without switching areas.
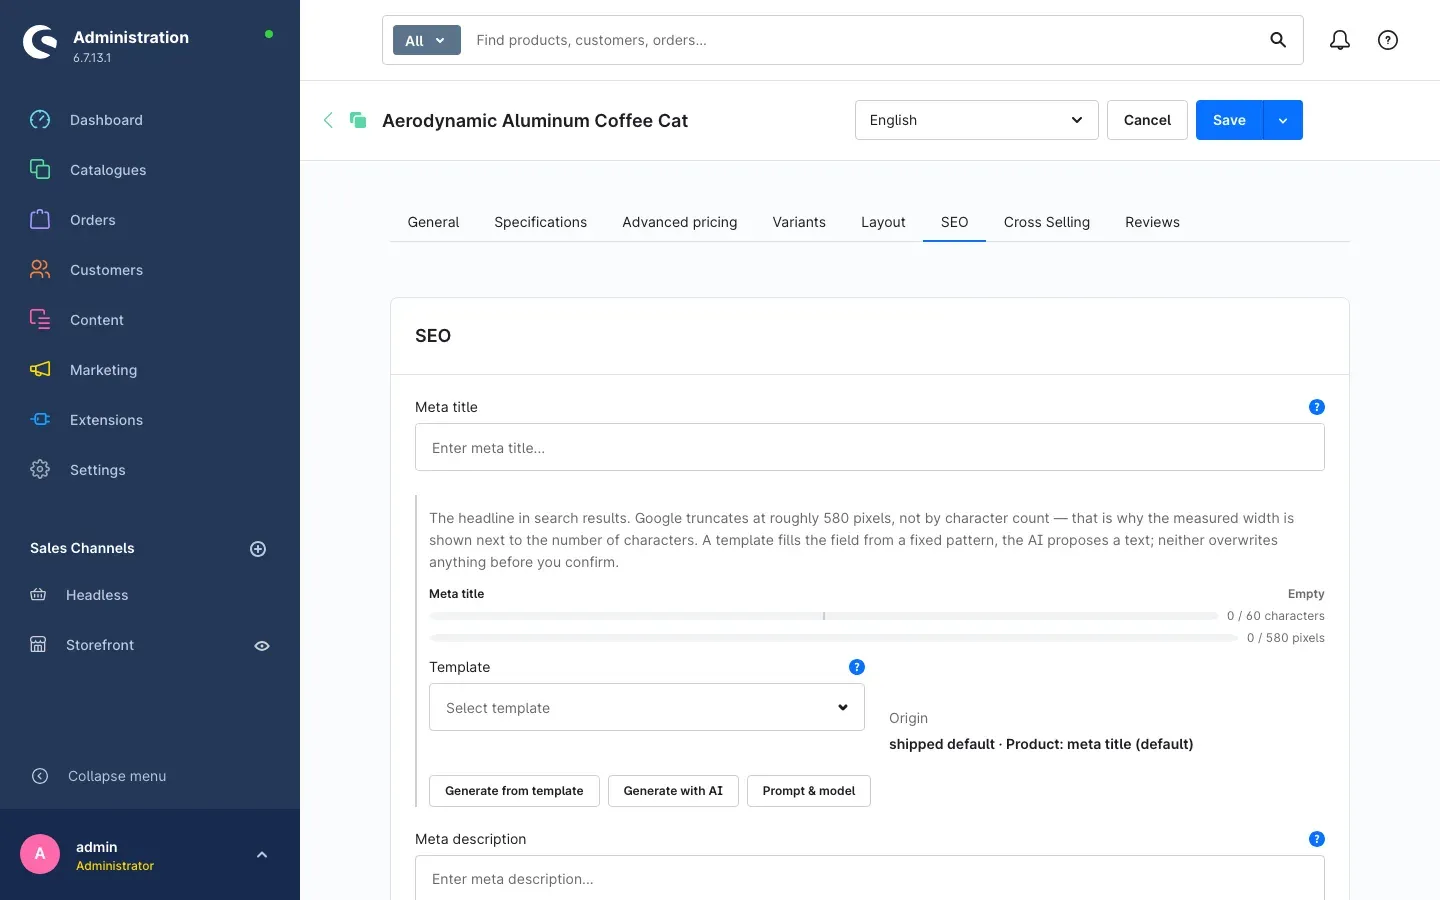 Fig. 24: The extended SEO tab in the product view
Open an article under Catalogues → Products and switch to the SEO tab. Next to the Shopware fields you find the additions from the plugin: the length indicator for meta title and meta description, a preview of how the entry looks in search, and the option to generate a suggestion for this one product. The same additions exist on categories and landing pages.
Troubleshooting
The AI SEO area does not appear in the menu
What causes it: the plugin is not activated yet, the cache is stale, or your user role lacks the permission.
How to fix it:
- Open Extensions → My extensions and check that the plugin is active.
- Clear the cache under Settings → System → Caches & indexes.
- Check under Settings → Users & permissions whether your role has the plugin permissions.
Nothing happens although everything looks switched on
What causes it: the settings apply per sales channel. You most likely set them for a different channel than the one you are looking at.
How to fix it: open the configuration, pick the right sales channel at the top and check the main switch there.
The AI produces no suggestions
What causes it: usually one of three switches is missing, or the daily budget is used up.
How to fix it:
- Check in the configuration that Allow outbound connections to external services and Use AI providers are both on.
- Check under AI settings → Providers that an account is stored and active, and run the connection test.
- Look at the Costs tab to see whether the daily budget has already been reached.
A redirect does not apply
What causes it: the rule is inactive, belongs to a different sales channel, or another rule matches first.
How to fix it: open the rule and check its sales channel and state. Watch the priority when several rules match the same address. Also check that Apply redirect rules is enabled in the configuration.
The audit aborts or takes a very long time
What causes it: on large catalogues the run works through many batches and needs time and memory accordingly.
How to fix it: lower the Number of records per audit batch in the configuration and start the run again. Also check that your shop’s queue processing is running.
Fact pages are not reachable in the shop
What causes it: fact pages are switched off for this sales channel, or the individual page is not published.
How to fix it: enable publishing on the Grounding pages (fact pages) card in the configuration and check in the list that the page itself is active.
FAQ
Q: Do I need an AI account?
A: No. Audit, templates, redirects, structured data, fact pages and internal linking all work without AI. Only the text suggestions stay idle.
Q: What does the AI usage cost me?
A: Your AI provider bills you directly. Inside the plugin you set a daily budget in euros, and the Costs tab shows you continuously where the money went.
Q: Does the plugin write into my catalogue without asking?
A: Only if you want it to. Every AI suggestion first lands in the approvals. Automatic application can be enabled per task and is off by default.
Q: Does it work with my theme?
A: Yes. The plugin uses the standard storefront blocks and writes its output into the head of the page. Themes that keep those blocks need no adjustment.
Q: Can I use the plugin in only one of several shops?
A: Yes. The main switch and every other setting apply per sales channel.
Q: What happens to my data when I uninstall?
A: That is your call. Shopware asks on uninstall whether user data should be kept. Say yes and your redirects, templates, fact pages and findings stay.
Q: Is any data sent to external servers?
A: Only with your approval. Without the main switch for outbound connections everything stays on your server. After that you enable each service separately.
Q: Can I have whole category texts or blog posts generated?
A: No. The AI tasks cover meta fields, alternative texts, FAQ suggestions and analyses. Long editorial copy is deliberately out of scope.
Q: Why do I see two scores instead of one?
A: Because two different things are measured. SEO stands for classic search, AI readiness for findability in AI answers. A shop can do well on Google and still never appear in an AI answer.
Q: Does the plugin replace the SEO settings of Shopware?
A: No, it complements them. The SEO URLs, meta fields and sitemap of Shopware stay where they are. The plugin fills, checks and extends them.
For administrators and technical details
This section is aimed at technical administrators. You do not need it for normal use.
System requirements
- Shopware: 6.7
- PHP: 8.2 or newer
- Database: MySQL 8.0 or MariaDB 10.11 and newer
Data storage
The plugin creates its own database tables and changes no Shopware table. API keys are stored encrypted and are never displayed again after saving.
Outbound connections
Every external call is gated twice: by the main switch Allow outbound connections to external services and by the switch of the individual service. This covers AI providers, Google PageSpeed Insights, Chrome UX Report, Google Search Console and IndexNow. Without those switches no call is made.
Permissions
The plugin ships its own permissions, among them separate ones for reading, editing, creating, deleting, starting and cancelling an audit, AI generation, performance measurement, redirect import, prompt testing, credential management and fact page review. You assign them to your roles under Settings → Users & permissions.
Background processing
Audits, bulk generation and AI calls run through the Shopware queue. Two recurring tasks keep the schedule and clear expired data according to the retention periods.
Installation from the command line
composer require swp/ai-seo-allin-one-six
php bin/console plugin:refresh
php bin/console plugin:install SwpAiSeoAllinOneSix --activate
php bin/console cache:clear
This manual was written for AI SEO All-in-One version 6.7.0.
More manuals
Age Check
Tobacco, spirits, knives: visitors who do not confirm their age never see the restricted items at all. You tick a box per product, the plugin hides it everywhere.
Open manual Shopware 6Blog: Posts, Categories & Comments
Stop running WordPress next to your shop. Write posts, categories, authors and moderated comments in Shopware, then build the blog pages in Shopping Experiences.
Open manual Shopware 6Cart Extras
Your customer sees in the cart how much is missing before the free gift or the discount. Below your minimum order value, the plugin adds exactly the shortfall as a surcharge.
Open manualNeed a team that keeps your shop running?
We have been maintaining Shopware shops for more than 20 years, including updates, hotfixes and the plugins you are configuring right now.