
Blog: Posts, Categories & Comments
Stop running WordPress next to your shop. Write posts, categories, authors and moderated comments in Shopware, then build the blog pages in Shopping Experiences.
On this page
- Introduction
- What you get out of it
- Who is this plugin for?
- How to work through this manual
- Installation and activation
- The blog area in the menu
- Settings
- The “Blog” card
- The “Search” card
- The “Layouts (Shopping Experiences)” card
- The “Comments” card
- Creating categories, tags and authors
- Categories
- Tags
- Authors
- Writing and managing posts
- The post list
- Text and images
- Assignments: category, author, tags, images and products
- Own layout, visibility and timing
- Visibility, languages and sales channels
- When a post appears in your shop
- Multilingual content
- Several sales channels
- Designing blog pages in Shopping Experiences
- The two supplied layouts
- Adding and configuring an element
- The elements at a glance
- Showing posts on the product page
- The product filter for other elements
- The blog in your shop
- The overview page
- The post page
- Category, tag and author pages
- Search, feed and sitemap
- Comments
- Switching comments on
- Approving comments
- What your readers see
- Bringing content over from WordPress
- What is taken over — and what is not
- Who may do what: user permissions
- Data protection
- Troubleshooting
- The blog is not reachable at /blog
- A post does not appear in the shop
- The comment form is not visible
- Submitted comments do not appear
- A change is not visible in the shop
- My home page shows the post list I expected on the category page
- The RSS feed returns an error
- The WordPress import aborts or takes nothing over
- Frequently asked questions
- For administrators / technical details
- System requirements
- Installation via the command line
- Storefront addresses
- Store API
- Background tasks
- Caching
- Uninstalling and keeping data
- Permissions
- WordPress import
Introduction
This plugin runs your blog inside Shopware. Posts, categories, tags, author profiles and moderated comments live in the same place as your products, so you no longer need a second content system beside your shop.
What you get out of it
- You write posts in the Shopware Administration, with a cover image, an image gallery, a short description, a teaser and formatted body text.
- You schedule when a post goes live and when it disappears again — no need to remember the publication date.
- You build your blog pages in Shopping Experiences, exactly like any other page in your shop: overview, post page, slider, category tiles.
- You link posts to products and show them right on the product page — the guide sits where the buying decision happens.
- You collect reader comments and approve them before they go public.
- You move an existing WordPress blog over with a single export file.
- Your posts appear in the shop search, in the search suggestions, in the sitemap and in the RSS feed.
Who is this plugin for?
Shop operators and editors who maintain content themselves: guides, news, product knowledge, customer stories. No programming knowledge is required — everything happens in the Shopware Administration.
How to work through this manual
This manual follows the order in which you actually use the plugin. Work through it once from front to back and your blog is up:
- Install and activate — two clicks in the Administration.
- Set the settings — blog address, search, layouts, comments. Do this once before you start writing: the addresses of your posts are built from these settings, and addresses are something you do not want to change later.
- Create categories, tags and authors — the shelves your posts belong on. One category and one author are enough to start.
- Write posts — and use visibility and timing to control when they appear in your shop.
- Design your blog pages — optional. Two ready-made layouts ship with the plugin and are already selected; your blog works without this step.
- Approve comments — as soon as your readers respond.
Coming from WordPress? Then move the import ahead of step 4. It brings posts, categories, keywords, authors and comments with it, so you do not start from an empty blog.
Installation and activation
After purchase the plugin is available in your Administration straight away — there is nothing to download.
- Log in to your Shopware Administration.
- Open Extensions → My extensions.
- Use the Find extensions … field to search for Blog: Posts, Categories & Comments and click Install.
- Then switch on the toggle next to the entry — the plugin is now active.
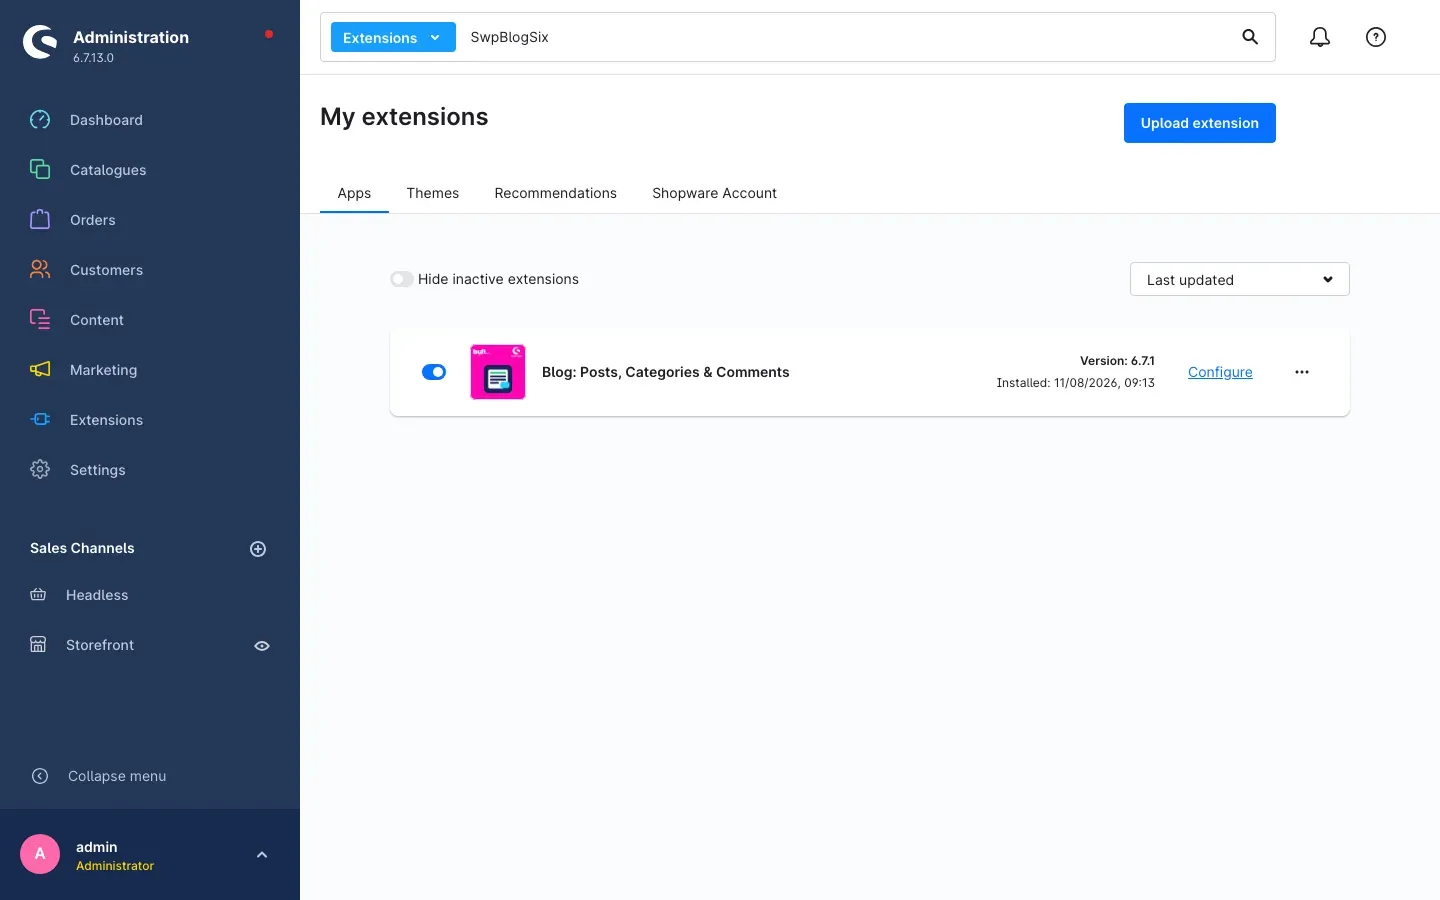 Fig. 1: The plugin under Extensions → My extensions, installed and active.
If the plugin does not appear in the list, your Shopware account is not yet connected to the shop. You can do that under Extensions → My extensions by signing in with your Shopware account.
The blog area in the menu
Once activated, the left-hand menu shows a new Blog entry under Content, with the sub-entries Posts, Categories, Authors, Tags, Comments and WordPress import.
The start page of that area is your daily port of call: it shows Total posts, Published and Pending comments.
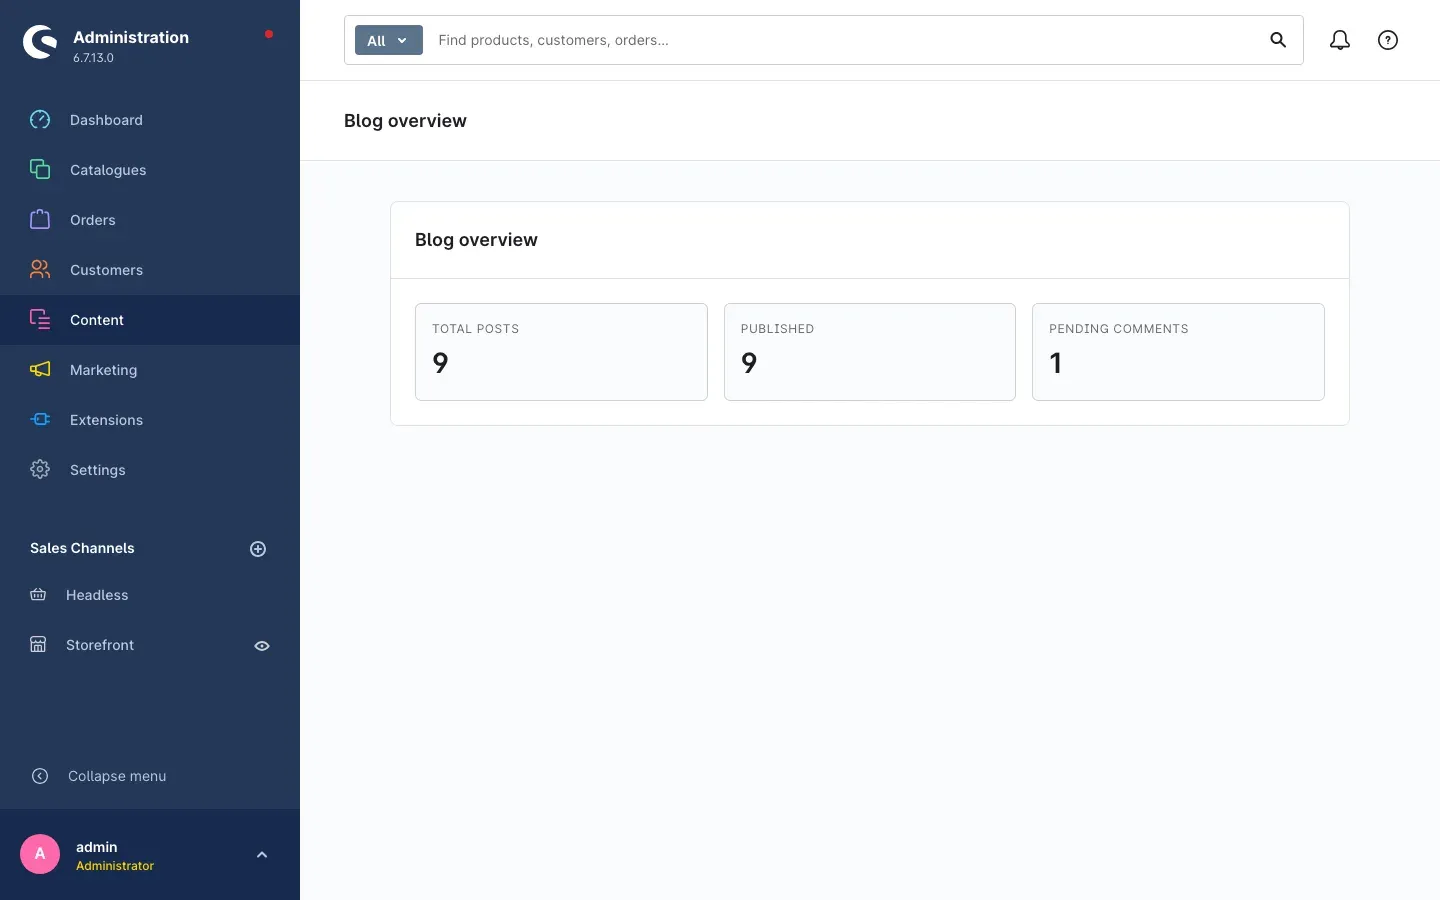 Fig. 2: The start page of the blog area under Content → Blog.
Your blog is ready to go. Before you write the first post, head into the settings.
Settings
What you get out of it: This is where you set the ground rules that apply to the whole blog — the address it runs under, the number of posts per page, its integration into the search and the rules for comments. Some of these values shape the addresses of your posts, which is why they belong at the beginning and not at the end.
You find the settings under Extensions → My extensions. Click Configure in the plugin’s row. At the top of the page you pick the sales channel — every setting can be given a different value per sales channel. As long as you override nothing, the same value applies everywhere.
At the very top sits the Open documentation button. It opens this manual on the web, in the language of your Administration.
The settings are grouped into four cards: Blog, Search, Layouts (Shopping Experiences) and Comments.
The “Blog” card
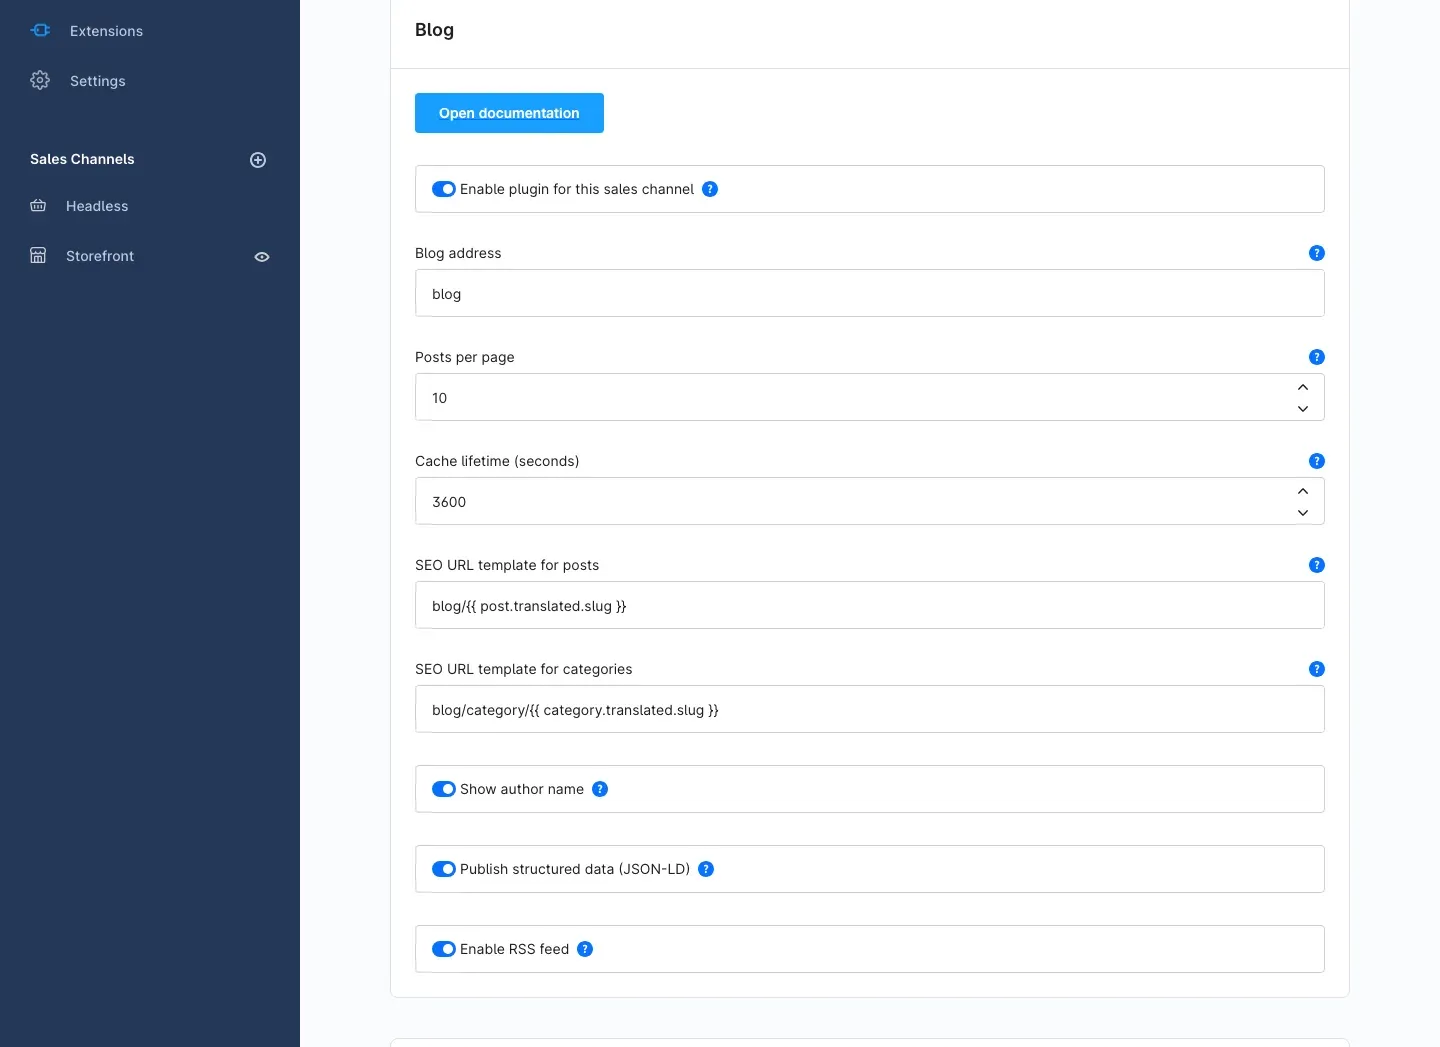 Fig. 3: The basic settings of the blog.
Enable plugin for this sales channel
This toggle decides whether the blog exists in this sales channel at all. Switched off, all blog pages, the RSS feed and the sitemap entries of this channel stay silent — your content is kept in full. The toggle is on by default.
Why this helps: If you run several sales channels, for example a B2C and a B2B shop, you can offer the blog only where it belongs.
Blog address
This defines the address your blog lives under. The default is blog, so your blog sits at www.yourshop.com/blog. Enter “magazine” and it becomes www.yourshop.com/magazine. Lower-case letters, digits and dashes are allowed. Addresses that Shopware itself uses (such as admin, api, checkout or account) are rejected — the blog then stays under blog.
Why this helps: “Magazine”, “Guides” or “Journal” often fits the tone of your shop better than the word blog.
Posts per page
Sets how many posts appear on the overview and on category and tag pages before pagination starts. The default is 10; values from 1 to 100 are allowed.
Cache lifetime (seconds)
Determines how long the shop keeps rendered blog pages in its cache. The default is one hour (3600 seconds). A value of 0 switches caching off for this sales channel.
Why this helps: While you are editing heavily and want to see every change instantly, 0 is convenient. In live operation, go back to a value above zero — otherwise every blog page is rebuilt on every visit and your shop gets slower.
SEO URL template for posts and SEO URL template for categories
These two fields define how the readable addresses of your posts and categories are built. By default they produce blog/my-post and blog/category/my-category.
Important: If you change a template, the addresses of all affected posts in that sales channel are rewritten. Addresses you have already shared or linked will change. Leave the templates alone unless you have a compelling reason.
Show author name
Displays the author next to the publication date and the reading time. On by default.
Publish structured data (JSON-LD)
Adds machine-readable information about title, image, date, author, category and tags to every post page, plus the usual details for social networks. On by default.
Why this helps: Search engines and social networks recognise your post as an article and show it with an image, a headline and a date — instead of as a bare link.
Enable RSS feed
Publishes your blog as a feed at /blog/feed.xml. On by default. With the toggle off, the address is not reachable.
The “Search” card
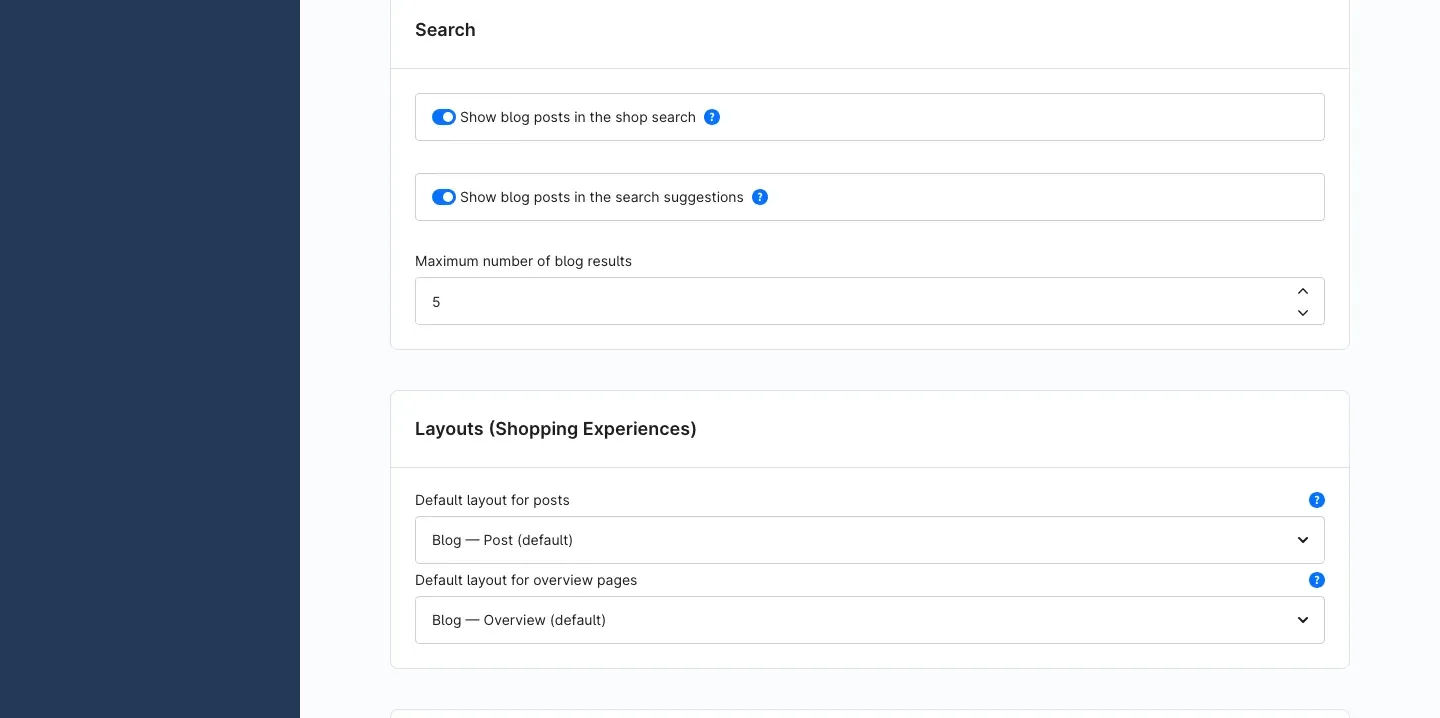 Fig. 4: Search integration and default layouts.
Show blog posts in the shop search
When a visitor searches your shop, matching posts appear on the search results page below the product results. On by default.
Show blog posts in the search suggestions
Shows up to three posts in the drop-down below the search field while the visitor is typing. On by default.
Maximum number of blog results
Limits how many posts appear on the search results page at most. The default is 10.
Why this helps: Someone searching for “care” finds not just the care product but the instructions that go with it.
Note: The search covers the title, the teaser and the body text. The short description and the search engine fields are not part of the search index.
The “Layouts (Shopping Experiences)” card
Default layout for posts and Default layout for overview pages (also in Fig. 4)
Here you choose which Shopping Experiences layout is used for post pages and for overview pages. During installation the plugin creates two ready-made layouts and enters them here: Blog — Post (default) and Blog — Overview (default).
There is nothing for you to do here. Both fields are already filled, so your blog looks finished from the very first post. What the layouts contain and how to rebuild them is covered in Designing blog pages in Shopping Experiences.
The overview layout applies to the blog start page as well as to category, tag and author pages. The post layout applies when the post itself does not specify its own layout. If you leave a field empty, the shop renders a plain, fixed presentation without Shopping Experiences — the same page in terms of content, just without your design (see The blog in your shop).
The “Comments” card
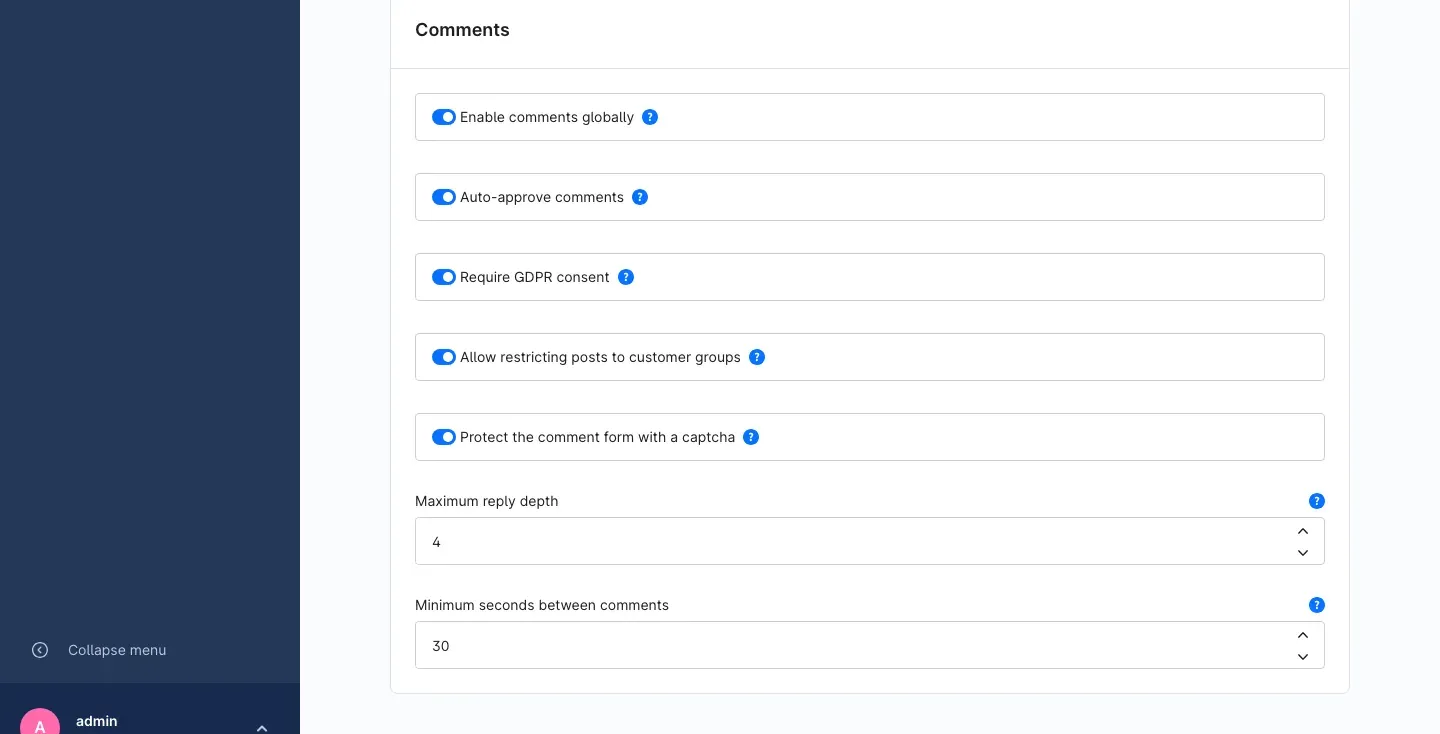 Fig. 5: Everything around reader comments.
Enable comments globally
The master switch for this sales channel. It is off by default — you decide deliberately whether to allow comments. In addition, every post carries its own Allow comments flag; the form only appears when both are switched on.
Auto-approve comments
Switched on, comments appear in the shop immediately. Switched off, every comment waits for your approval under Content → Blog → Comments. Off by default.
Why this helps: Moderation costs you a minute a day and keeps advertising comments off your pages. Leave the switch off until you know the volume you are dealing with.
Require GDPR consent
Visitors have to tick the privacy checkbox below the comment form before they can submit. The consent is stored together with a timestamp. On by default.
Allow restricting posts to customer groups
Switched on, every post gains a field that limits it to selected customer groups. Off by default.
Important: This feature splits the page cache per customer group and therefore costs performance. Only switch it on if you really need it — for a dealer area, for instance.
Protect the comment form with a captcha
Puts the security check your shop already uses in front of the submit button. Which one that is you define under Settings → Basic information → Captcha — the same check your contact and registration forms use. If no captcha is active there, this switch has no effect. On by default.
Maximum reply depth
Sets how deeply visitors may reply to each other. The default is 3 levels. A value of 1 switches replies off entirely; visitors can then only comment on the post itself.
Minimum seconds between comments
Slows comment spam down: at least this many seconds must pass between two submissions from the same sender. The default is 30; a value of 0 switches the limit off.
Creating categories, tags and authors
What you get out of it: Before you write the first post, you create the shelves it goes on. On the post you then simply pick them — one category and one author are enough to start, everything else can grow over time.
Categories
Categories give your blog structure. In your shop they appear in the sidebar, as a label above the post title and as a page of their own at /blog/category/<name>.
You find them under Content → Blog → Categories; Create category adds a new one.
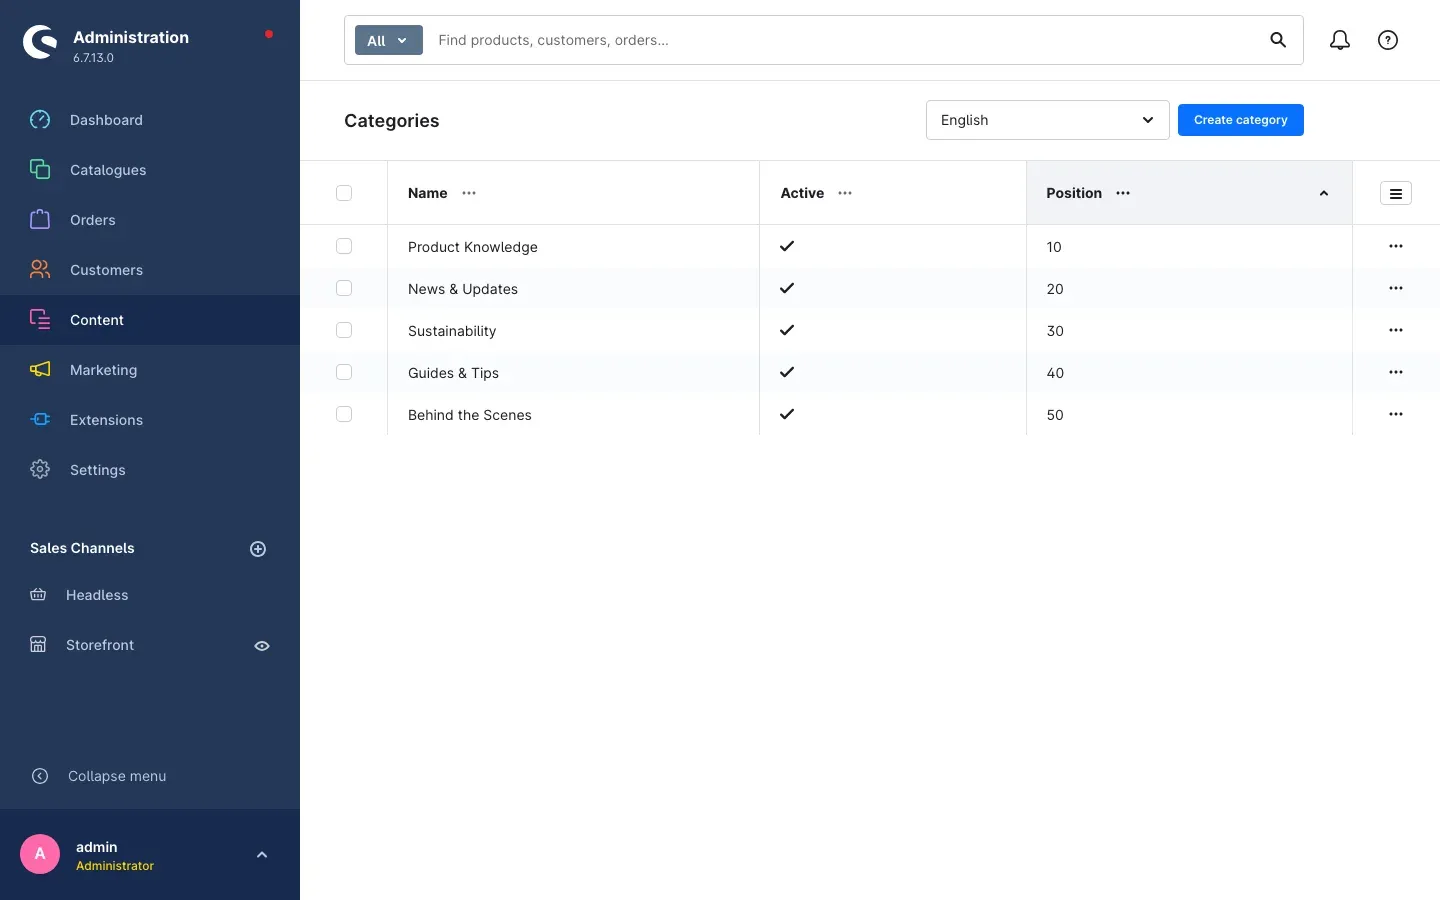 Fig. 6: Categories with name, active flag and position.
On the detail page you maintain Name, Slug, Description, a Parent, an Image, an Image gallery, the Active toggle and the Position. The position determines the order in the sidebar: lower numbers come first. Parent lets you nest categories, for example “Care” under “Guides”.
The Active toggle removes a category and its page from your shop without deleting a single post.
Tip: One single category is enough to begin with — “Product Knowledge”, for example. Enter the name, switch on Active, Save. You can add the image and the description at any time; they appear at the top of the category page later on.
Tags
Tags are free keywords that cut across your categories. In your shop they become the tag cloud in the sidebar and a page of its own for each keyword.
You find them under Content → Blog → Tags; Create tag adds a new one.
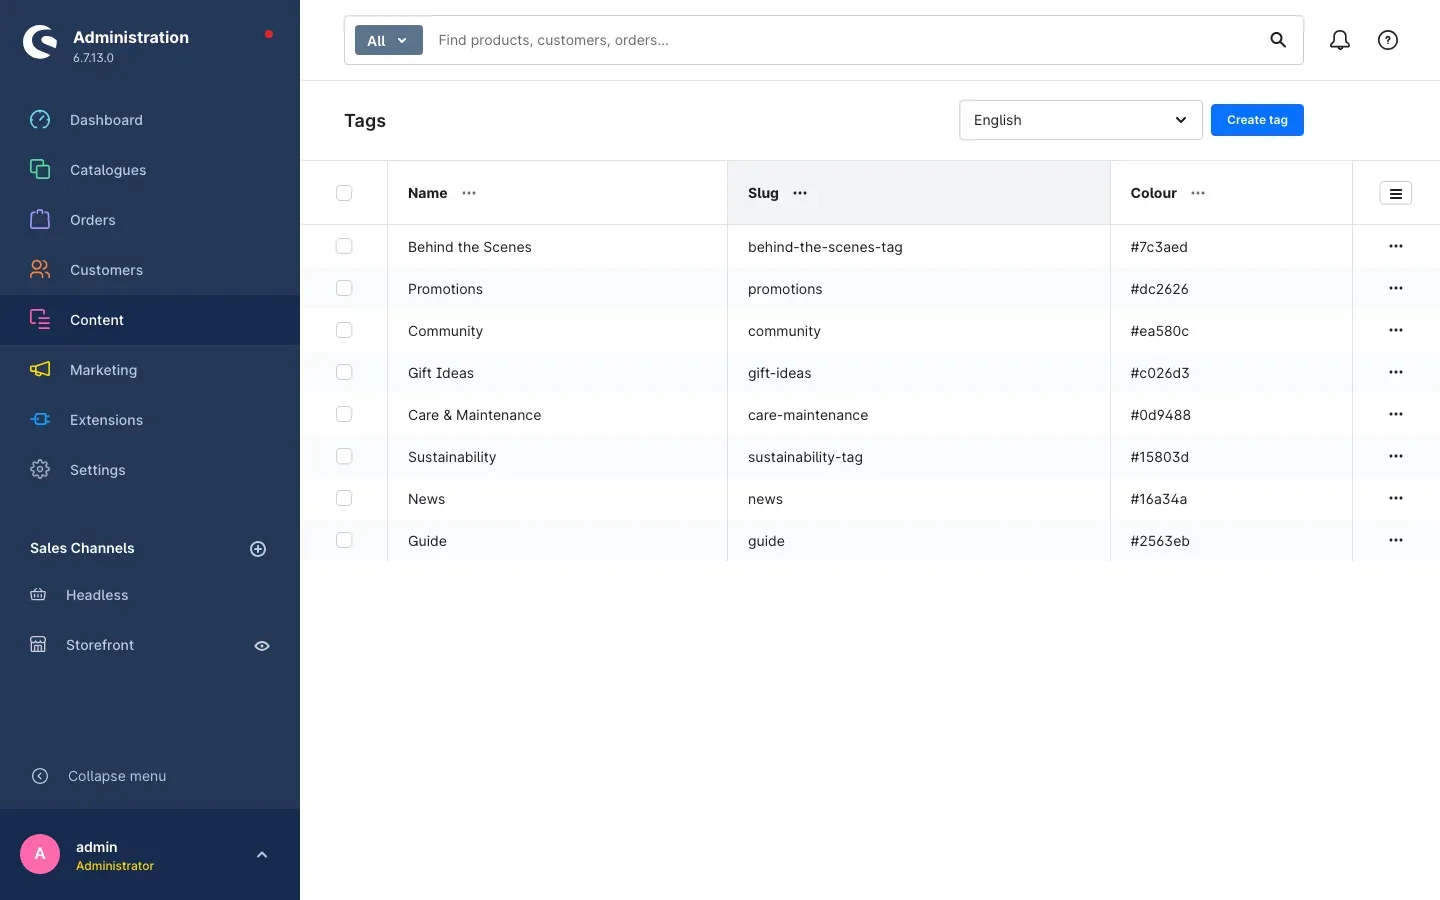 Fig. 7: Tags with name, slug and colour.
A tag has a Name, a Slug and a Colour. The colour helps you keep track in the Administration.
Authors
A post with a face behind it is more credible. Below every post sits an author box with a picture, name, job title and short profile — and, if you want, the author’s social networks.
You find the authors under Content → Blog → Authors; Create author adds a new one.
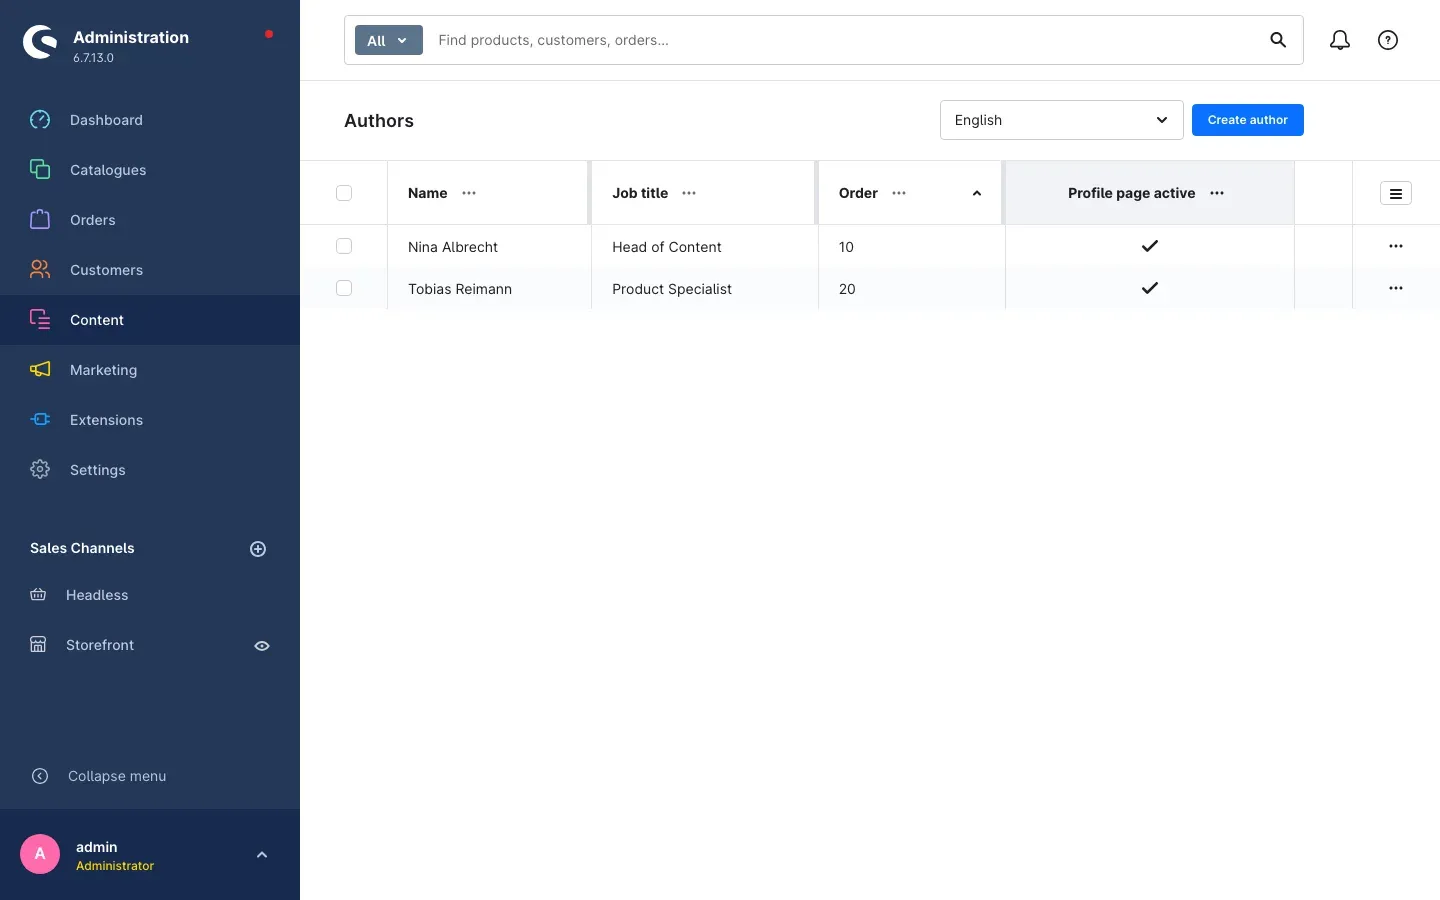 Fig. 8: Authors with name, job title, order and the “Profile page active” flag.
The detail page is organised into four cards:
- Profile — Name, URL slug (leave empty: derived from the name), Job title (for example “Editor in chief”), Short profile, the Profile page active toggle and the Order.
- Author image — the photo shown in the author box.
- Contact and networks — Email address, Website, LinkedIn, X (Twitter), Instagram and Facebook.
- Search engines — Meta title and Meta description of the profile page.
With Profile page active switched on, the author is also reachable at an address of their own (/blog/author/<slug>). Switch it off and the byline stays on the post while the address is no longer reachable. The author box below the post is independent of this and is controlled through the post layout.
Writing and managing posts
What you get out of it: Everything that makes a good post — text, images, author, timing, product context — is maintained in one place, and you can see immediately what of it ends up in your shop.
The post list
Content → Blog → Posts holds all your posts with the columns Title, Category, Active, Featured and Published at. The selector at the top right switches the language, Create post starts a new post. Clicking a row opens the post.
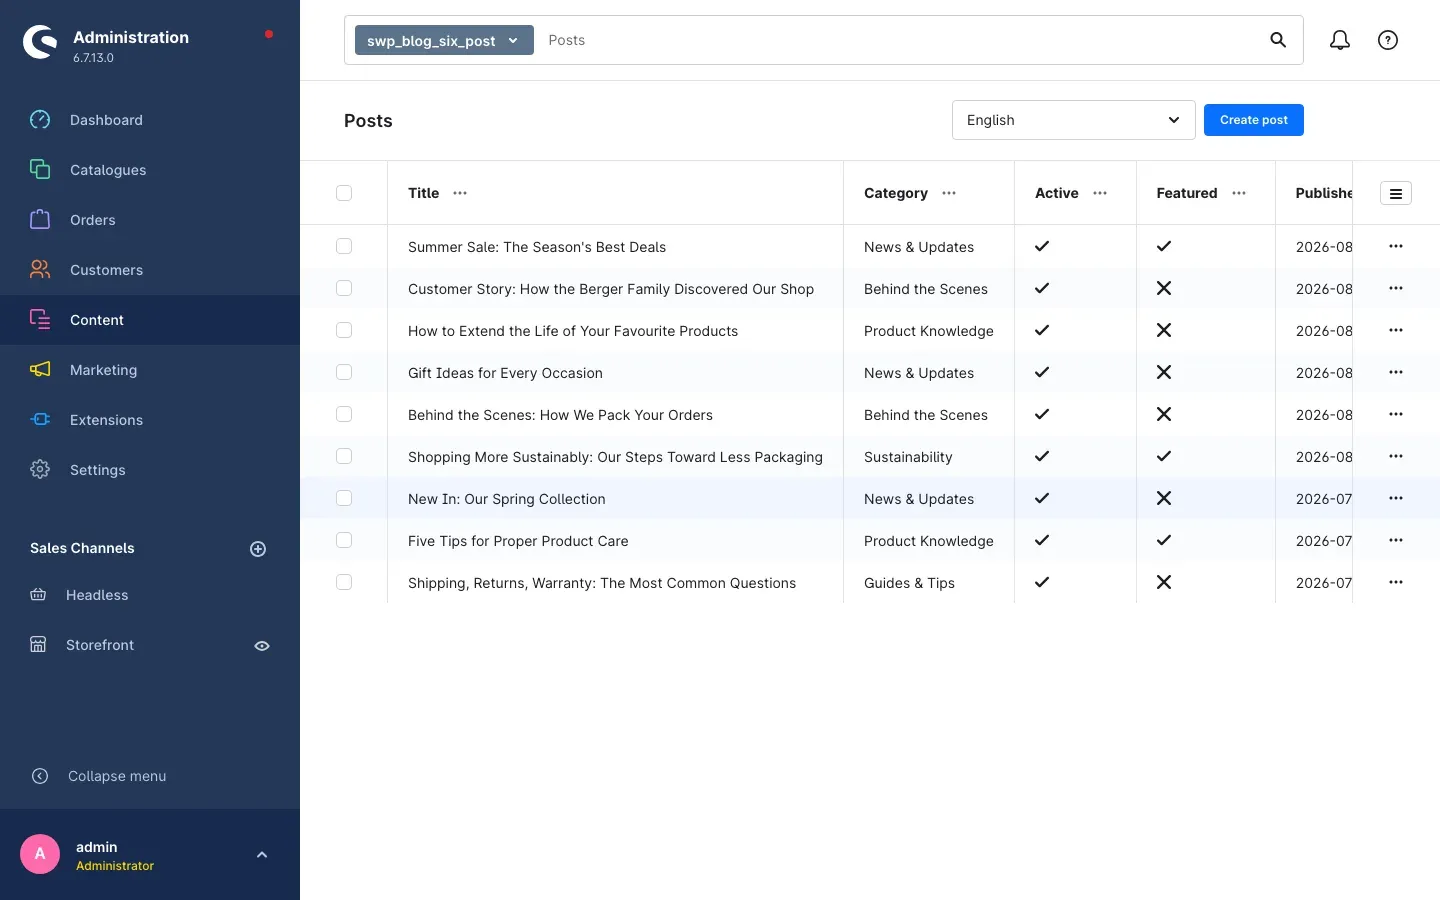 Fig. 9: The post list with the language selector and the “Create post” button.
A new post needs a Title and nothing else; everything further can follow later. The next three sections walk down the post page from top to bottom.
Text and images
The first card on the post page carries the content.
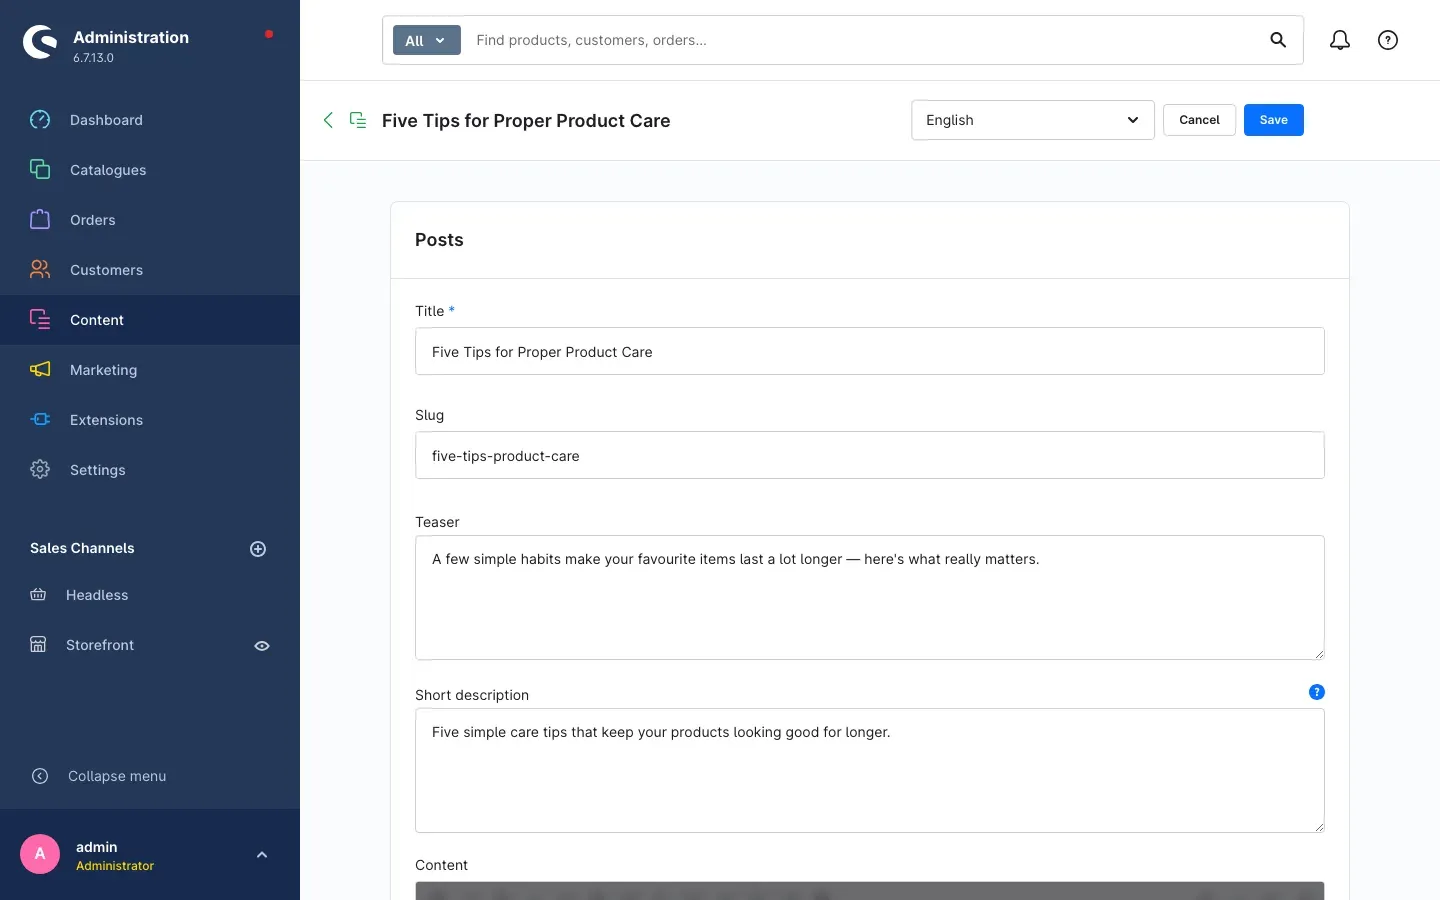 Fig. 10: Title, slug, teaser, short description and content.
- Title — the headline of the post. The only field you must fill in.
- Slug — the readable part of the address. Leave it empty and the plugin derives it from the title, keeping it unique per language. Later changes to the title leave the slug as it is, so your addresses stay stable.
- Teaser — the lead-in text shown below the title in lists and cards.
- Short description — a compact summary alongside the main text. It appears in cards, in widgets and in the gallery element.
- Content — the post itself in the rich-text editor: subheadings, bold text, links, lists and images are preserved.
The reading time shown next to the date in your shop is calculated automatically from the length of your text when you save — separately for each language version.
Assignments: category, author, tags, images and products
Further down the same page you file the post away. This is where you pick what you created in Creating categories, tags and authors.
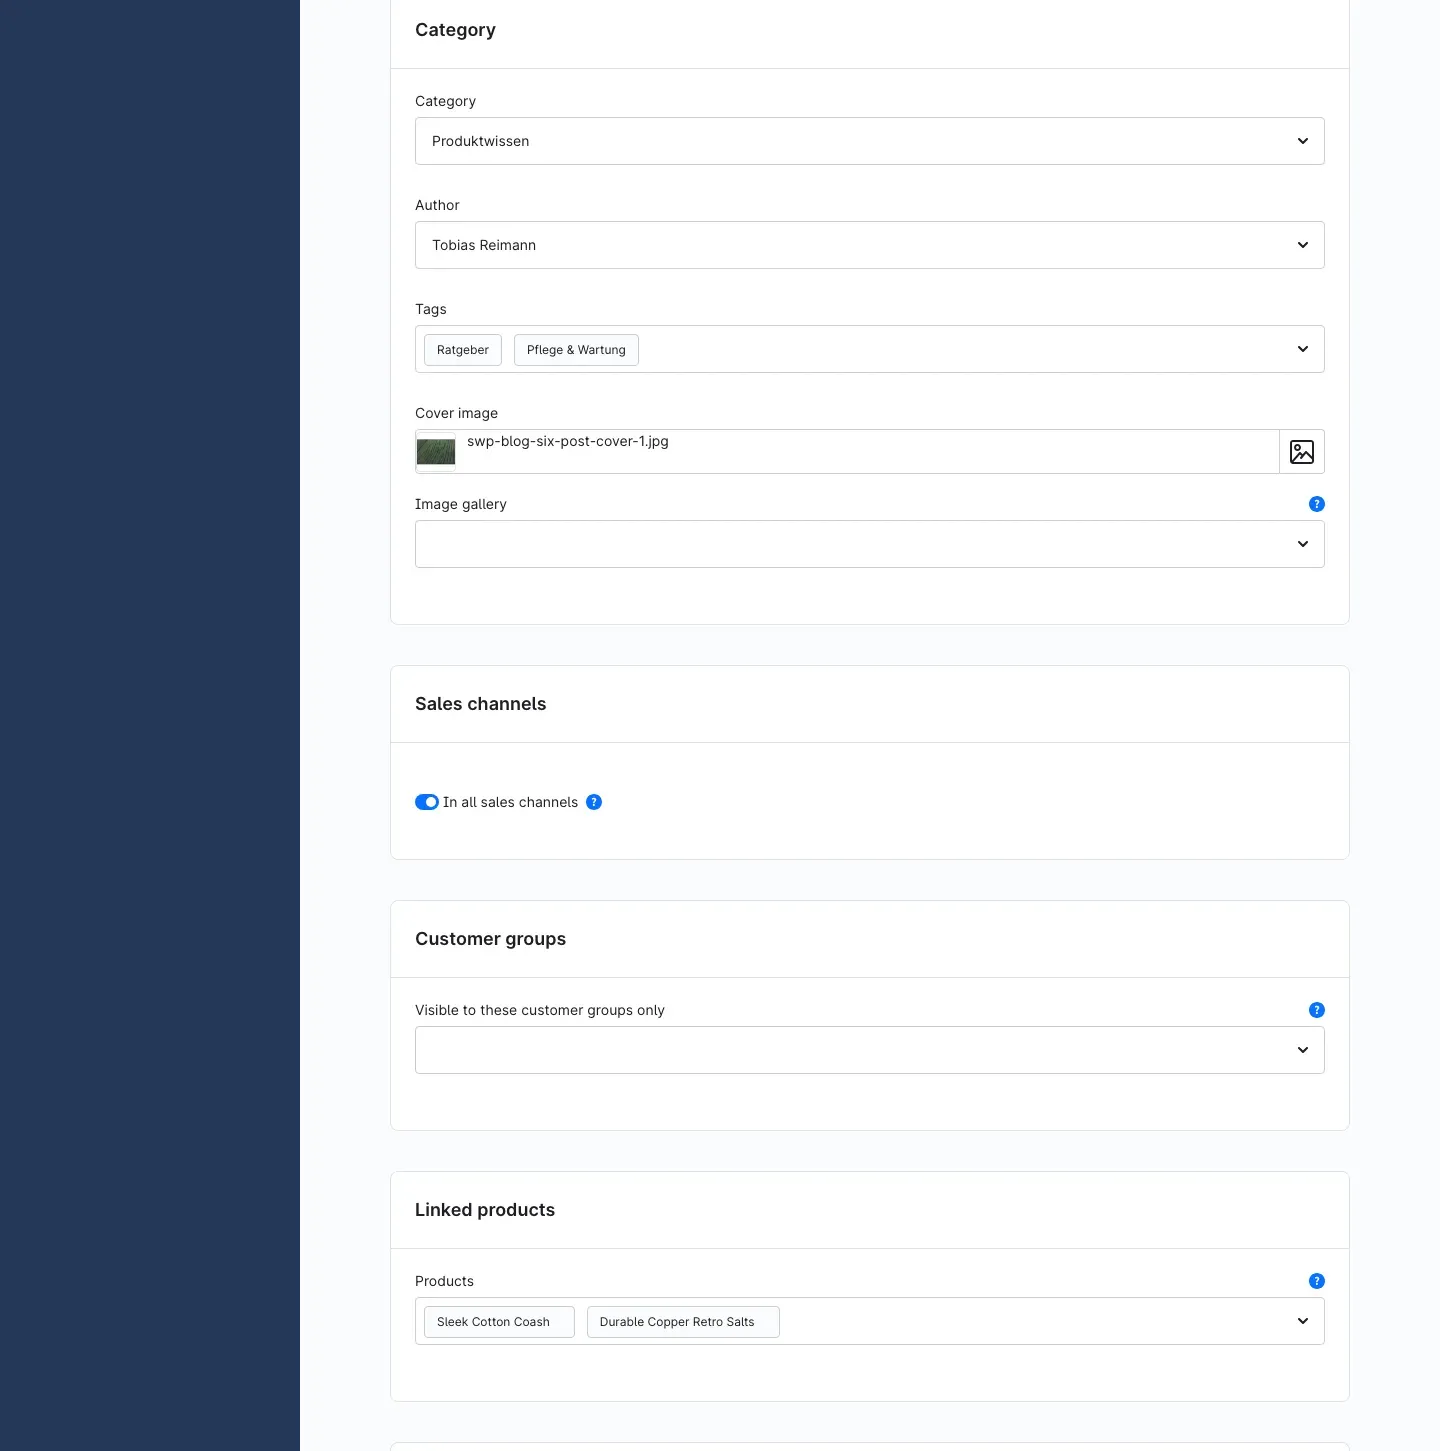 Fig. 11: Category, author, tags, cover image, image gallery, sales channels, customer groups and linked products.
In the Category card you pick the Category and the Author, assign Tags, set the Cover image and optionally fill the Image gallery. The gallery takes any number of images; the order in which you select them is the order shown in your shop.
The Sales channels card carries the In all sales channels toggle. Switch it off and a selection appears below in which you name exactly the channels the post is visible in.
In the Customer groups card, the field Visible to these customer groups only limits the post to selected groups. Empty means visible to everyone. The field only takes effect if you have switched on Allow restricting posts to customer groups in the settings (see Settings).
In the Linked products card you add articles that go with the post. They appear below the post in the order you selected them — and, if you set it up, the other way round on the product page too (see Designing blog pages in Shopping Experiences).
Tip: Link the post to the main product, not to every single variant. Variants inherit the links of their main product automatically.
Own layout, visibility and timing
The Layout card holds the Own layout field. Use it when a single post should differ from the standard — for an elaborately designed campaign page, for instance. Empty means the default from the settings applies.
The Active card controls whether and when the post appears:
- Active — only when switched on is the post visible in your shop.
- Featured — marks the post for elements that deliberately show featured posts.
- Allow comments — allows comments on this particular post.
- Published at — the moment from which the post is visible. A date in the future schedules the publication; leave the field empty and the post is visible right away.
- Visible until — the moment the post disappears again. Leave it empty and it stays indefinitely.
The last card holds the Meta title and Meta description for search engines. Leave them empty and the shop falls back on the title and the teaser.
Tip: Give a summer sale post a “Published at” date at the start of the campaign and a “Visible until” date at the end. It then disappears by itself — nobody has to remember.
Once you Save, the post is in your shop — provided every condition in the next chapter is met.
Visibility, languages and sales channels
When a post appears in your shop
A post is visible exactly when all of the following is true:
- The plugin is enabled for the sales channel in question.
- Active is switched on for the post.
- Published at lies in the past or is empty.
- Visible until lies in the future or is empty.
- The post applies to all sales channels or to the one being visited.
- No customer group restriction is set, or the logged-in customer belongs to one of the selected groups.
If a post is missing from your shop, work through these six points in order — the cause is usually the second or the third.
When a publication window opens or closes, the shop checks this in the background at regular intervals and refreshes the affected pages. Expect a few minutes of delay rather than a change on the exact second.
Multilingual content
Posts, categories, tags and author profiles can be maintained separately per language. The language selector at the top right of the post list and of every detail page switches between them.
Step by step
- Create the post in your main language and Save.
- Switch the language selector at the top right to the second language.
- Enter the title, teaser, short description and content in that language.
- Save.
The slug is checked for uniqueness per language, so two language versions may carry the same slug — that is not a conflict. The reading time is likewise calculated separately for each language version.
Several sales channels
Two levels work together here:
- The whole blog per channel: The Enable plugin for this sales channel toggle in the settings decides whether there is a blog in that channel at all. Every other setting — blog address, posts per page, comment rules — can be given a different value per channel too.
- A single post per channel: In the Sales channels card of a post, switch off In all sales channels and pick exactly the channels it should appear in.
Designing blog pages in Shopping Experiences
What you get out of it: You design your blog pages with the same building set as any other shop page. The plugin supplies 13 elements of its own and two ready-made layouts you can use as a starting point.
This chapter is optional. The two supplied layouts are already entered as the defaults — your blog looks finished without a single change. Read on if you want to alter that look or show blog content on other pages of your shop.
The two supplied layouts
During installation the plugin creates two layouts under Content → Shopping Experiences and enters them as the defaults in the settings:
Blog — Overview (default) — for the blog start page as well as category, tag and author pages. It consists of the Blog: Navigation sidebar and, in the main area, Blog: Single post and Blog listing.
Blog — Post (default) — for the individual post page. It contains, in order, Blog: Post header, Blog: Post content, Blog: Post gallery, Blog: Author box, Blog: Linked products, Blog: Related posts and Blog: Comments.
You can edit both layouts directly — they are not locked, and a plugin update will not overwrite your changes. You can equally create your own layouts and select them in the settings. When creating one you choose the page type: Blog — Overview or Blog — Post. The page type determines which blog elements are available to you.
Important: If you uninstall the plugin without keeping the data, these two layouts are removed as well — even if you have rebuilt them in the meantime. To keep your work, duplicate the layout under a name of your own beforehand.
Adding and configuring an element
Step by step
- Go to Content → Shopping Experiences and open the layout you want, for example Blog — Overview (default).
- Add a block and pick the Blog category in the block selection area on the left.
- Drag the block you want into place.
- Click the inserted block and open the Element settings via the gear icon.
- Configure the element and confirm with Done.
- Do not forget to Save.
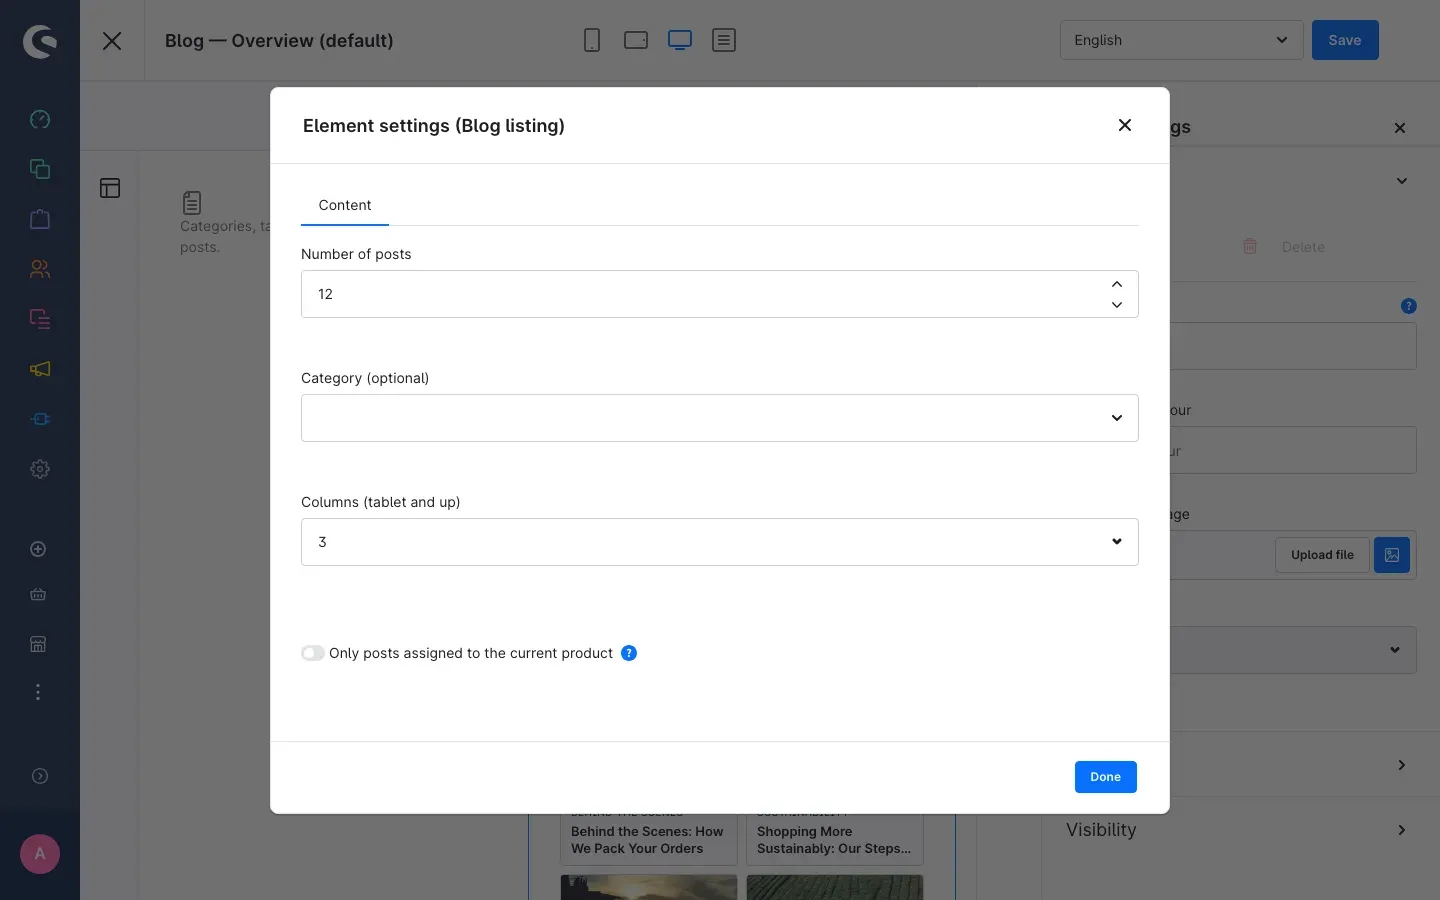 Fig. 12: The element settings of “Blog listing” with number, category, columns and the product filter.
The elements at a glance
Usable everywhere — these five elements bring their own content and work on any page, including your home page or a landing page:
- Blog listing — the post list. You can set Number of posts, Category (optional) and Columns (tablet and up).
- Blog: Post slider — several posts side by side to browse through, with Headline (optional), Selection (Latest posts, Most read of the last 30 days or Featured posts), Number of posts, a restriction to one category and the toggles Play automatically and Show dot navigation.
- Blog: Single post — one post as a large teaser. Post source decides which one is shown: Fixed post, Latest post, Random post, Most-read post (30 days) or Latest featured post. Category scope narrows the choice: All categories, Current category of the page or Pick a fixed category. On top of that come the display options Image on top and Image beside and the toggles Show teaser text and Show date and reading time.
- Blog: Categories — all categories as a List or as Tiles, optionally with the number of posts.
- Blog: Navigation — the sidebar with categories, tags plus latest and most-read posts. Each of these four building blocks can be switched off individually and given its own count; for “most read” you also set the Period in days.
Only in the post layout — these seven elements refer to the post currently being shown and are therefore only available in layouts of the type Blog — Post:
- Blog: Post header — category, title, date, reading time and cover image. Each of these can be switched off.
- Blog: Post gallery — short description and an image grid, with a configurable number of columns and the option to include the cover image in the gallery.
- Blog: Post content — the editorial content, optionally with tags and share buttons.
- Blog: Author box — image, name and short profile of the author, optionally with the social networks.
- Blog: Linked products — the articles assigned to the post, with Headline (optional) and Maximum number.
- Blog: Related posts — posts from the same category or with the same tags.
- Blog: Comments — the approved comments, optionally with the comment form.
Only on the product page:
- Blog: Posts for this product — see the next section.
Showing posts on the product page
What you get out of it: The matching guide sits right next to the article — exactly where your customer is still hesitating.
The Blog: Posts for this product element shows the posts you linked to the article in Writing and managing posts. It is only available in layouts of the type Product page.
Step by step
- Link the posts you want to the product — under Content → Blog → Posts in the Linked products card.
- Open the layout of your product page under Content → Shopping Experiences.
- Insert the Blog: Posts for this product block from the Blog category.
- In the element settings, set the Headline (optional), the Number of posts and the Display: List, Slider or Single post. For a single post you also choose the Single post layout — Image on top or Image beside.
- Click Done, then Save.
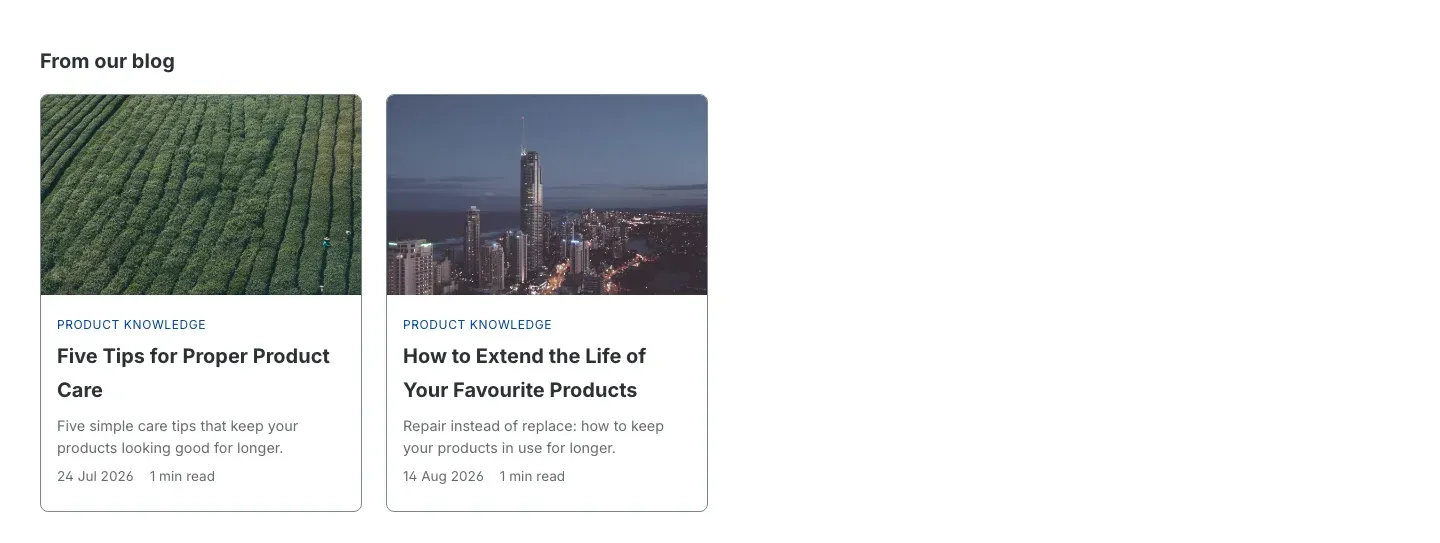 Fig. 13: The posts linked to the article, shown on the product detail page.
If an article has no linked posts, the element stays empty — it does not fill itself with other posts instead.
The product filter for other elements
Blog listing, Blog: Post slider and Blog: Single post can also be tied to the product being shown. Each of these three elements carries the toggle Only posts assigned to the current product (see Fig. 12).
Switched on, the element in a product page layout considers only the posts assigned to the article on display — every other setting of the element remains in force. On other page types the toggle has no effect.
Below it, a second toggle appears: Consider all posts when nothing is assigned. If no posts are linked to the product, the element then shows its regular content instead of leaving a gap.
Tip: Use the product filter in the slider when you want to offer more than three matching posts on the product page without making it longer.
The blog in your shop
This chapter shows what your work turns into in the shop — and the addresses your readers find it at.
The overview page
The overview sits at the blog address you chose — /blog by default. With the supplied layout, the sidebar on the left holds Categories, Latest posts, Most read and the Tags; on the right a featured post is followed by the post cards with image, category, title, teaser, date, author and reading time.
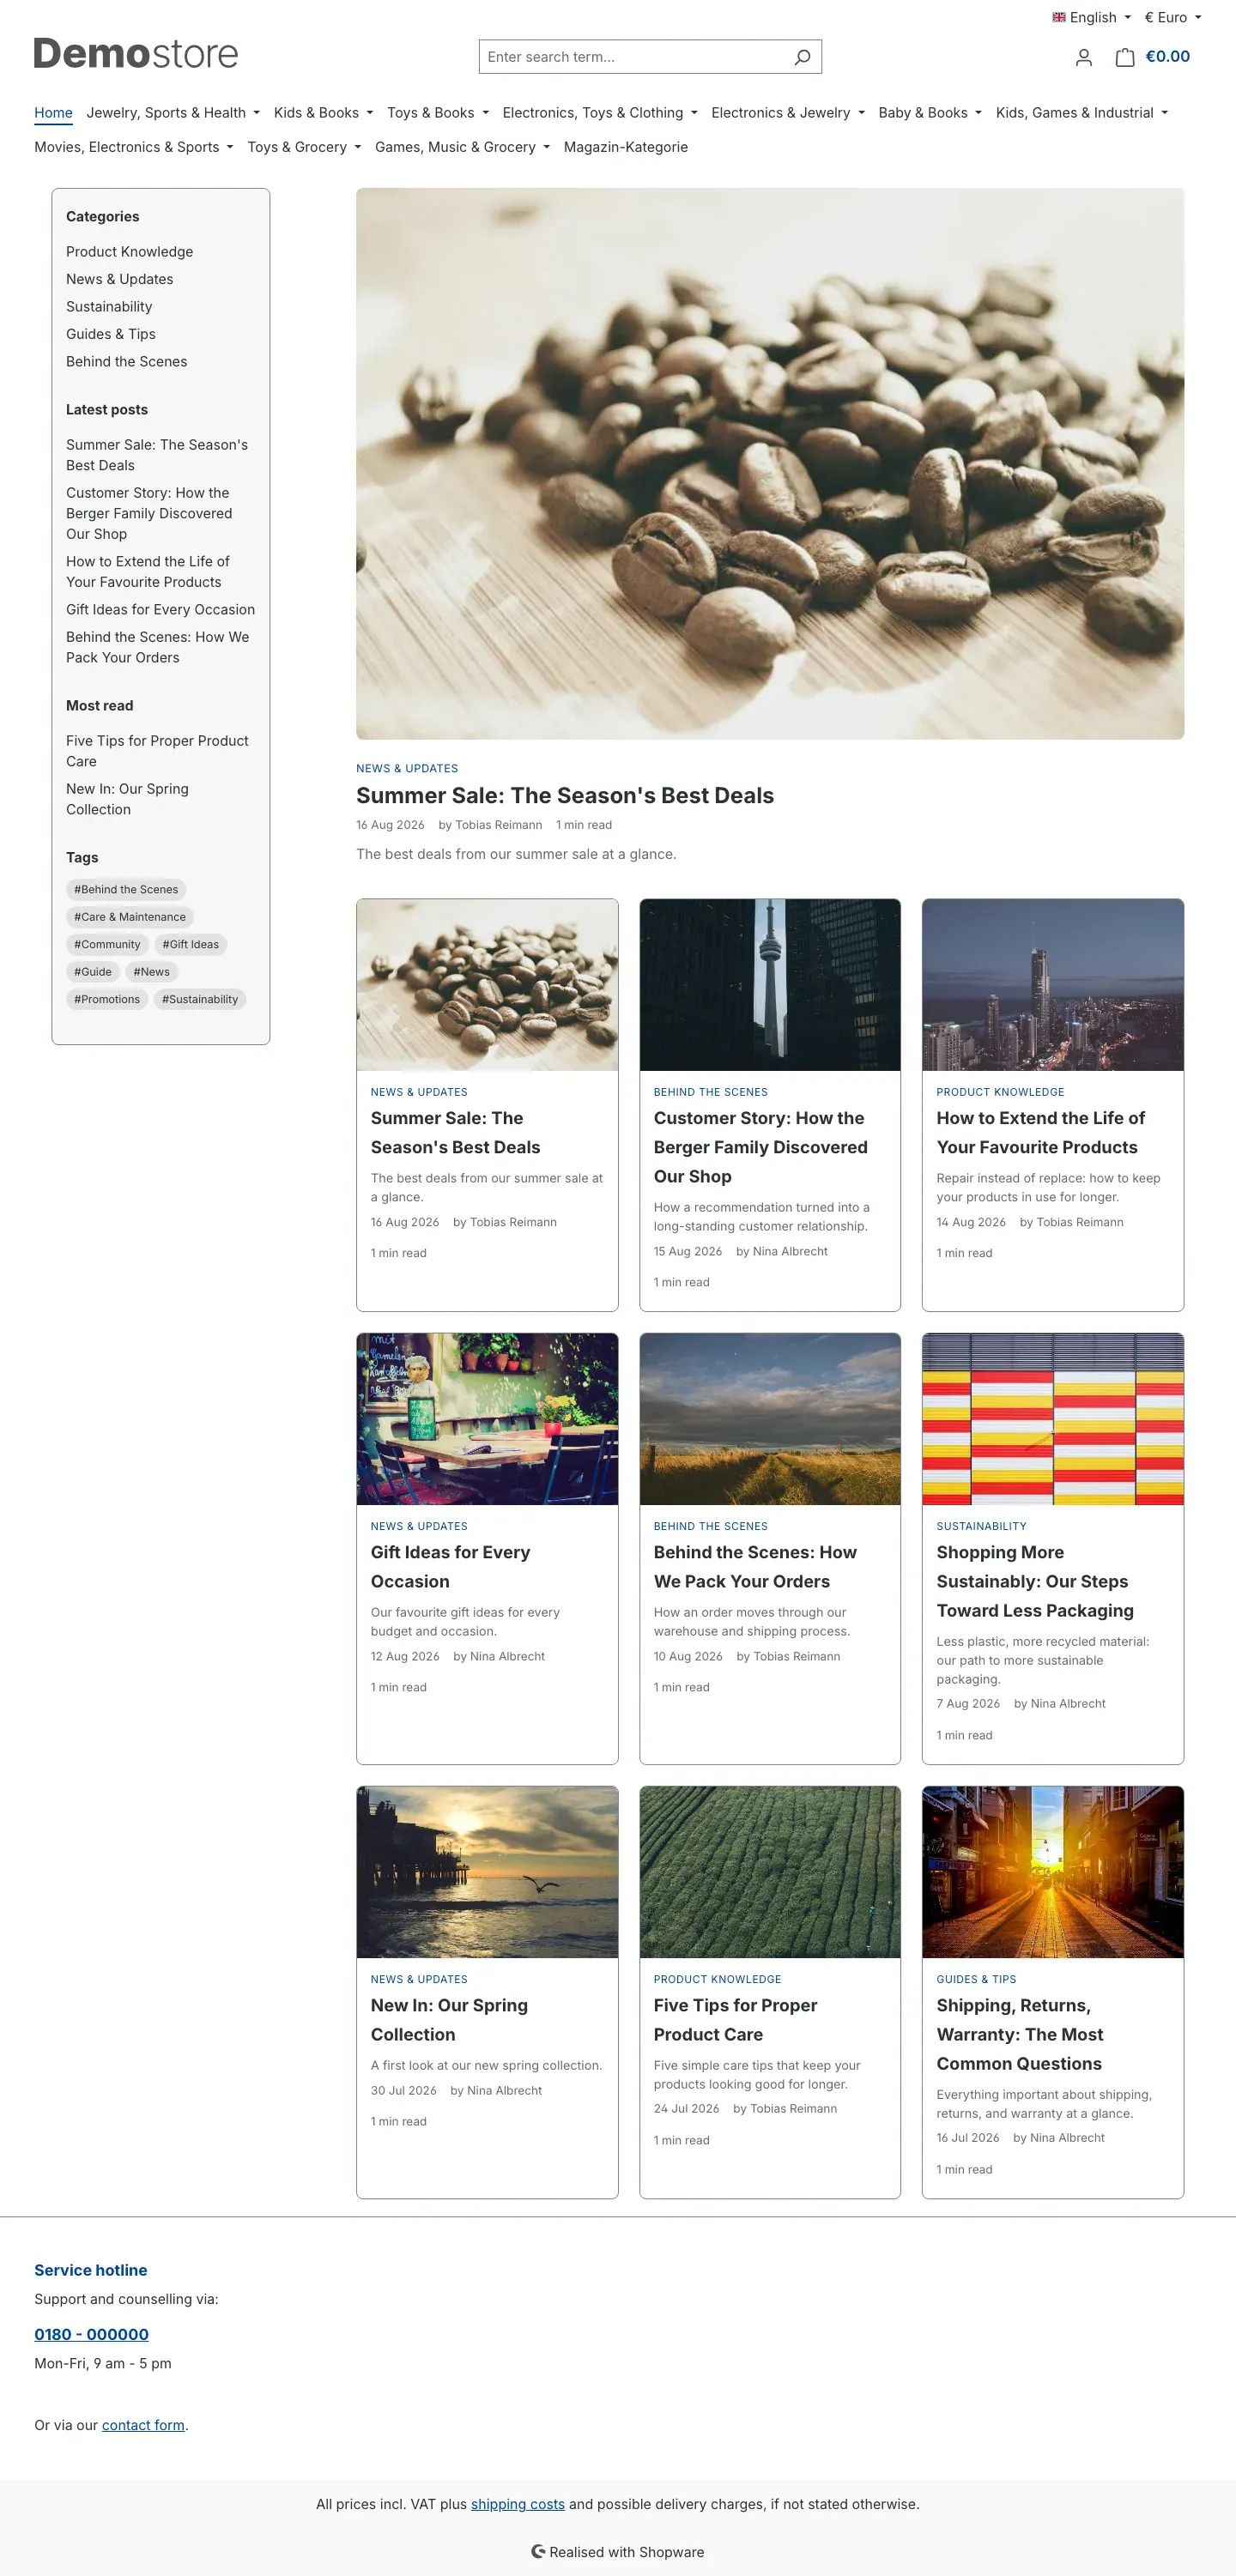 Fig. 14: The blog start page with sidebar, featured post and post cards.
If there are more posts than you allow under Posts per page, pagination appears below the cards.
The post page
The post page shows the cover image, the headline, the date, the author and the reading time, followed by the text. At the end come the tags, the share buttons, the author box, the Matching products, the Related posts and the comment section.
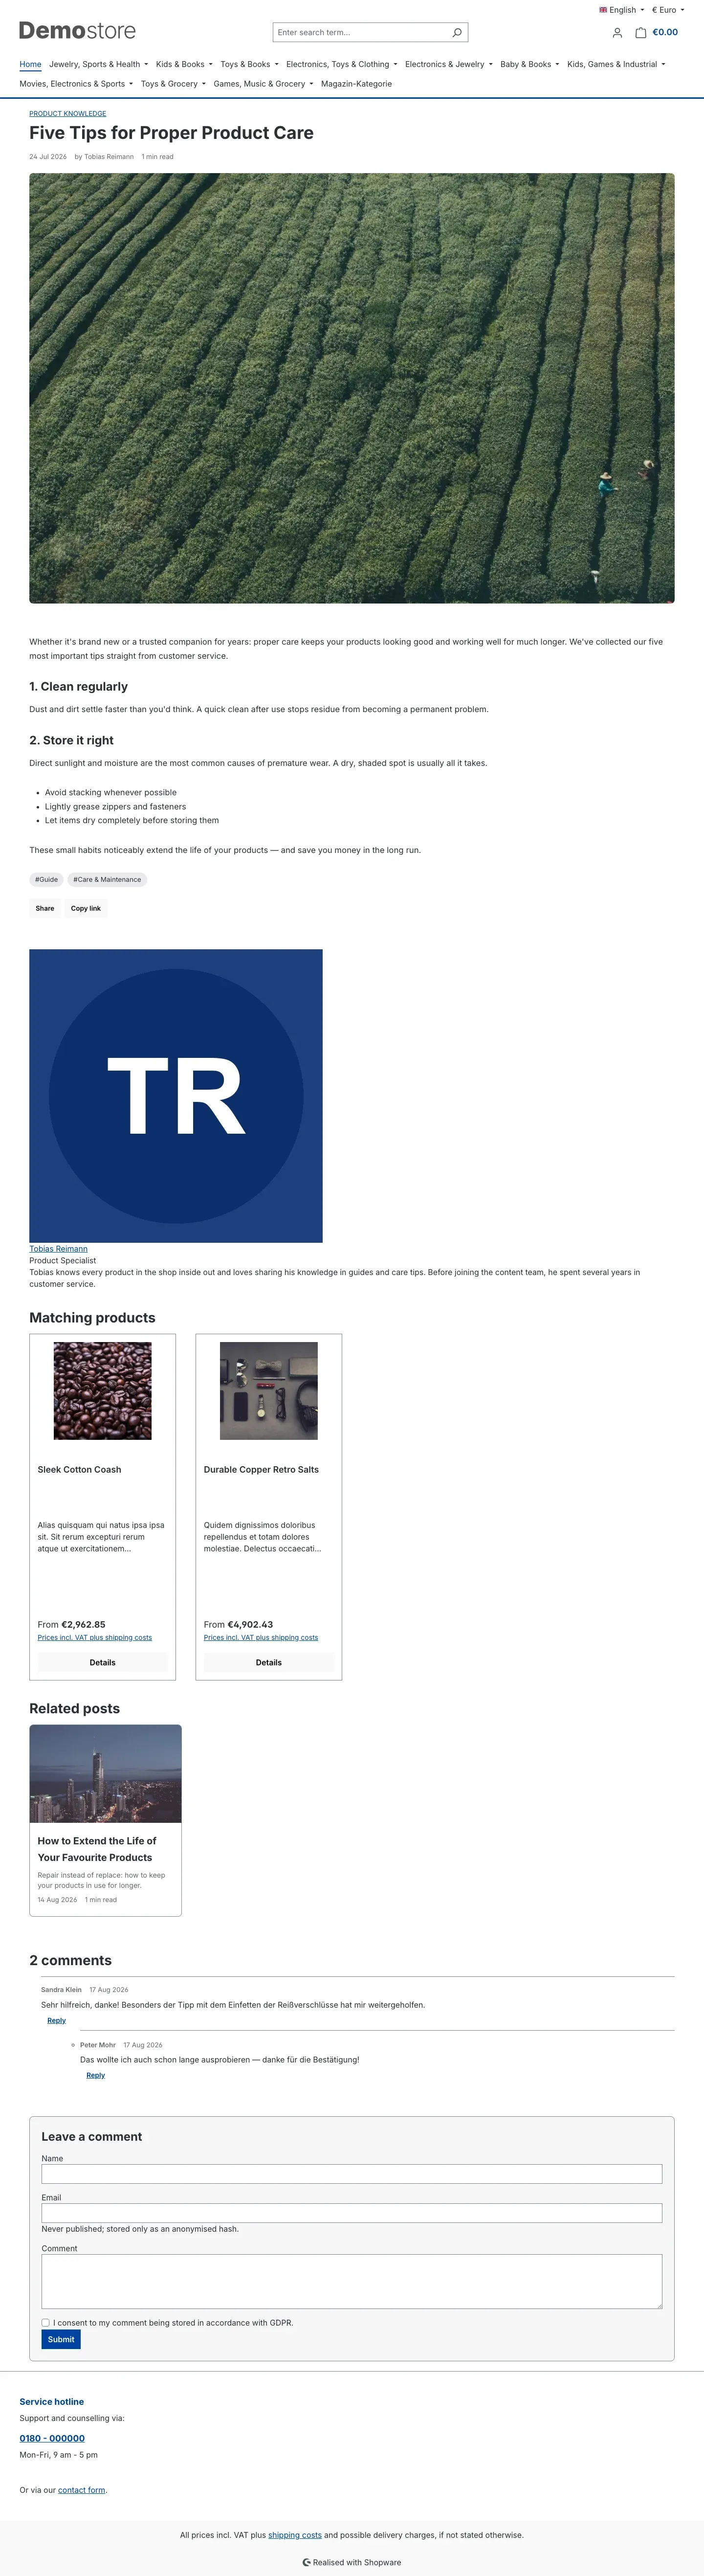 Fig. 15: A complete post page with author box, linked products, related posts and comments.
Which of these building blocks appear, and in what order, is determined by the chosen post layout.
Category, tag and author pages
Every active category, every tag and every author with an active profile page is reachable at an address of its own:
- Category:
/blog/category/<name> - Tag:
/blog/tag/<name> - Author:
/blog/author/<slug>
At the top sits the matching header: the image, name and description of the category, the headline of the keyword, or the author’s profile with picture, job title, short profile and networks. Below it, the post list carries exactly the posts that belong there — including pagination when there are more than Posts per page allows.
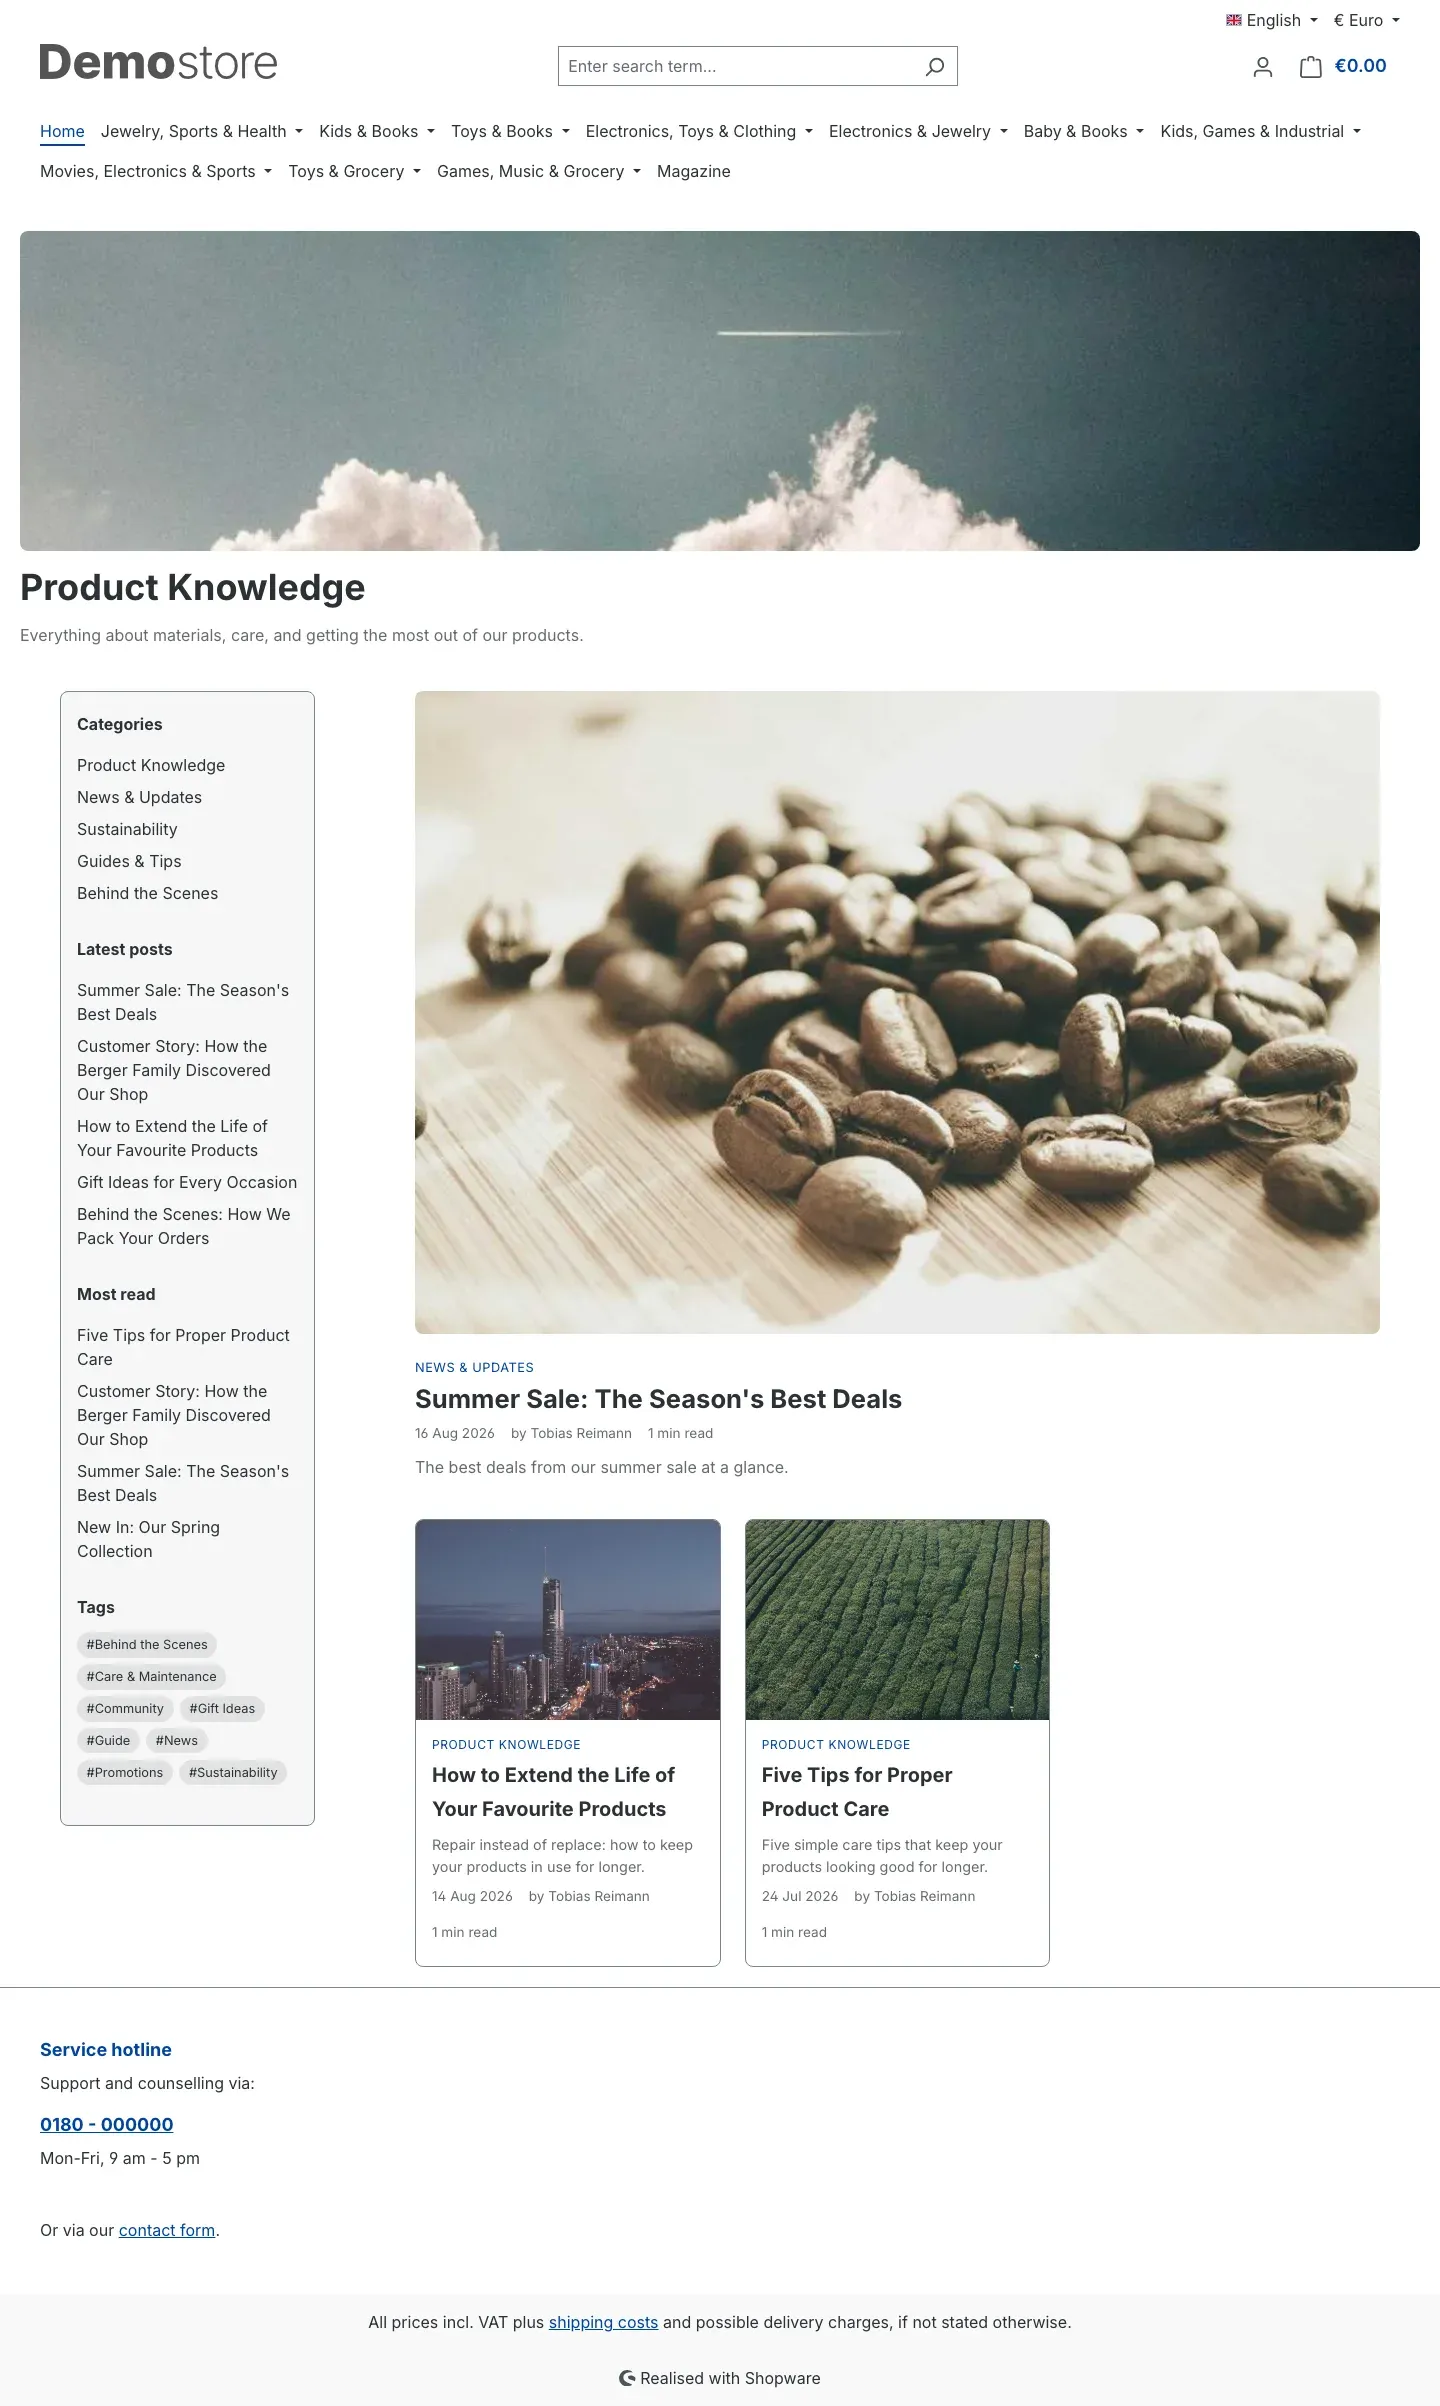 Fig. 16: A category page: category image, name and description, with the posts of that category below.
Whether you entered a layout under Default layout for overview pages makes no difference to that — it only changes the look:
- With a layout (the setting after installation) the page is built from the elements of your layout. The Blog listing takes the posts of the page being opened; its own Number of posts and Category (optional) settings do not apply there, only where you place the element outside the blog pages — on your home page, for instance.
- Without a layout — you leave the field empty — the shop renders the same content in a plain, fixed presentation: header, post list, pagination and the sidebar on the right.
The large teaser at the top does not belong to the category. In the supplied layout, the Blog: Single post element sits above the list and follows its own setting — which is why, in Fig. 16, it shows a post from “News” on the “Product Knowledge” page. To make it follow the page being opened, set Category scope to Current category of the page in its element settings.
Search, feed and sitemap
- Search: With search integration switched on, posts appear on the search results page below the products and — as suggestions — in the drop-down below the search field.
- RSS feed:
/blog/feed.xmloffers the 20 most recent posts as a feed, each with title, address, date and teaser. The feed is not announced automatically in the page head — link it yourself, for example in your shop footer or your newsletter, so readers can find it. - Sitemap: Posts and categories are included in your shop’s sitemap so search engines can find them. Tag and author pages are not part of the sitemap.
Comments
What you get out of it: Readers can ask questions and share experiences below your posts — and you decide what becomes public.
Switching comments on
Two things have to be true before a comment form appears below a post:
- Enable comments globally is switched on in the settings (Comments card, see Settings).
- Allow comments is switched on for the post itself.
That way you can allow comments in principle and still switch them off for individual posts.
Approving comments
As long as Auto-approve comments is off, every new comment comes to you first. How many are waiting is shown under Content → Blog as Pending comments.
Step by step
- Go to Content → Blog → Comments.
- Set the Status filter to Pending — you then see only the comments waiting for you.
- Read Name, Comment, Post and Created at in the row.
- Click the three-dot icon at the right-hand end of the row and choose Approve or Reject.
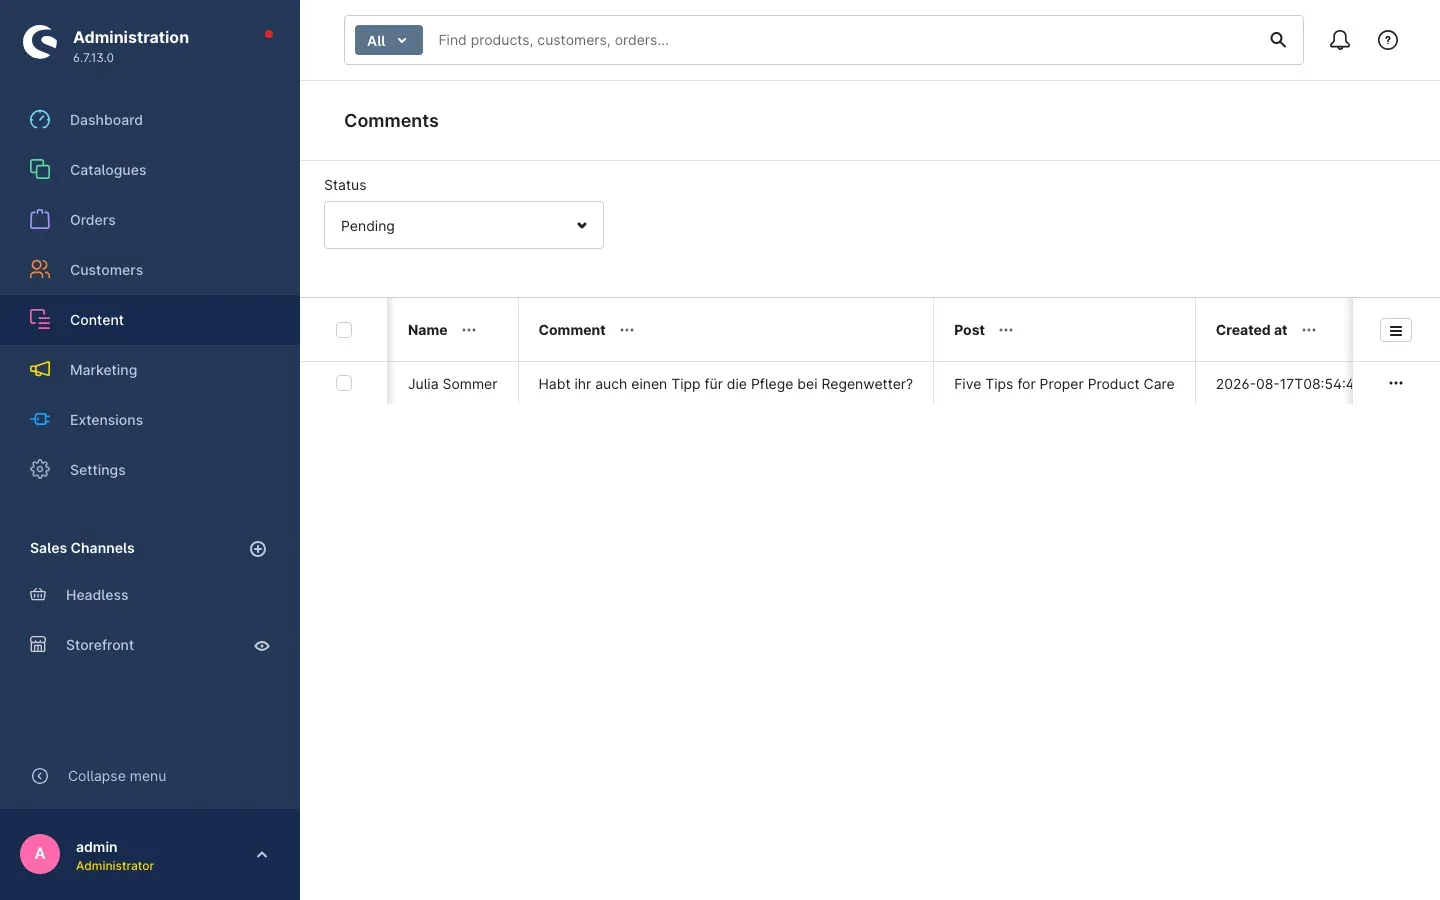 Fig. 17: The comment list, filtered to the “Pending” status.
An approved comment appears in your shop immediately. A rejected one stays in the list but is not published — so you can retrace a decision and reverse it if needed. The Status filter switches between Pending, Approved and Rejected.
Tip: Approving straight from the list is the fastest route and shows you what is still open. If a comment is long, or you want to check the privacy consent, click the row to open it — the detail page shows the full text and the recorded moment of consent, and carries the same Approve and Reject buttons.
Note: No email is sent when a new comment arrives. Check the Pending comments figure under Content → Blog regularly.
What your readers see
Below the post, the approved comments appear as a conversation thread with replies. Underneath sits the Leave a comment form with the fields Name, Email and Comment plus the privacy checkbox. The note below the email field tells your readers explicitly: Never published; stored only as an anonymised hash.
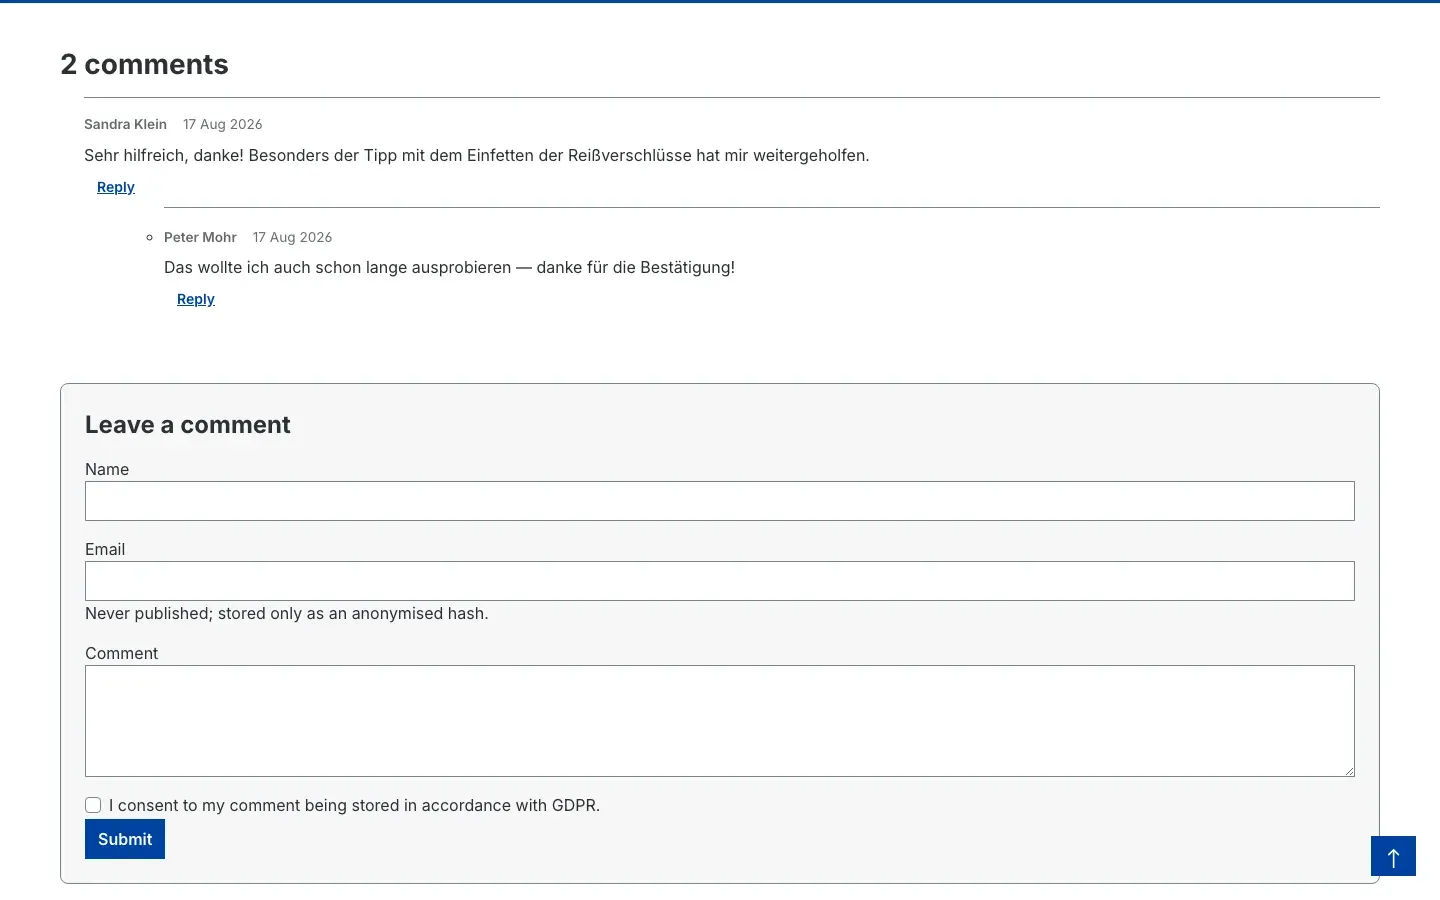 Fig. 18: A comment thread with a reply and the “Leave a comment” form.
Using Reply below a comment, a reader can respond to another one directly — as deeply as you allow under Maximum reply depth.
Bringing content over from WordPress
What you get out of it: You bring your existing blog across — posts, categories, keywords, authors and comments — without retyping anything.
The import is a one-off step at the start. Set the settings first, so the imported posts land at the addresses you want to keep.
Step by step
- Create an export file in WordPress: Tools → Export → All content. You receive a WXR file.
- In Shopware, go to Content → Blog → WordPress import.
- Drop the file onto the Drag a file here to upload area or pick it via Choose file.
- Click Start import.
- The Progress card tracks the run: Status, Imported and Skipped. Cancel import stops it.
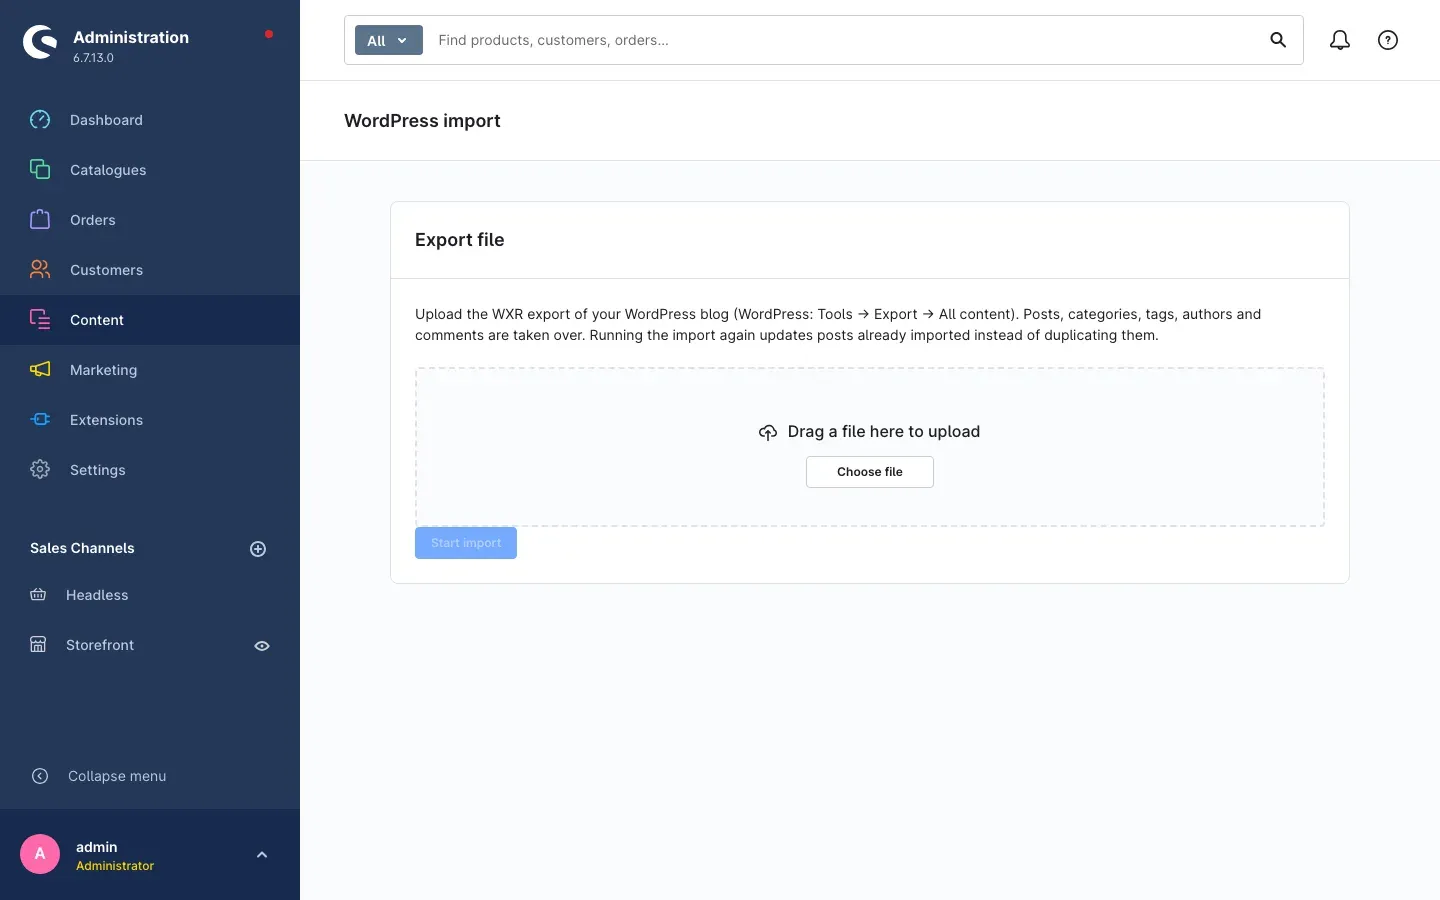 Fig. 19: The import page with hint text, upload area and the “Start import” button.
The import runs in the background in packages, so even a large blog does not block your Administration. If it is interrupted, the next run picks up at the last completed package.
What is taken over — and what is not
Taken over are posts (title, address, content, teaser, publication date and publication status), categories, keywords, authors and comments including their approval status. Pages and other WordPress content types are left out.
Important: Images are not moved across. Cover images stay empty, and images inside the post text still point at your old WordPress server. Upload the images to the Shopware media library and place them again in your most important posts — and do not switch off your old server until that is done.
Important: A second import of the same file recognises posts already taken over by their address and updates them instead of duplicating them. Comments, however, are created again. So only import a second time if you review the comments afterwards.
If the uploaded file is not a WordPress export, the import rejects it and says so, instead of appearing to succeed with zero posts.
Tip: Review the imported posts afterwards. Categories and keywords are often named differently in WordPress than you want them in your shop — renaming them in the category and tag lists takes a minute.
Who may do what: user permissions
What you get out of it: Your editorial team writes posts and moderates comments without gaining access to orders or customer data.
The plugin brings its own Blog permission group with four levels: read, edit, create and delete. They build on one another — whoever may create may also read and edit.
Step by step
- Go to Settings → System → Users & permissions.
- Open an existing role or create a new one.
- In the Permissions area, open the Content group and the Blog entry inside it.
- Tick the boxes you want and Save.
- Assign the role to the users concerned.
Important: Blog permissions alone are not enough to work in the Administration. Combine them with the basic permissions your editorial team needs anyway.
Data protection
The plugin is built so that as little personal data as possible is collected:
- A commenter’s email address is never stored in plain text, only as a value that cannot be converted back. The note about this sits directly below the field in the comment form.
- A commenter’s name is stored in plain text and is publicly visible — that is the point of asking for it.
- The consent to storage is recorded together with its timestamp when you have switched on Require GDPR consent.
- The IP address is not stored. It only enters the short-lived cache that watches the minimum interval between two comments, in an unrecognisable form, and expires with it.
- Post view counting is aggregated per post, sales channel and day — with no personal reference and no cookie. This is what feeds the “Most read” listing.
- The share buttons below a post use only the browser’s own facilities and the clipboard. No social network scripts or tracking pixels are loaded.
The uploaded WordPress export file is not publicly accessible and is deleted once the import finishes, fails or is cancelled — otherwise it would keep the email addresses of every imported commenter in plain text. Uninstalling without keeping the data clears these files too.
Troubleshooting
The blog is not reachable at /blog
What causes it: Either the plugin is not enabled for this sales channel, or another page claims the same address.
How to fix it:
- Check under Extensions → My extensions that the plugin is active.
- Open the configuration, pick the sales channel concerned at the top and check Enable plugin for this sales channel.
- Open Content → Blog. If the notice The blog address is taken appears there, a shop category claims the same address. Either rename that category or enter a different Blog address.
- Then clear the cache: Settings → System → Caches & indexes → Clear cache.
A post does not appear in the shop
What causes it: Usually one of the visibility conditions is not met.
How to fix it: Work through the six points in Visibility, languages and sales channels. The most common ones: Active is off, Published at lies in the future, or the post is restricted to a different sales channel.
The comment form is not visible
What causes it: One of the two switches is missing.
How to fix it: Switch on Enable comments globally in the configuration and check Allow comments on the post. If you use a post layout of your own, it must also contain the Blog: Comments element with Show comment form switched on.
Submitted comments do not appear
What causes it: They are waiting for your approval.
How to fix it: Go to Content → Blog → Comments, set Status to Pending and approve the comments from the row menu.
A change is not visible in the shop
What causes it: The page is still in the cache.
How to fix it: Wait for the configured Cache lifetime (seconds) or clear the cache under Settings → System → Caches & indexes → Clear cache. While editing heavily you can set the cache lifetime to 0 temporarily.
My home page shows the post list I expected on the category page
What causes it: When you place the Blog listing outside the blog pages — on your home page, for example — its own settings apply there. Without a Category (optional) it shows the latest posts from every category.
How to fix it: Open the element settings and enter the category you want under Category (optional). On the blog pages themselves this is not necessary: there the element always follows the category, keyword or author being visited.
The RSS feed returns an error
What causes it: The feed is switched off for this sales channel.
How to fix it: Switch on Enable RSS feed in the configuration.
The WordPress import aborts or takes nothing over
What causes it: The uploaded file is not a WordPress export in WXR format, or it is too large.
How to fix it: In WordPress, export explicitly via Tools → Export → All content and upload the resulting file. A saved HTML page or an export from another system is rejected. Split very large exports by time period in WordPress.
Frequently asked questions
Q: Can I write a post now and have it published automatically later?
A: Yes. Set Published at to the moment you want in the future and switch on Active. The post then appears by itself, a few minutes after the time you set.
Q: How do I make a campaign post disappear again?
A: Enter the end date under Visible until. After that the post is no longer reachable but remains available to you in the Administration.
Q: Can I switch comments off for individual posts only?
A: Yes. Switch off Allow comments on the post concerned. All other posts are unaffected.
Q: Am I notified when a new comment arrives?
A: No, no email is sent. The number of waiting comments is shown under Content → Blog as Pending comments.
Q: Do I have to design my blog pages myself?
A: No. The plugin ships two ready-made layouts and enters them as the defaults during installation. You can design, but you do not have to.
Q: Are my images taken over from WordPress?
A: No. Text, categories, keywords, authors and comments come across; images do not. Upload them to the Shopware media library and place them in the posts again.
Q: What happens to the posts if I delete a category?
A: The posts remain and simply have no category afterwards. In your shop only the category label on the post disappears.
Q: Can I run the blog in one sales channel and not in another?
A: Yes. Pick the channel at the top of the configuration and switch off Enable plugin for this sales channel there. The content is kept.
Q: How do I show blog posts on my home page?
A: Open the layout of your home page under Content → Shopping Experiences and insert, for example, Blog listing or Blog: Post slider from the Blog block category.
Q: Why does “Most read” show something other than I expect?
A: It evaluates the views of the last 30 days. As long as there are no figures yet — right after installation, for instance — the element shows the latest posts instead.
Q: Does the plugin work with my theme?
A: Yes. The blog pages use your theme’s building blocks, and the plugin’s own styles are scoped so they do not override your theme.
Q: Do I keep my posts if I uninstall the plugin?
A: Only if you choose the option to keep the data when uninstalling. Without it, posts, categories, tags, authors, comments, the plugin settings and the two supplied layouts are deleted permanently.
For administrators / technical details
This section is aimed at technical administrators. You do not need it for normal use.
System requirements
- Shopware: 6.7
- PHP: 8.2 or newer
- The Shopware Storefront and Administration must be installed.
Installation via the command line
composer require swp/blog-six
php bin/console plugin:refresh
php bin/console plugin:install SwpBlogSix --activate
php bin/console cache:clear
Storefront addresses
The base address is configurable; the default blog is shown below. If the configured address differs, /blog redirects there permanently (301).
| Address | Content |
|---|---|
/blog | Overview of all visible posts |
/blog/{slug} | A single post |
/blog/category/{slug} | Category page |
/blog/tag/{slug} | Tag page |
/blog/author/{slug} | Author profile |
/blog/feed.xml | RSS feed with the 20 most recent posts (can be switched off) |
All four overview routes paginate through the p parameter. A page number beyond the last page is answered with 404 so search engines do not index empty pages; page 1 of an empty blog stays 200.
Store API
For headless setups the plugin provides its own Store API routes for the post list, post detail, categories, tags, comment list and comment submission. They live under /store-api/swp/blog-six/.
Background tasks
The plugin ships two scheduled tasks. One checks several times an hour whether a publication window has opened or closed and refreshes the affected pages. The second aggregates the view counts per post once an hour. Both run through the Shopware scheduler and require a running worker.
Caching
Blog pages are stored with cache tags of their own per sales channel. Changes to posts, translations, categories, tags, assignments, galleries, product links, customer group visibility and comments refresh exactly the affected pages; a change to the plugin configuration refreshes the overview and the sidebar. The lifetime is controlled per channel via Cache lifetime (seconds).
Uninstalling and keeping data
When uninstalling, Shopware offers to keep the user data:
- Keeping the data: tables, content, layouts and settings are left untouched. A later reinstallation finds everything in place.
- Without keeping the data: the plugin removes all of its own tables, the plugin settings, the SEO URL templates it created, the two supplied layouts and the uploaded WordPress export files.
Permissions
The permission group is called Blog and sits under Content in the role editor. It offers the four usual levels (read, edit, create, delete), which build on one another.
WordPress import
A WXR file from Tools → Export → All content is expected; the upload limit is 512 MB. Processing runs in packages of 50 posts through the message queue, so even large blogs are taken over without timing out — a running worker is a prerequisite. Posts already imported are recognised by their address and updated rather than duplicated; comments, however, are created again on a repeat run. The uploaded file is stored in the non-public file area and is deleted in every final state of the job.
This manual was written for Blog: Posts, Categories & Comments version 6.7.0.
More manuals
Admin Password Reminder
Admin Password Reminder: your backend users renew their passwords on time, prompted after login and by a daily email. Premium locks expired accounts until the password is changed.
Open manual Shopware 6Age Check
Tobacco, spirits, knives: visitors who do not confirm their age never see the restricted items at all. You tick a box per product, the plugin hides it everywhere.
Open manual Shopware 6AI Media Labelling
AI labelling for images and videos: flag a media item once in the media manager and the badge with your notice appears wherever it shows up in your shop. No template work needed.
Open manualNeed a team that keeps your shop running?
We have been maintaining Shopware shops for more than 20 years, including updates, hotfixes and the plugins you are configuring right now.