Area Calculation
Area calculation on the product page: your customer knows the square metres, not the number of packs. The plugin works it out, adds the offcut and fills the quantity field.
On this page
- Introduction
- What this plugin does for you
- Who is this plugin for?
- Installation
- Preparing your products
- Step by step
- The settings at a glance
- Choose the sales channel first, then configure
- Enable plugin for this sales channel
- Where the calculator should appear
- Adding the offcut
- Activate offcut
- Offcut
- Offcut calculation type
- Select the type of offcut input for the customer
- How the plugin calculates
- Choosing the price display
- Price logic
- Activate reverse pricing logic
- Entering width and length
- Settings per product or product unit
- On an individual product
- For a whole product unit
- What your customer sees
- Troubleshooting
- No input fields appear on the product
- The fields are there, but nothing is calculated
- The offcut is not added
- The prices are wrong
- The “Area Calc” group is missing on the product
- After an update the plugin is off in one channel
- FAQ
- For administrators
- System requirements
- Installing from the command line
- What the plugin adds to and changes in your shop
- Languages
Introduction
Laminate, tiles, turf, foil, cable: these goods are planned by area or by length, but sold in packs, rolls or containers. Your customer knows they need 24 square metres — they do not know how many packs that is. Anyone doing the maths in their head gets it wrong: they order too little and have to reorder, or they order too much and send it back.
Area Calculation does that arithmetic for them. On the product page they enter what they need — either directly in square metres or by the width and length of the room. The plugin works out the number of packs, adds the offcut and writes the quantity straight into the quantity field. Below it, the page states what will actually be delivered.
What this plugin does for you
- Your customers order in their own unit and get the matching number of packs suggested to them.
- The offcut is included from the start — fixed, deselectable or defined by the customer, depending on your setting.
- You get fewer enquiries, fewer follow-up orders and fewer returns caused by miscalculations.
- You can keep your prices either as pack prices or as square-metre prices — the shop displays both correctly.
- You control every function separately: for all products, for individual products, for a single product unit — and per sales channel.
Who is this plugin for?
For shops that sell goods by area, length or volume but ship them in fixed pack sizes: floor coverings, tiles, insulation, garden and building materials, textiles, foils and cables.
Installation
After your purchase the plugin is available directly in your administration — there is nothing to download.
- Log in to your Shopware administration.
- Open Extensions → My extensions.
- Use the search field at the top to look for Area Calculation.
- In the Area Calculation row, click Install.
- Then switch on the toggle to the left of the plugin name. It turns blue — the plugin is active.
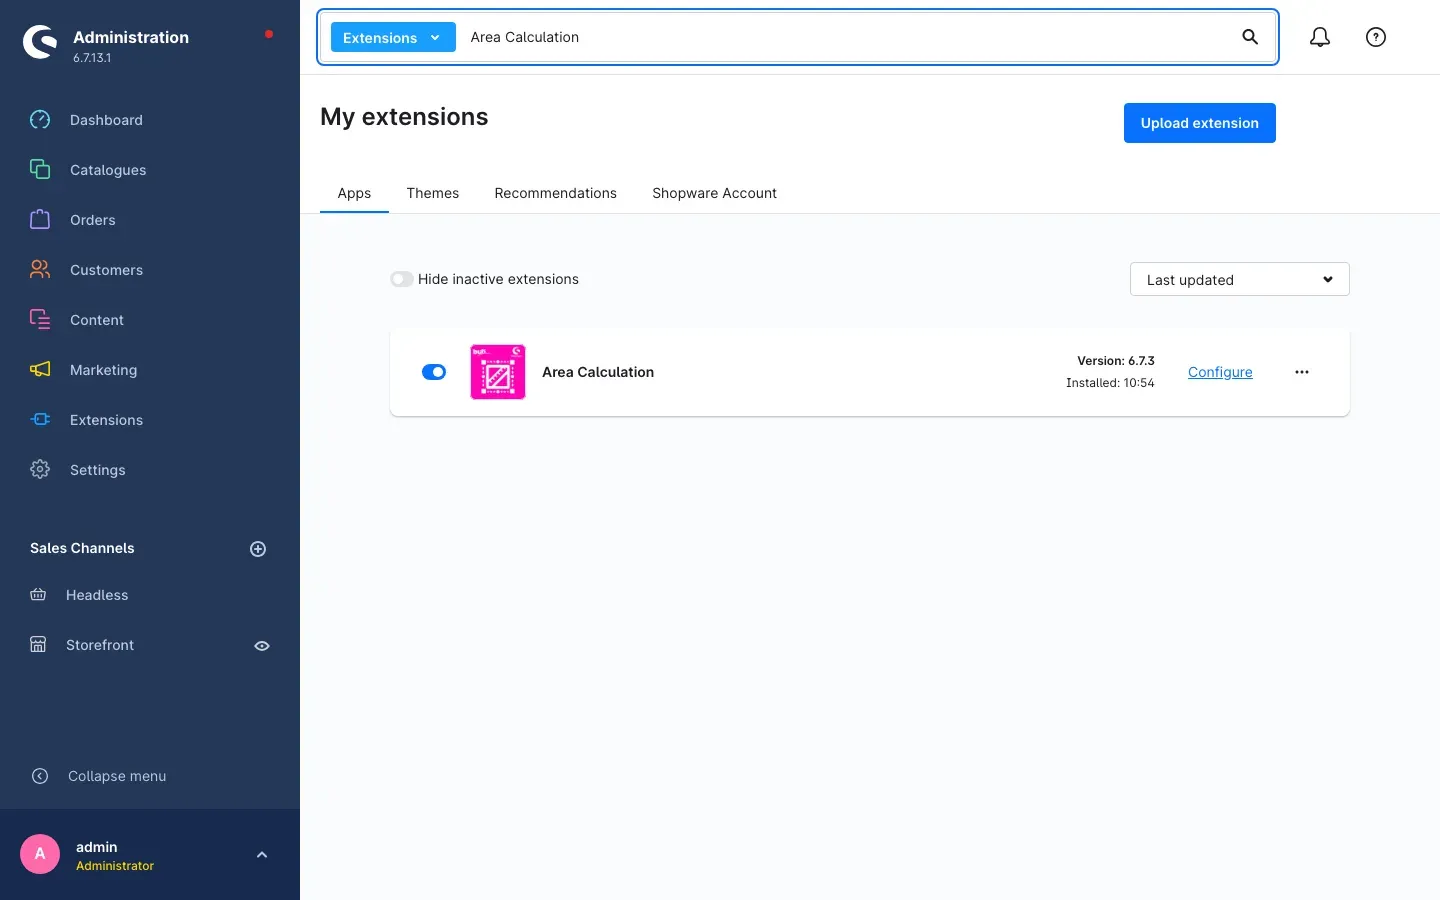 Fig. 1: The extension is installed and activated. On the right you see the version and the
installation time, next to it the Configure link.
Fig. 1: The extension is installed and activated. On the right you see the version and the
installation time, next to it the Configure link.
The Configure link in the same row opens the plugin settings. You will need it repeatedly — it is the fastest way to the configuration page.
Important: Nothing is visible yet after installation. The calculator only appears on products that have a product unit and a selling unit. The next chapter explains how to enter those.
Preparing your products
This is the step most often overlooked. The plugin works with two values from the product: which unit the customer enters and how much of it is in one pack. If either is missing, the product page stays unchanged.
Step by step
- Open Catalogues → Products and select your product.
- Switch to the Specifications tab.
- In the Selling and packaging card, enter:
- Selling unit — how much one pack contains, for example
2.5for a pack of laminate covering 2.5 square metres. - Product unit — the unit your customer thinks in, for example Square meter.
- Basic unit — the reference used for the unit price, usually
1.
- Selling unit — how much one pack contains, for example
- Below that, fill in Packaging unit and Packaging unit plural, for example “pack” and “packs”. These words appear next to the price in the shop.
- Click Save.
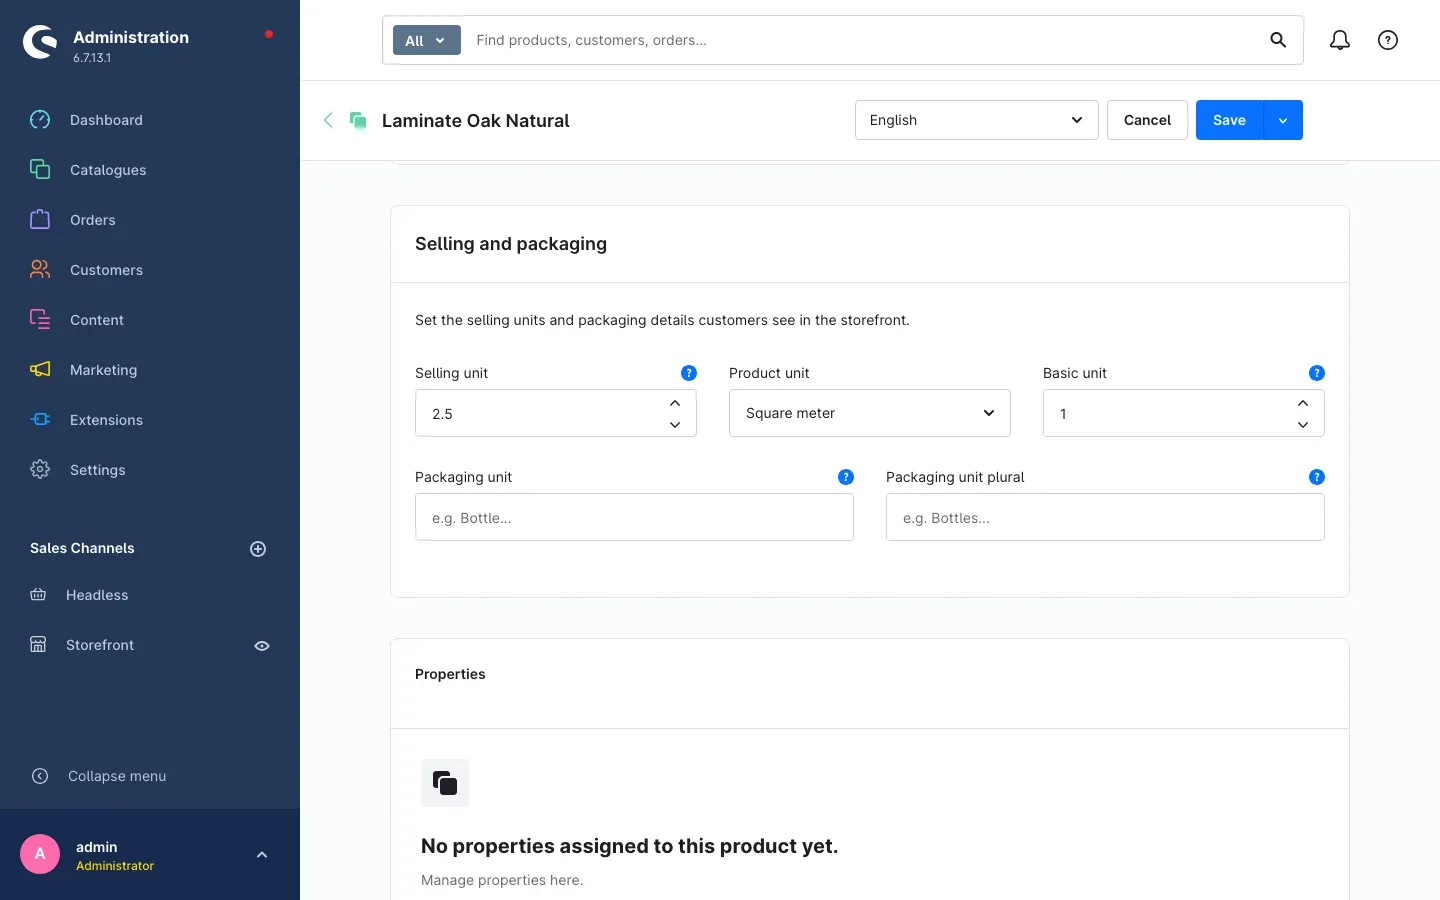 Fig. 2: The demo product is sold by square metre, one pack contains 2.5 m².
Why this matters: everything else follows from these three values. The customer enters “24”, the plugin divides by 2.5 and rounds up to whole packs. The product unit also appears literally in the shop, in the text above the input field: “Required Square meter:”.
Tip: You maintain the list of product units under Settings → General → Product units. Create whatever you need there — square metres, running metres, kilograms.
The settings at a glance
You reach the settings via Extensions → My extensions and the Configure link in the Area Calculation row.
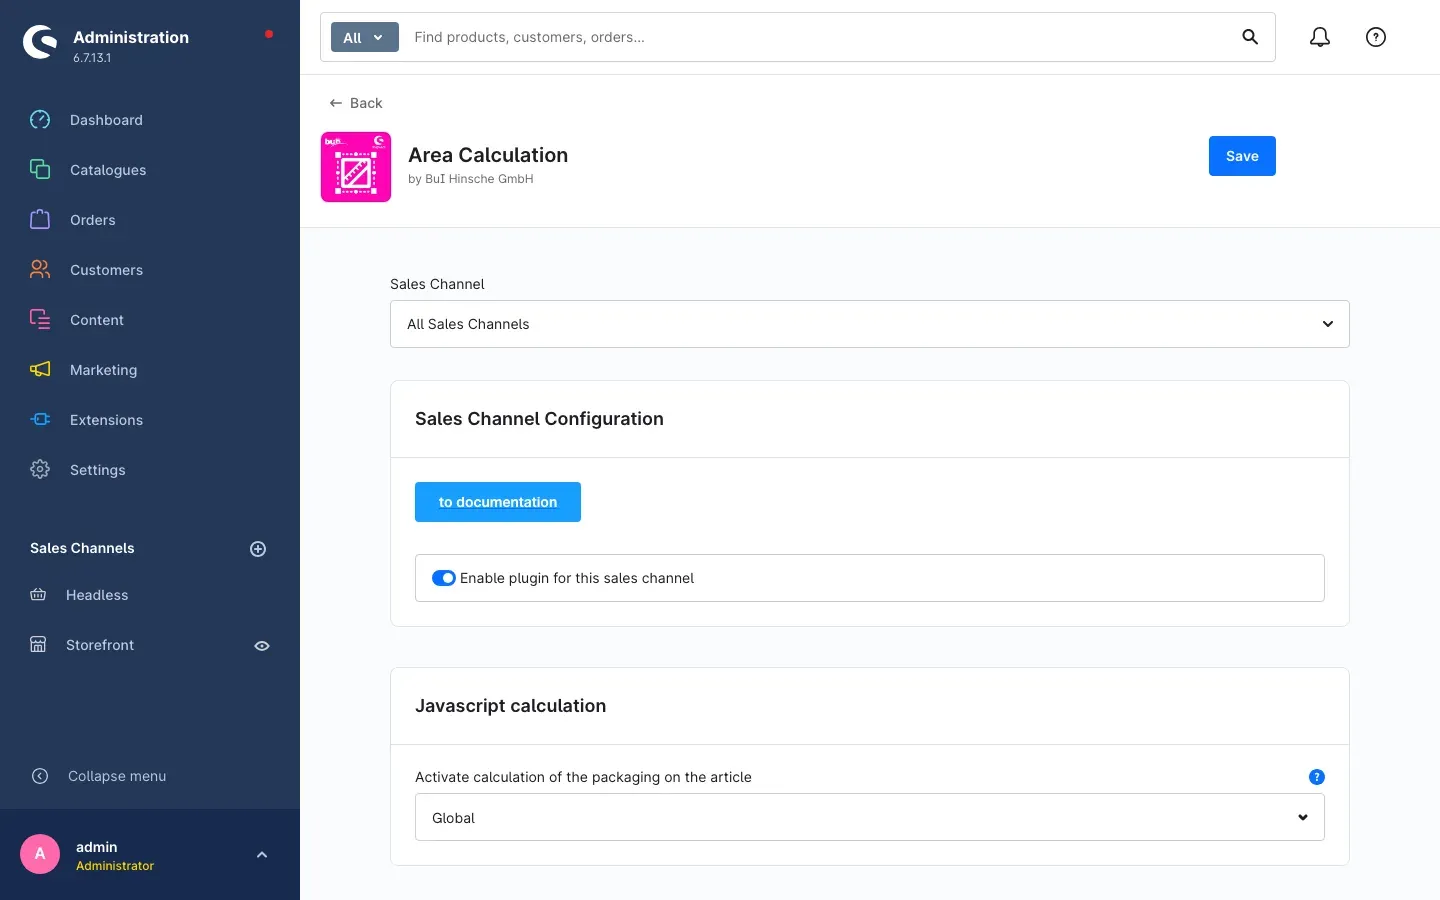 Fig. 3: The sales channel selector, the Sales Channel Configuration card and the
Javascript calculation card.
Fig. 3: The sales channel selector, the Sales Channel Configuration card and the
Javascript calculation card.
Choose the sales channel first, then configure
The Sales Channel selector sits at the very top. Everything you set below it applies to exactly the channel selected there. With All Sales Channels selected, your setting applies everywhere — except in the channels for which you later store something different.
Why this matters: you can run the area calculation in your consumer shop and keep it switched off in your trade channel, without uninstalling the plugin.
Enable plugin for this sales channel
The Enable plugin for this sales channel switch in the Sales Channel Configuration card is the master switch. When it is off, the selected channel behaves as if the plugin were not installed at all: no calculator on the product page and no changed price display. It is switched on by default.
The to documentation button above it opens this manual in your browser — always in the language you are using the administration in.
Where the calculator should appear
In the Javascript calculation card, the setting Activate calculation of the packaging on the article defines on which products customers can enter their requirement. It is set to Global by default.
- Global — on every product that has a product unit and a selling unit. This is the usual choice.
- Setting per article — only on the products you enable individually.
- Setting per unit — on all products with a given product unit, for example everything sold by square metre.
- Inactive — the calculator does not appear anywhere.
How to enable individual products and product units is described in Settings per product or product unit.
Do not forget to click Save at the top right.
Adding the offcut
What this does for you: material is lost during installation — cut rows, edges, a reserve for later repairs. Anyone ordering exactly their measured requirement orders too little. The plugin adds the offcut before it works out the number of packs, so your customers receive an amount that will actually see them through.
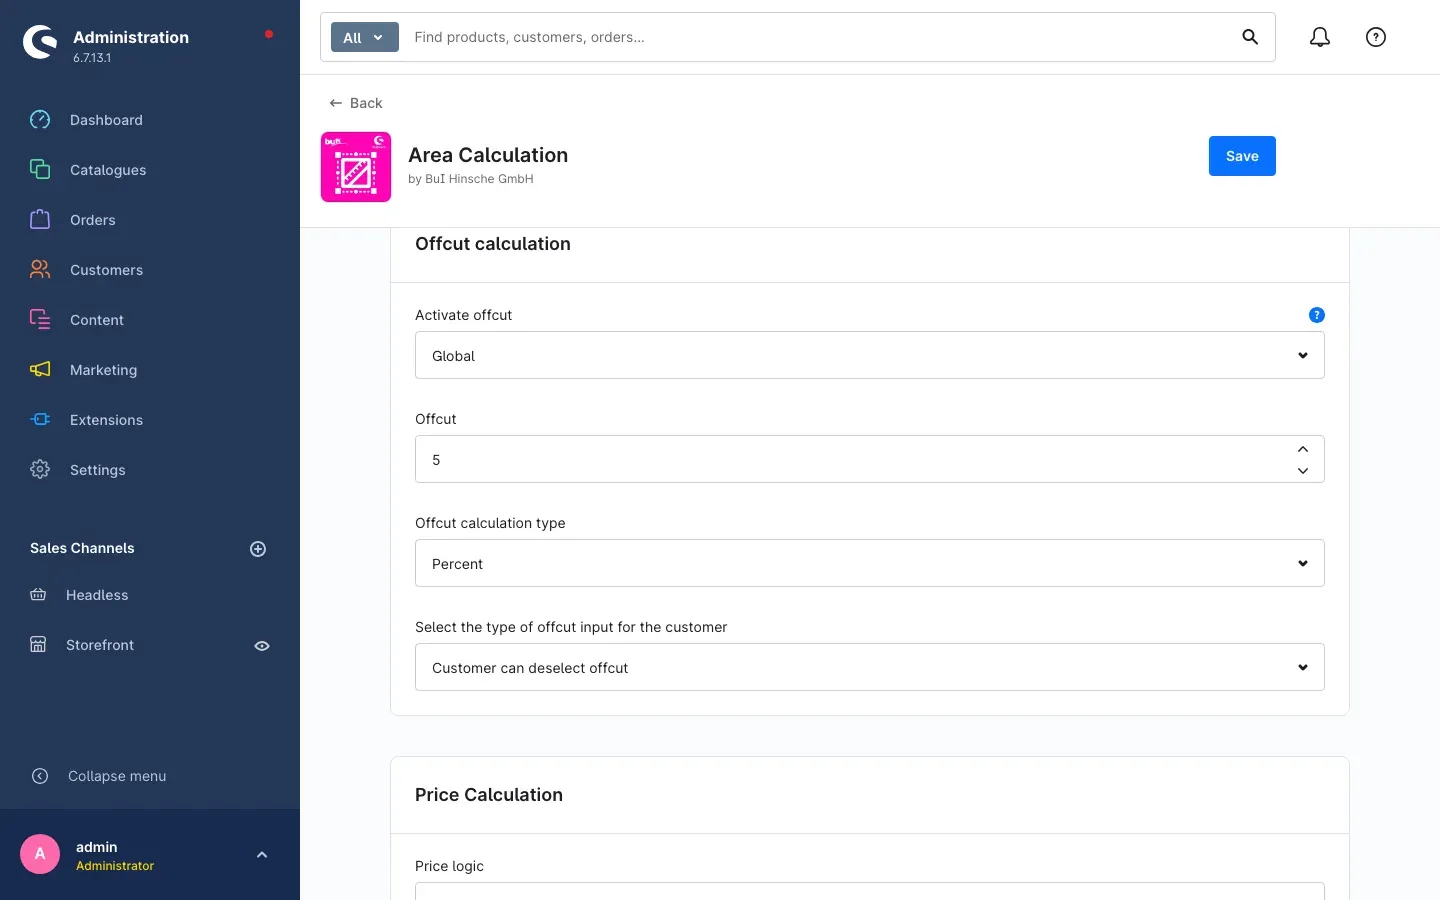 Fig. 4: The complete offcut configuration.
Activate offcut
Activate offcut decides which products get an offcut added at all: Global for all, Setting per article only for individually enabled products, Setting per unit for all products with a given product unit. It is set to Global by default.
Offcut
In the Offcut field you enter the value that is added — 5 in the example. The field is empty
by default, and as long as it is empty or set to 0, the plugin calculates without an offcut.
Offcut calculation type
Offcut calculation type defines how that value is read. It is set to Percent by default.
- Percent — the value is a percentage.
5means 5 % more than the entered requirement. - Absolute — the value is added in the product unit of the product.
5then means 5 square metres extra, regardless of the size of the area.
Why this matters: a percentage suits areas, because cutting waste grows with the area. An absolute value suits cases where the same reserve always makes sense — an extra roll, or a fixed allowance for trimming.
Select the type of offcut input for the customer
This setting decides how much of the offcut your customer sees and may change. It is set to no change by customers by default.
- no change by customers — the offcut is included and the customer cannot deselect it. A line above the quantity field states the offcut that was added.
- Customer can deselect offcut — the shop shows a checkbox, in the example incl. 5 % Offcut. It is ticked from the start. If the customer clears it, the page recalculates immediately.
- Customer determines value for offcuts themselves — the customer gets their own input field Offcut in % (with an absolute offcut it shows the short code of the product unit). Your value is already filled in as a suggestion and can be overwritten.
How the plugin calculates
An example with the values from the figures: requirement 24 m², offcut 5 % percent-based, pack of 2.5 m².
- 24 m² plus 5 % offcut = 25.2 m²
- 25.2 m² divided by 2.5 m² per pack = 10.08 packs
- Rounded up to whole packs = 11 packs
- That delivers 11 × 2.5 m² = 27.5 m²
The result is always rounded up, because nobody can ship half a pack.
Choosing the price display
What this does for you: some shops maintain the price per pack, others receive a square-metre price from their ERP system. Both work — you do not have to convert your prices.
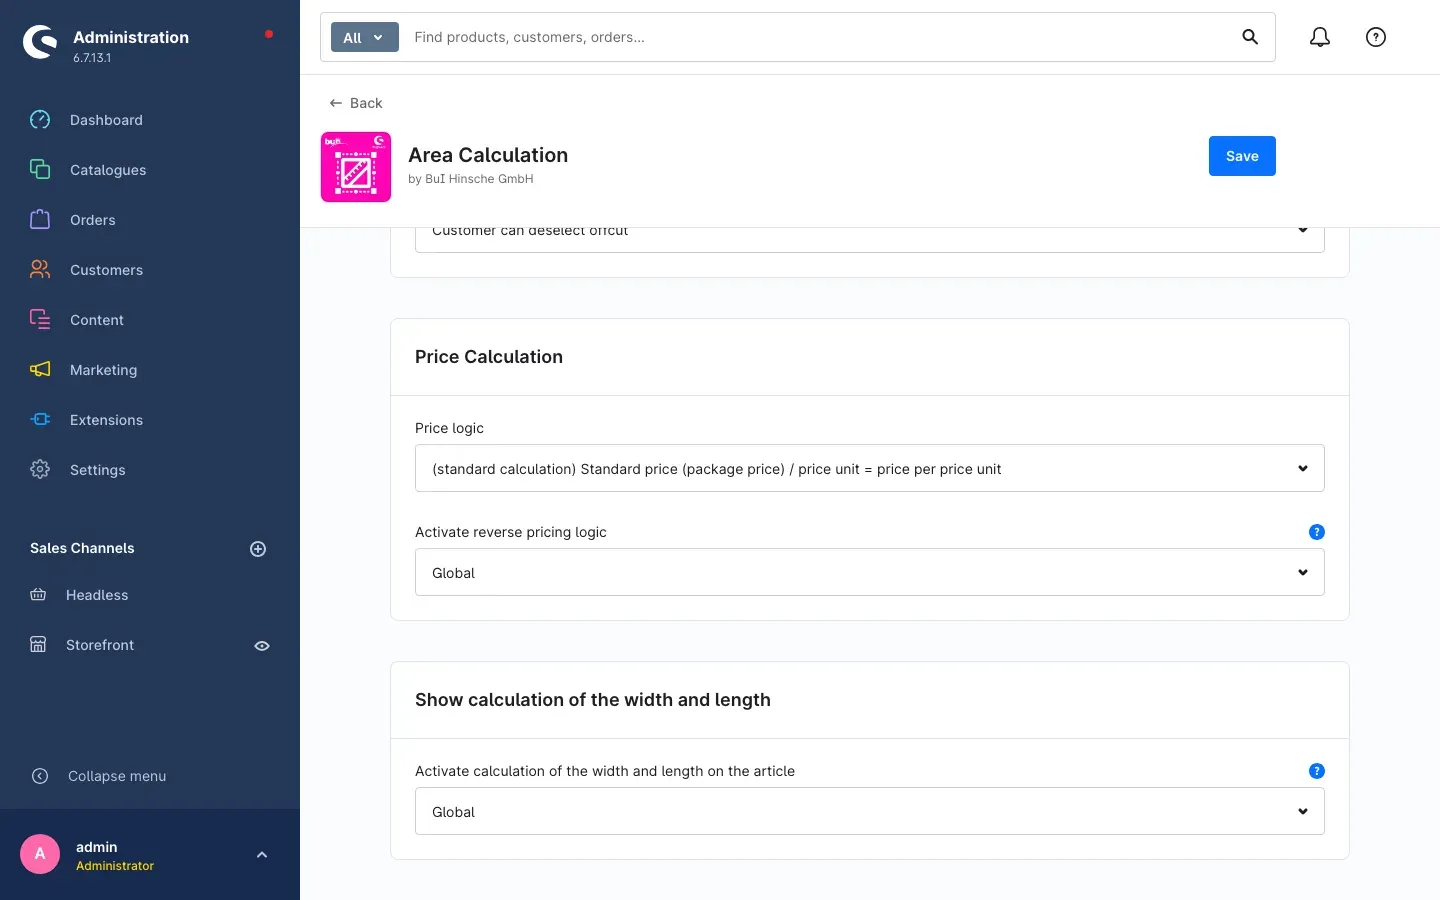 Fig. 5: Price logic, reverse pricing logic and the switch that unlocks the width and length
fields.
Fig. 5: Price logic, reverse pricing logic and the switch that unlocks the width and length
fields.
Price logic
In the Price Calculation card, Price logic defines what the price you maintain on the product refers to. The first option is the default.
- (standard calculation) Standard price (package price) / price unit = price per price unit — the price on the product is the price of a whole pack. The shop derives the price per square metre from it for the unit price display. This is how Shopware behaves without this plugin.
- Standard price * price unit = package price — the price on the product is the square-metre price. The shop multiplies it by the pack contents and displays the pack price. The plugin calls this the reverse pricing logic.
With the reverse pricing logic the two price lines on the product page swap roles: the price per square metre is shown large, and the pack price appears next to it in brackets. Strike-through and previous prices are converted to the same basis, so that a price reduction never reads as an increase.
Activate reverse pricing logic
Activate reverse pricing logic determines which products your choice applies to. It is set to Global by default.
- Global — your choice under Price logic applies to all products.
- Setting per article — you define an exception per product.
- Setting per unit — you define the exception per product unit.
- Inactive — nothing is ever converted, all products follow the standard calculation.
The switch on the product or product unit always acts as an exception to your base setting: if Price logic is on the standard calculation, switching it on makes that one product use the reverse logic. If Price logic is on the reverse option, switching it on brings that product back to the standard calculation.
Important: check a product in the shop after changing this. The two options lead to noticeably different prices, and which one is correct depends solely on how your prices are maintained.
Entering width and length
What this does for you: not every customer works out square metres themselves. For rooms it is easier to enter width and length. That lowers the barrier and the number of wrong entries.
In the Show calculation of the width and length card, the setting Activate calculation of the width and length on the article unlocks it — again Global, Setting per article, Setting per unit or Inactive. It is set to Inactive by default, so the fields only appear once you switch them on.
When they are active, two extra fields sit above the requirement field: Width: and Length:. As soon as the customer has filled in both, the shop writes the result into the requirement field and carries on as usual. The customer can also overwrite that value by hand.
Settings per product or product unit
Wherever you chose Setting per article or Setting per unit in the configuration, you still need to enable the function in the corresponding place. The plugin creates its own group of fields for this when it is activated.
On an individual product
- Open Catalogues → Products and select the product.
- Switch to the Specifications tab and scroll down to the Custom fields card.
- There you find the Area Calc group with these switches and fields:
- Deactivated — switches the area calculation off completely for this product, even if everything else is set to Global. The calculator disappears and the price is not converted.
- Activate calculation of the packaging on the article — enables the calculator for this product.
- Activate offcut — enables the offcut for this product.
- Type of offcut input for the customer — defines for this product whether the customer cannot change the offcut, may deselect it or may set it themselves.
- Reverse price logic — the exception described in Choosing the price display.
- Show calculation of the width and length — enables the two extra fields for this product.
- Demand per unit of measurement — optional. Enter how many selling units are needed for one unit of the product unit, for example 6 tiles per square metre. The plugin then calculates with that value instead of the selling unit. It cannot be combined with the reverse pricing logic.
- Click Save.
For a whole product unit
- Open Settings → General → Product units.
- Select the unit, for example Square meter.
- Set the same switches of the Area Calc group there.
- Click Save.
The setting then applies to every product using that product unit — you do not have to touch each product individually.
Tip: the offcut value always comes from the Offcut field in the plugin configuration. On the product and on the product unit you only decide whether the offcut applies and how much your customer may change about it.
What your customer sees
On the product page the input fields sit directly above the quantity field and the Add to shopping cart button.
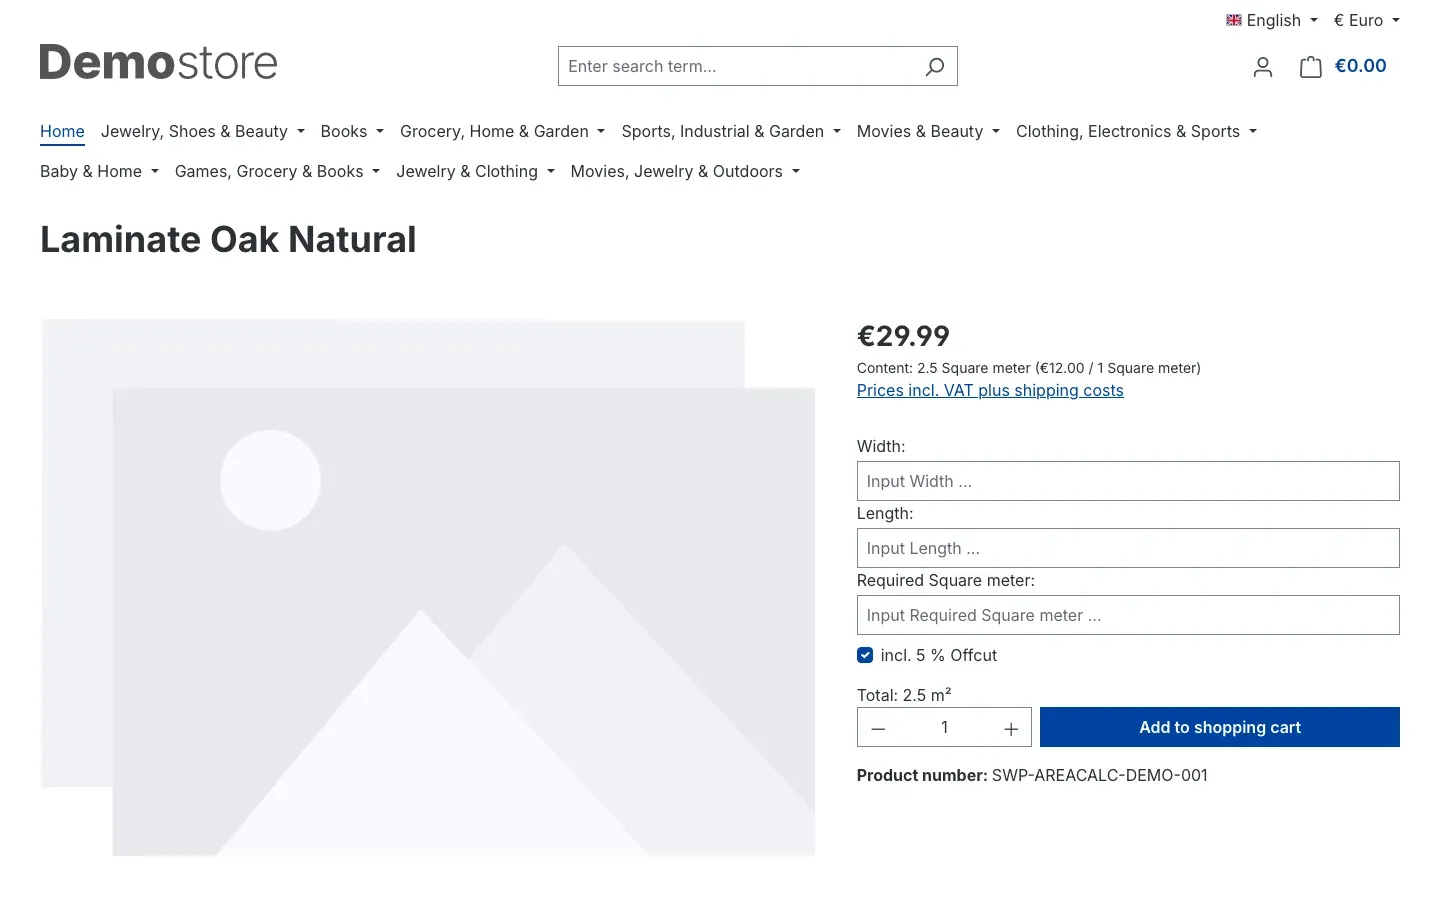 Fig. 6: The initial state. The fields show placeholder texts such as “Input Width …”, and the
incl. 5 % Offcut checkbox is already ticked.
Fig. 6: The initial state. The fields show placeholder texts such as “Input Width …”, and the
incl. 5 % Offcut checkbox is already ticked.
The customer enters width and length — 4 and 6 metres here. While they are still typing, the area appears in the Required Square meter: field, the Total: line below it updates, and the quantity field jumps to the matching number of packs.
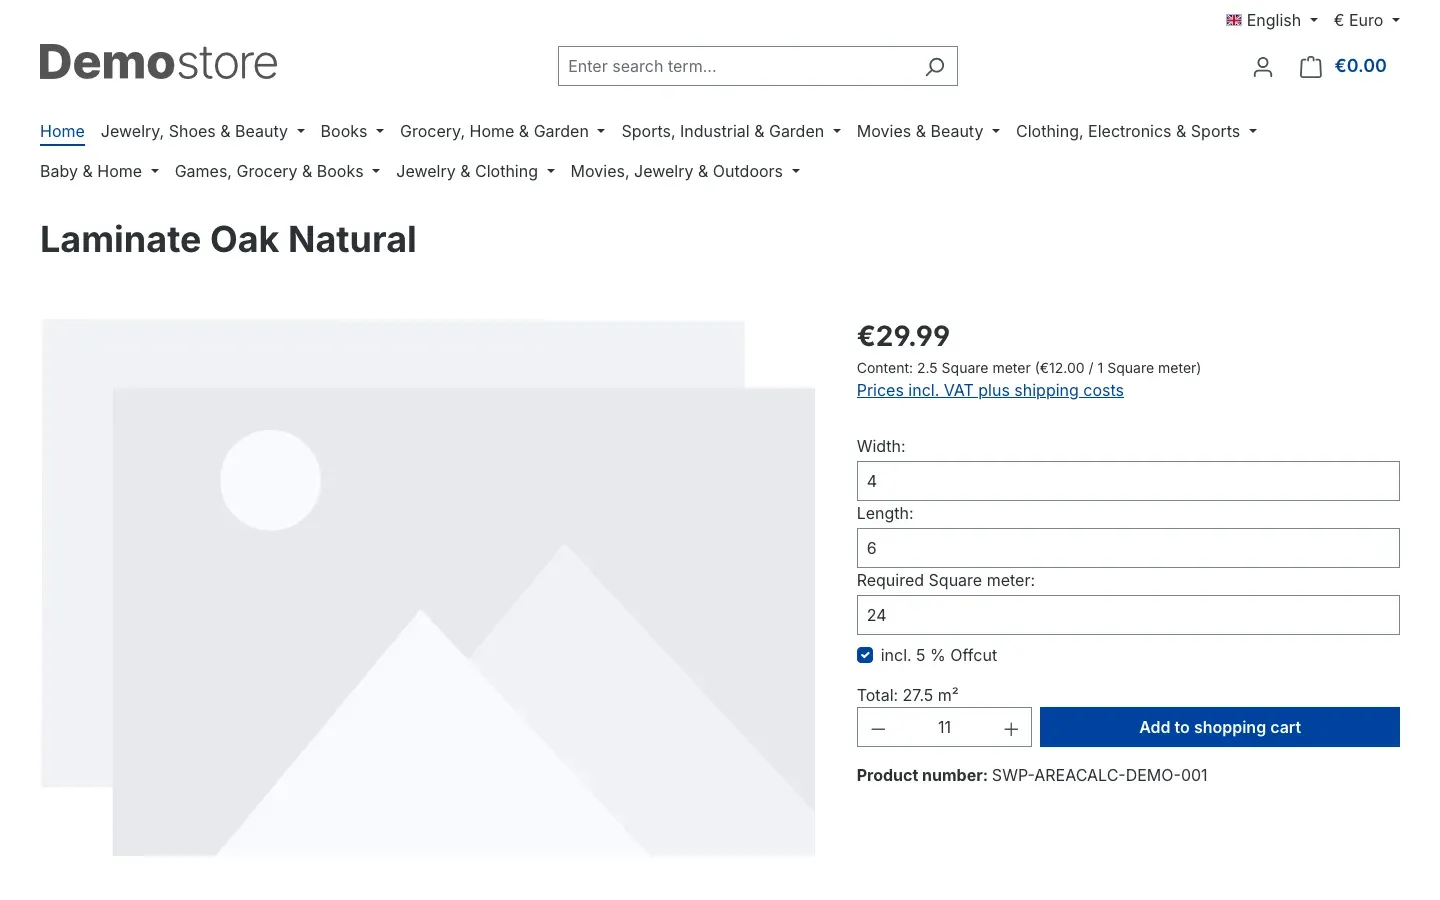 Fig. 7: 4 m × 6 m becomes 24 m². With a 5 % offcut this results in 11 packs, adding up to
Total: 27.5 m².
Fig. 7: 4 m × 6 m becomes 24 m². With a 5 % offcut this results in 11 packs, adding up to
Total: 27.5 m².
One point worth explaining to your customers: Total is the amount that will actually be delivered — the rounded-up number of packs times the pack contents, not the requirement they entered. If the customer clears the incl. 5 % Offcut checkbox, the page recalculates immediately.
The quantity field stays editable at all times. If the customer raises or lowers the number of packs by hand, the Total: line follows. When they add the product to the cart, exactly the calculated quantity is carried over.
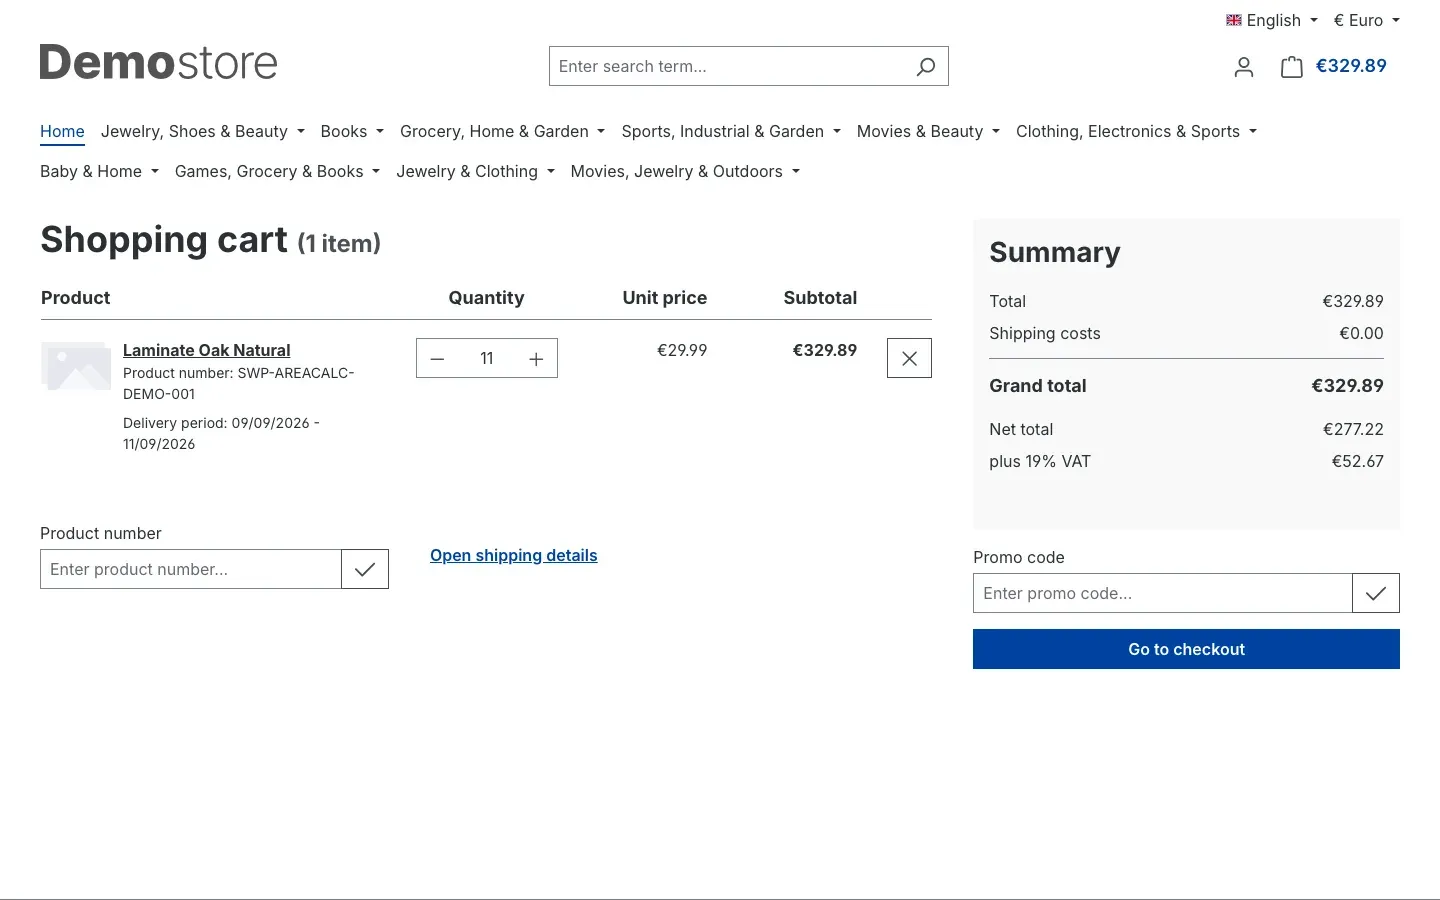 Fig. 8: The 11 packs appear unchanged in the Quantity column.
Numbers follow the language of the shop: an English storefront shows “27.5 m²”, a German one “27,5 m²”. You do not have to configure anything for that. Both separators are also accepted on input — comma and full stop.
Troubleshooting
No input fields appear on the product
Why it happens: usually one of the two values from Preparing your products is missing on the product, or the calculator is not enabled for this channel.
How to fix it:
- On the product’s Specifications tab, check that Product unit is filled in and Selling unit is greater than 0.
- In the plugin configuration, check that the correct Sales Channel is selected at the top and that Enable plugin for this sales channel is switched on.
- Check that Activate calculation of the packaging on the article is not set to Inactive.
- If the setting is Setting per article or Setting per unit, the product or unit has not been enabled yet — see Settings per product or product unit.
- On the product, check whether the Deactivated switch in the Area Calc group has been set by mistake.
The fields are there, but nothing is calculated
Why it happens: usually an outdated cache, occasionally a theme or another plugin that replaces the buy area of the product page.
How to fix it:
- Clear the cache under Settings → System → Caches & indexes.
- Reload the product page while holding the shift key.
- If it persists: when another plugin replaces the buy form on that page — for example with an enquiry button instead of a quantity field — the calculator deliberately hides itself. There would be no quantity field left for it to fill in.
The offcut is not added
Why it happens: the Offcut field is empty or set to 0, or the function has not been enabled.
How to fix it: enter a value greater than 0 in the Offcut calculation card. If Activate offcut is set to Setting per article or Setting per unit, also switch on Activate offcut on the product or on the product unit.
The prices are wrong
Why it happens: the selected price logic does not match the way your prices are maintained.
How to fix it: see Choosing the price display. If the price logic is set to the reverse option although you maintain pack prices, the shop multiplies by the pack contents on top — the price is then several times too high. The other way round it is too low.
The “Area Calc” group is missing on the product
Why it happens: the fields are created when the plugin is activated and hidden again when it is deactivated.
How to fix it: check under Extensions → My extensions that the toggle next to Area Calculation is switched on, then reload the product page in the administration.
After an update the plugin is off in one channel
Why it happens: since a more recent version the master switch is called Enable plugin for this sales channel. The previous value is carried over during the update.
How to fix it: check the setting per sales channel anyway — especially if you previously worked with different values per channel.
FAQ
Q: Does the plugin always round up to whole packs?
A: Yes. It rounds up to the next whole pack, because half a pack cannot be shipped. That is why the Total: line always shows slightly more than the customer entered.
Q: Can the customer still change the suggested quantity?
A: Yes. The quantity field stays editable, the plugin only enters a suggestion. The Total: line adjusts accordingly.
Q: Does the customer have to fill in width and length?
A: No. They can also enter their requirement directly in the Required … field. The two fields for width and length are an aid, not a requirement — and they only appear if you have enabled them.
Q: Does this work with graduated prices?
A: Yes. The shop applies the price scale to the calculated number of packs.
Q: Does a setting apply to all sales channels?
A: Only if you store it under All Sales Channels. Otherwise it applies to the channel selected at the top.
Q: Can I exclude individual products from the calculator?
A: Yes. Set the Deactivated switch in the Area Calc group on the product — see Settings per product or product unit.
Q: Can I store a different offcut for individual products?
A: No. The value applies per sales channel. On the product and on the product unit you only control whether the offcut applies and how much the customer may change about it. If customers are allowed to set their own value, they can overwrite your suggestion.
Q: Does the calculator slow down the product page?
A: No. The calculation runs directly in your customer’s browser while they type. No data is loaded for it.
Q: What happens when the plugin is uninstalled?
A: Shopware asks whether your data should be kept. If you answer yes, settings and fields remain. Otherwise the plugin removes its settings and its fields on products and product units again.
For administrators
This section is aimed at technical administrators. You do not need it for everyday use.
System requirements
- Shopware: 6.7
- PHP: 8.2 or newer
- Shopware’s storefront component (the plugin extends the product page and the price display)
Installing from the command line
composer require swp/areacalc-six
php bin/console plugin:refresh
php bin/console plugin:install SwpAreaCalcSix --activate
php bin/console cache:clear
What the plugin adds to and changes in your shop
- On activation it creates an Area Calc field group on products and on product units. The fields are hidden again when the plugin is deactivated, and removed when it is uninstalled without keeping the data.
- It extends the storefront price calculation. When the master switch is off for a sales channel, the calculation is passed on to Shopware unchanged — that channel then behaves exactly like a shop without this plugin.
- All settings are resolved per sales channel; without an individual value, the value from All Sales Channels applies.
- The calculator itself runs in the customer’s browser. It causes no additional server requests and no additional load on product or category pages.
- If Demand per unit of measurement is used on a product, that value stays with the order line item. This keeps the basis of the calculated quantity traceable later on.
Languages
The interface and the shop texts are available in German, English and Dutch. Numbers in the calculator are formatted according to the storefront language, not to a fixed setting.
This manual was written for Area Calculation version 6.7.3.
More manuals
Age Check
Tobacco, spirits, knives: visitors who do not confirm their age never see the restricted items at all. You tick a box per product, the plugin hides it everywhere.
Open manual Shopware 6AI SEO All-in-One: SEO and GEO suite for Shopware 6
Google finds your shop, ChatGPT never mentions it. This plugin checks both in one run, fills empty meta fields from templates and turns the findings into a to-do list.
Open manual Shopware 6Article information and icons
Vegan, organic, regional: mark your articles with your own icons and a short explanation. Grouped on the article page, optional badge in the listing, switchable per channel.
Open manualNeed a team that keeps your shop running?
We have been maintaining Shopware shops for more than 20 years, including updates, hotfixes and the plugins you are configuring right now.