
Best before for articles
Best before date on every product and variant, shown on the detail page and in the cart, with expired stock switched off automatically every hour. No import, no code.
On this page
- Introduction
- What you get out of it
- Who is this plugin for?
- Installation
- Configuration
- Choosing the sales channel
- Enable plugin for this sales channel
- to documentation
- Adding a best before date to a product
- Step by step
- Variants and batches
- How a variant inherits the date
- How to give a variant its own date
- How the date appears in your shop
- On the product detail page
- In the shopping cart
- Switching off expired products automatically
- How the check works
- What the check does not do
- Requirement: the background service is running
- Running the check immediately
- Uninstalling
- Switching off temporarily
- Removing completely
- Troubleshooting
- The “Best before date” tab is missing on the product
- The date does not appear in the shop
- Expired products stay online
- A product went offline too early
- The date is shown one day out
- A switched-off product should go back on sale
- FAQ
- For administrators / technical details
- System requirements
- Installation via the command line
- Triggering the check manually
- Scheduled task
- Data model
- How the check runs
- Storefront changes
- Data protection
- Behaviour on uninstall
Introduction
This plugin lets you store a best before date on every product, show it to your customers in the shop and take expired stock out of sale automatically — with no import, no extra software and no line of code.
What you get out of it
- You maintain the date where you already work. A new area appears on the product itself, and that is where you enter the date. No extra menu entry, no separate list to keep up to date.
- Your customers see the date before they buy. It appears on the product detail page below the buy area and again on every line in the shopping cart. That saves support enquiries and returns.
- Expired stock leaves your range on its own. A check runs roughly once an hour in the background and switches off every product whose date has been reached.
- You factor in your delivery time. For each product you set a lead time in days. Anything that would expire while it is still in transit is never sold in the first place.
- Every batch gets its own date. Variants take the value from the main product and may override it. The older delivery goes offline while the fresh one stays on sale.
- You control every sales channel separately. Whether the date appears in the shop is your decision per sales channel.
Who is this plugin for?
For everyone selling goods with a limited shelf life: food and delicatessen, natural cosmetics, pet food, drugstore and pharmacy supplies, food supplements, paints and chemicals. Anywhere an expired product in the cart is not just annoying but a legal risk.
You do not need any programming knowledge. Everything described in this manual is done in your Shopware Administration.
Legal notice: We accept no liability for compliance with legal requirements. If in doubt, please review your use of this plugin with qualified legal counsel.
Installation
After your purchase the plugin is available directly in your Administration — there is nothing to download.
- Log in to your Shopware Administration.
- Open Extensions → My extensions.
- Next to the entry Best before for articles, click Install.
- Then switch the plugin on using the toggle to the left of the entry.
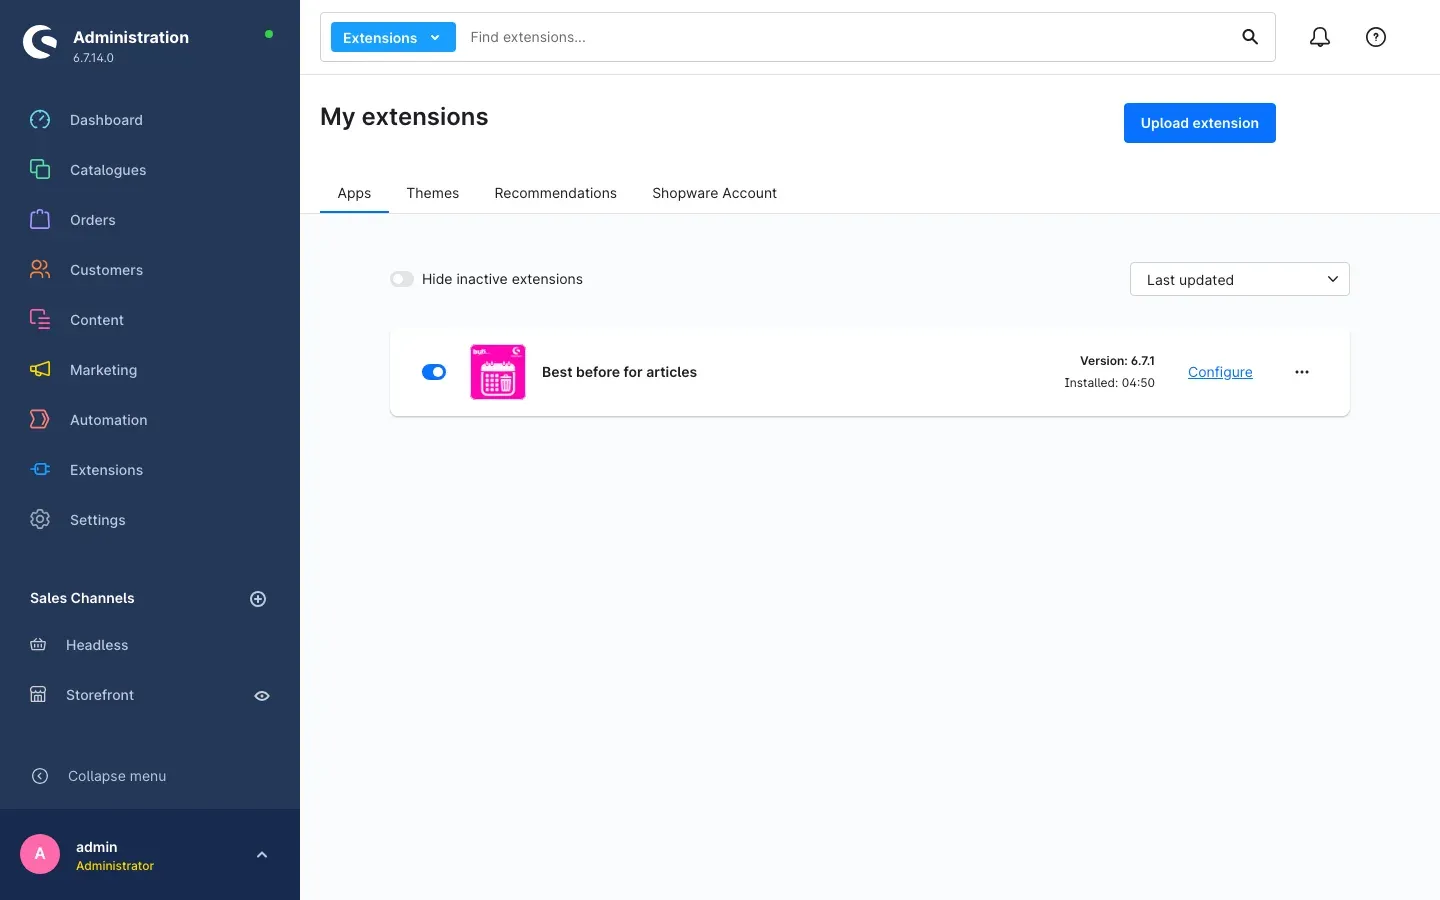 Fig. 1: The plugin is installed and active. On the right you can see the version and the Configure link.
A blue toggle means the plugin is active. That completes the installation: a new area for the best before date is now available on every product, and the display in the shop is switched on.
Cannot see the plugin in the list? Then your shop is not yet connected to your Shopware account. You will find the login under Extensions → My extensions on the Shopware Account tab.
Tip: The toggle next to the entry is also your emergency stop later on. Switch it off and the input fields on the product and the display in the shop disappear — but the dates you have already entered are kept and are back immediately once you switch it on again.
Configuration
What you get out of it: This is where you decide in which of your sales channels the best before date appears. If you run a single shop you can skip this chapter — the default setting is what you want.
To open the settings:
- Open Extensions → My extensions.
- Next to the entry Best before for articles, click Configure.
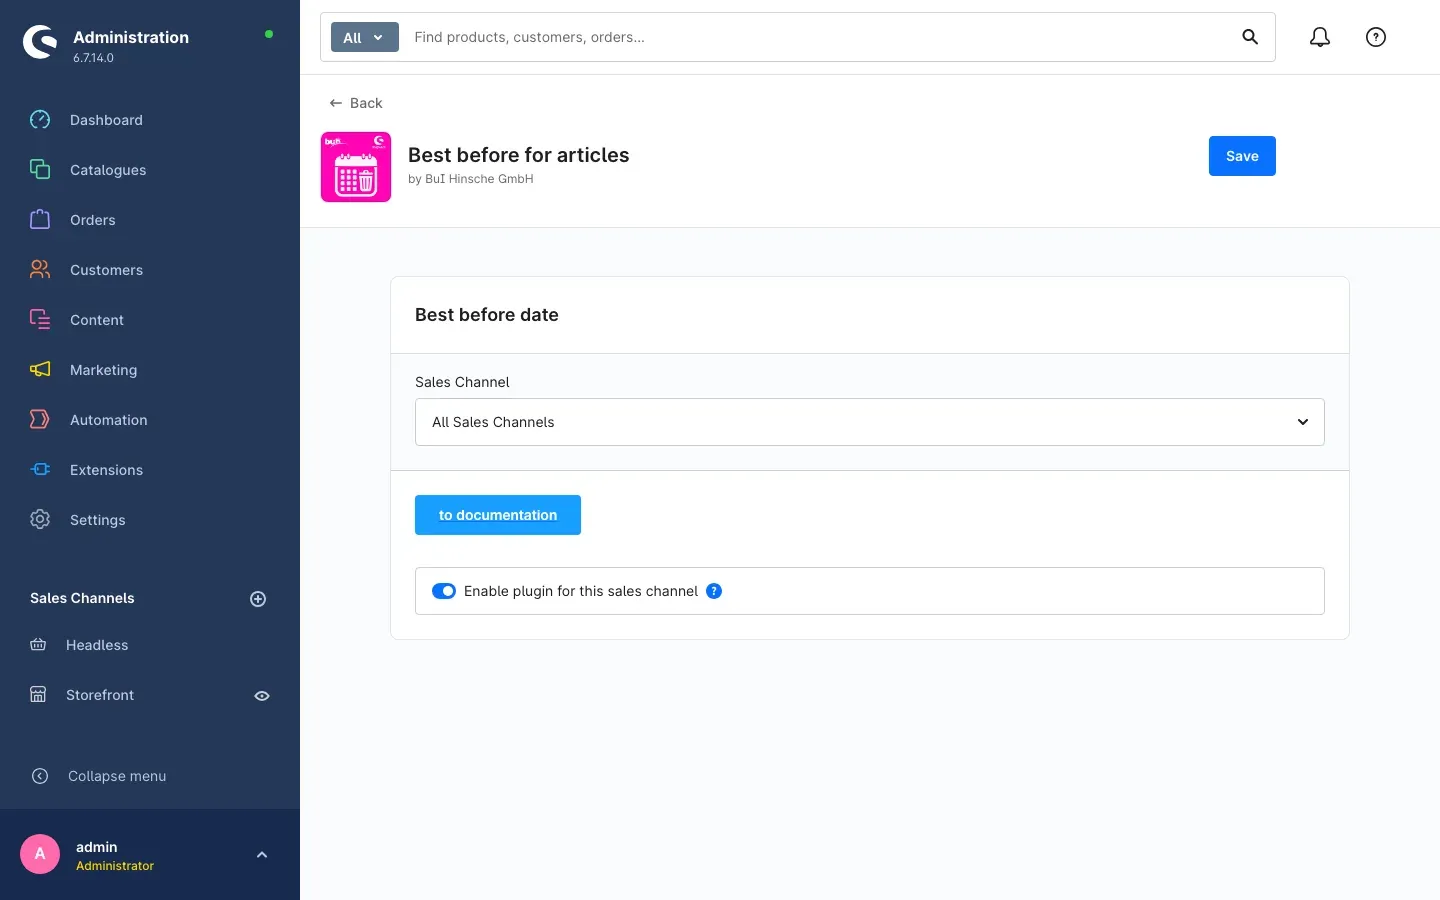 Fig. 2: The configuration page with the Sales Channel selection, the to documentation button and the Enable plugin for this sales channel toggle.
Choosing the sales channel
At the top you will find the Sales Channel selection, preset to All Sales Channels. Whatever you set while it is in that position applies to every one of your shops.
If you run several sales channels — a B2B and a B2C shop, for example — select the channel you want first and then set the toggle below it. Each channel keeps its own setting.
Enable plugin for this sales channel
The Enable plugin for this sales channel toggle decides whether the best before date is shown on the product detail page and in the shopping cart of this sales channel. It is switched on out of the box.
Why this is useful: Your delicatessen shop shows the date while your second shop with its non-food range stays exactly as it was. You do not have to uninstall anything or rebuild anything.
Remember to save your change with Save at the top right.
Important: The toggle controls the display per sales channel. Switching off expired products, on the other hand, works shop-wide, because in Shopware a product is either active for all channels or for none. As long as the plugin is switched on in at least one sales channel, expired products will be switched off. See Switching off expired products automatically for details.
to documentation
The blue to documentation button opens this manual in a new browser tab, in the language of your Administration. That way help is always available right where you are working.
Adding a best before date to a product
What you get out of it: You enter a date on a product and decide how many days before that date it should leave the shop. From then on the plugin takes care of the display and the switch-off — you never have to look for that product by hand again.
Step by step
- Open Catalogues → Products and click the product you want.
- Switch to the Specifications tab.
- Scroll down to the Custom fields card.
- Click the Best before date tab inside that card. The card holds several tabs side by side; use the small arrows on the left and right to page through to the others.
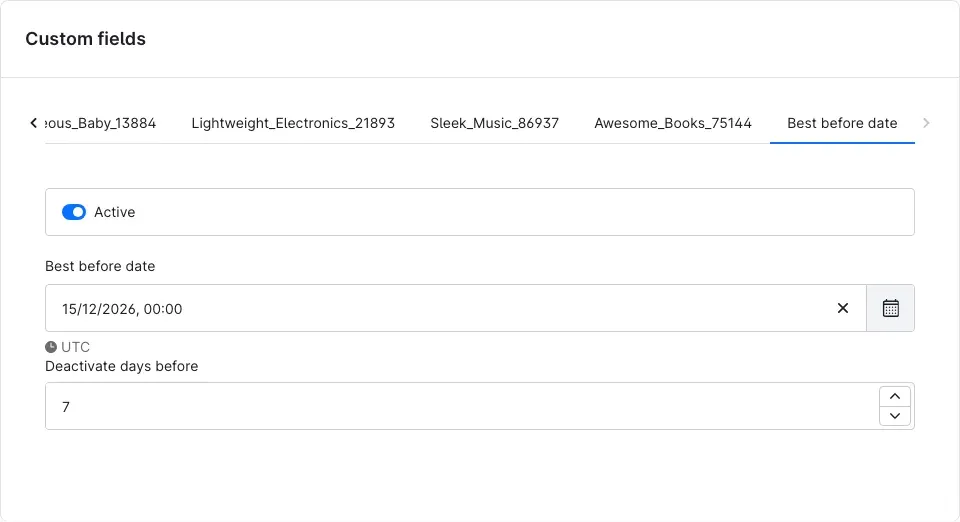 Fig. 3: The three entries on the Best before date tab, here filled in with 15/12/2026 and a lead time of seven days.
-
Fill in the three entries:
- Active — this toggle decides whether the plugin handles this product at all. While it is off, nothing happens: no display in the shop, no automatic switch-off. Turn it on for every product whose shelf life you want to manage. It has nothing to do with your product’s visibility — you still control that with the usual toggle at the top of the product page.
- Best before date — use the calendar icon to pick the date printed on the goods. Below the field you will see the note UTC: Shopware stores points in time in universal time. That makes no difference to a shelf life measured in days, because the calculation uses the day, not the time. Simply leave the time at
00:00. - Deactivate days before — the lead time in days. Enter
7and the product goes offline seven days before the date. Leave the field empty and it is switched off on exactly the day the date is reached.
-
Save the product with Save at the top right.
That is all. In the example in figure 3 the product stays on sale until 7 December 2026 and is switched off automatically from 8 December 2026 — seven days before the best before date of 15 December 2026.
Tip: Set the lead time to at least your usual delivery time. Then no parcel is still in transit while the goods on the shelf would already have expired. Because the value belongs to the individual product, you can give fresh goods fourteen days and tinned goods none at all.
Important: The Best before date tab only appears while the plugin is switched on. If you cannot find it, see Troubleshooting.
Variants and batches
What you get out of it: You sell the same product from several deliveries with different shelf lives. Each delivery becomes a variant with its own date. The older batch goes offline by itself while the fresh one stays on sale.
How a variant inherits the date
If you set the best before date on the main product, all variants take that value automatically. This is the normal case and exactly right for most ranges: maintain one date and every size and colour is covered.
How to give a variant its own date
- Open the main product and switch to the Variants tab.
- Click the variant that is to get its own date.
- Switch to the Specifications tab and open the Best before date tab in the Custom fields card.
- Click the chain icon to the left of the field (Remove inheritance). Only then can you enter your own value — before that the field merely shows the inherited value of the main product.
- Enter the date of this batch and save.
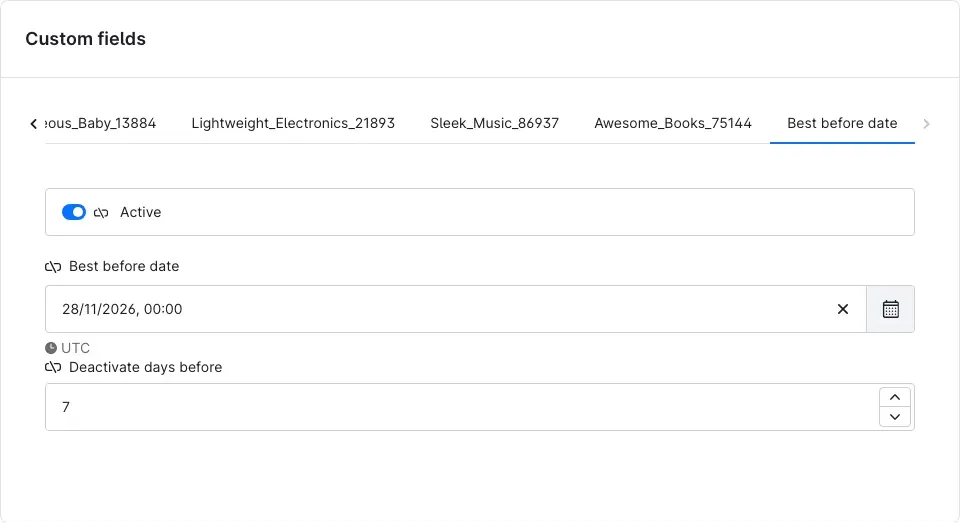 Fig. 4: This variant carries its own date of 28/11/2026. The icons in front of the field labels show that inheritance has been removed here.
If you want to go back to the main product’s value later, click the same icon again (Restore inheritance).
Tip for batch handling: Create one variant per delivery — for example using a property “Batch” with the values “CW 38”, “CW 42” and so on. Each variant gets its own date, and only what is still fit for sale stays available in the shop.
Important: If the main product itself expires, it goes offline together with every variant that does not carry its own date. Variants with their own, still valid date are unaffected as long as they also have their own visibility set. With batches, always double-check whether the date on the main product is really what you want.
How the date appears in your shop
What you get out of it: Your customer learns how long the goods will keep before buying — at the two places where the purchase decision is actually made.
The date appears as soon as these three conditions are met:
- The Active toggle is switched on for the product.
- A Best before date has been entered.
- The plugin is enabled for this sales channel (see Configuration).
On the product detail page
On the product detail page the date sits directly below the buy area, right after the product number — written out with the weekday so nobody has to decode it.
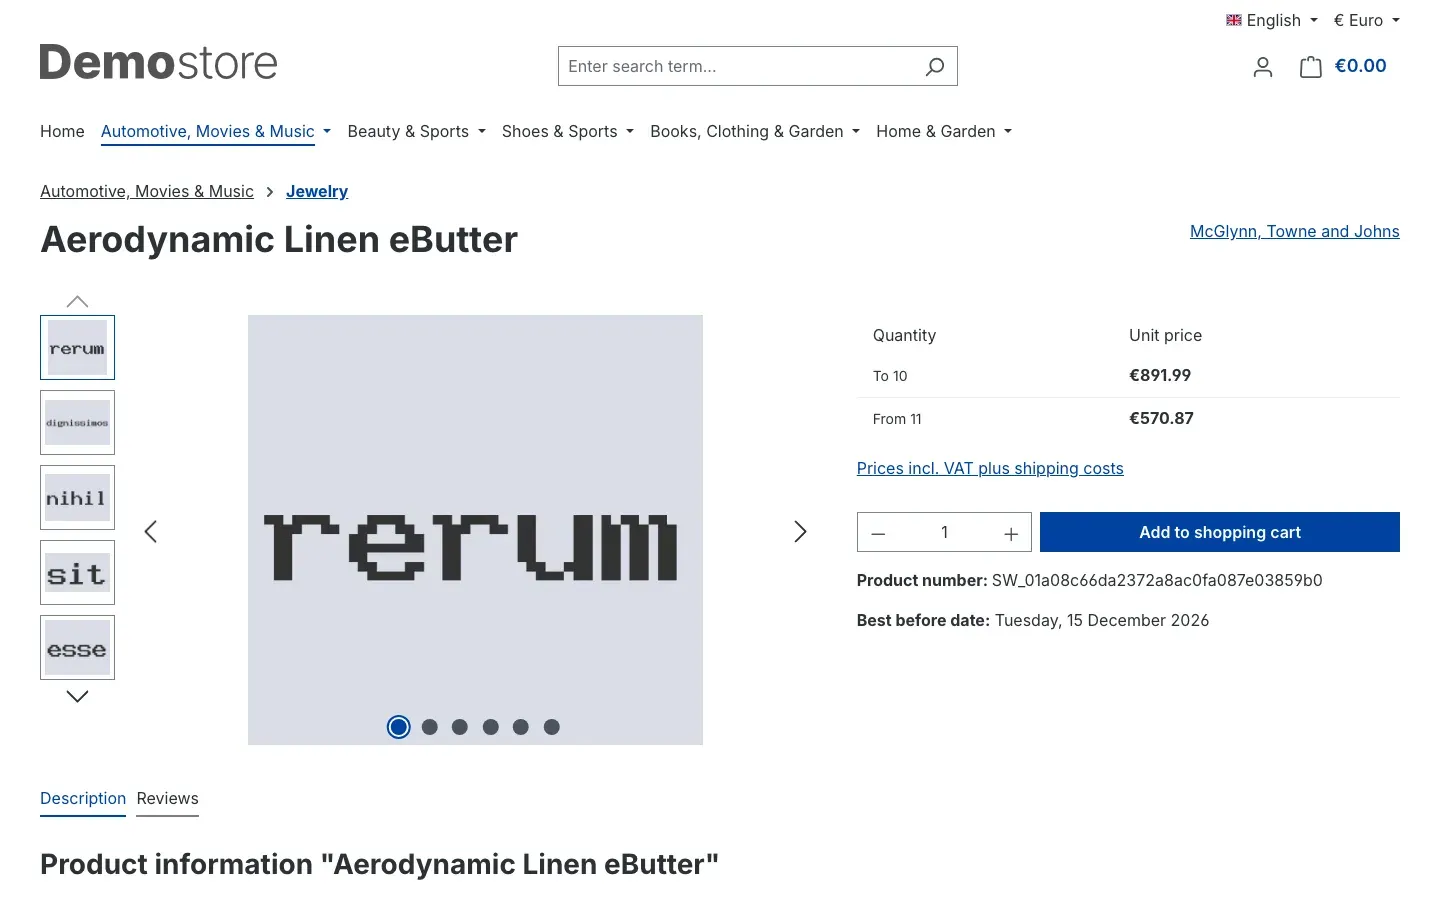 Fig. 5: Display on the product detail page: “Best before date: Tuesday, 15 December 2026”.
In the shopping cart
In the shopping cart the date appears on every single line below the product number, in short form. So your customer can still see what is in the cart even after collecting several items.
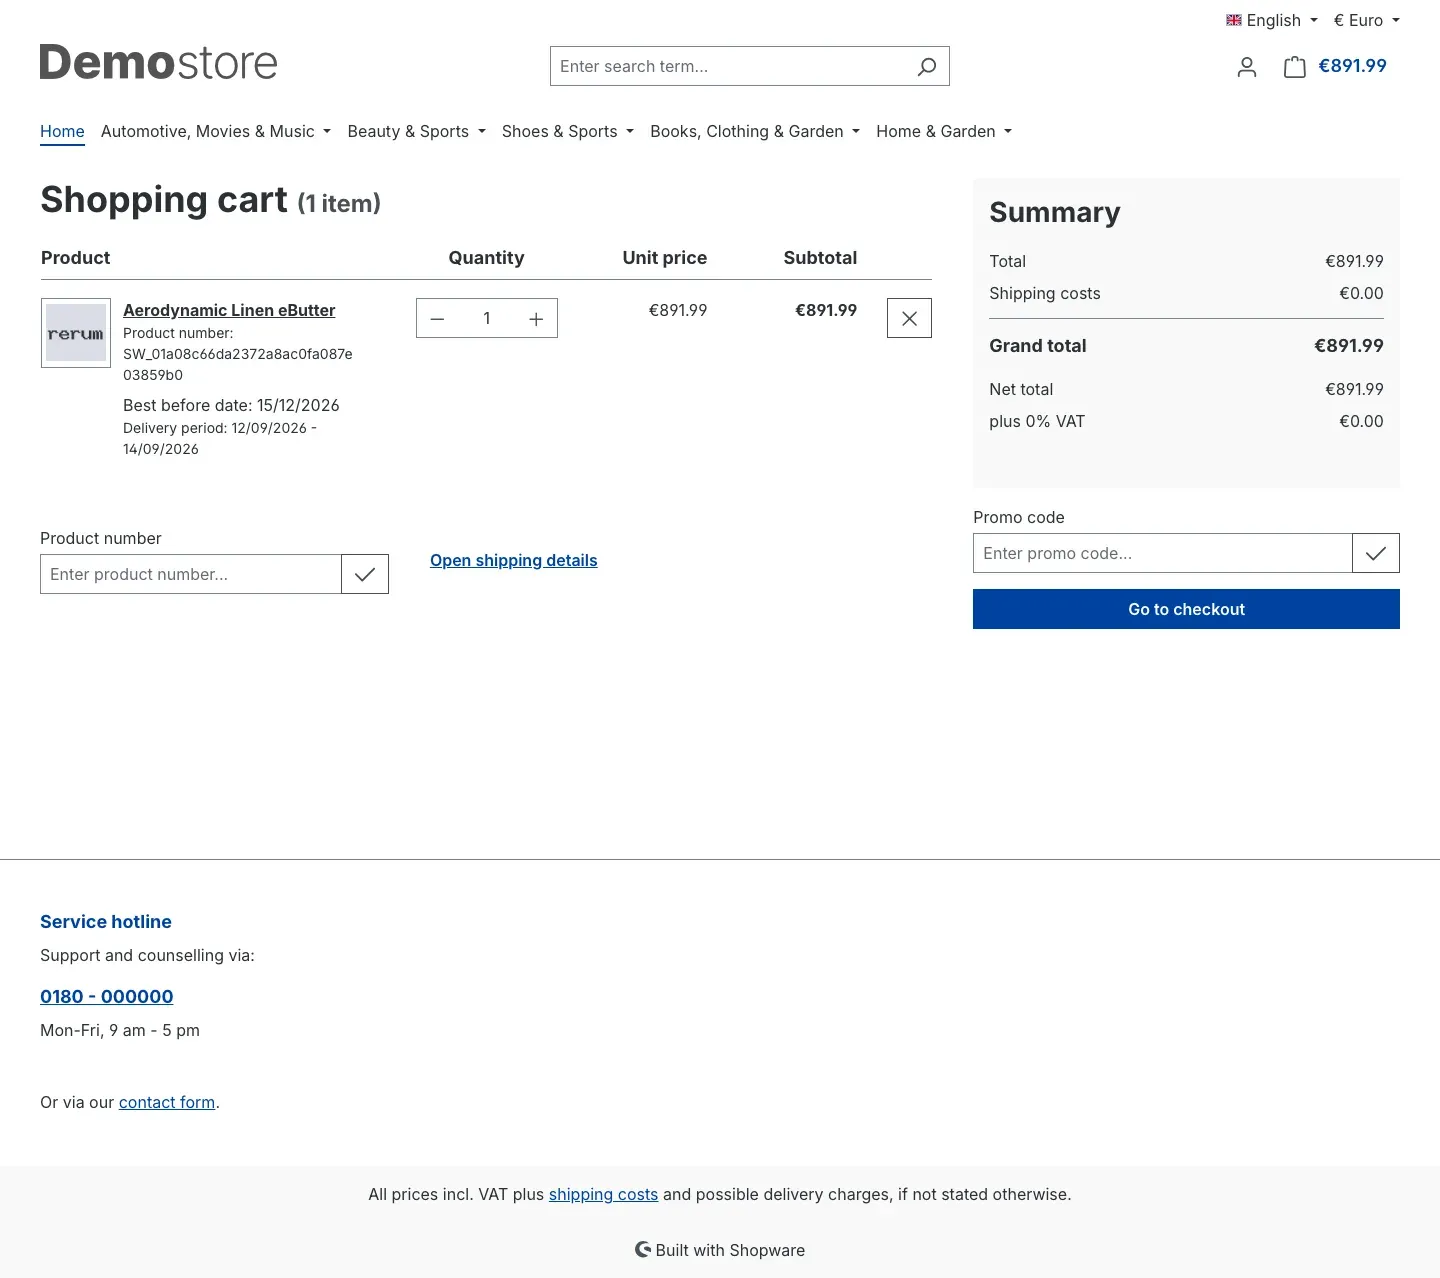 Fig. 6: Display in the shopping cart: “Best before date: 15/12/2026” below the product number.
Good to know: The date appears on the product detail page and in the shopping cart only. It does not show up in category listings, search results or the order confirmation.
Tip: Check the display once in your own shop on a test product after setting things up. Two minutes and you know it all works — with your theme too.
Switching off expired products automatically
What you get out of it: You never again have to pull a list, look up products and untick boxes. The shop tidies itself up, and it does so hourly rather than once a week.
How the check works
After activation the check runs by itself — you neither have to set it up nor start it. Roughly once an hour the plugin goes through every product that has the Active toggle set and a date entered, and calculates for each one:
Best before date minus Deactivate days before — once that day is reached or has passed, the product is switched off.
Switched off means the product’s visibility is turned off, exactly as if you had flipped the toggle at the top of the product page yourself. The product disappears from the shop, from the search and from every category. It remains fully intact in your Administration, with all its data, images and prices.
So no more than an hour passes between the cut-off day being reached and the product being switched off.
What the check does not do
- It never switches anything back on. A product that has been switched off stays switched off until you activate it by hand. That is intentional — goods brought back automatically would be exactly the case you are trying to avoid.
- It does not send notifications. There is no warning email before an expiry. The lead time in days is the practical substitute: the product goes offline earlier and you notice it the next time you look at your product list.
- It deletes nothing. No product, no image and no price is lost.
Requirement: the background service is running
The check is a background job. For background jobs to run in your shop at all, the so-called worker has to be running. In the vast majority of Shopware installations this is the case out of the box — as long as your Administration is open or your hosting provider has set up the service.
If expired products stay online permanently even though everything is entered correctly, this is almost always the reason. Contact your administrator or hosting provider and have them check that the worker is running.
Running the check immediately
Do not want to wait for the next hourly run, for instance while setting things up or after a large import? Then your technical contact can trigger the check directly on the server:
bin/console mhd:cronThe command does exactly what the hourly run does, only immediately. It is safe to repeat and can be run as often as you like.
Uninstalling
You have two levels to choose from: switch off temporarily or remove completely.
Switching off temporarily
Open Extensions → My extensions and switch off the toggle to the left of the entry.
The Best before date tab on the product and the display in the shop disappear, and nothing is switched off automatically any more. The dates you have entered are fully preserved and are back the moment you flip the toggle again. This is the right way to pause the plugin briefly.
Removing completely
-
Open Extensions → My extensions.
-
Click the three dots (…) on the right of the entry and choose Uninstall.
-
In the window that opens, decide about the Remove all app data permanently checkbox:
- Checkbox not ticked — your input fields and all the dates you have entered stay in the database. If you install the plugin again later, everything is still there unchanged. This is the recommended setting.
- Checkbox ticked — the plugin removes its input fields and settings completely. All best before dates you entered are gone for good. This cannot be undone.
-
Confirm with Uninstall.
Important: Products the plugin has already switched off stay switched off after uninstalling as well. Uninstalling does not reactivate any product automatically. So check your product list before you remove the plugin.
Troubleshooting
The “Best before date” tab is missing on the product
What causes it: The plugin is not active, you are on the wrong tab of the product page, or your shop’s cache is still out of date.
How to fix it:
- Check under Extensions → My extensions that the toggle next to the entry is switched on.
- Make sure you are on the Specifications tab of the product and have scrolled all the way down to the Custom fields card.
- Page to the right inside the card using the small arrows — with many custom fields the tab can sit outside the visible area.
- Clear the cache: Settings → System → Caches & indexes → Clear cache, then reload the page.
The date does not appear in the shop
What causes it: Usually one of the three conditions from How the date appears in your shop is missing.
How to fix it:
- Check on the product that the Active toggle is on and a date has been entered. Both have to be true.
- Check in the configuration that Enable plugin for this sales channel is switched on for exactly the sales channel you are looking at in the browser.
- Clear the cache: Settings → System → Caches & indexes → Clear cache.
- If the date still does not appear, your theme may have heavily rebuilt the buy area or the cart line. Test with the Shopware standard theme once and get in touch with us — see chapter 11.
Expired products stay online
What causes it: Either an entry on the product is missing, or background jobs are not running in your shop.
How to fix it:
- Check on the product that Active is set and a date has been entered. Without both, the plugin does not touch the product.
- Do the maths: date minus lead time. The switch-off only happens once that day has been reached.
- Check in the configuration that the plugin is switched on in at least one sales channel. If it is off everywhere, no check takes place.
- Wait up to an hour — that is how far away the next run can be.
- If nothing changes, ask your administrator or hosting provider to check that the background service is running and to trigger the check by hand once (see Switching off expired products automatically).
A product went offline too early
What causes it: The lead time under Deactivate days before is higher than you assumed.
How to fix it: Open the product, correct the lead time and switch the product’s visibility back on at the top of the product page. The plugin never brings a switched-off product back by itself.
The date is shown one day out
What causes it: Shopware stores points in time in universal time (the UTC note below the field). If you accidentally picked a late time in the date field, the display can slip to the following day in your time zone.
How to fix it: Open the date field and set the time to 00:00.
A switched-off product should go back on sale
What causes it: This is not a fault, it is intentional — the plugin never activates anything by itself.
What to do: Enter the new best before date of the fresh goods on the product and switch the product’s visibility back on at the top of the product page. The next run will then leave it alone as long as the new date has not been reached.
FAQ
Q: Does this work with my theme?
A: As a rule, yes. The plugin adds to the standard areas of the buy area and the cart line and passes the original content on unchanged. If your theme has heavily rebuilt exactly those areas, the display may end up somewhere else. Two minutes on a test product will tell you.
Q: What happens to products whose date passed long ago?
A: They are switched off on the next run, so within an hour at the latest. There is nothing to catch up on and nothing to trigger.
Q: Does the plugin switch products back on as well?
A: No. A product that has been switched off stays switched off until you activate it by hand. Goods brought back automatically would be exactly what you are trying to prevent.
Q: Do I get an email before a product expires?
A: No, the plugin does not send notifications. If you need advance warning, use the lead time in days: the product goes offline earlier and you will notice what is missing the next time you look at your product list.
Q: Is this batch management?
A: No. You can maintain a separate date per variant, so per batch — but the plugin does not track stock levels or goods receipts per batch. You need an ERP system for that.
Q: Does my customer see the date in the category listing as well?
A: No, only on the product detail page and in the shopping cart. It does not appear in listings, search results or order confirmations.
Q: Can I show the date in one sales channel and not in another?
A: Yes, that is exactly what the toggle in the configuration is for. For the automatic switch-off this applies with one restriction: whether a product is sellable is a shop-wide property in Shopware. If the plugin is switched on in at least one channel, the switch-off applies everywhere.
Q: Do I have to maintain a date for every product?
A: No. Products without the Active toggle switched on are left untouched. You only maintain what genuinely has a shelf life.
Q: Can I maintain many products at once?
A: The product list lets you edit several products together, and this plugin’s fields are available there just like any other Shopware custom field. For very large ranges, going through your ERP system or an import is usually more convenient.
Q: Does the plugin slow my shop down?
A: No. The display only reads values Shopware has already loaded for the product — there is no additional database query on the detail page, in the cart or during checkout. The hourly check works in the background in portions of one hundred products.
Q: Is any data sent to external servers?
A: No. The plugin has no interface to the outside world. Date, toggle and lead time stay in your Shopware database, and it processes no personal data.
Q: What happens to my maintained data when I uninstall?
A: You decide, using the Remove all app data permanently checkbox in the uninstall window. Without the tick everything is kept, with the tick it is removed for good. See Uninstalling.
For administrators / technical details
This section is aimed at technical administrators. You do not need it for everyday use of the plugin.
System requirements
- Shopware: 6.7 (Storefront required)
- PHP: 8.2 or newer
- Database: MySQL 8.0 / MariaDB 10.11 or newer
- Background processing: a running message worker or an active admin worker
Installation via the command line
composer require swp/mhd-six
bin/console plugin:refresh
bin/console plugin:install SwpMhdSix --activate
bin/console cache:clear
Triggering the check manually
bin/console mhd:cronThe command runs the same routine as the scheduled task and can be repeated as often as required.
Scheduled task
The plugin registers the scheduled task swp_mhd_six.task with a default interval of 3600 seconds. It is executed through the message queue and therefore needs a running worker (bin/console messenger:consume async) or the admin worker. Without a running worker no product is switched off. Shopware 6.7 no longer shows scheduled tasks on a dedicated Administration page — the proof that the run takes place is the result in your product range, or the console command above.
Data model
The plugin creates no database table of its own and modifies no Shopware table. It uses a custom field set (swp_mhd_six) on the product entity with three fields: swp_mhd_six_status (toggle), swp_mhd_six_best_before_date (date, UTC) and swp_mhd_six_deactivate_days_before (integer). The fields are translatable and inheritable, which is why variants take on the values of the parent product as long as they carry no value of their own.
The sales channel setting lives in the system configuration domain SwpMhdSix.config. and is always read with the respective sales channel ID.
How the check runs
The run only starts if the sales channel setting is active in at least one sales channel. Products are read through the Data Abstraction Layer in portions of 100 with inheritance enabled, so variants see the inherited values. A product counts as expired when the date minus the lead time is less than or equal to today. All matches are set to active = false in one write through the Data Abstraction Layer, which keeps indexers, search and cache invalidation correct. Variants whose visibility is inherited from the parent product are skipped when the parent is being switched off anyway. An unreadable date produces a warning in the plugin log and does not abort the run.
Storefront changes
The plugin extends the standard templates of the buy area (buy-widget) and the cart line item (line-item/type/product), in each case through sw_extends while calling the original block content. Extensions from other plugins at the same points are therefore preserved. The output hangs on the CSS classes swp-mhd-detail-container, swp-mhd-detail-label, swp-mhd-detail-value and swp-mhd-line-item and can be styled through them in your own theme.
Data protection
The plugin calls no external services and transfers no data to third parties. It processes no personal data; only the toggle, the date and the lead time on the product are stored.
Behaviour on uninstall
Without the Remove all app data permanently tick, the custom field set, the fields and the values remain in place. With the tick, the custom field set, the fields and the plugin’s system configuration are deleted. Products that have already been deactivated stay deactivated in both cases.
This manual was written for Best before for articles, version 6.7.1.
More manuals
Age Check
Tobacco, spirits, knives: visitors who do not confirm their age never see the restricted items at all. You tick a box per product, the plugin hides it everywhere.
Open manual Shopware 6AI SEO All-in-One: SEO and GEO suite for Shopware 6
Google finds your shop, ChatGPT never mentions it. This plugin checks both in one run, fills empty meta fields from templates and turns the findings into a to-do list.
Open manual Shopware 6Area Calculation
Area calculation on the product page: your customer knows the square metres, not the number of packs. The plugin works it out, adds the offcut and fills the quantity field.
Open manualNeed a team that keeps your shop running?
We have been maintaining Shopware shops for more than 20 years, including updates, hotfixes and the plugins you are configuring right now.