
Custom Badges
New in, clearance or organic: badges make single products stand out in your listing. Assign them per product, per category or in bulk, and pick the colours yourself.
On this page
- Introduction
- What this plugin does for you
- Who is this plugin for?
- Installation
- Getting started
- Step 1: Create your first badge
- Step 2: Assign the badge to a product
- Step 3: Check the result in your shop
- Settings
- Enable plugin for this sales channel
- Activate plugin for Listing
- Activate plugin Detail
- How to use the features
- How to create a badge
- How to assign badges to a product
- How to give a whole category a badge
- How to change badges for many products at once
- How to hide a badge temporarily
- Where badges appear in your shop
- Giving staff access
- Troubleshooting
- No badge appears in the shop at all
- Badges are missing on the product page but visible in the overview
- One particular badge is missing, the others show up
- The badge is assigned to the product but does not appear in the shop
- The Badges area is missing from the Catalogues menu
- Bulk edit reports that no products were found
- FAQ
- For administrators / technical details
- System requirements
- Installation from the command line
- Data storage
- Elasticsearch
- Behaviour on errors
- Colour values from interfaces
- Performance
Introduction
Custom Badges helps you highlight products in your shop with eye-catching labels — for example “New”, “Bestseller” or “Handmade”.
A badge is a small coloured label that appears right at the product: in the category overview, in search results, next to cross-selling recommendations and on the product page itself. You decide the text, the font colour and the background colour, and you choose which products carry which badge.
What this plugin does for you
- Highlight individual products without editing product images or rewriting texts.
- Give a badge to an entire category — every product in it receives the badge automatically.
- Change the badges of many products in one go instead of opening each product.
- Switch a badge off temporarily, for instance once a promotion week ends, without losing any assignments.
- Let customers see at a glance what is new, popular or special.
- If you run several shops from one Shopware installation, decide per shop whether and where badges appear.
Who is this plugin for?
For shop operators and editors who maintain their own product range and want to highlight individual products or whole product groups. No programming knowledge is required — everything happens in the Shopware administration.
Installation
After your purchase the plugin is available directly in your administration — there is nothing to download.
-
Log in to your Shopware administration.
-
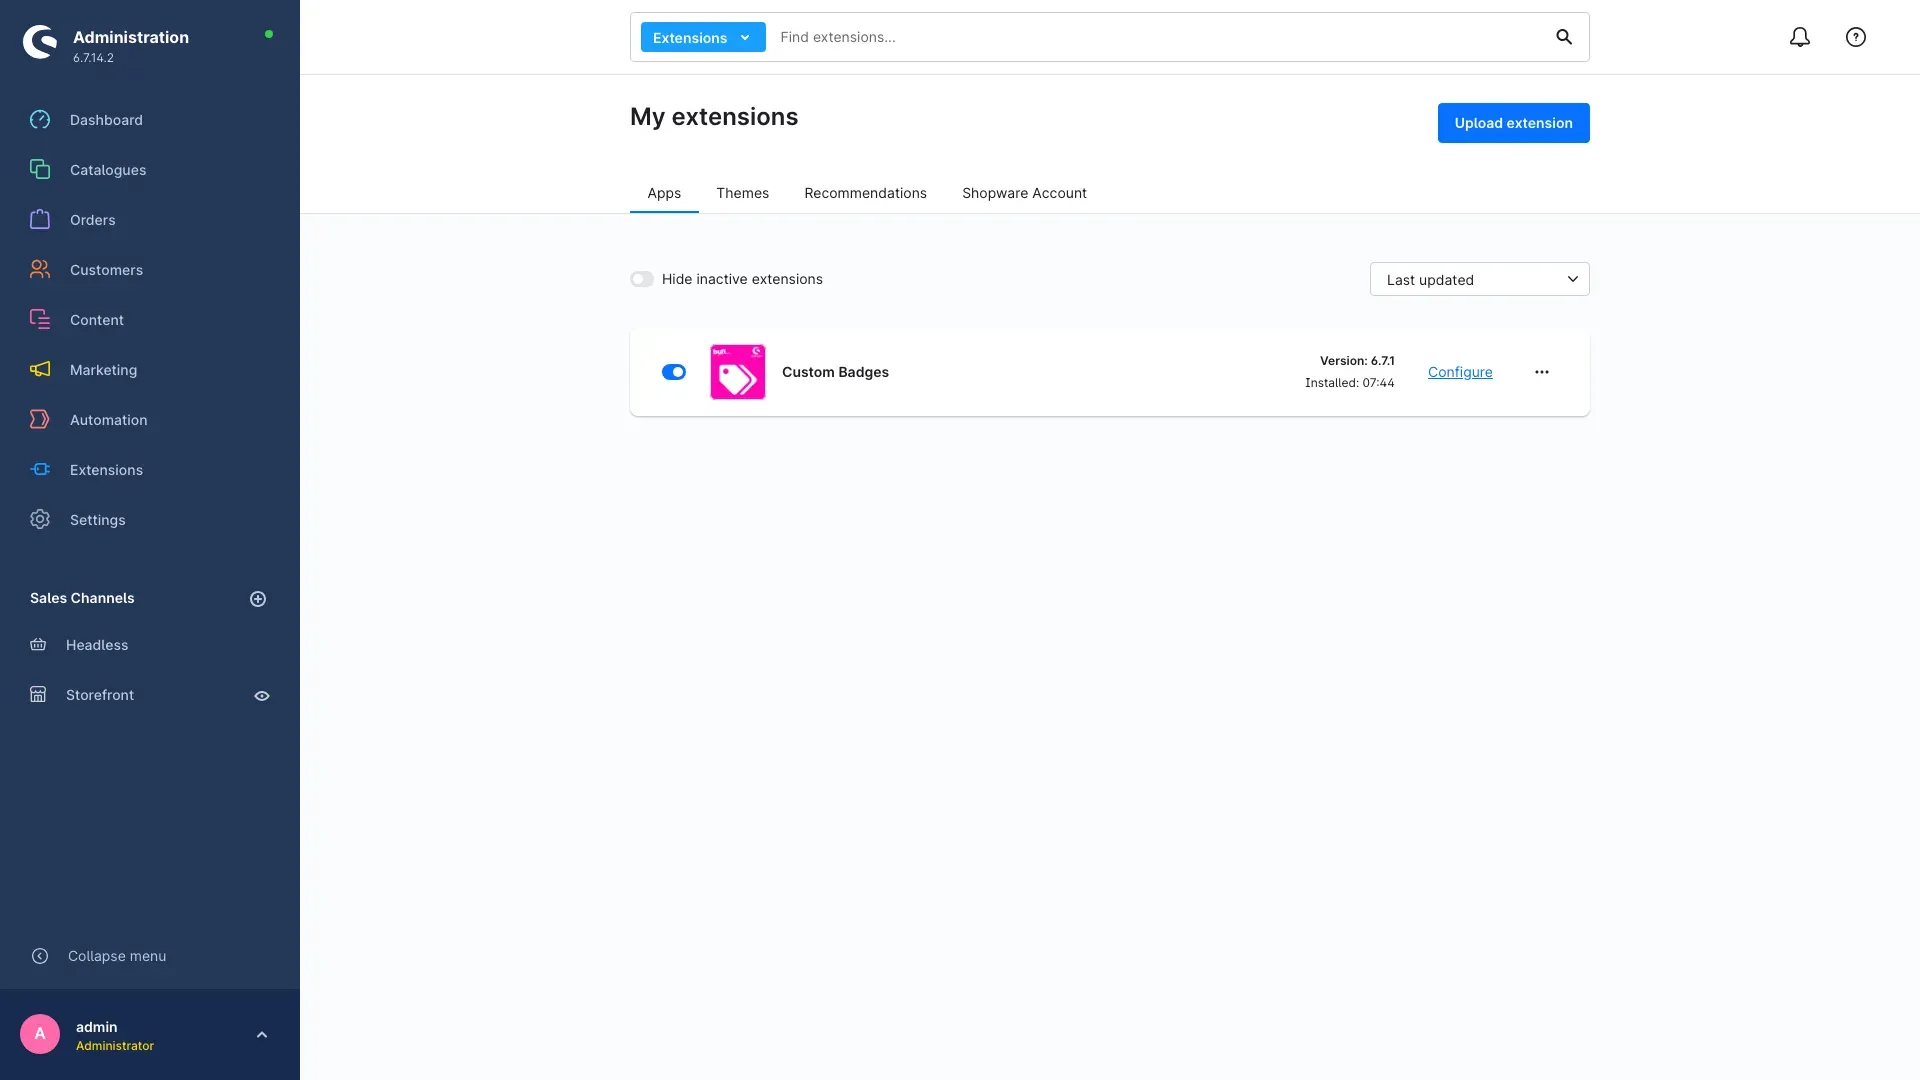
Open Extensions → My extensions.
-
In the row Custom Badges, click Install.
-
Then switch the plugin on using the toggle next to the entry — done.
When you switch it on, the plugin sets up everything it needs in the background: the Badges area in the administration and the field you will later use to assign badges to products and categories.
If Custom Badges does not appear in the list, your Shopware account is not yet connected to this shop. You can connect it under Extensions → My extensions by signing in with your Shopware account.
Getting started
Three steps and your first badge is live in your shop.
Step 1: Create your first badge
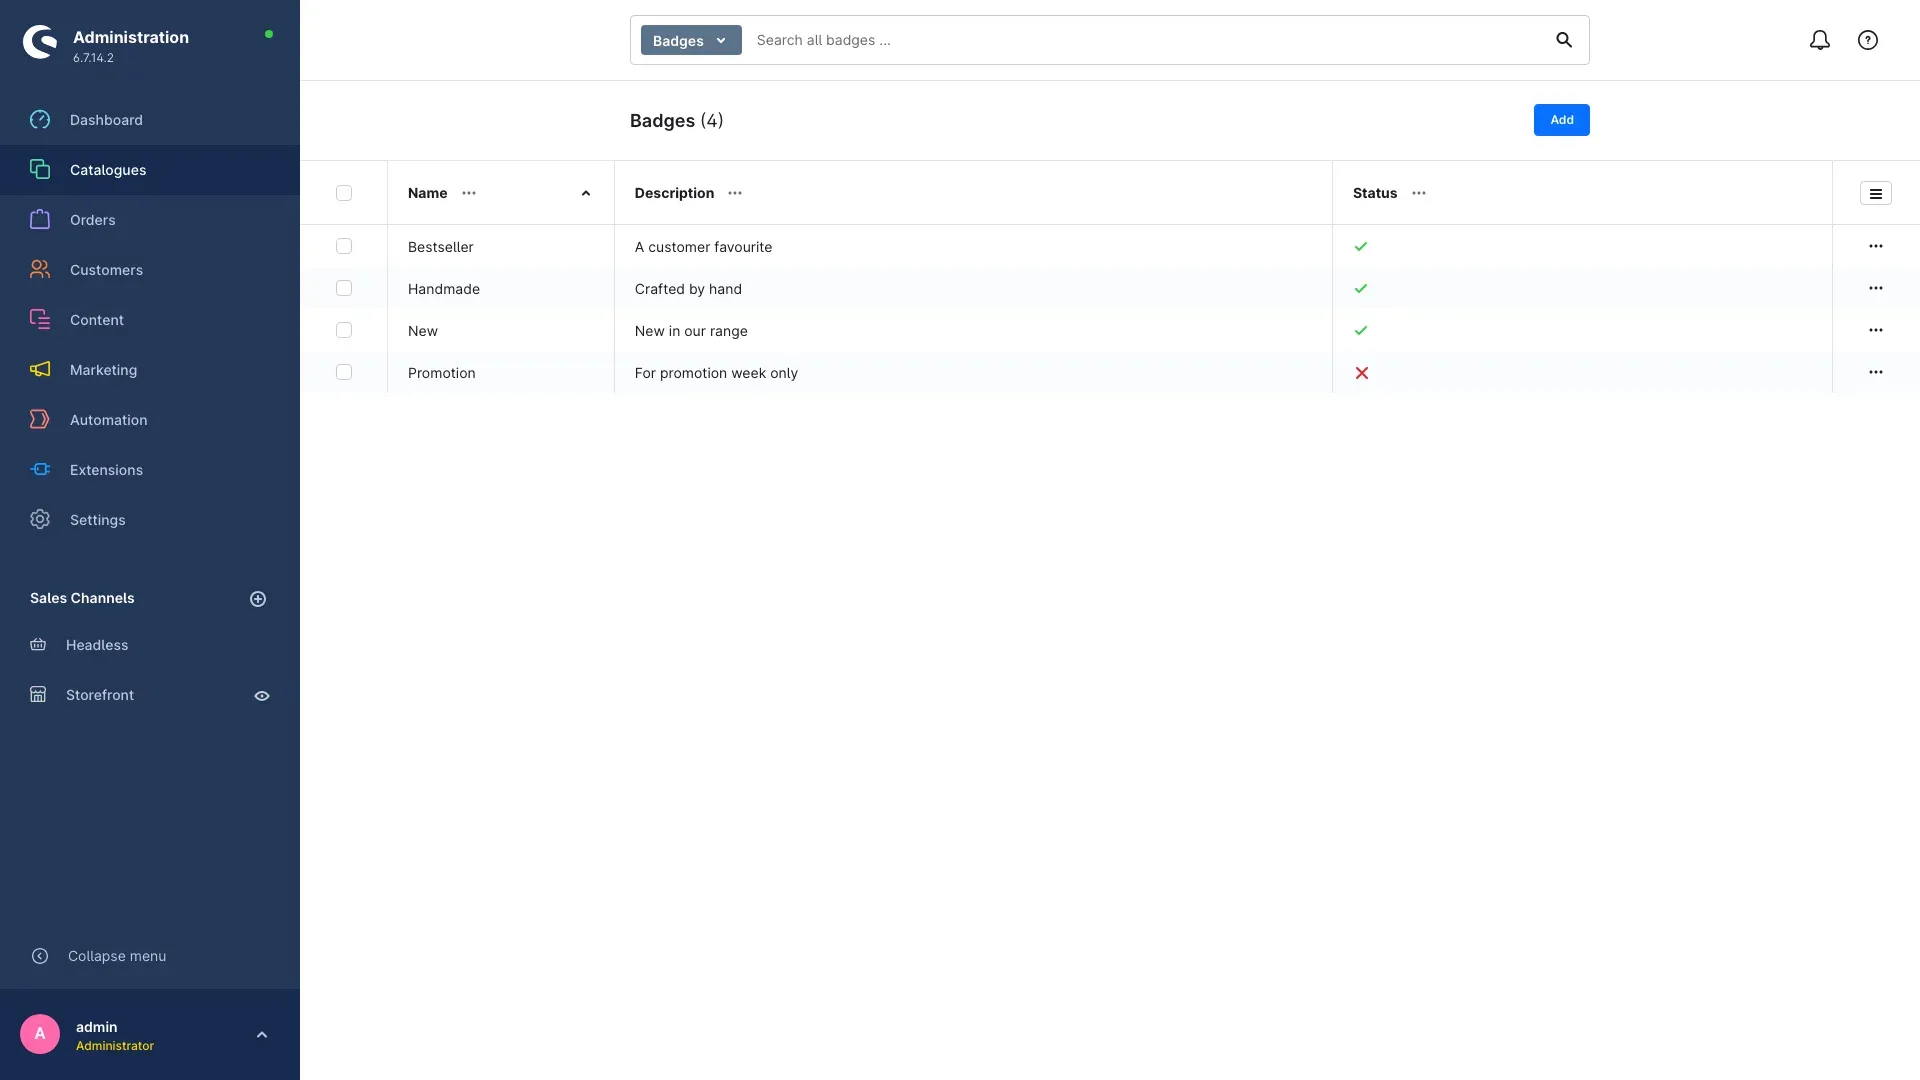
Open Catalogues → Badges, click Add, enter a name and pick the two colours. Remember to save. The detailed instructions are in How to create a badge.
Step 2: Assign the badge to a product
Open Catalogues → Products, pick a product, switch to the Specifications tab and select the badge in the Custom fields card, tab Badges. See How to assign badges to a product.
Step 3: Check the result in your shop
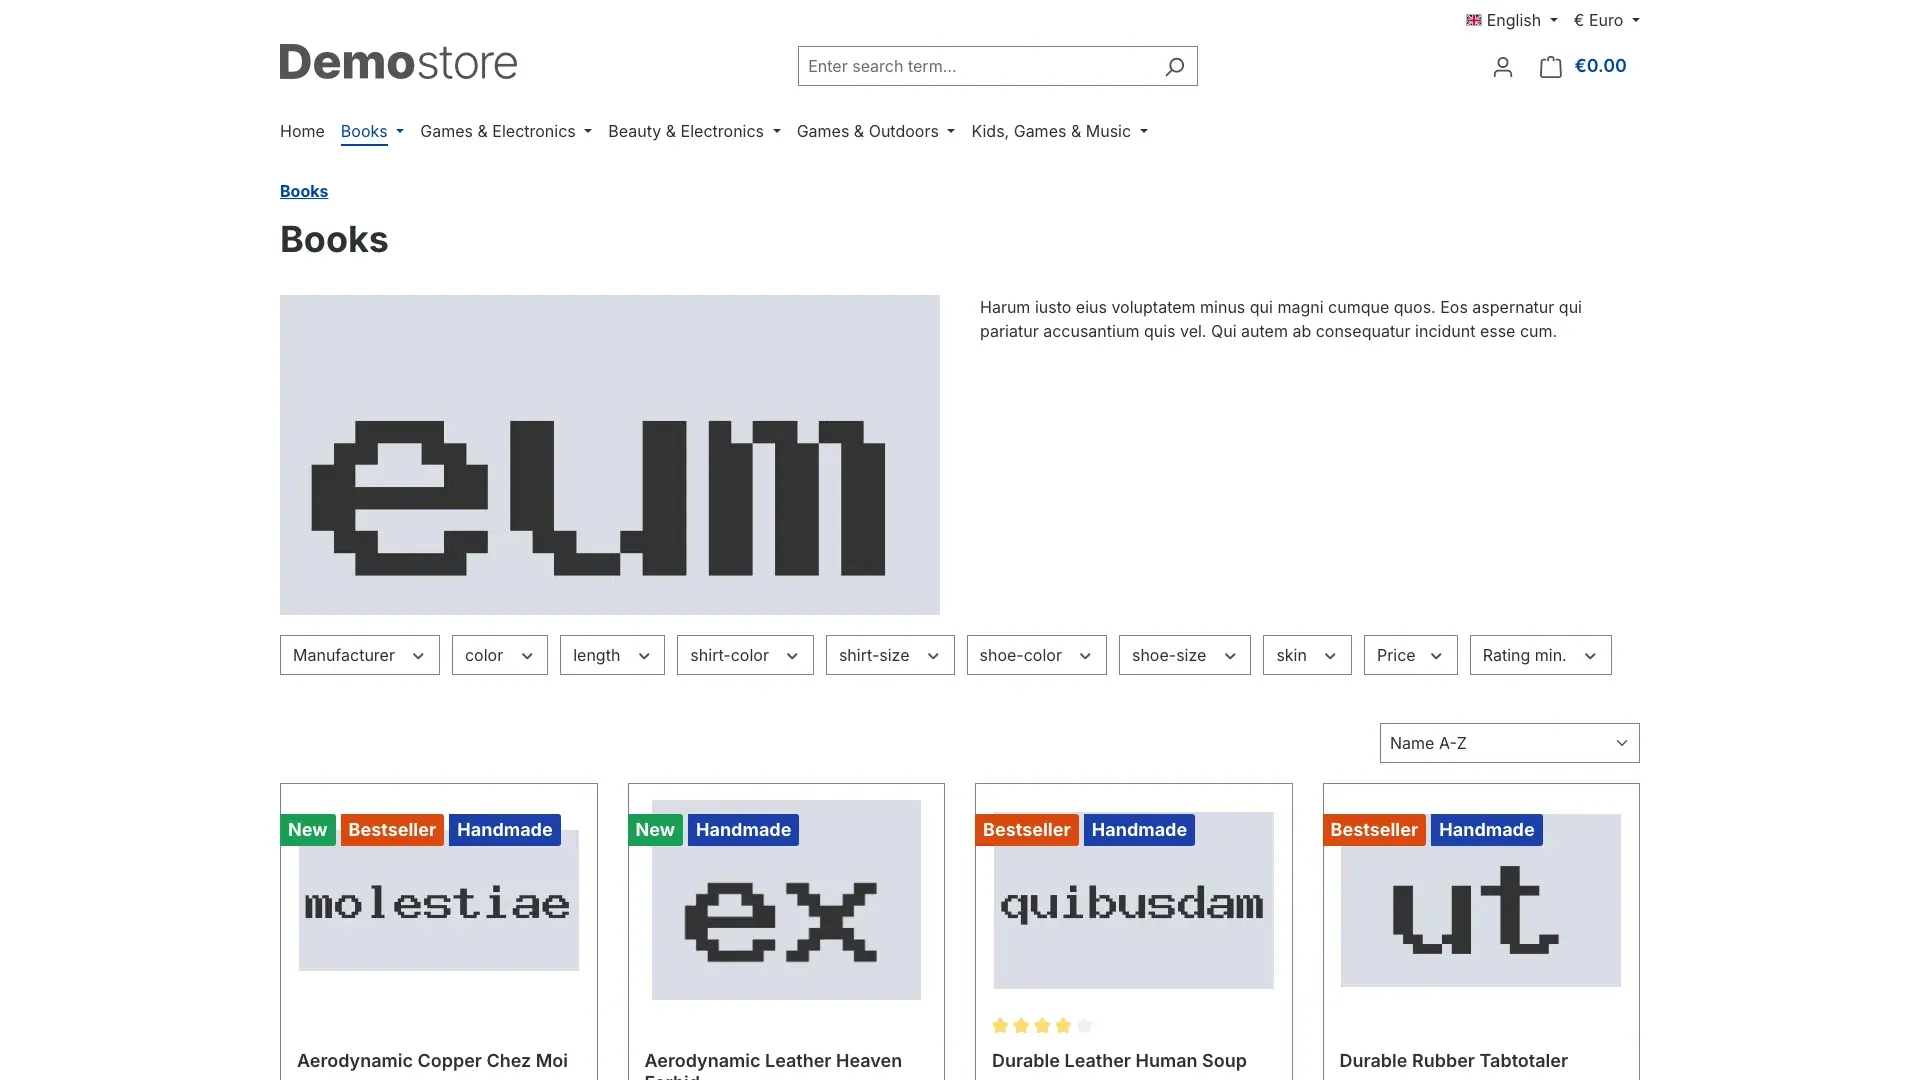
Open the category page the product belongs to. The badge appears on the product tile.
Tip: If you cannot see the badge, have a look at Settings — that is where you decide in which sales channel and in which places badges are shown.
Settings
You reach the settings through Extensions → My extensions: click Configure in the Custom Badges row.
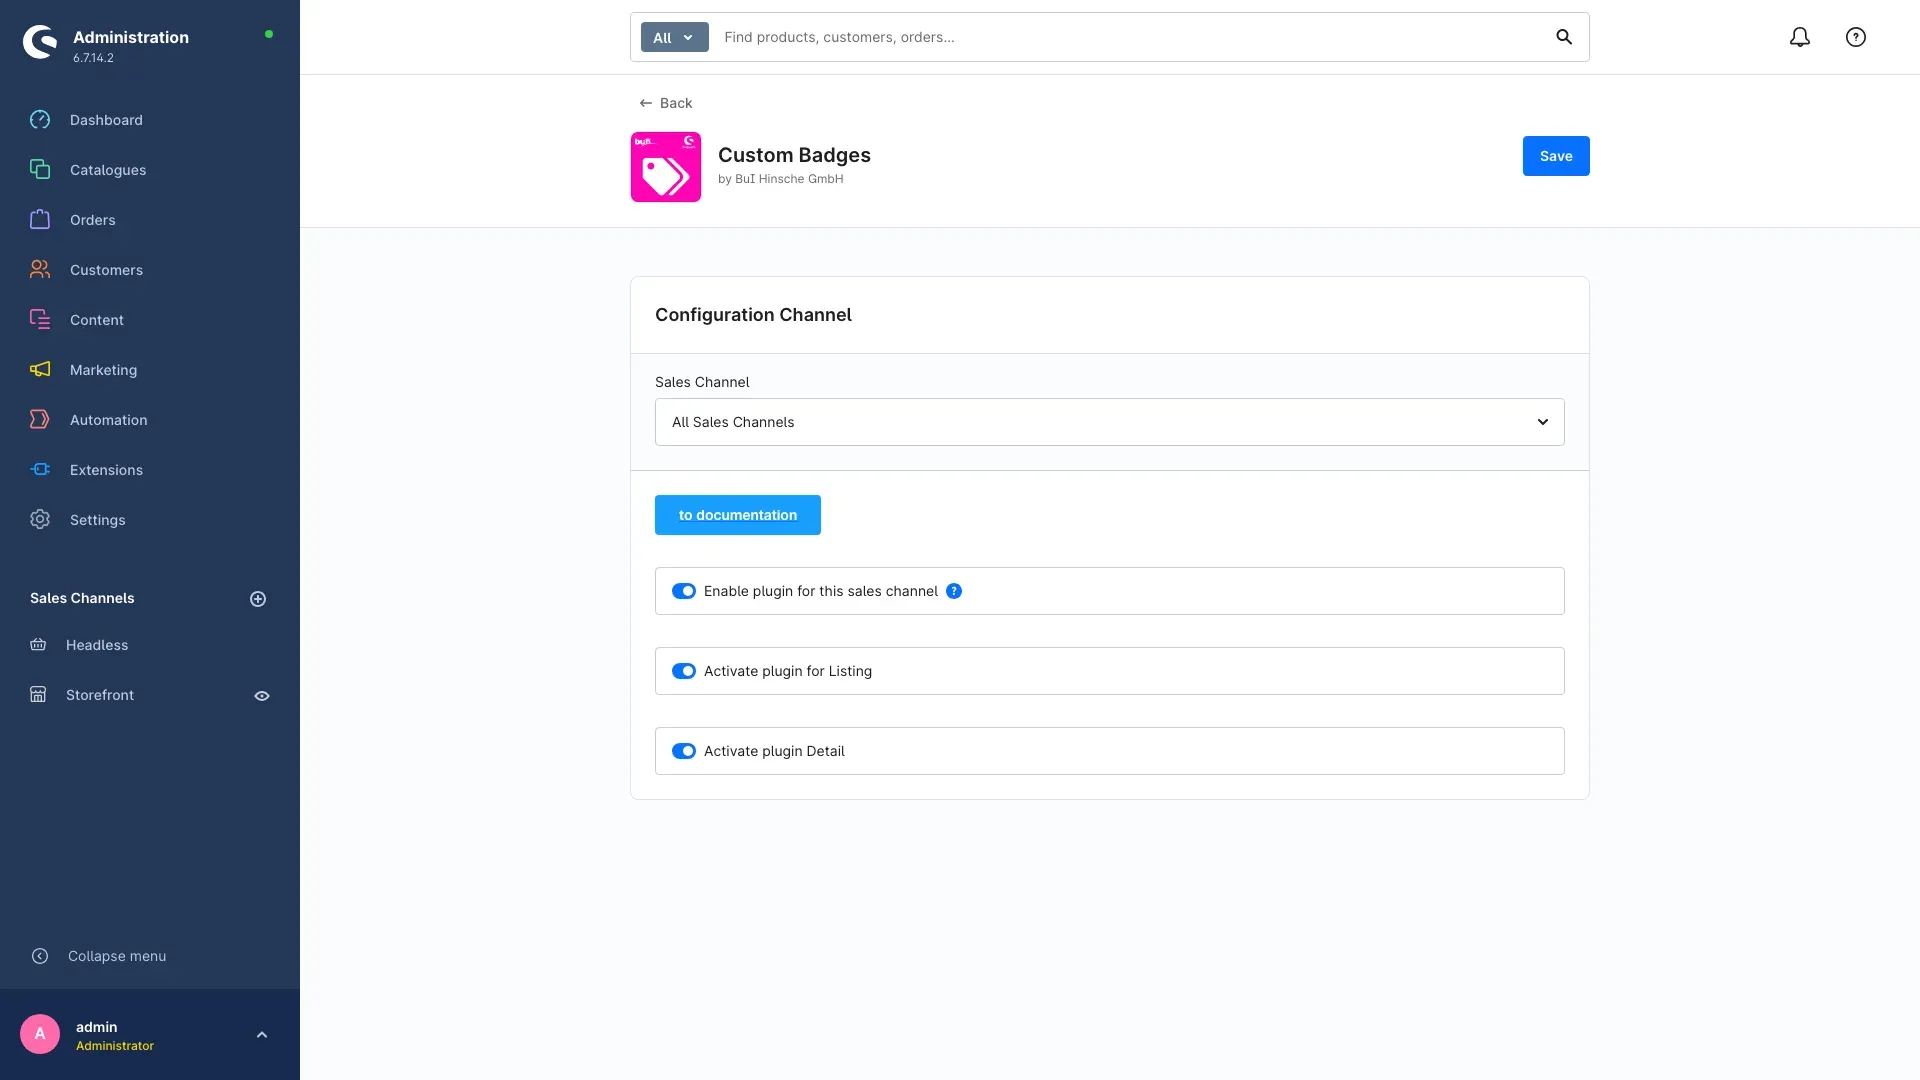
At the top of the Configuration Channel card sits the Sales Channel field. All three switches below always apply to the channel selected there. That way you can show badges in your consumer shop and leave them out of your trade shop. If you leave it on All Sales Channels, your setting applies to every channel that has no setting of its own. After every change, click Save in the top right corner.
The to documentation button at the start of the Configuration Channel card opens this manual in your browser at any time.
Enable plugin for this sales channel
This is the master switch. When it is off, no badges are output in this sales channel — neither in overviews nor on product pages. Your badges and all assignments stay untouched, they are simply not displayed. The switch is on by default.
What it is good for: You can put badges to rest in one shop without uninstalling the plugin. Handy for a B2B channel where promotional labels are unwanted, or when you want to try badges in a test channel first.
Activate plugin for Listing
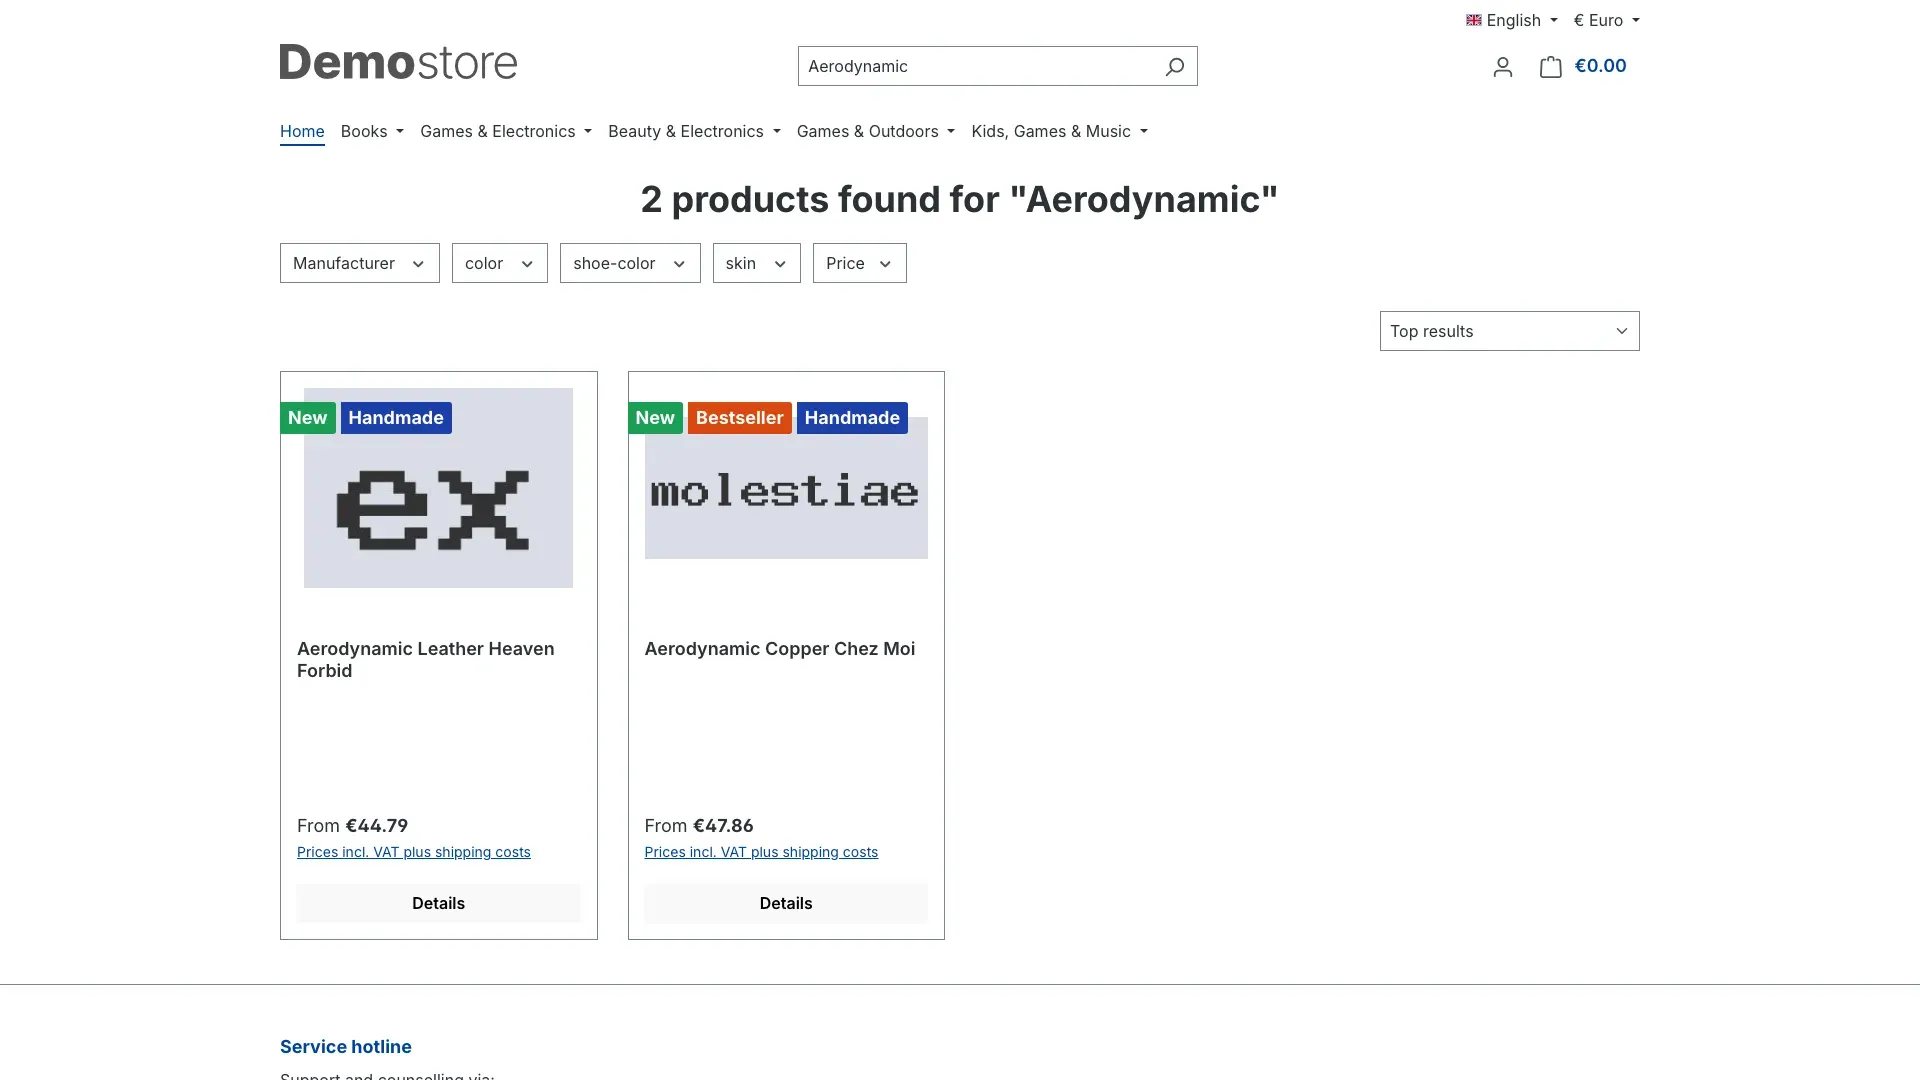
Controls everywhere products appear as tiles side by side: the category overview, search results, cross-selling recommendations and the product elements in Shopping Experiences. The switch is on by default.
What it is good for: This is where badges work hardest, because customers see many products at once and the label does the pre-selection for them. Switch it off if your tiles are already busy and you would rather show badges only on the product page.
Activate plugin Detail
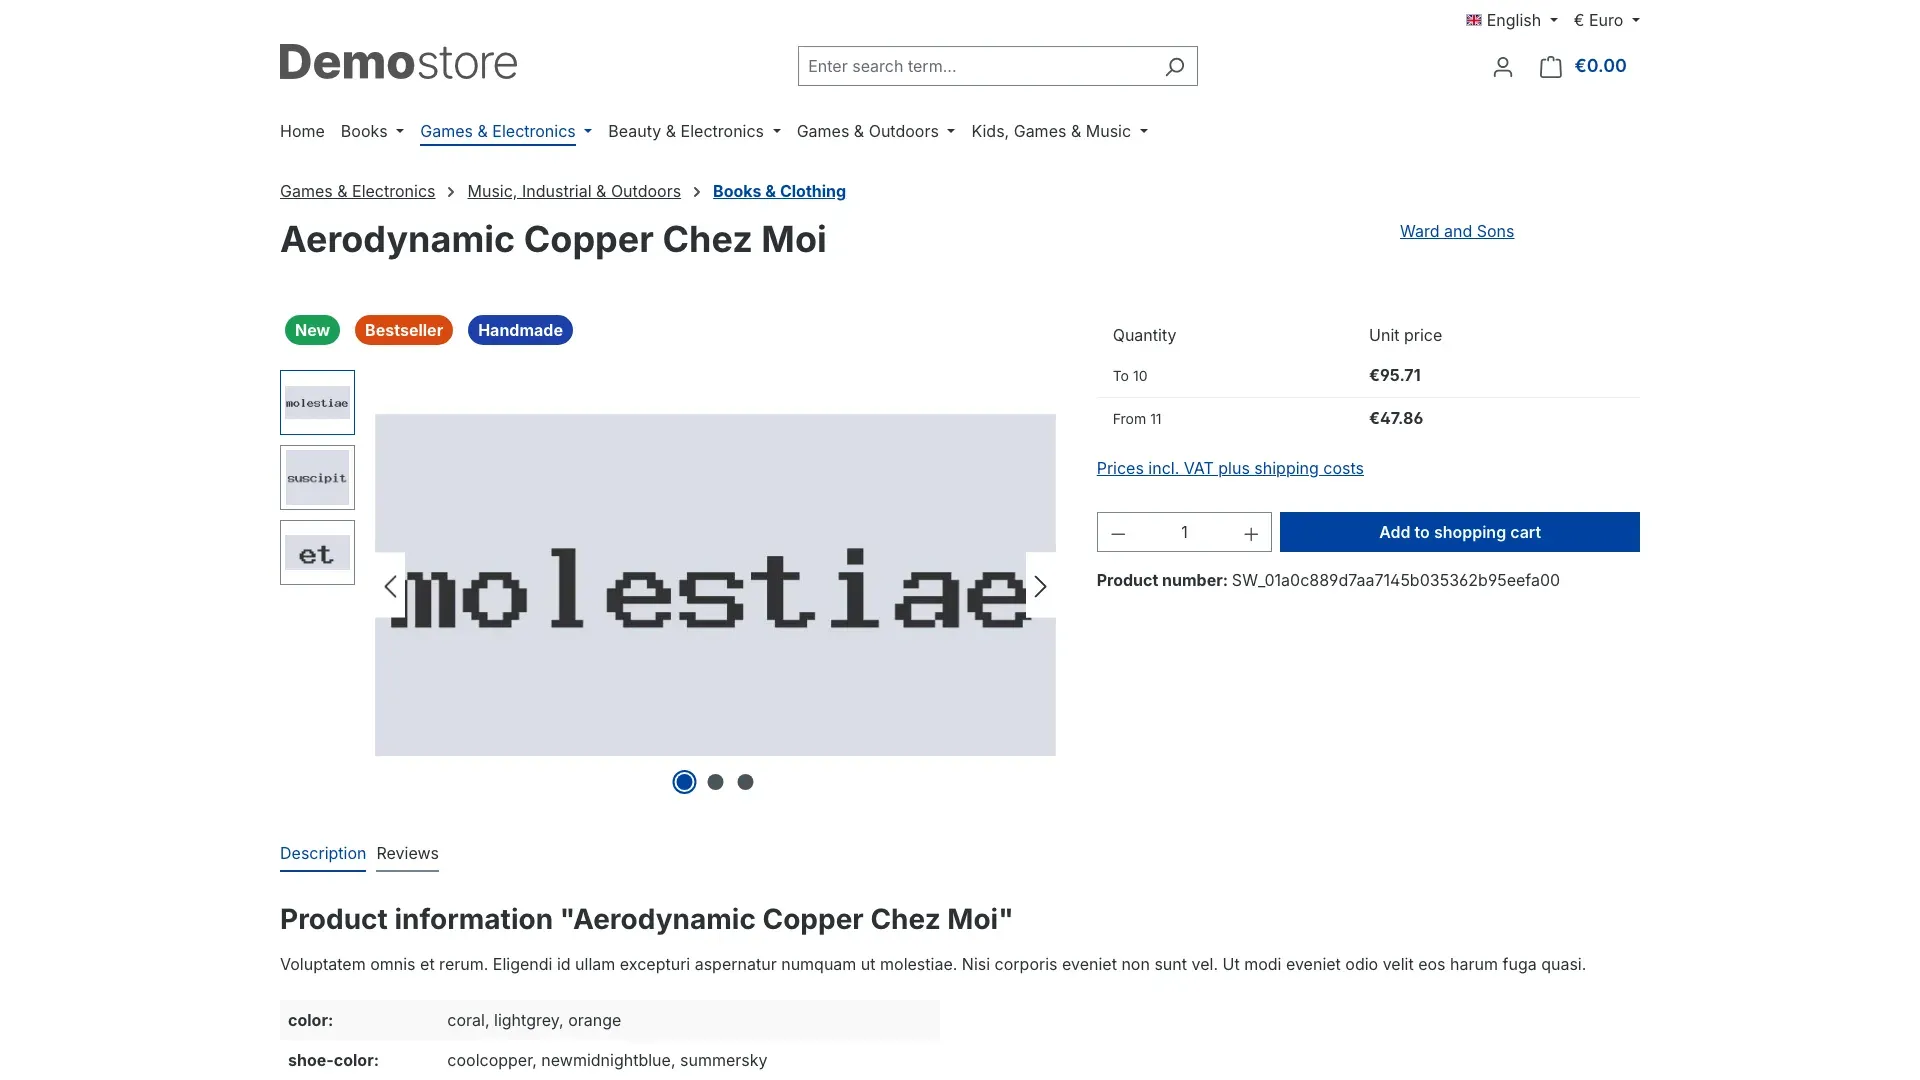
Controls the display on the product page, right next to the product images. This switch is off by default — so right after installation badges appear in overviews only.
What it is good for: On the product page the customer has already decided to take a closer look. A badge such as “Handmade” or “Online only” provides the final argument there. Switch it on if you want that effect as well.
Important: The three switches build on each other. If the master switch is off, the other two no longer change anything.
How to use the features
How to create a badge
What this gives you: You decide what the label says and how it looks. Only then can it be assigned to products and categories.
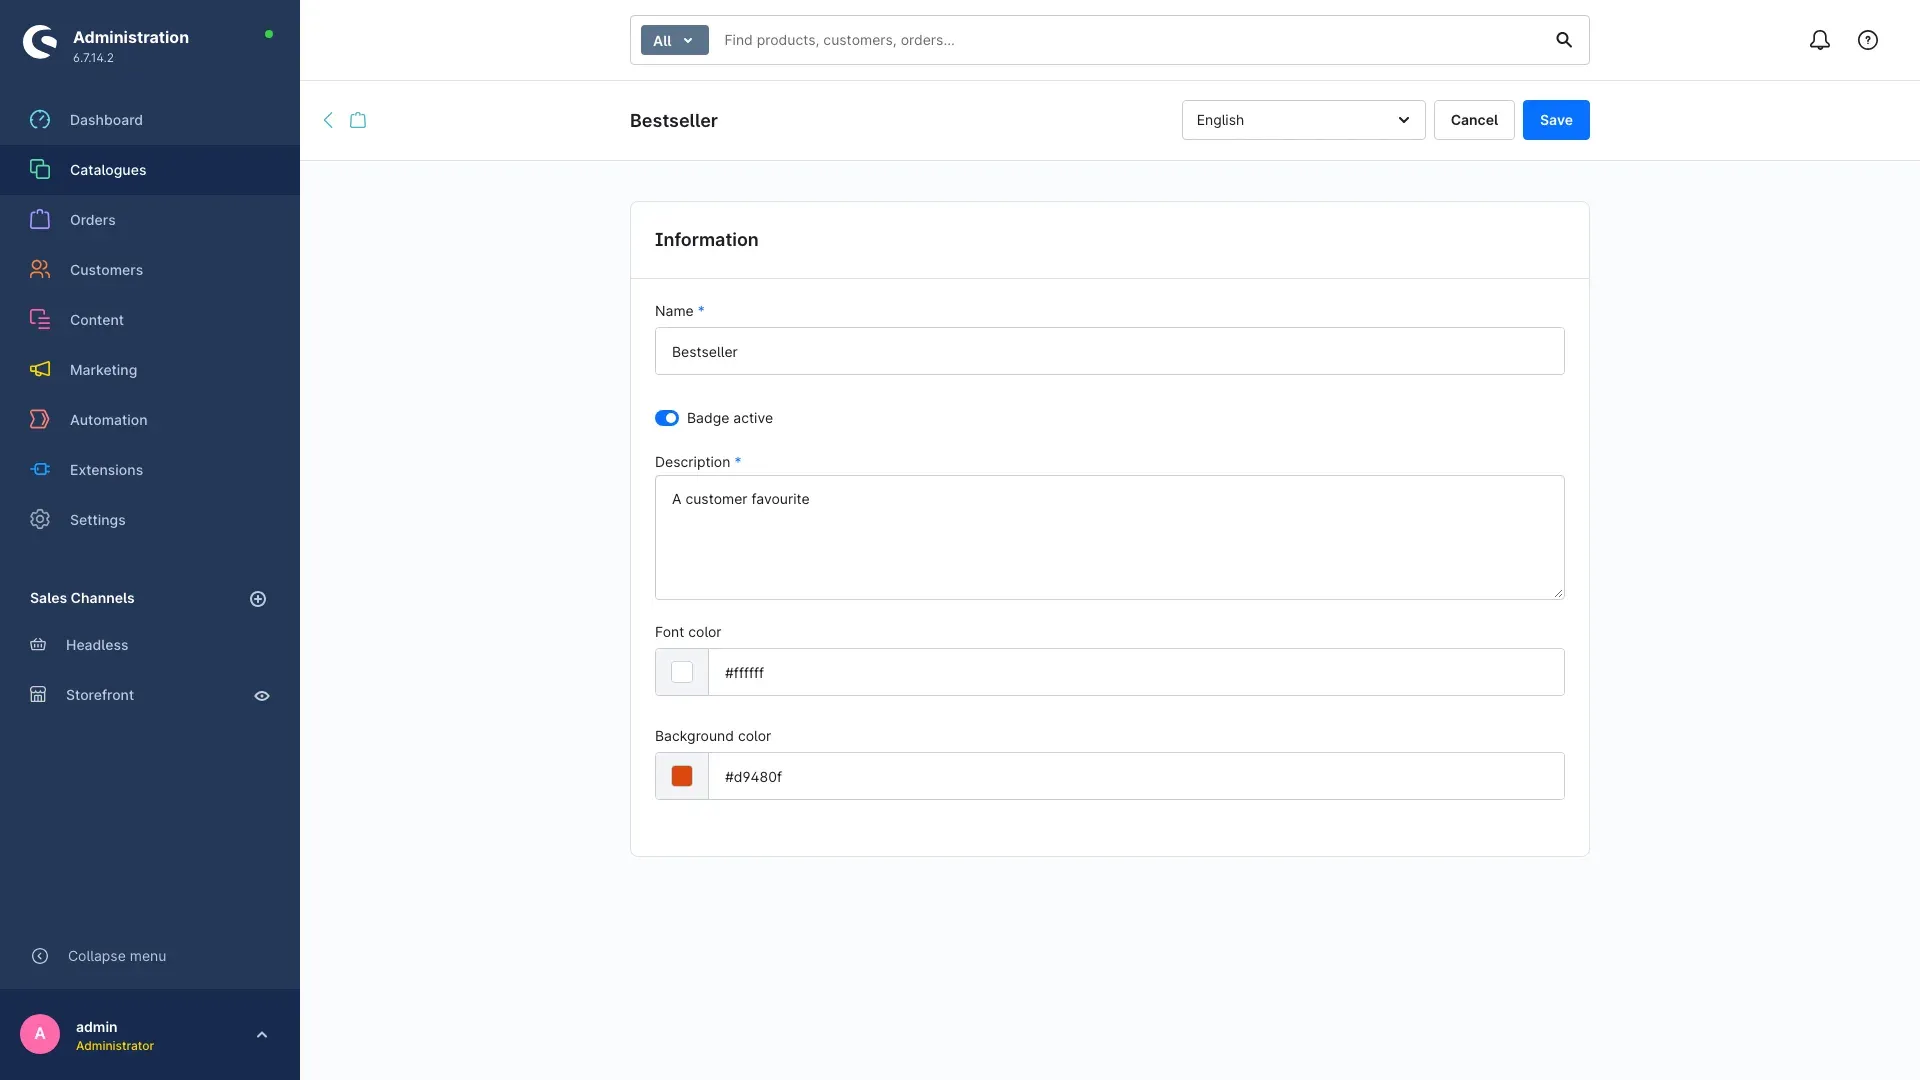
Step by step
- Go to Catalogues → Badges.
- Click Add in the top right corner.
- Fill in the Information card:
- Name: the text that later appears on the badge in your shop. Keep it short — there is little room on a product tile. “New” works better than “New in our range”.
- Badge active: decides whether the badge is output in your shop. Leave it on as long as the badge should be visible.
- Description: one explanatory sentence. Customers see it as a small tooltip when they hover over the badge.
- Font color: the colour of the text on the badge.
- Background color: the colour of the area behind the text.
- Click Save. A message confirms the badge was saved.
Tip: Mind the contrast between the two colours. White text on a strong colour reads best; light text on a light background disappears on small screens.
Tip: Use the language selection at the top of the page to maintain name and description per language. This pays off in a multilingual shop — otherwise the same text is used everywhere. The colours and the Badge active switch always apply to all languages.
Editing a badge later
The overview under Catalogues → Badges lists every badge with Name, Description and Status. Clicking the name opens the badge for editing. Name, description and status can also be changed right in the list without opening the badge.
If you change the name or the colours, the change takes effect everywhere the badge is assigned — you do not have to touch the products again.
How to assign badges to a product
What this gives you: This is the direct route for individual products. A product can carry several badges at the same time.
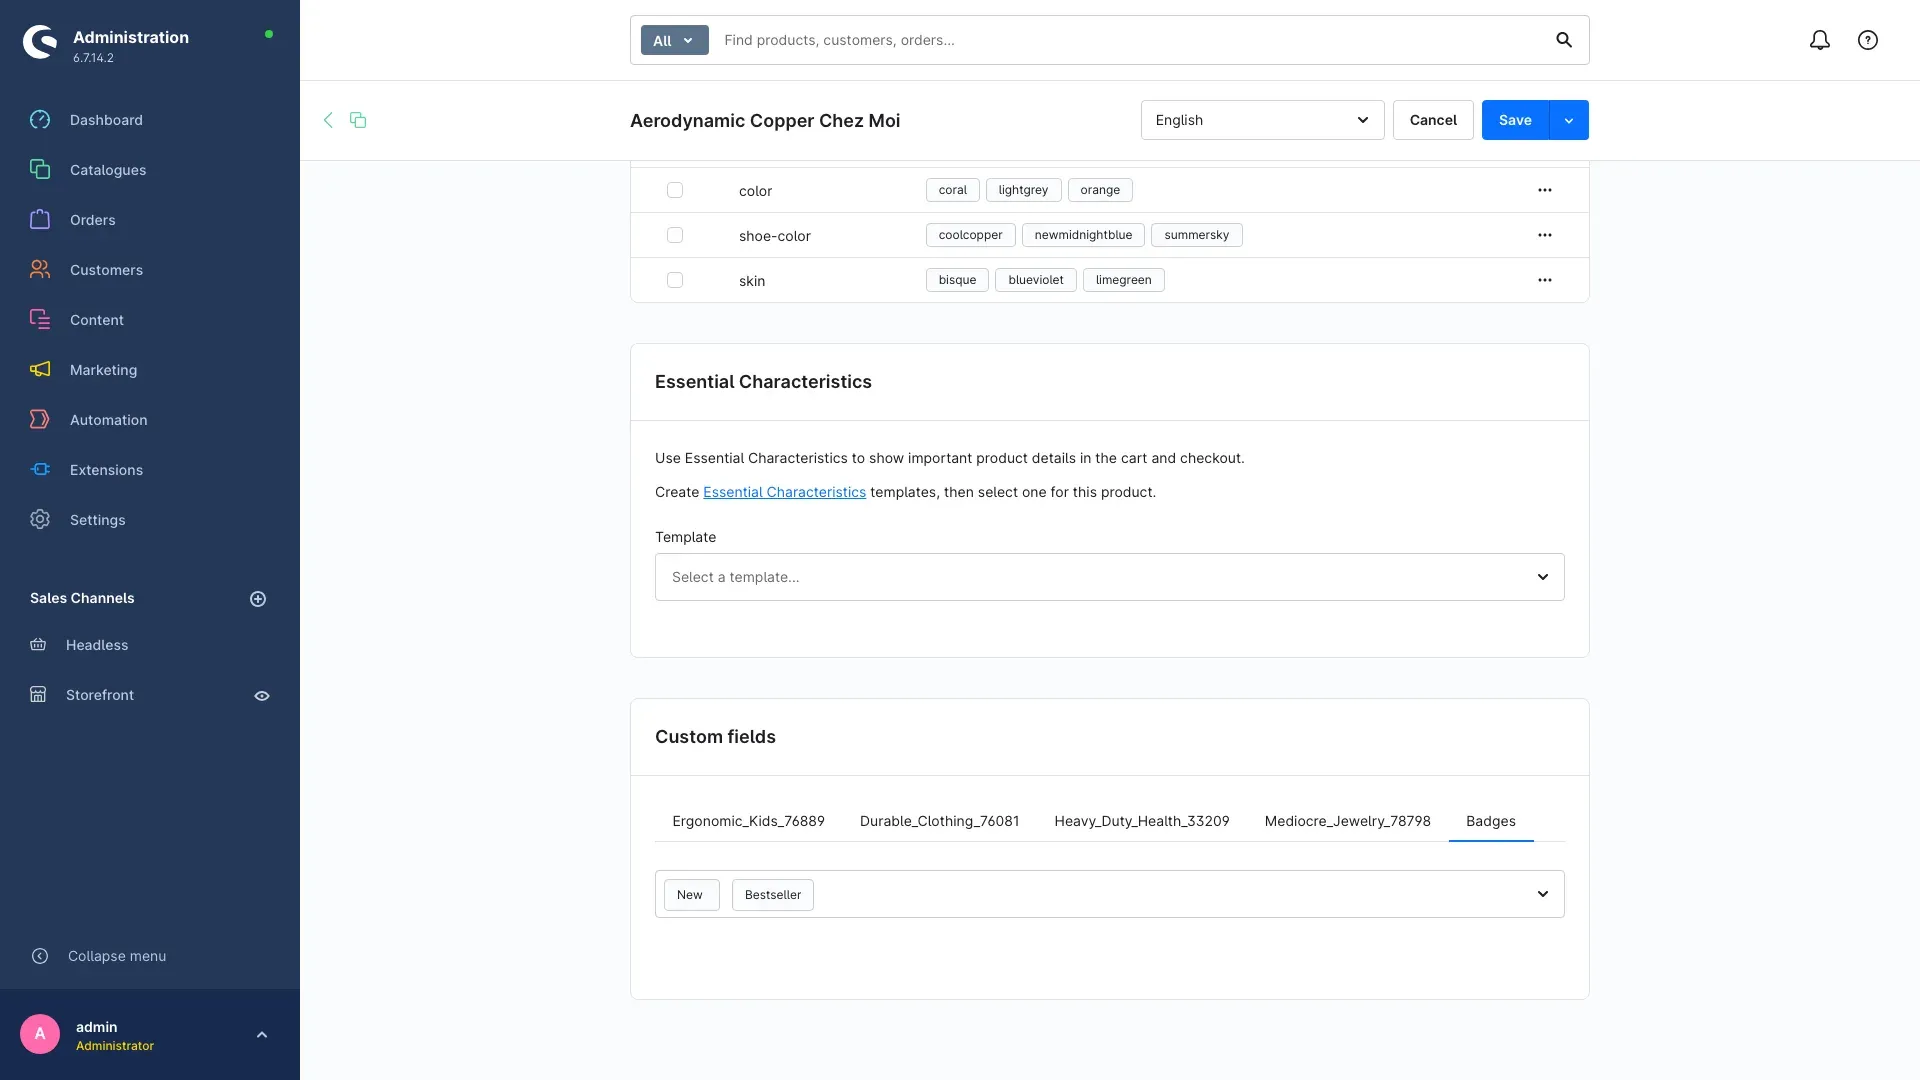
Step by step
- Go to Catalogues → Products and open the product you want.
- Switch to the Specifications tab.
- Scroll down to the Custom fields card and click the Badges tab inside it.
- Open the selection field below and pick one or more badges. You can type to narrow down the list.
- Click Save in the top right corner.
The order in your shop follows the order of your selection.
Tip: To remove a badge, deselect it in the selection field. The badge itself is kept and stays assigned to all other products.
How to give a whole category a badge
What this gives you: Instead of labelling every product individually, you attach the badge to the category. Every product in it carries the badge automatically — including products you add later.
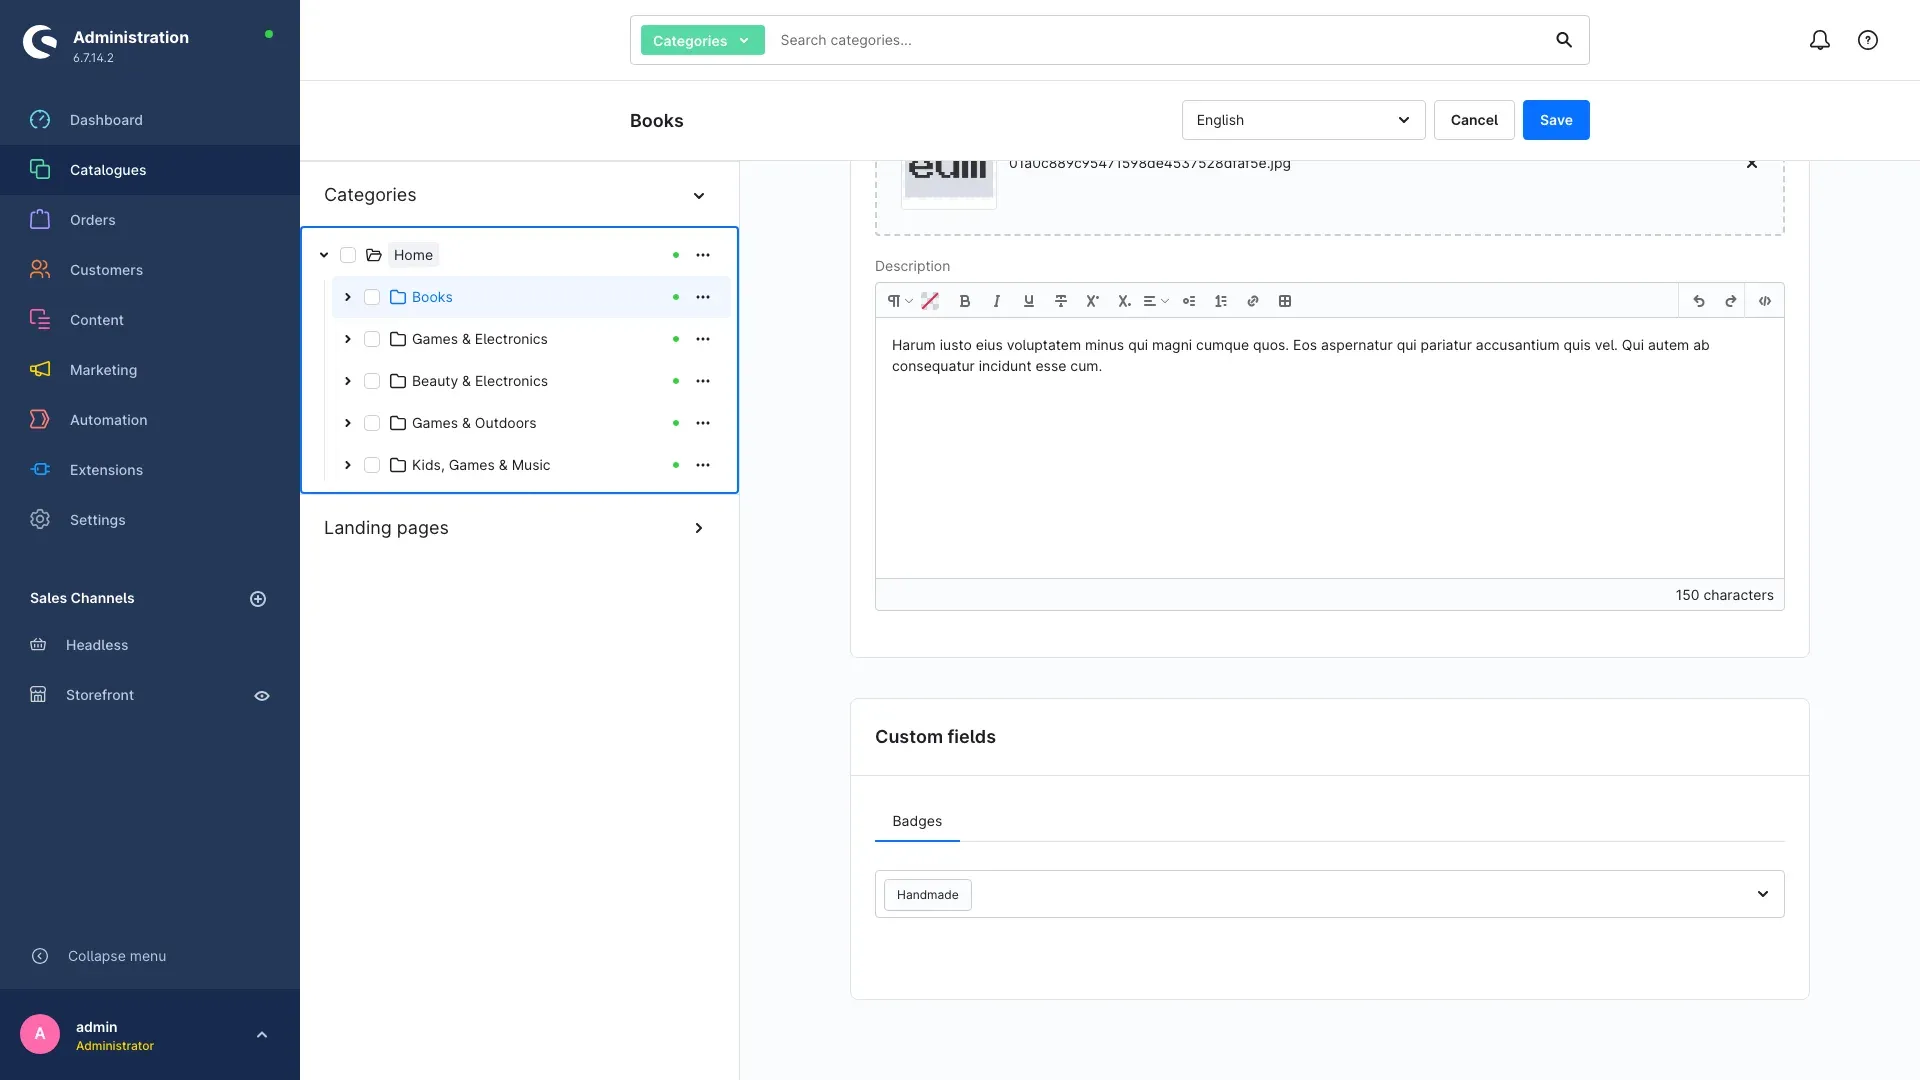
Step by step
- Go to Catalogues → Categories.
- Select the category you want in the category tree on the left.
- In the General tab, scroll down to the Custom fields card and click the Badges tab inside it.
- Select one or more badges in the selection field below.
- Click Save.
This also covers subcategories: a badge on a parent category reaches every product below it.
Important: This assignment is not a copy. Products show the badge as long as they sit in the category — so you will not see it in the Badges tab of the individual product. Remove the badge from the category and it disappears everywhere at once.
Tip: Category and product assignment complement each other. A product in a category carrying “Handmade” can additionally carry its own “Bestseller” — your shop then shows both. A badge assigned twice still appears only once.
How to change badges for many products at once
What this gives you: You give dozens or hundreds of products the same badge in one go — or take it away again. A typical case: the promotion week is over and the “Promotion” badge should disappear from the whole range.
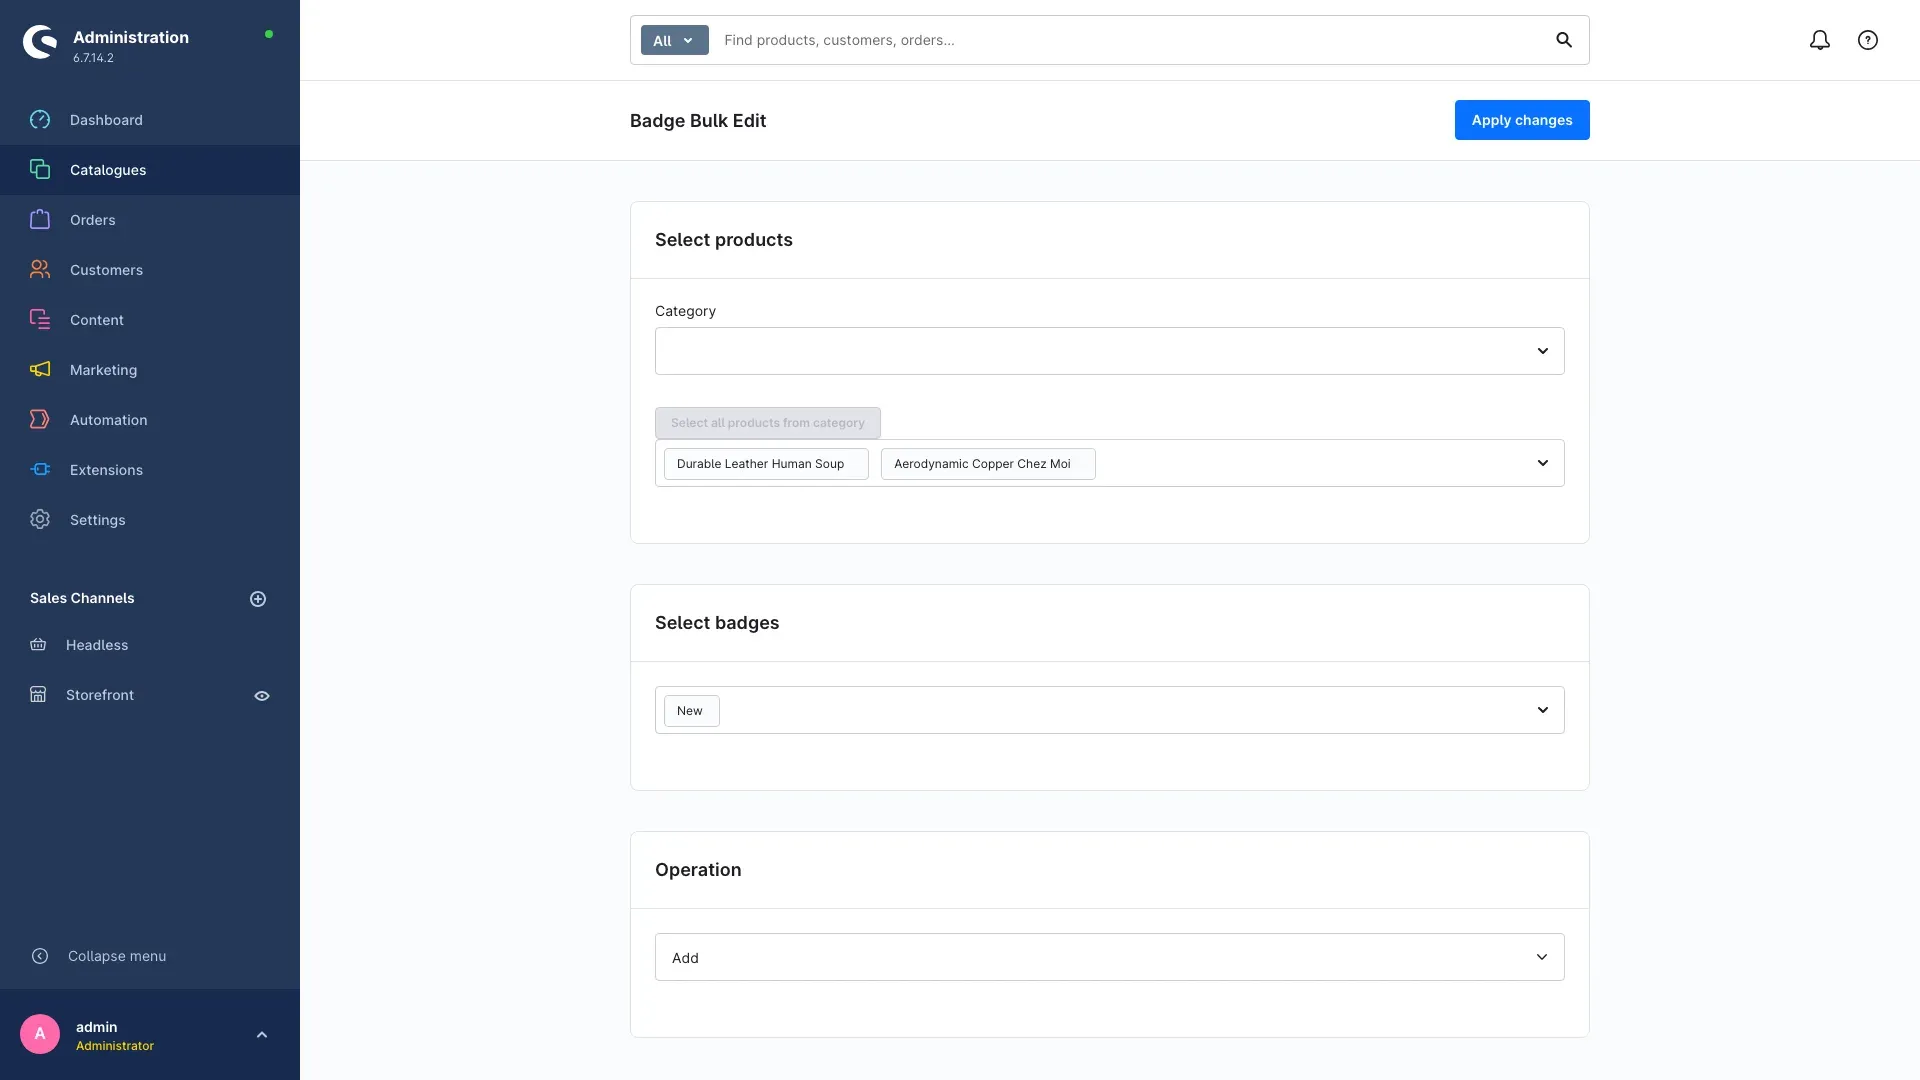
Step by step
- Go to Catalogues → Badge Bulk Edit.
- In the Select products card, put together the products you want to edit. There are two ways, and you can combine them:
- Pick a category in the Category field and click Select all products from category. This puts every product of that category into the selection, variants included.
- Use the search field below (Search products…) to add individual products, or to build the selection from scratch. If you picked a category beforehand, the field only suggests products from that category.
- In the Select badges card, choose the badges you want to work with.
- In the Operation card, decide what should happen:
- Add: the selected badges are added to whatever the products already carry. Existing badges stay.
- Remove: the selected badges are taken off the products. All others stay.
- Replace: the products end up carrying exactly the selected badges — anything that was there before is dropped.
- Click Apply changes in the top right corner. A message confirms that the badges were updated.
Important: Replace overwrites existing assignments without asking, and there is no undo button. When in doubt, try the operation on a handful of products first.
Important: Bulk edit always changes the badges on the product. Badges that come from a category (see How to give a whole category a badge) cannot be removed here — you take those off the category itself.
Tip: The Category field only lists categories without subcategories. To work through a whole branch, go category by category — or assign the badge to the parent category right away, as described in How to give a whole category a badge.
If you select no products or no badges, the page tells you so and does nothing.
How to hide a badge temporarily
What this gives you: The badge disappears from your whole shop while every assignment is kept. Next time you simply switch it back on instead of assigning it all over again.
Step by step
- Go to Catalogues → Badges.
- Open the badge and switch Badge active off. Alternatively, change the Status directly in the list.
- Click Save.
From then on the badge appears nowhere in your shop — neither in overviews nor on product pages. In the administration it stays visibly assigned to all products and categories.
Tip: This is the right approach for recurring occasions such as “Promotion”, “Advent offer” or “Trade fair price”. Assigned once, back every year with a single switch.
Where badges appear in your shop
What this gives you: You know where to check the result of your work.
Badges appear in these places — provided the matching switch from Settings is on:
| Place in your shop | Required switch |
|---|---|
| Category overview | Activate plugin for Listing |
| Search results | Activate plugin for Listing |
| Cross-selling recommendations on the product page | Activate plugin for Listing |
| Product elements in Shopping Experiences | Activate plugin for Listing |
| Product page, next to the product images | Activate plugin Detail |
On the product page the badges sit above the product images and are displayed slightly larger than on the tiles:
Tip: Hover over a badge in your shop. The description you entered in How to create a badge then appears.
Giving staff access
What this gives you: Staff without administrator rights can maintain badges — exactly as far as you allow.
- Go to Settings → System → Users & permissions.
- Open the role you want to extend, or create a new one.
- In the Catalogues area, find the row for badge management.
- Tick the boxes you want to grant:
- View — open the badge overview and look at badges.
- Edit — change existing badges and use bulk edit.
- Create — create new badges.
- Delete — remove badges.
- Click Save.
Important: The levels build on each other. Creating or deleting also requires View; creating additionally requires Edit. Shopware ticks the necessary boxes for you.
Important: These permissions cover badges only. For a staff member to assign badges to products and categories, their role also needs the usual permissions for products and categories.
Troubleshooting
No badge appears in the shop at all
What causes it: Usually one of the three switches is off, or the cache is still serving the old page.
How to fix it:
- Open Extensions → My extensions, click Configure on Custom Badges and select the sales channel in question at the top.
- Check that Enable plugin for this sales channel is on.
- Check that the switch for the place where you expect the badge is on (see Where badges appear in your shop).
- Clear the cache: Settings → System → Caches & indexes → Clear cache.
Badges are missing on the product page but visible in the overview
What causes it: Activate plugin Detail is off right after installation.
How to fix it: Open Extensions → My extensions → Configure, switch it on for the affected sales channel and clear the cache afterwards.
One particular badge is missing, the others show up
What causes it: That badge is switched off.
How to fix it: Open Catalogues → Badges and look at the Status column. A badge that is switched on carries a green tick there, one that is switched off a red cross. Open the badge and switch Badge active back on.
The badge is assigned to the product but does not appear in the shop
What causes it: Almost always the colours. If a colour was filled in with an invalid value through an interface or an import, it is discarded — text and background can then end up in the same colour and the badge looks invisible.
How to fix it: Open the badge under Catalogues → Badges and set Font color and Background color again using the colour pickers. Clear the cache afterwards.
The Badges area is missing from the Catalogues menu
What causes it: The plugin is probably not switched on, or your user account lacks the permission.
How to fix it:
- Open Extensions → My extensions and check that Custom Badges is installed and switched on.
- Have your role checked (see Giving staff access).
- Clear the cache and reload the administration.
Bulk edit reports that no products were found
What causes it: No product is selected. This happens if you picked a category but did not click Select all products from category — or if the category contains no products.
How to fix it: Click Select all products from category or pick products using the search field. The operation only runs once products are in the selection.
FAQ
Q: How many badges can one product carry?
A: As many as you like. Do keep the space on the product tile in mind though — more than two or three badges side by side quickly looks cluttered.
Q: Do I have to create separate badges for each language?
A: No. You create a badge once and maintain name and description per language using the language selection. Colours and assignments apply to all languages alike.
Q: Can I show badges in only one of several shops?
A: Yes. All three switches on the configuration page (Extensions → My extensions → Configure) apply per sales channel. Select the channel at the top and configure it independently.
Q: What happens to my assignments if I delete a badge?
A: The badge disappears from your shop and from every product and category it was assigned to. It cannot be restored. If you only want it out of the way for a while, switch it off instead (see How to hide a badge temporarily).
Q: Do badges also appear on product variants?
A: Yes. Assign a badge to a variant and it appears on that variant. Select all products from category in bulk edit picks up variants automatically.
Q: Can I use my own images or icons as a badge?
A: No. A badge consists of text, font colour and background colour. This keeps the display crisp on every screen size and the page fast.
Q: Why can I not see a badge in the product’s Badges tab although it appears in the shop?
A: Then it comes from a category (see How to give a whole category a badge). Category badges are maintained on the category, not on the individual product.
Q: What happens to my badges when I uninstall?
A: On uninstall Shopware asks whether all data should be removed. If you leave the Remove all app data permanently checkbox unticked, your badges and assignments are kept and are back after a re-installation.
For administrators / technical details
This section is aimed at technical administrators. You do not need it for everyday use.
System requirements
- Shopware: 6.7.0 or newer
- PHP: 8.2 or newer
- Database: MySQL 8.0 / MariaDB 10.11 or newer
Installation from the command line
composer require swp/custombadges-six
php bin/console plugin:refresh
php bin/console plugin:install SwpCustomBadgesSix --activate
php bin/console cache:clear
Data storage
Badges live in two dedicated database tables of the plugin; Shopware’s own tables are not modified. The assignment to products and categories is handled by a custom field set that is created when the plugin is switched on and refreshed with every update.
On uninstall, the Remove all app data permanently checkbox decides: without it, tables and custom field set remain in place; with it, they are removed. Simply switching the plugin off never deletes data.
Elasticsearch
If your shop runs on Elasticsearch, the plugin ships the matching index mapping for the badge field itself. No intervention is needed. After installation the product index should be rebuilt once so that badge-based dynamic product groups and sortings work:
php bin/console es:indexBehaviour on errors
If a badge assignment cannot be resolved, the affected badge is skipped and the page is delivered as usual. The incident is recorded in the plugin’s own log channel. A shop page never fails because of it.
Colour values from interfaces
If an external system writes the colours through the API, only hex values and rgb() / rgba() notations are accepted. Everything else is discarded, so no foreign code can reach a shop page through this field.
Performance
The badges of a page are loaded in one batch: whether an overview shows 12 or 120 products, the same constant number of database queries is issued. Bulk edit processes the selection in bands of 100 products, so even very large selections run through without locking the entire product table.
This manual was written for Custom Badges version 6.7.1.
More manuals
Admin Password Reminder
Admin Password Reminder: your backend users renew their passwords on time, prompted after login and by a daily email. Premium locks expired accounts until the password is changed.
Open manual Shopware 6Age Check
Tobacco, spirits, knives: visitors who do not confirm their age never see the restricted items at all. You tick a box per product, the plugin hides it everywhere.
Open manual Shopware 6AI Media Labelling
AI labelling for images and videos: flag a media item once in the media manager and the badge with your notice appears wherever it shows up in your shop. No template work needed.
Open manualNeed a team that keeps your shop running?
We have been maintaining Shopware shops for more than 20 years, including updates, hotfixes and the plugins you are configuring right now.