AI Media Labelling
AI labelling for images and videos: flag a media item once in the media manager and the badge with your notice appears wherever it shows up in your shop. No template work needed.
On this page
- Introduction
- What you achieve with this plugin
- Who is this plugin for?
- Installation
- Getting Started
- Settings
- Sales Channel
- Enable plugin for this sales channel
- Badge text
- Default legal notice
- Badge position
- Badge style
- Show legal notice as tooltip
- Show on product detail pages
- Show on product tiles
- Show in shopping experiences
- Show on gallery thumbnails
- Show on videos
- How to Use the Features
- How to label a single image or video
- How to label many media items at once
- How your customers see the label
- Troubleshooting
- The badge does not appear in the shop at all
- The badge appears later on the search results page or in cross-selling
- In one language the default text is shown instead of my notice
- The “Set AI labelling” action is greyed out
- The badge is missing only with a particular theme
- The plugin does not appear under My extensions
- FAQ
- For Administrators / Technical Details
- System requirements
- Installation via the command line
- Where the label is stored
- Background processing (message queue)
- Headless and Composable Frontends
- Logging
- Uninstallation
Introduction
AI Media Labelling helps you visibly label images and videos in your shop that were created or modified, in whole or in part, using artificial intelligence — for example with regard to the transparency obligations of the EU AI Act (Article 50).
You flag an image or video once in the media manager. From then on, a small badge reading “AI-generated” appears wherever it is shown in the storefront. When a customer hovers over the badge, they see your notice, for example “Created with Midjourney v6”. No template work is needed.
Important — no legal advice: This plugin is a technical tool. Whether, where and with which wording you have to label AI content is something to clarify with your legal advisor. The plugin only puts your decision into practice in the shop.
What you achieve with this plugin
- You label individual images and videos with a single switch directly in the media manager.
- You label many media items at once with a bulk action.
- You add an individual notice per media item, for example about the tool used — or rely on a general default text.
- Your customers see the badge on product detail pages, on product tiles, in shopping experiences and on product videos.
- You choose the text, position and look of the badge and decide where it appears — separately for each sales channel.
Who is this plugin for?
For shop owners and editors who use AI-generated or AI-edited product images, banner images or videos in their shop and want to make them recognisable to their customers.
Installation
After purchase, the plugin is available directly in your Administration — there is nothing to download.
-
Log in to your Shopware Administration (
yourshop.com/admin). -
Open Extensions → My extensions, tab Apps. The search bar at the top finds the entry quickly, for example with the search term “AI Media”.
-
Click Install next to AI Media Labelling.
-
Activate the plugin with the switch to the left of the entry — done.
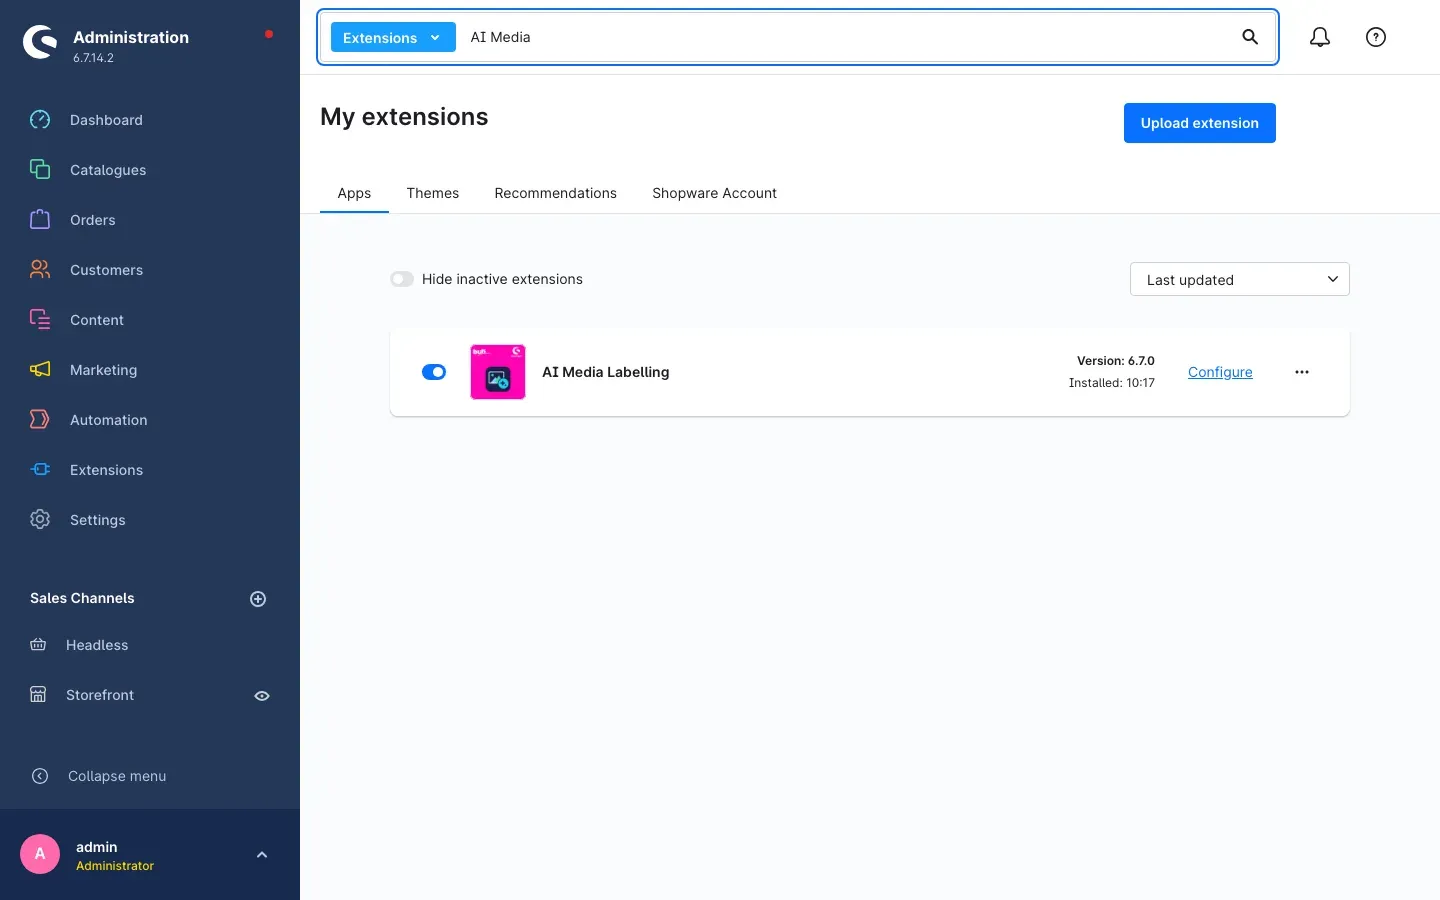 Fig. 1: AI Media Labelling is installed and active (switch blue).
If AI Media Labelling does not appear in the list, your Shopware account is not yet connected to the shop. You can do this under Extensions → My extensions in the Shopware Account tab by logging in with your Shopware account.
Getting Started
Three steps to see the first label in your shop:
- Check the settings: Under Extensions → My extensions, click Configure next to the plugin. The plugin is ready to use right after installation — the defaults suit most shops. Details are in Settings.
- Label a media item: Open Content → Media, click a product image and, in the sidebar under AI labelling, switch on Created or modified using AI. Click Save. Section How to label a single image or video explains this step by step.
- Check the result: Open a product in the storefront that uses this image. The “AI-generated” badge appears on the image.
Settings
You open the settings under Extensions → My extensions via Configure next to AI Media Labelling. All settings are in the AI labelling card. Click Save at the top right to apply your changes.
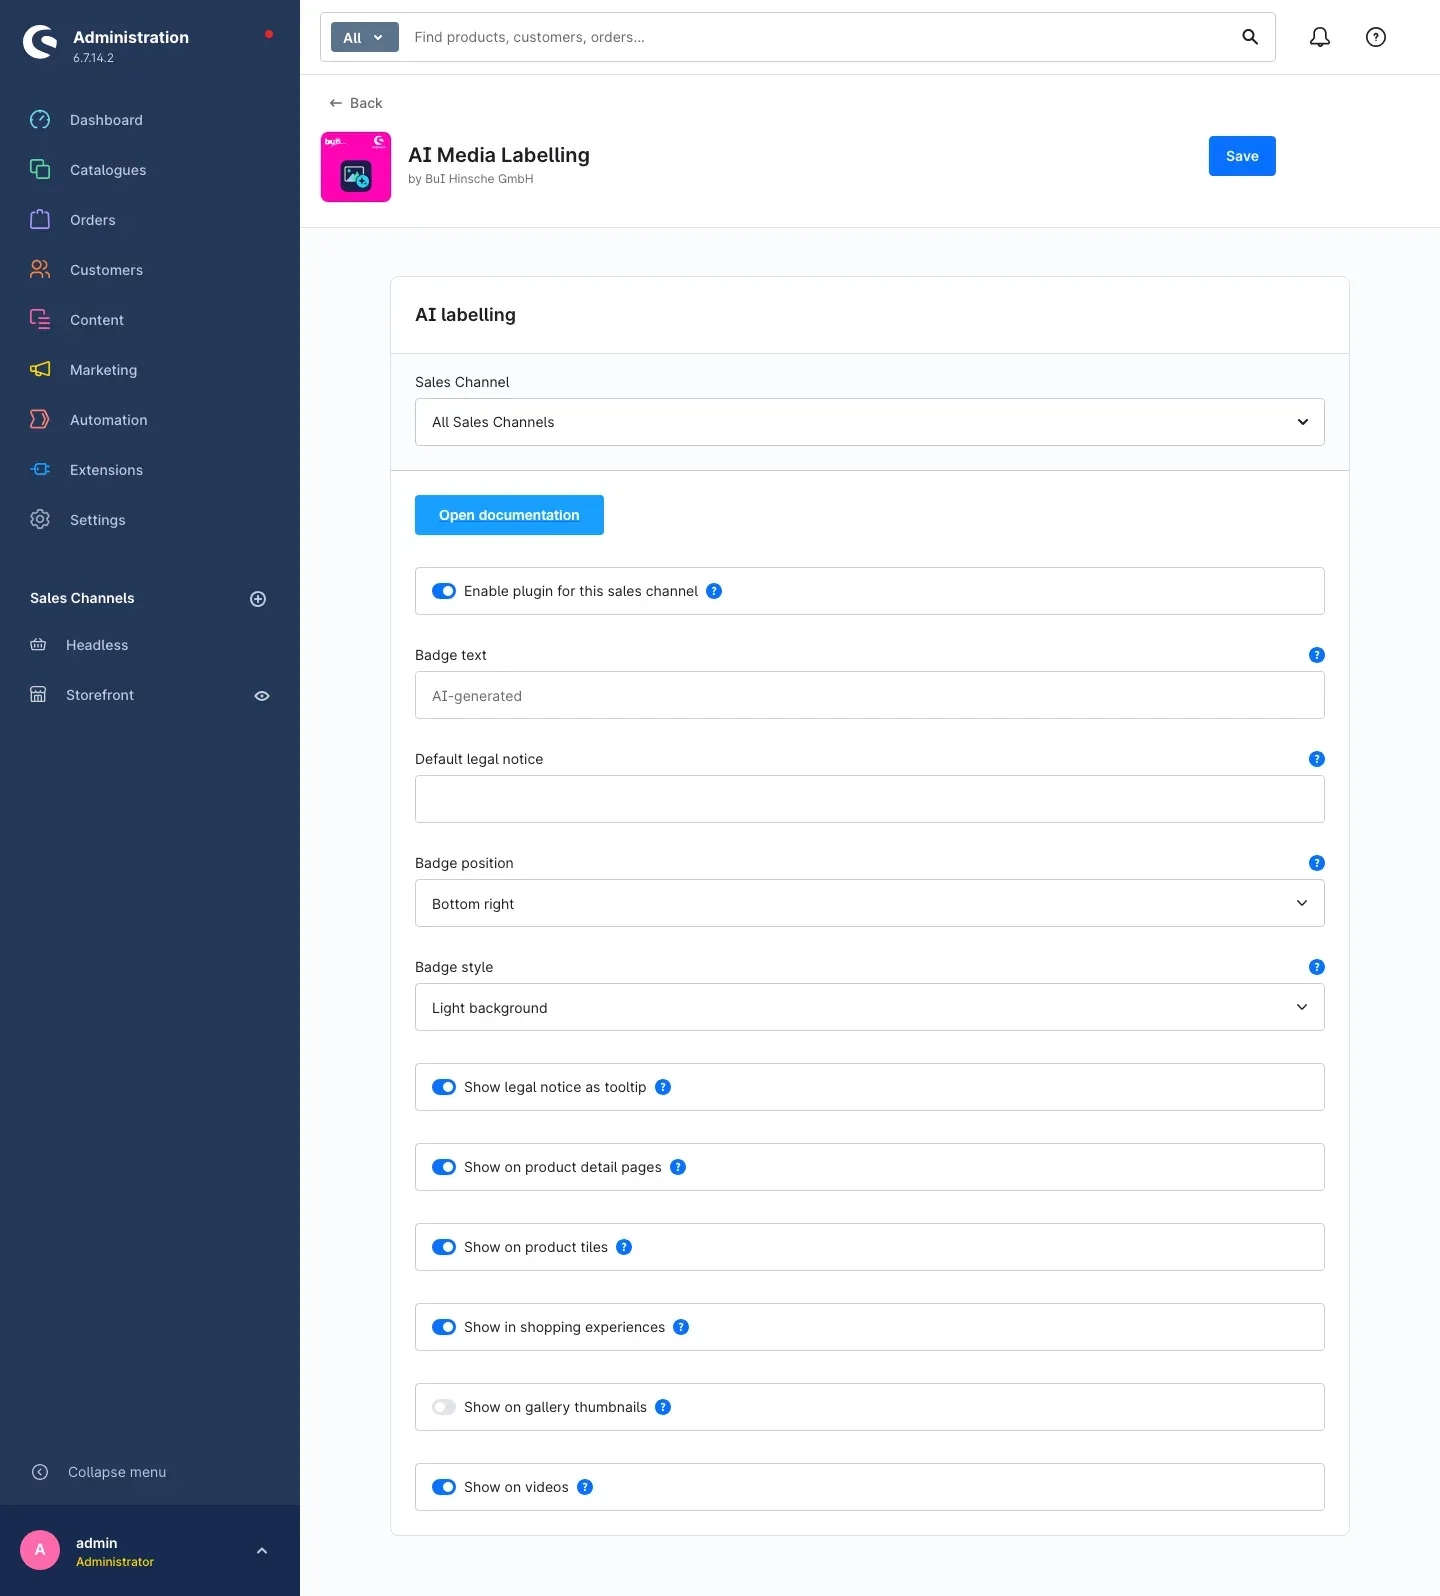 Fig. 2: The AI labelling card with all settings.
At the very top of the card, the Open documentation button takes you straight to this manual on our website.
Sales Channel
The Sales Channel selection at the top of the card determines which shop your settings apply to. Under All Sales Channels you set the defaults for all shops. If you pick a single sales channel, you can set individual values differently there — everything else is taken over from the defaults.
Why this is useful: If you run several shops, for example a B2C and a B2B shop, you can style the labelling differently per shop or switch it off entirely in one of them.
Enable plugin for this sales channel
The Enable plugin for this sales channel switch turns the AI labelling on or off in the selected sales channel without uninstalling the plugin. It is switched on by default.
Why this is useful: You want to hide the labelling in one shop, temporarily or permanently — the flags on your media items are kept.
Badge text
Badge text determines what the badge says. If you leave the field empty, the shop automatically shows the translated default text in the customer’s language: “AI-generated” in the English shop and “KI-generiert” in the German shop.
Why this is useful: If you prefer your own wording, such as “Made with AI”, enter it here. In multilingual shops, leaving the field empty is usually the best choice, because the text then always matches the language.
Default legal notice
The Default legal notice appears as a tooltip on the badge when you have not added an individual notice to a flagged media item. If the field is empty, the shop uses the translated default text: “This content was created or modified, in whole or in part, using artificial intelligence.”
Why this is useful: You define a general notice in your own wording once and do not have to write one for every media item.
Badge position
Badge position selects the corner of the image the badge is placed in: Bottom right (default), Bottom left, Top right or Top left.
Why this is useful: If your theme already places other elements in a corner, such as a discount label or gallery arrows, move the badge to a free corner.
Badge style
Badge style determines how strongly the badge stands out from the image: Light background (default), Dark background or Outline only. The colours come from your theme, so the badge matches your shop design.
Why this is useful: A dark badge stands out better on light product images, a light badge on dark motifs.
Show legal notice as tooltip
When Show legal notice as tooltip is switched on (default), your customers see the notice as soon as they hover over the badge. Switched off, the badge shows its text only. Screen readers still read the notice aloud.
Why this is useful: If the short badge is enough for you and you do not want an extra pop-up, switch the tooltip off — the information remains available to visitors using a screen reader.
Show on product detail pages
With Show on product detail pages (default: on), the badge appears on every media item of the product detail page: the gallery main image including the zoom modal, plus image, image slider and manufacturer logo elements you have placed in the product detail layout.
Show on product tiles
With Show on product tiles (default: on), the badge appears on product images in category and search listings, in cross-selling and in product sliders.
Show in shopping experiences
With Show in shopping experiences (default: on), the badge appears on image, image slider, image gallery and manufacturer logo elements outside the product detail page — on landing pages, the home page and in category layouts.
Good to know: Show on product detail pages and Show in shopping experiences never overlap. The first applies to everything in the product detail layout, the second to all other shopping experiences.
Show on gallery thumbnails
Show on gallery thumbnails is off by default. On the small preview images next to the gallery main image, the badge would cover the motif, and the main image next to it already carries the label. Switch it on if you also want to label the thumbnails.
Show on videos
With Show on videos (default: on), the badge also appears on flagged product videos — in the gallery and on product tiles.
How to Use the Features
How to label a single image or video
What this gives you: You flag a media item exactly once. The badge then appears automatically everywhere in the shop where this image or video is shown — without editing products or shopping experiences one by one.
Step by step
- Go to Content → Media and open the folder containing the image or video.
- Click the media item. The sidebar with its details opens on the right.
- Expand the AI labelling card in the sidebar.
- Switch on Created or modified using AI.
- If needed, enter your own text under Legal notice, for example “Created with Midjourney v6”. Up to 500 characters are possible; the counter below the field shows how many you have used. If you leave the field empty, the default legal notice from the settings is shown.
- Click Save below the card.
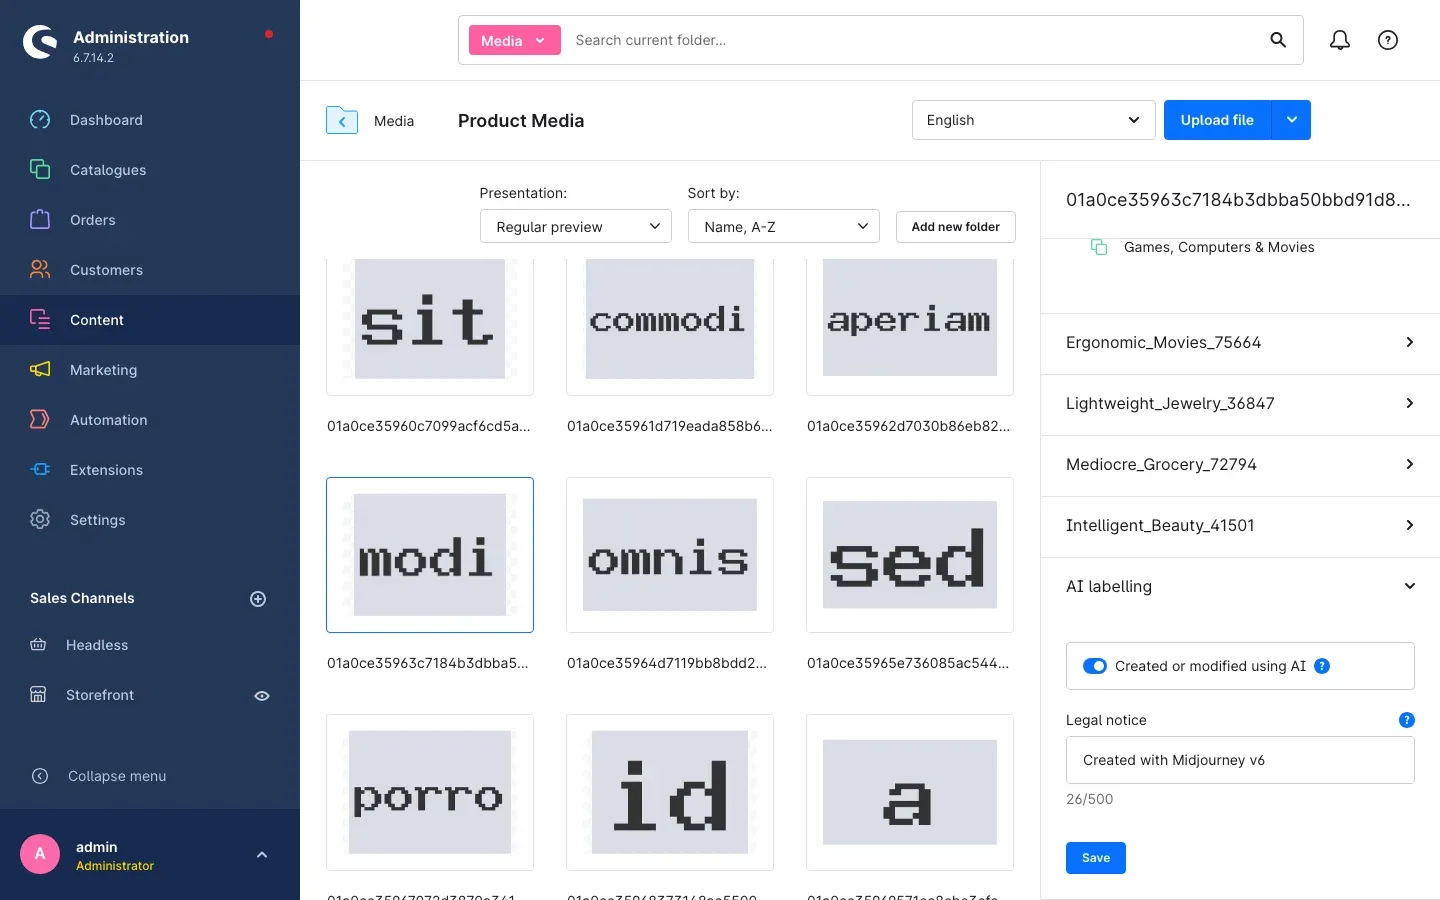 Fig. 3: The AI labelling card in the media manager sidebar.
Important — notice per language: The legal notice is stored separately for each content language. The language you are editing is shown in the language selection at the top next to Upload file. Switch to each language of your shop in turn and enter the notice there. If the notice is missing in a language, customers in that language see the default legal notice.
Tip: To remove the label again, switch off Created or modified using AI and click Save.
How to label many media items at once
What this gives you: If you have created a whole series of images with AI, you label all of them in one go instead of opening each one.
Step by step
-
Go to Content → Media and open the folder.
-
Tick the checkbox at the top left of the preview of every media item you want to label. The sidebar then shows how many files are selected.
-
In the sidebar, click Set AI labelling under Actions.
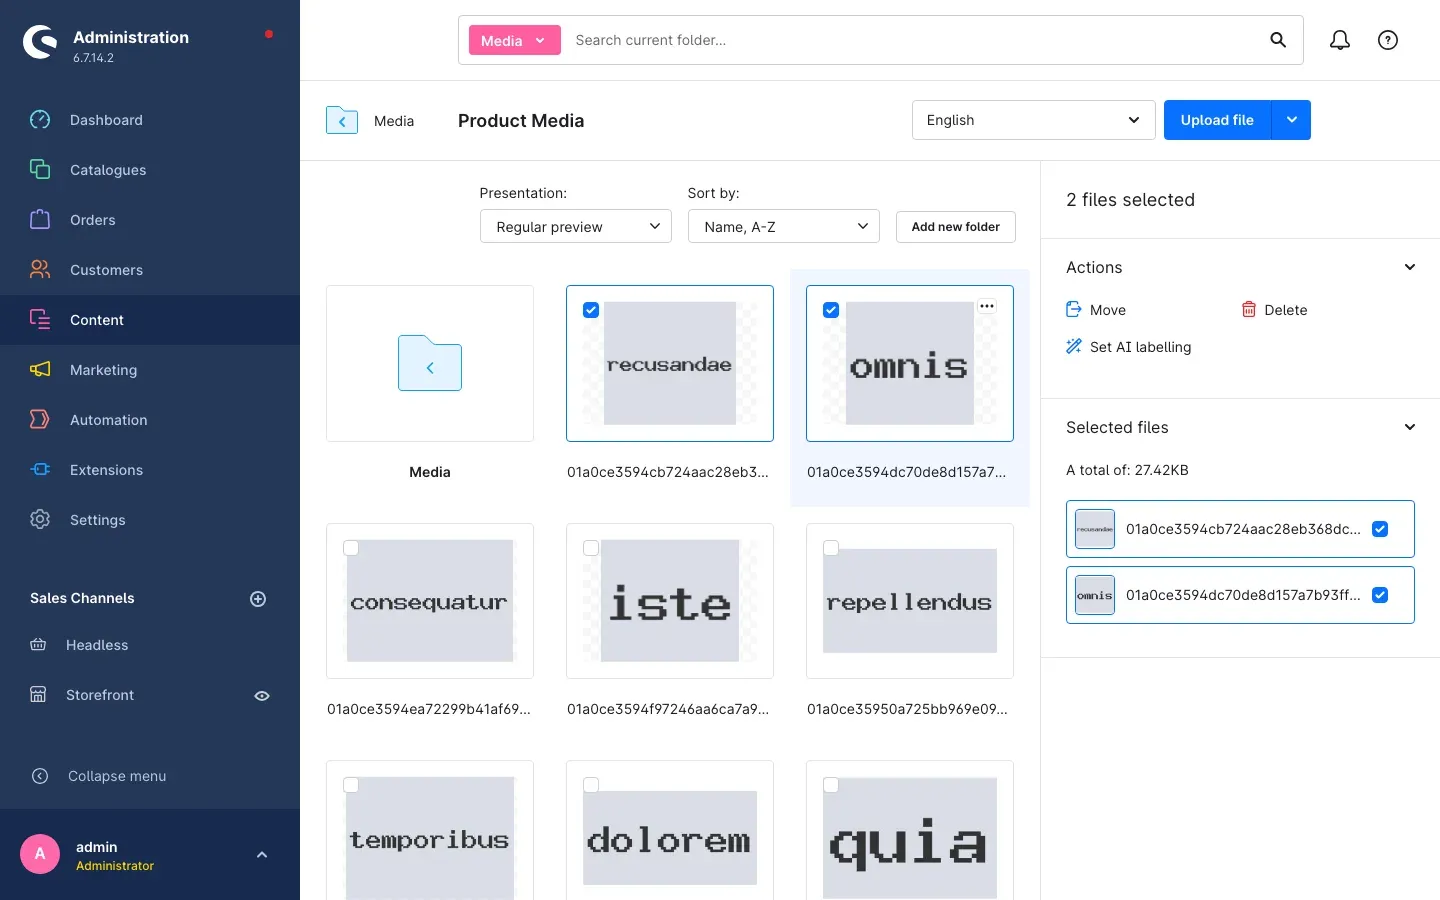 Fig. 4: Two selected files and the Set AI labelling action.
 -
The AI labelling for multiple media window opens. At the top you see how many media items will be changed, for example “2 media items will be changed.”
-
Leave Mark as AI-generated switched on to label all selected media items. Switched off, the label is removed from all selected media items.
-
If needed, enter a shared notice under Legal notice. The field is optional: leaving it empty keeps the existing notices of the individual media items. The notice is stored in the language currently selected at the top of the media manager.
-
Click Apply. Cancel closes the window without any change.
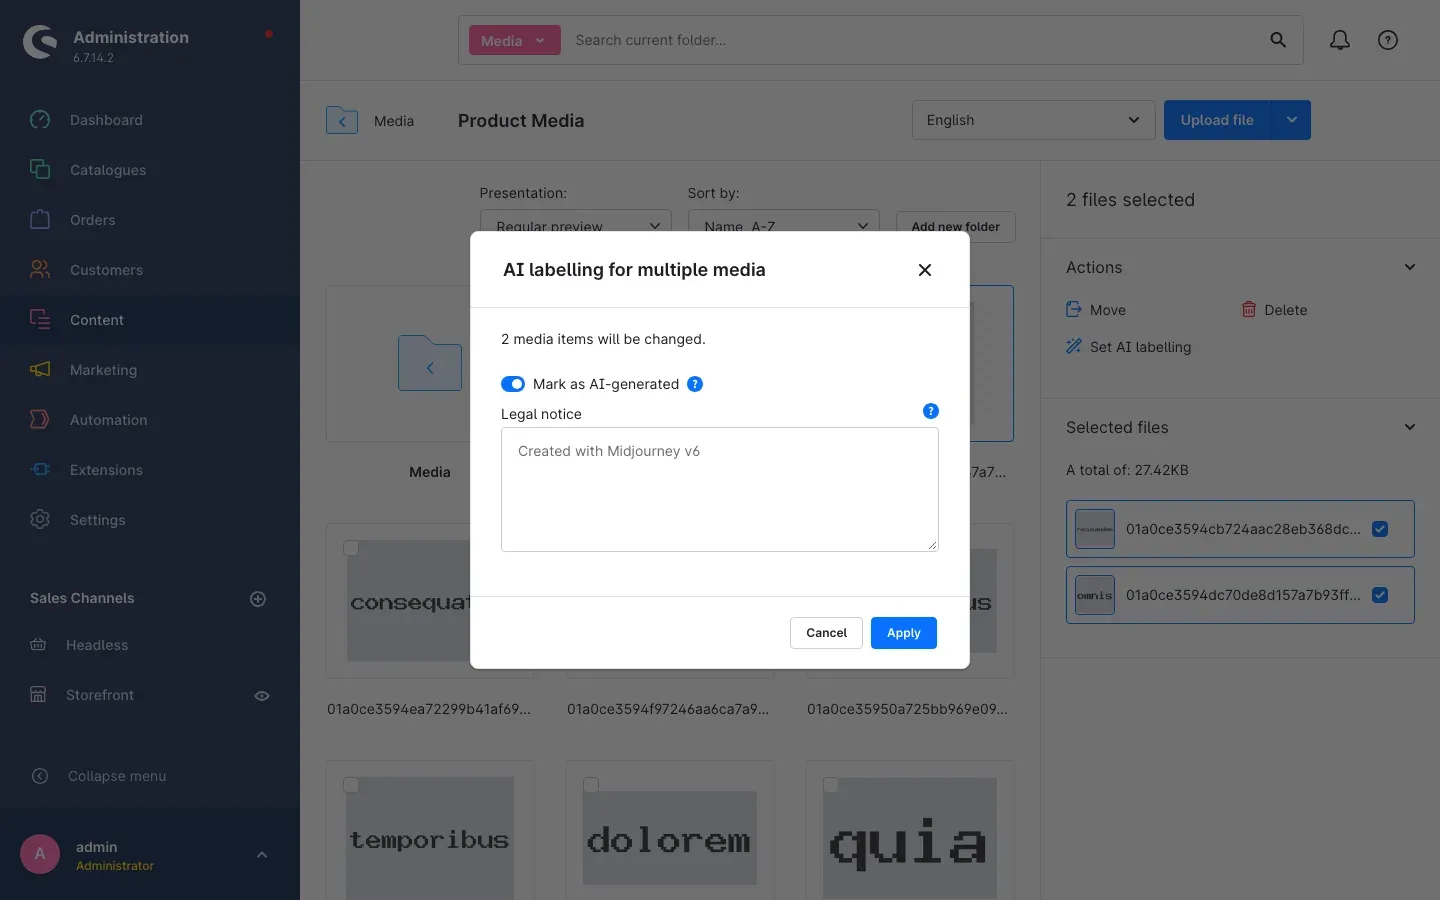 Fig. 5: The AI labelling for multiple media window.
After saving, a message confirms how many media items were updated, for example “2 media items were updated.” All selected media items are changed in a single operation.
Important — permission: The bulk action requires the Edit media permission. Without it, the action is greyed out or you see the message “This change requires the “Edit media” permission.” In that case, contact the person who manages users and roles in your shop.
How your customers see the label
What this gives you: Your customers recognise at a glance which images and videos were made with AI — right on the media item, without having to look for it.
On the product detail page, the badge with an icon and the text “AI-generated” sits in the corner of the gallery main image that you selected under Badge position.
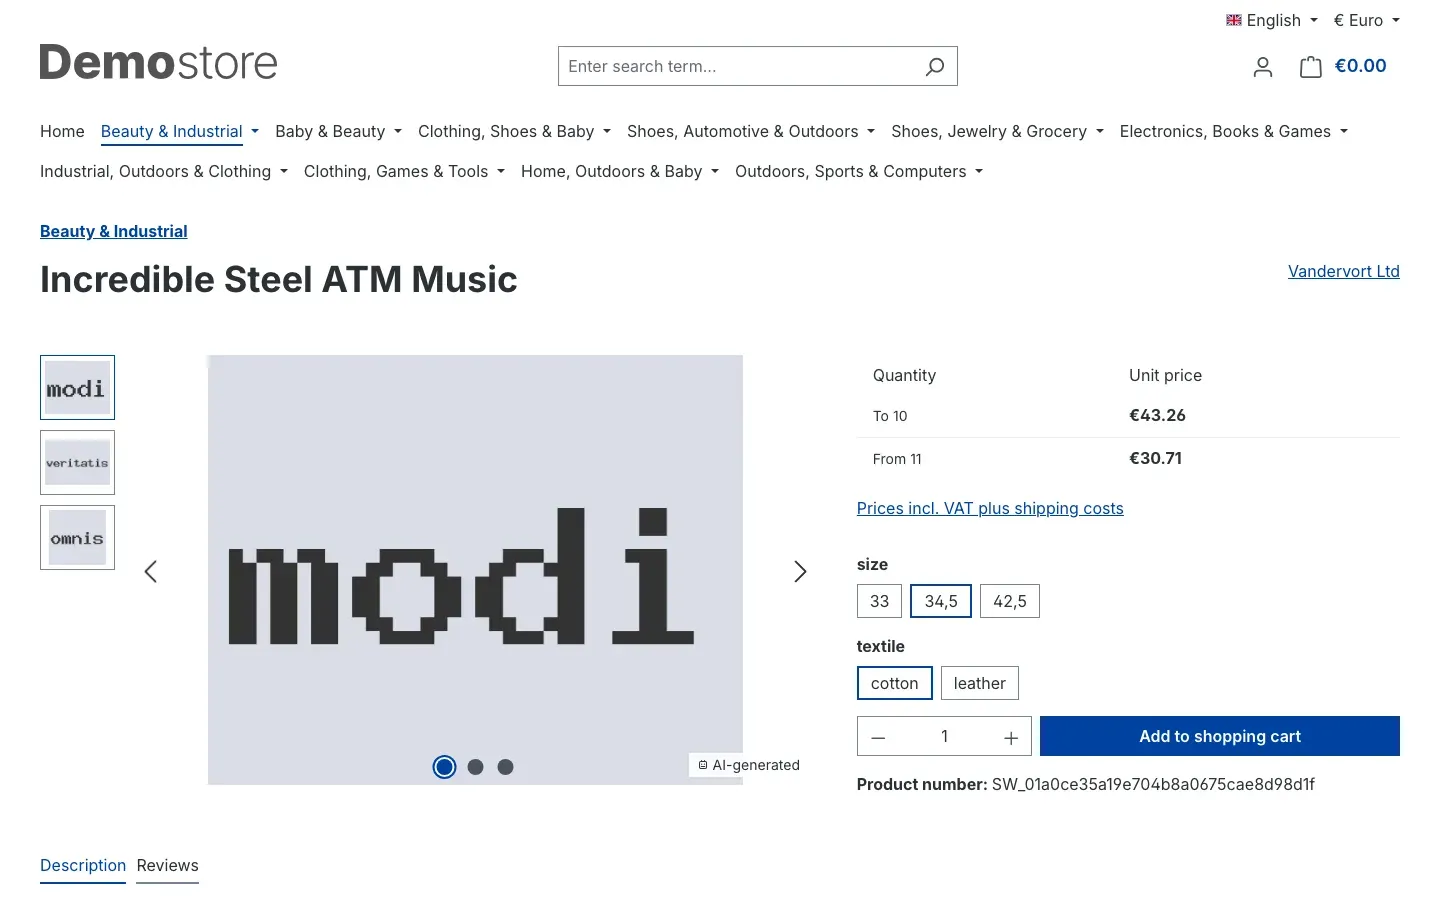 Fig. 6: The badge at the bottom right of the gallery main image.
When a customer hovers over the badge, the legal notice appears as a tooltip — here the individual notice “Created with Midjourney v6”.
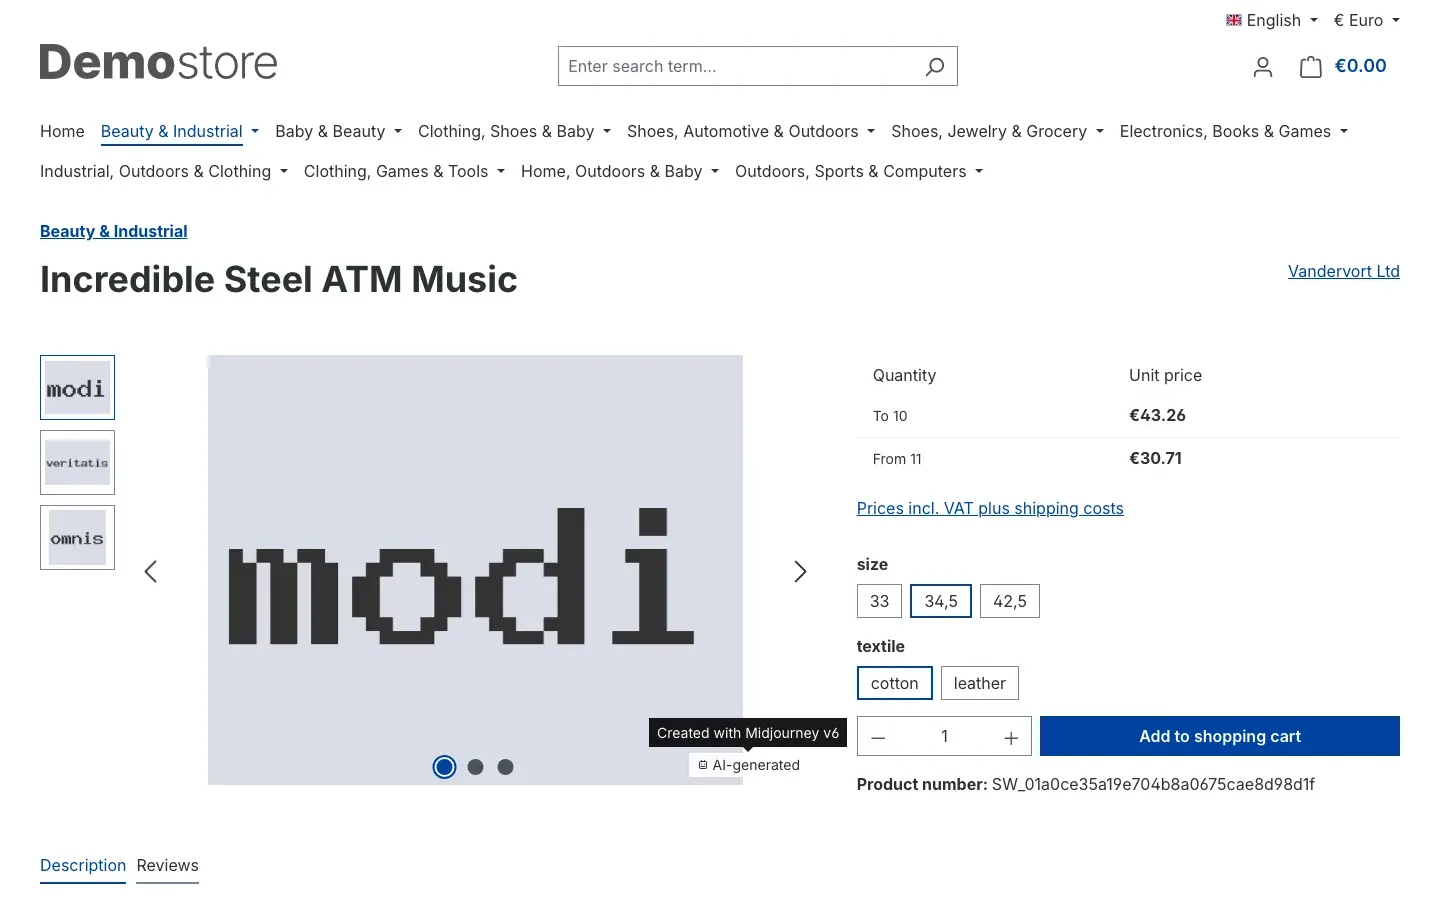 Fig. 7: The legal notice as a tooltip on the badge.
The image also carries the badge on the product tiles in the category listing.
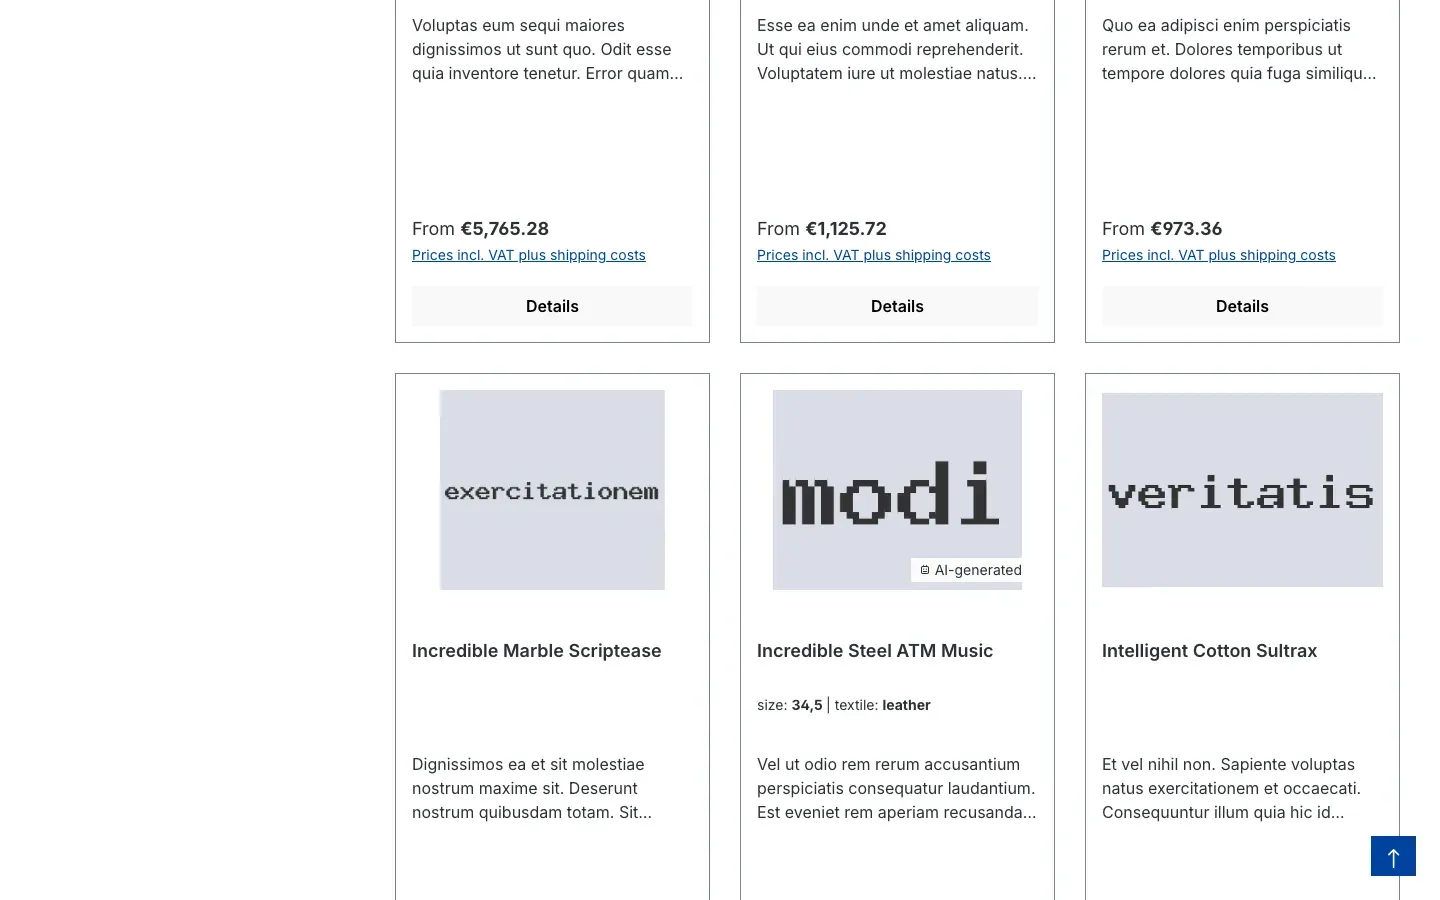 Fig. 8: The badge on the product tile in the category listing.
In the cart, in the off-canvas cart and on very small preview images, the shop deliberately shows no badge so that the small images are not covered.
Troubleshooting
The badge does not appear in the shop at all
Cause: Usually the labelling is switched off for the sales channel or for the page in question, or your shop’s cache still shows the old state.
How to fix it:
- Check under Content → Media that Created or modified using AI is switched on and saved for the media item.
- Open the plugin settings and select the affected Sales Channel at the top. Check that Enable plugin for this sales channel is switched on.
- Check that the matching display option is switched on — for example Show on product tiles for the category listing or Show on videos for product videos.
- Clear the cache under Settings → System → Caches & indexes with Clear cache.
- If that does not help, ask your technical contact to check that your shop’s background processing is running (see For Administrators / Technical Details).
The badge appears later on the search results page or in cross-selling
Cause: The shop does not update search results pages and cross-selling filled from a dynamic product stream immediately. The label appears there once the cache expires — with the shop’s default setting after two hours at the latest.
How to fix it: Wait a little, or clear the cache under Settings → System → Caches & indexes with Clear cache to make the label visible immediately.
In one language the default text is shown instead of my notice
Cause: The legal notice is stored per content language. No individual notice has been entered for this language yet.
How to fix it: In the media manager, select the affected language in the language selection at the top, open the media item and enter the notice under Legal notice. Click Save.
The “Set AI labelling” action is greyed out
Cause: Your user lacks the Edit media permission.
How to fix it: Ask the person who manages users and roles in your shop to grant you this permission.
The badge is missing only with a particular theme
Cause: Some themes completely replace the shop’s image output with their own. The plugin then finds no place to insert the badge.
How to fix it: Check the display with the default theme. If the badge appears there, your theme needs an adjustment — contact the theme provider or your agency.
The plugin does not appear under My extensions
Cause: Your Shopware account is not yet connected to the shop.
How to fix it: Log in with your Shopware account under Extensions → My extensions in the Shopware Account tab.
FAQ
Q: Does this plugin make my shop legally compliant?
A: The plugin is a technical tool and does not replace legal advice. It makes your AI content visibly recognisable — whether and with which wording you have to label it is something to clarify with your legal advisor.
Q: Do I have to edit every product individually?
A: No. You label the image or video itself in the media manager. The badge then appears wherever this media item is used — for all products and in all shopping experiences.
Q: Does this also work with videos?
A: Yes. Flagged product videos carry the badge in the gallery and on product tiles as long as Show on videos is switched on.
Q: Can I switch the labelling off in one of my shops?
A: Yes. Select the sales channel at the top of the settings and switch off Enable plugin for this sales channel. The flags on your media items are kept.
Q: Why don’t I see the badge in the cart?
A: That is intentional. In the cart and on very small preview images, the badge would cover the product image.
Q: Can I remove the label from many media items at once?
A: Yes. Select the media items, click Set AI labelling, switch off Mark as AI-generated and click Apply.
Q: Which notice appears if I don’t enter my own?
A: The Default legal notice from the settings. If that is empty too, “This content was created or modified, in whole or in part, using artificial intelligence.” appears in the customer’s language.
For Administrators / Technical Details
This section is intended for technical administrators. You do not need it for normal use.
System requirements
- Shopware: 6.7
- PHP: 8.2 or newer
Installation via the command line
If the plugin is already present in the shop, install and activate it like this:
php bin/console plugin:refresh
php bin/console plugin:install SwpAiMediaMarkerSix --activate
php bin/console cache:clear
Where the label is stored
The plugin adds its own custom field set swp_ai_media_marker to media. It contains two fields: swp_ai_marker_is_ai (switch “Created or modified using AI”) and swp_ai_marker_legal_notice (text “Legal notice”, at most 500 characters, translatable per language). Shopware’s own tables remain unchanged.
Background processing (message queue)
After a change to the labelling, the plugin clears the affected page caches asynchronously via the message queue. For the storefront to update promptly, a worker must be running (for example bin/console messenger:consume). Without a running worker, a change only appears after the HTTP cache expires (Shopware default: 7200 seconds) or after clearing the cache manually.
Headless and Composable Frontends
For frontends that work exclusively via the Store API, the route GET/POST /store-api/swp-ai-media-marker/config returns the badge configuration of the current sales channel.
Logging
The plugin writes errors to its own log channel swp_ai_media_marker.
Uninstallation
If you choose to keep the plugin data when uninstalling, the custom field set and all labels on the media items are kept.
This manual was created for AI Media Labelling version 6.7.0.
More manuals
Admin Password Reminder
Admin Password Reminder: your backend users renew their passwords on time, prompted after login and by a daily email. Premium locks expired accounts until the password is changed.
Open manual Shopware 6Age Check
Tobacco, spirits, knives: visitors who do not confirm their age never see the restricted items at all. You tick a box per product, the plugin hides it everywhere.
Open manual Shopware 6AI SEO All-in-One: SEO and GEO suite for Shopware 6
Google finds your shop, ChatGPT never mentions it. This plugin checks both in one run, fills empty meta fields from templates and turns the findings into a to-do list.
Open manualNeed a team that keeps your shop running?
We have been maintaining Shopware shops for more than 20 years, including updates, hotfixes and the plugins you are configuring right now.