Digital Product Passport (ESPR)
From 2027 the product passport has to be reachable before the sale in distance selling. This plugin puts it on the product page, issues your own passports and publishes them.
On this page
- Introduction
- What you achieve with this plugin
- Who is this plugin for?
- Installation
- Getting started
- Step 1: Open the settings and choose the operating mode
- Step 2: Put a schema in charge
- Step 3: Create the first passport
- Step 4: Look at the result in the shop
- Settings
- General
- Resolver
- Signature
- EU registry (external service)
- Supplier check (external service)
- Data protection and retention
- Data carrier
- Default values for new passports
- How to create and maintain product passports
- Creating a passport
- Where the data of a new passport comes from
- Filling in the data and reading the validation state
- Publishing and withdrawing
- Versions and change history
- Signing and verifying authenticity
- Identifiers, data carriers and labels
- Understanding and adding identifiers
- Printing a whole label sheet
- The nameplate
- Choosing the nameplate language
- Setting up the plate
- Putting fields on the plate
- Saving the layout and producing the nameplate
- Who may see which information
- The visibility levels
- Issuing an access grant
- Tracing who accessed the passport
- Schemas
- The schemas included
- Assigning a schema to the right products
- Importing your own schema
- Creating a new version
- What your customers see in the shop
- The passport panel on the product page
- The public passport page
- The authenticity check
- When a passport is not found
- Items, orders and the passport sheet
- Items and batches
- The product passport tab on the product
- The product passport sheet for an order
- The email for the order
- Importing and exporting passport data
- EU registry and supplier check
- Monitoring supplier links
- Submitting passports to the registry
- Keeping an eye on compliance and the queue
- The compliance overview
- The queue
- Permissions for your team
- Troubleshooting
- The installation stops with a Composer message
- The “Digital product passport” menu entry is missing
- I click “Create passport” but no passport appears
- A passport does not appear at all, or only after a long time
- The QR code leads to “This product passport cannot be shown”
- The passport panel is missing on the product page
- A mandatory field stays open although the article carries a value
- ”Substances of concern” keeps being reported as missing
- I have lost an access token
- After changing the settings, the address of printed codes does not change
- FAQ
- For administrators / technical details
- System requirements
- Installation from the command line
- Background process — a prerequisite for day-to-day operation
- Keys and credentials
- Addresses of the passport pages
- Command line commands
- Data protection
Introduction
Digital Product Passport (ESPR) makes your shop ready for the EU ecodesign regulation for sustainable products. You store the information the law requires for your products, publish it under a permanent address, print the matching QR code onto the label — and your customers reach the passport on the product page, before they buy.
What you achieve with this plugin
- You create a product passport for every product, fill it in field by field and publish it with one click.
- You save yourself the typing: whatever your shop already knows about the article is in the passport the moment it is created — in every passport language, taken from the translations of the article.
- You get a permanent address and a QR code or Data Matrix code for every passport, ready to print onto a label, a nameplate or the packaging.
- You meet the requirement that the passport must be reachable before the purchase in distance selling: the passport panel appears directly on the product page.
- You control precisely who sees which information — the public sees less than a repairer, a repairer less than an authority.
- You keep every change traceable: every version of a passport is retained and chained to its predecessor.
- You print whole label sheets and produce nameplates as image files — for series production as well as for single items.
- You add a product passport sheet to the order that carries the serial number and the matching code for every item sold.
- You report published passports to the EU registry as soon as your registry access is in place.
Who is this plugin for?
For manufacturers, importers and distributors who place products on the EU market and have to — or want to — provide a digital product passport for them. Typical cases: electrical appliances, furniture, textiles, construction products — and batteries, which carry their own passport obligation from 18 February 2027.
You do not need any programming knowledge. Everything described in this manual is done in the Shopware administration.
Installation
After the purchase the plugin is available in your administration right away — there is nothing to download.
- Log in to your Shopware administration.
- Open Extensions → My extensions.
- Click Install in the row Digital Product Passport (ESPR).
- Then activate the plugin using the toggle next to the entry.
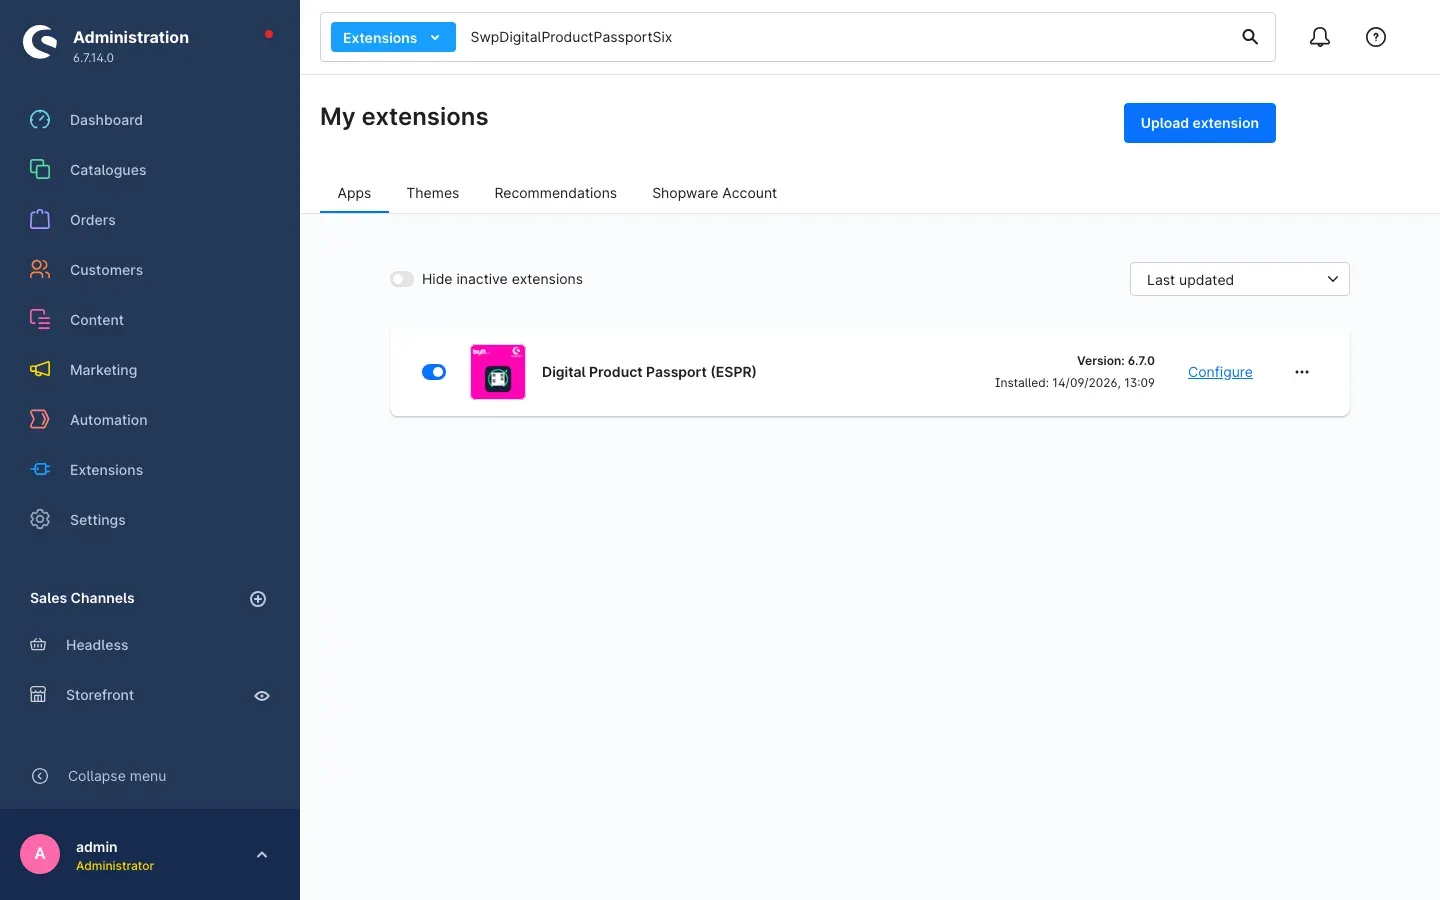 Fig. 1: The plugin in “My extensions”, filtered on the plugin name: installed and active
That completes the installation. On activation the plugin brings everything it needs with it: two ready-made schemas, the number range for serial numbers, the document type for the sheet attached to an order, an email template, the field set for your articles and two import/export profiles.
Good to know: During installation Shopware automatically downloads a helper library for the QR codes (via Composer). This takes a moment longer than with most plugins. If the installation stops with a Composer message, your shop is not allowed to run Composer — see Troubleshooting.
If Digital Product Passport (ESPR) does not appear in the list, your Shopware account is not yet connected to the shop. You do that under Extensions → My extensions by logging in with your Shopware account.
Getting started
These four steps take you from the freshly installed plugin to your first publicly reachable product passport.
Step 1: Open the settings and choose the operating mode
Open Settings → Extensions → Digital Product Passport (ESPR).
The most important decision is right at the top, in the General card under Operating mode. Choose Distributor and the plugin displays passports that other manufacturers have provided. Choose Manufacturer and it additionally issues, signs and registers your own passports. If you are both, choose Distributor and manufacturer. On delivery the mode is set to Distributor — if you want to issue your own passports, change it now. All settings on this page are described in Settings.
Step 2: Put a schema in charge
Open Catalogues → Digital product passport → Schemas. A schema determines which fields a passport has and which of them are mandatory. Two schemas are included: the ESPR base schema for product groups without their own legal act, and the Battery passport (Annex XIII).
Two things have to be right before a passport can be created at all: the schema must be Active, and its Assignment must cover your articles. On delivery the assignment is set to manual — so the schema does not claim any article by itself yet. How to change that is described in Schemas.
Step 3: Create the first passport
Open Catalogues → Digital product passport → Passports and click Create passport in the top right. Select your product and confirm with Create passport.
The passport is written in the background and appears in the list once it is ready — usually within a few minutes. The details are in How to create and maintain product passports.
Step 4: Look at the result in the shop
Open the finished passport, stay on the Data tab, fill in the open mandatory values and publish it via More actions → Publish. Then open the product page in your shop: the Product passport area is now there, and Open the full product passport takes you to the public passport page.
Settings
You find the settings under Settings → Extensions → Digital Product Passport (ESPR). They are grouped into eight cards. The sales channel selector sits at the very top — every setting on this page applies to the channel selected there. So if you run a B2B and a B2C shop, you can operate the plugin in one and switch it off in the other.
General
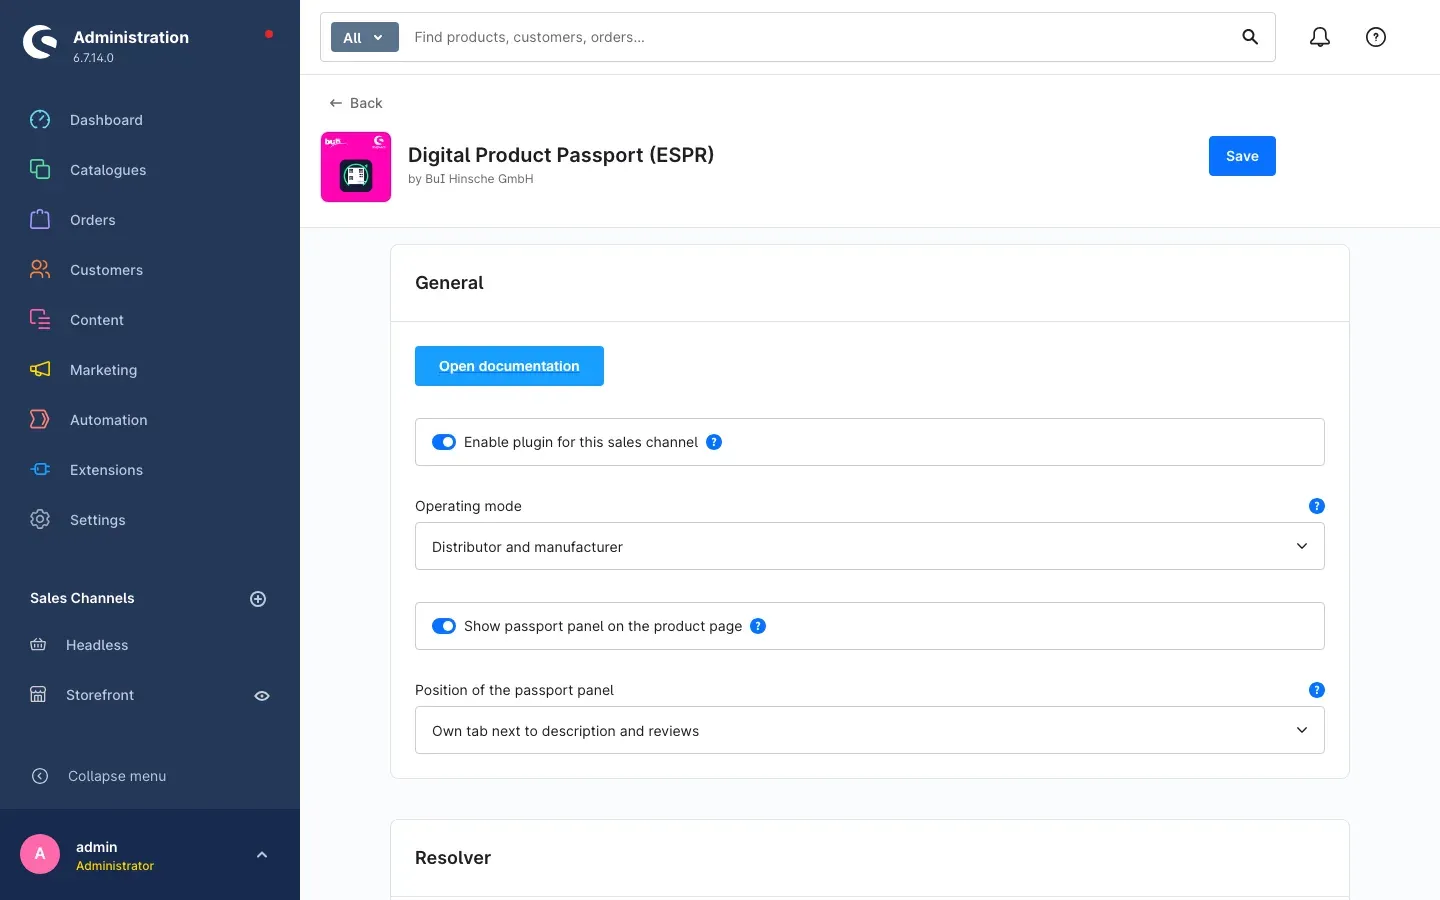 Fig. 2: “General” card: documentation button, per-channel activation, operating mode and the passport panel on the product page
At the very top sits the Open documentation button. It opens this manual on the web, in the language of your administration.
Enable plugin for this sales channel switches the plugin off for the selected channel without you having to uninstall it. In a channel that is switched off nothing is displayed, no new passport is created, nothing is published, nothing is reported to the EU registry and no supplier link is checked. The toggle is on by default.
So that your passports are correct when you switch the channel on again, the plugin keeps existing data up to date even in a switched-off channel: it syncs existing passports with their article, signs new versions, updates the addresses of data carriers after a domain change and withdraws passports of deleted articles. This also applies when the plugin is switched off in every channel. What was skipped and how you catch it up is described in Keeping an eye on compliance and the queue.
What this is good for: You carry a new range in only one of your shops. Instead of installing the plugin several times, you leave it on there and off in the other channels.
Operating mode decides how much the plugin does. Distributor displays third-party passports. Manufacturer additionally issues, signs and registers your own. Distributor and manufacturer combines both. On delivery this is set to Distributor.
Show passport panel on the product page shows the passport before the purchase — exactly what the EU ecodesign regulation requires in distance selling. The toggle is on by default and you should leave it on.
Position of the passport panel determines where the area appears on the product detail page. The choices are Own tab next to description and reviews (default), Below the buy box and Below the product description.
What this is good for: The own tab keeps the product page tidy. If you want to emphasise the passport — because sustainability is your selling point, for instance — you move it directly below the buy box.
Resolver
The resolver is the page that opens when somebody scans the QR code.
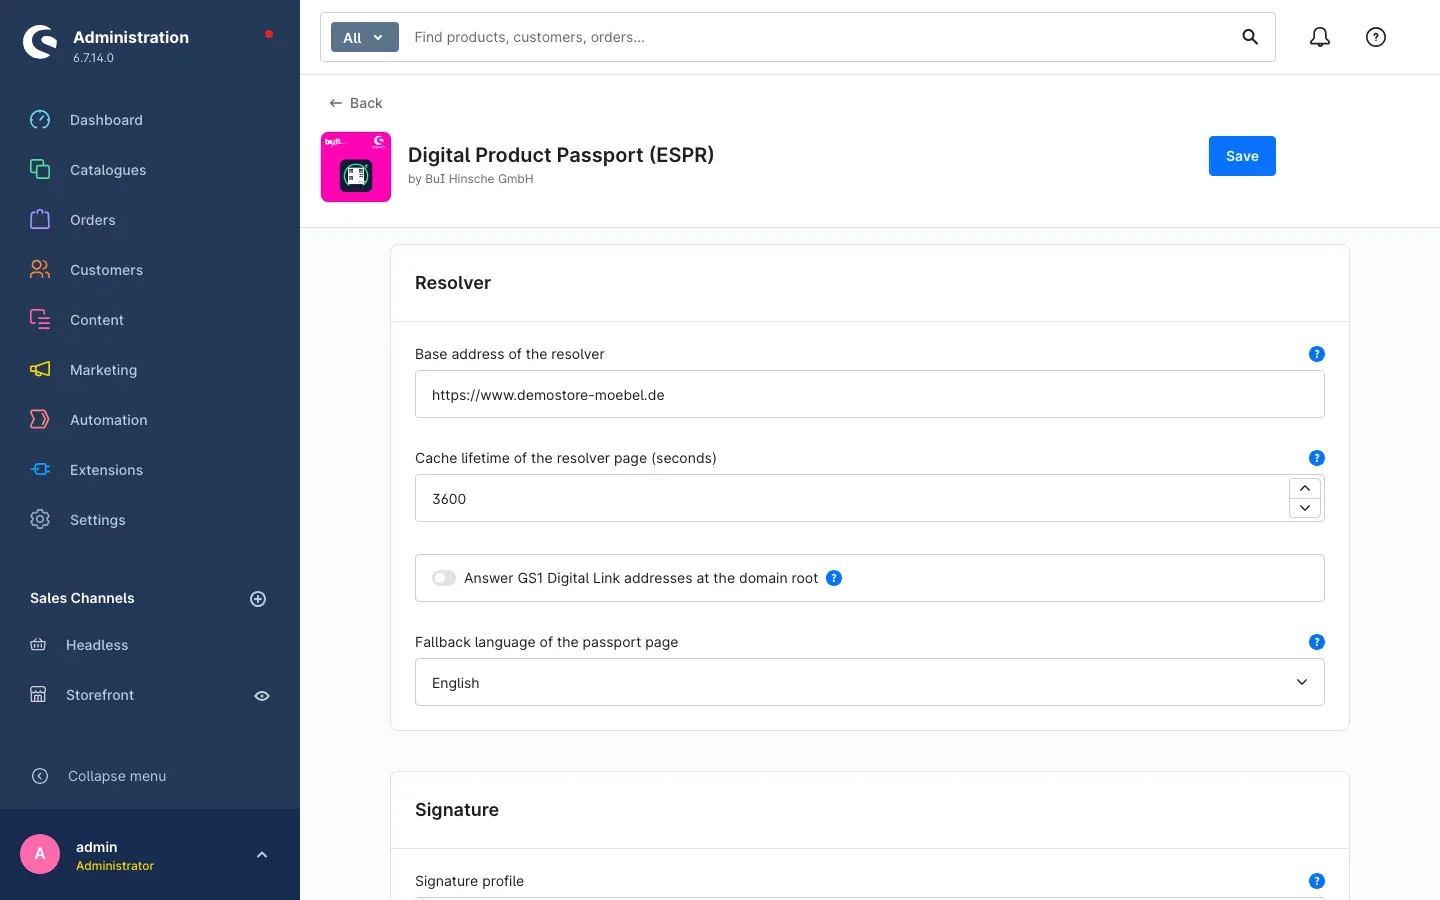 Fig. 3: “Resolver” card: base address, cache lifetime and fallback language of the passport page
Base address of the resolver is the address the data carrier points to. Leave the field empty and the plugin uses the domain of the respective sales channel — that is the normal case.
Important: This address is printed on every label and has to stay reachable for the entire statutory retention period. Only enter something here if you run your own permanently secured domain for product passports — and then do not change it again.
Cache lifetime of the resolver page (seconds) determines how long a published passport page may be served from the cache. The default is one hour. A higher value takes load off the shop when there are many scans; a lower one makes changes visible faster.
Answer GS1 Digital Link addresses at the domain root activates the short, GS1-style address form directly below your domain. The toggle is off on delivery. Only switch it on if no other system in your shop already answers these addresses.
Fallback language of the passport page takes effect when a scan asks for a language the passport does not contain. German, English and Dutch are available; English is preset.
Signature
A signature makes it provable that the content of the passport was not altered afterwards.
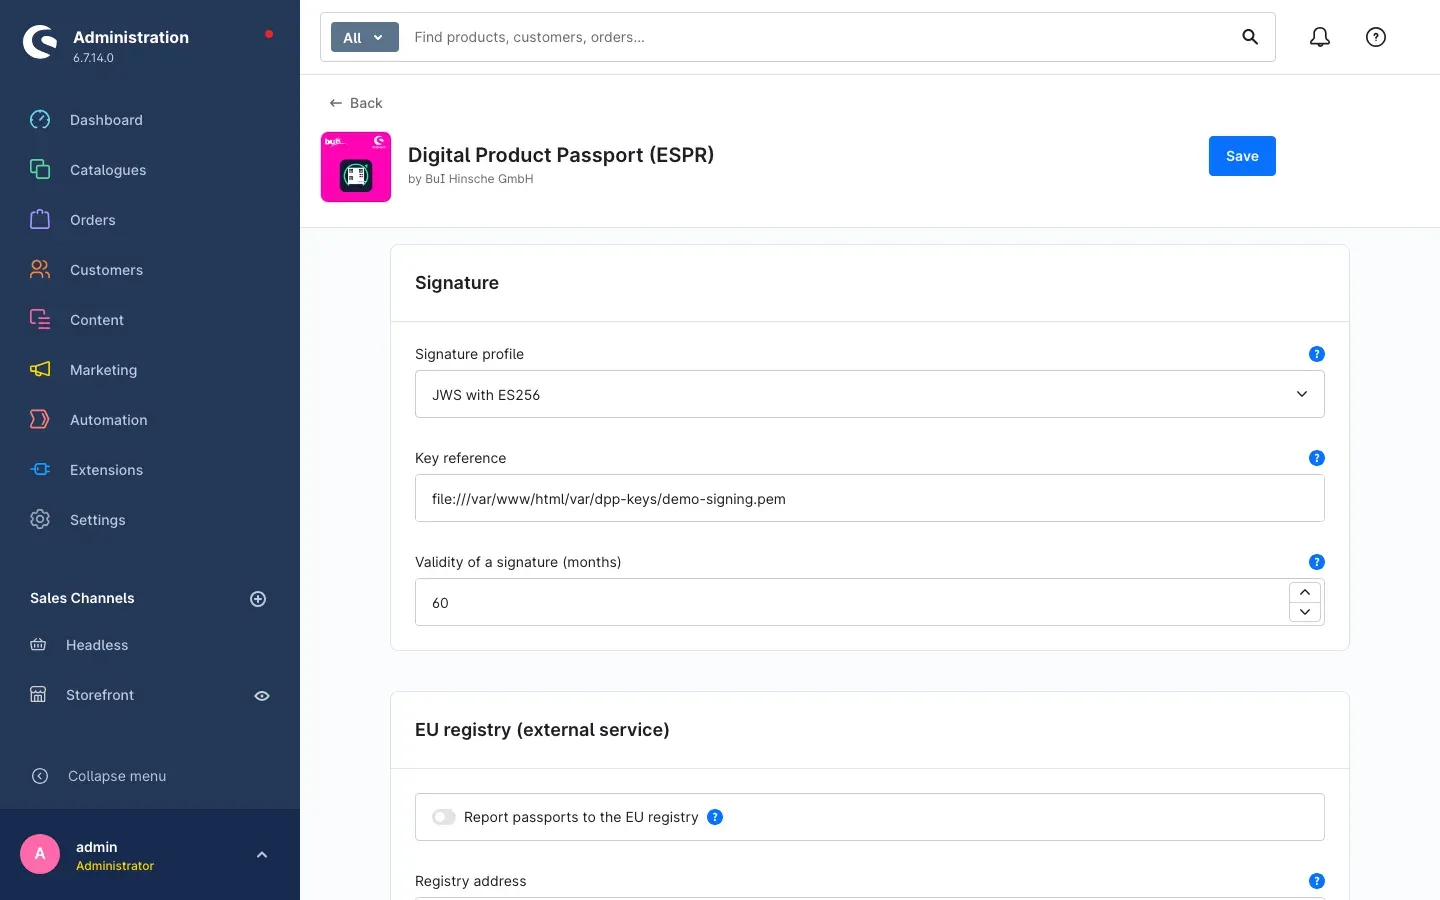 Fig. 4: “Signature” card: signature profile, key reference and validity
Signature profile determines the procedure. Without a signature the passport is still complete, but its integrity cannot be verified. No signature is preset; JWS with ES256, W3C Verifiable Credential (Data Integrity) and ISO 22376 are also available.
Key reference holds a pointer to the private key, never the key itself. What such a pointer looks like is described in For administrators / technical details — this part is usually set up by your administrator.
Validity of a signature (months) determines after which period a passport version is listed as due for re-signing in the compliance overview. The default is 60 months.
EU registry (external service)
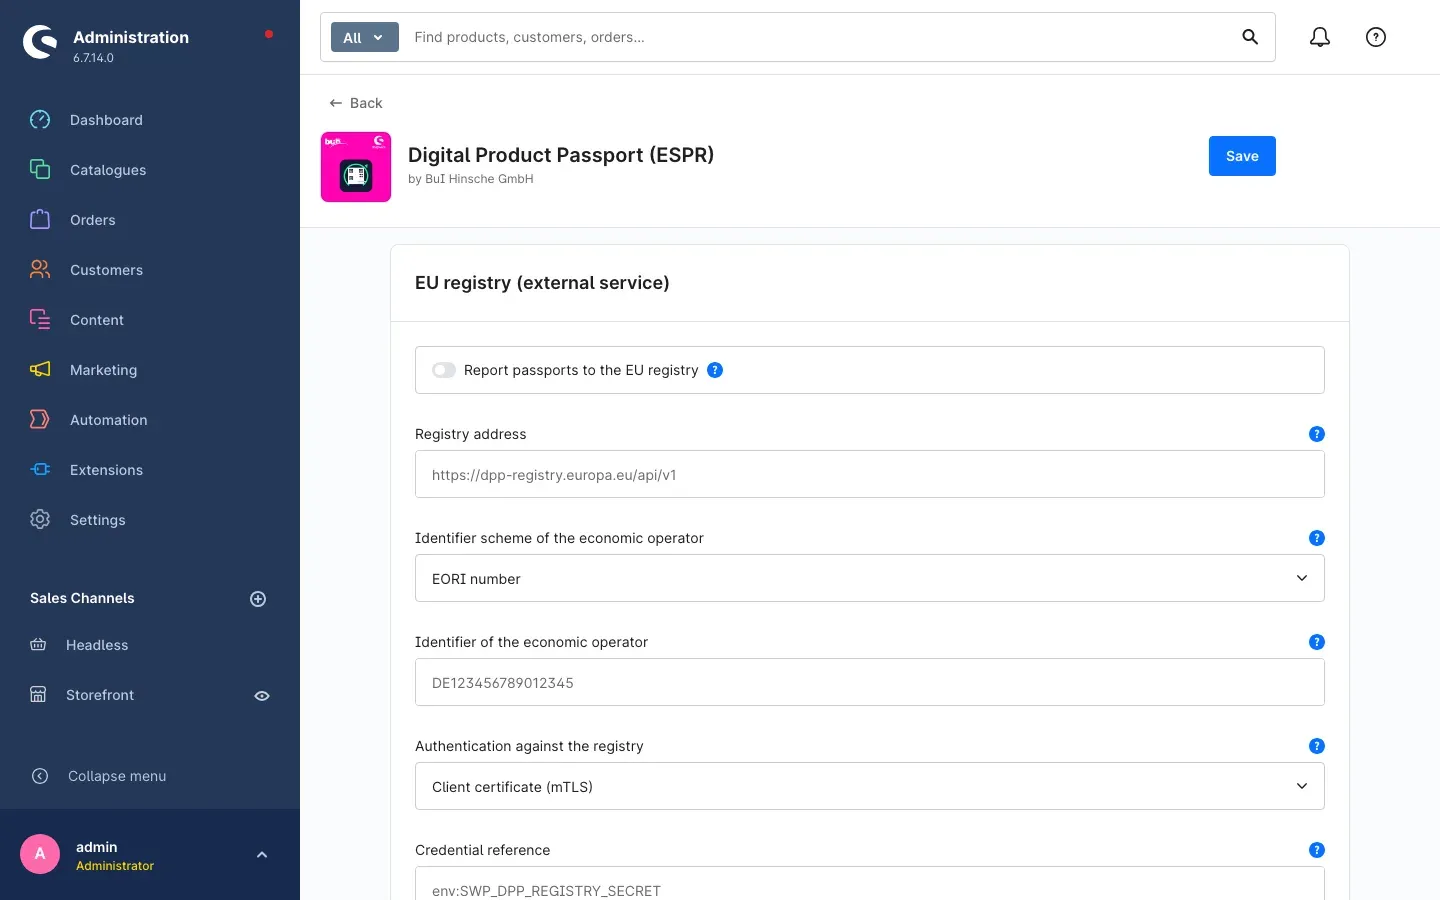 Fig. 5: “EU registry (external service)” card: switch, address, identifier scheme and authentication
Report passports to the EU registry is off on delivery. While the switch is off, the plugin never contacts the registry at all.
With the switch on you need the Registry address given to you by the registry operator, the Identifier scheme of the economic operator (EORI number, GS1 GLN, LEI or VAT identification number) and the matching Identifier of the economic operator of your company. Under Authentication against the registry you choose the procedure the operator prescribes — Client certificate (mTLS) or OAuth 2.0 client credentials. The Credential reference is again a pointer, never the value itself.
What this is good for: As long as you have no registry access, you leave this card alone. The plugin works completely without it; you can create, publish and print passports.
Supplier check (external service)
If your passport refers to an upstream passport of a supplier, the plugin can check regularly whether it is still reachable.
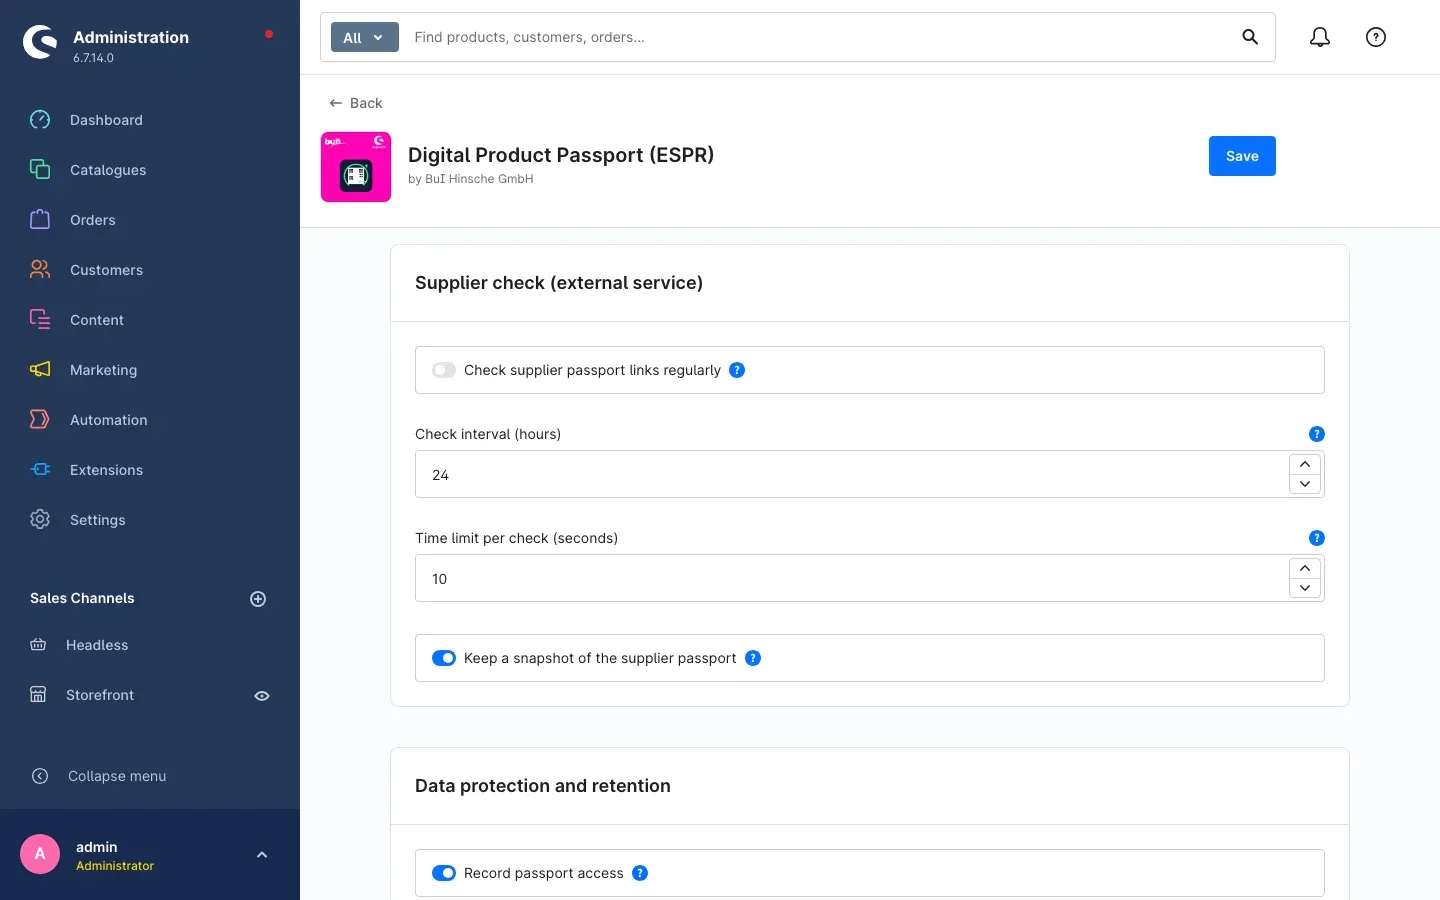 Fig. 6: “Supplier check (external service)” card: switch, check interval, time limit and snapshot
Check supplier passport links regularly is off on delivery. While the switch is off, the plugin never calls a supplier address.
Check interval (hours) determines how often an address is called again after a successful check — every 24 hours by default. Time limit per check (seconds) determines when an address counts as unreachable; the default is ten seconds.
Keep a snapshot of the supplier passport stores a shortened copy of the answer. The toggle is on by default.
What this is good for: If your supplier’s address disappears, you still have evidence of what it said — and your own passport stays provable.
Data protection and retention
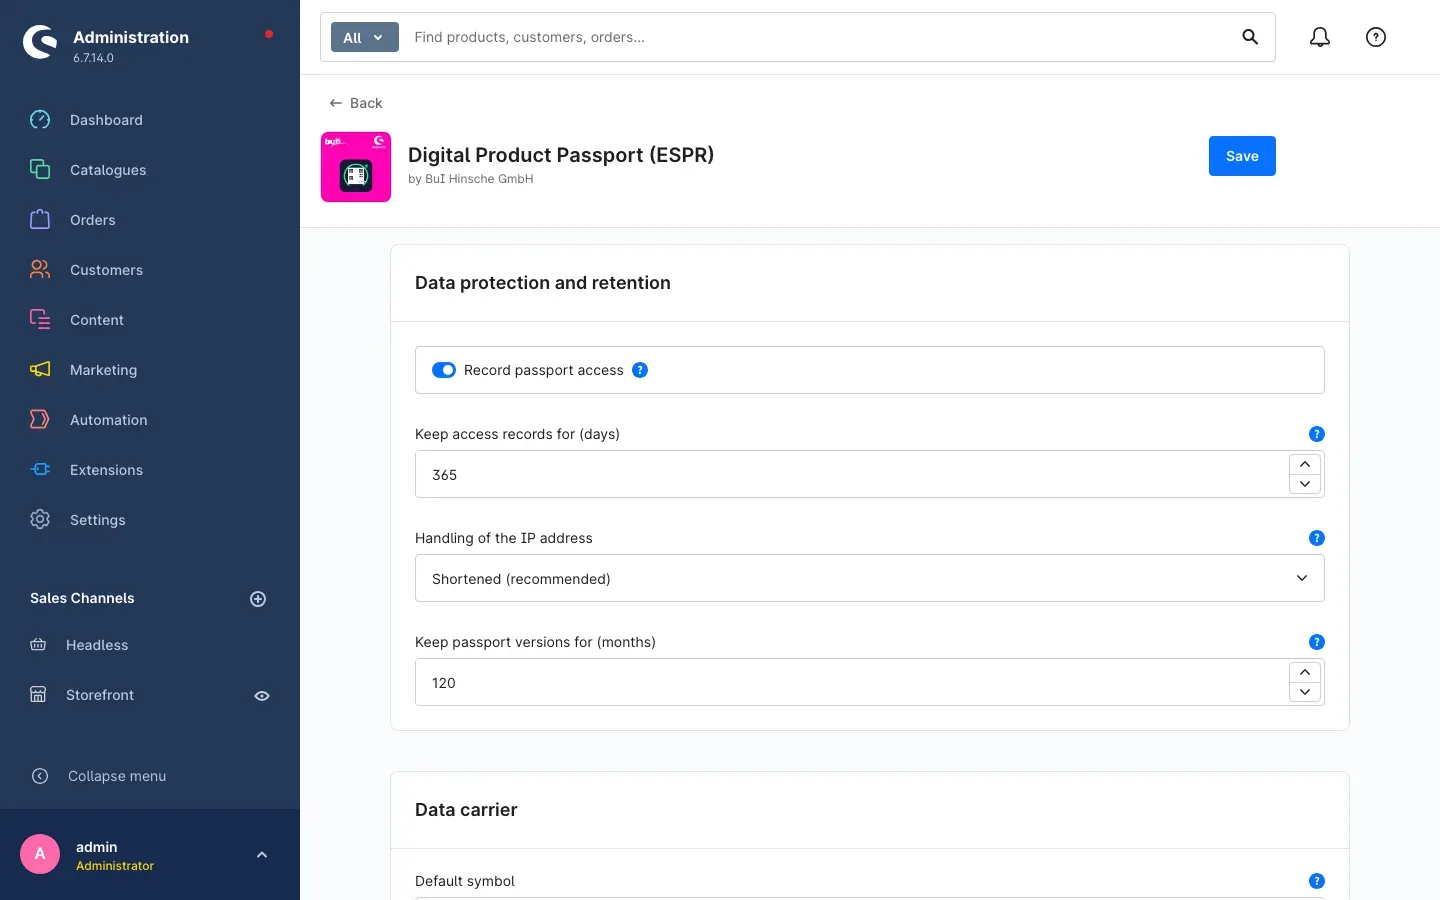 Fig. 7: “Data protection and retention” card: access log, retention periods and handling of the IP address
Record passport access is on by default and is required as evidence towards market surveillance authorities. What is recorded is which visibility levels were served — never the visitor.
Keep access records for (days) deletes older entries automatically; the default is 365 days.
Handling of the IP address is set to Shortened (recommended). The alternatives are Do not store and Full address (personal data).
Important: The full address stores personal data. If you choose it, you need your own legal basis for it and a note in your privacy policy. When in doubt, stay with the shortened version.
Keep passport versions for (months) sets the retention period; the default is 120 months. If a schema demands a longer period, the longer one applies.
Data carrier
Here you set how the printed codes look.
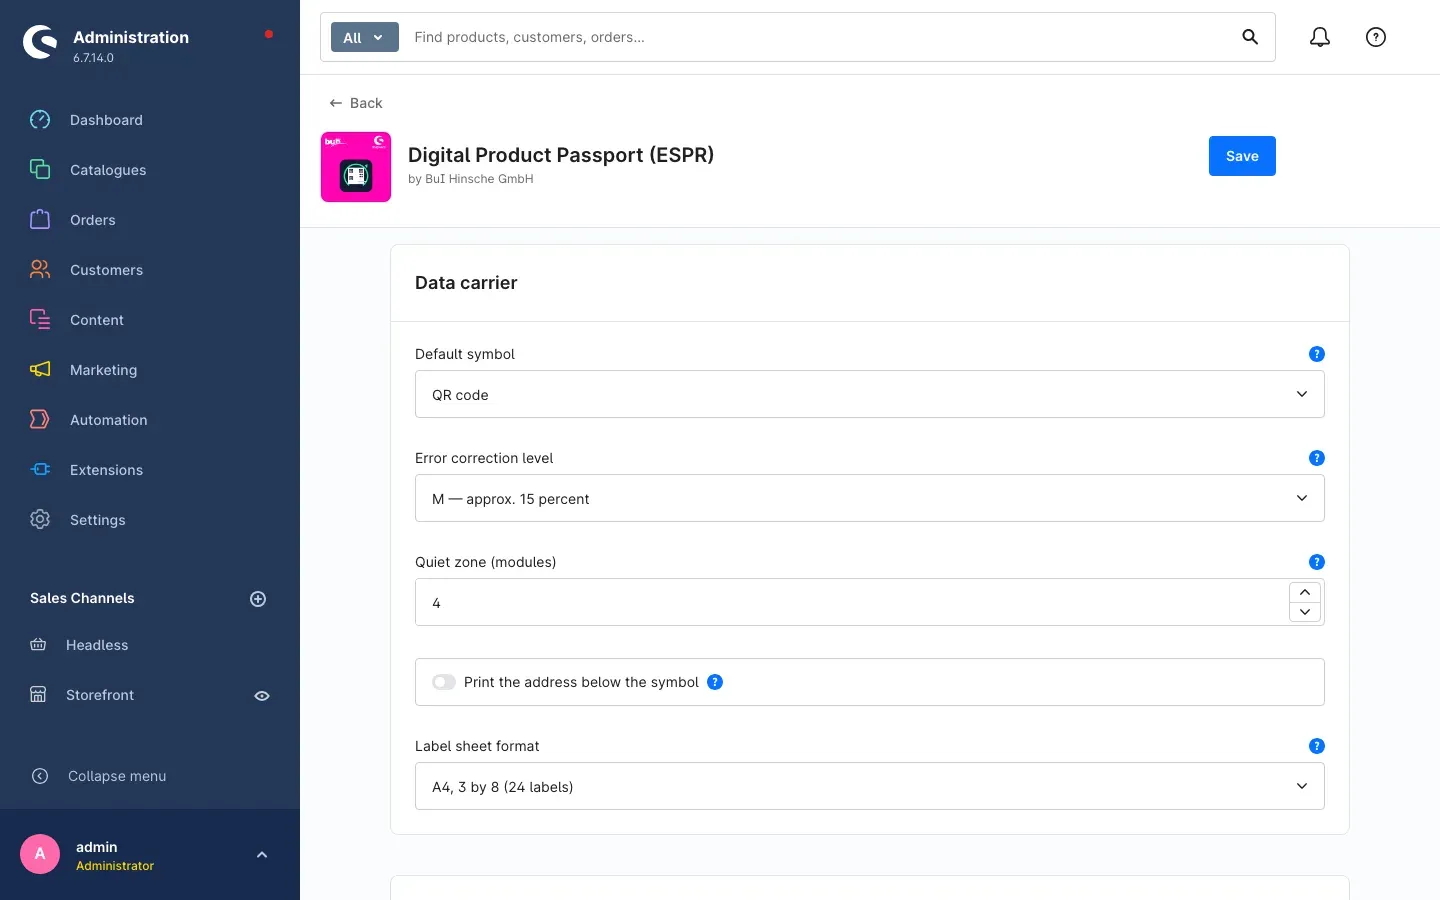 Fig. 8: “Data carrier” card: default symbol, error correction level, quiet zone and label sheet format
Default symbol is the symbol produced for new passports — QR code (default) or Data Matrix (ECC200).
Error correction level determines how much damage a symbol tolerates. Four levels from about seven to about 30 percent are available; the middle level M — approx. 15 percent is preset.
What this is good for: If the label sits on a device exposed to oil, dust or sunlight, choose a higher level — the symbol gets bigger but stays readable even when scratched.
Quiet zone (modules) is the empty margin around the symbol, measured in the small squares a QR code is built from. The default is four; below four many scanners fail to read the symbol.
Print the address below the symbol prints the address as text as well — on by default. That keeps the passport reachable when no scanner is at hand. The caption adjusts to the width of the symbol: even a long identifier is printed in full, just smaller.
Label sheet format determines the grid of the printable A4 sheet: A4, 3 by 8 (24 labels) as the default, plus A4, 2 by 7 (14 labels) and A4, 4 by 10 (40 labels).
Default values for new passports
These three entries apply to every new passport of the sales channel — unless the article or its manufacturer carries a value of its own. More on that in How to create and maintain product passports.
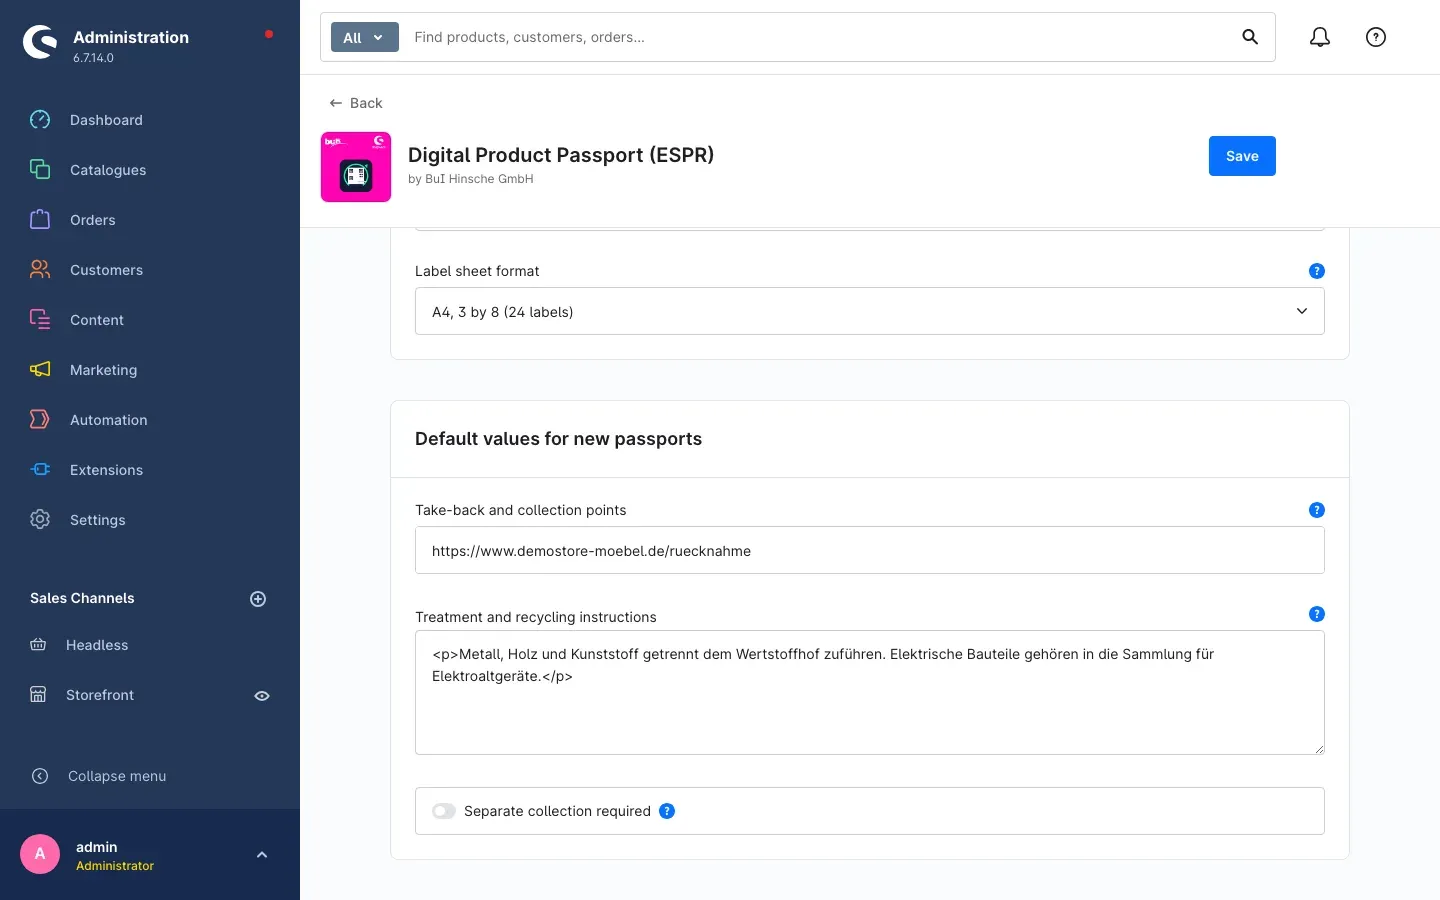 Fig. 9: “Default values for new passports” card: take-back points, recycling instructions and separate collection
Take-back and collection points holds the address of the page that describes where the product can be returned.
Treatment and recycling instructions apply to a range of comparable products — “remove the battery before disposal”, for instance.
Separate collection required records whether the product must not go into household waste. That depends on the product group, not on the single article; the toggle is on by default.
What this is good for: Three of the fourteen mandatory entries of the ESPR base schema are filled in here once for the whole channel — instead of being typed into every passport separately.
How to create and maintain product passports
Everything to do with passports is under Catalogues → Digital product passport → Passports.
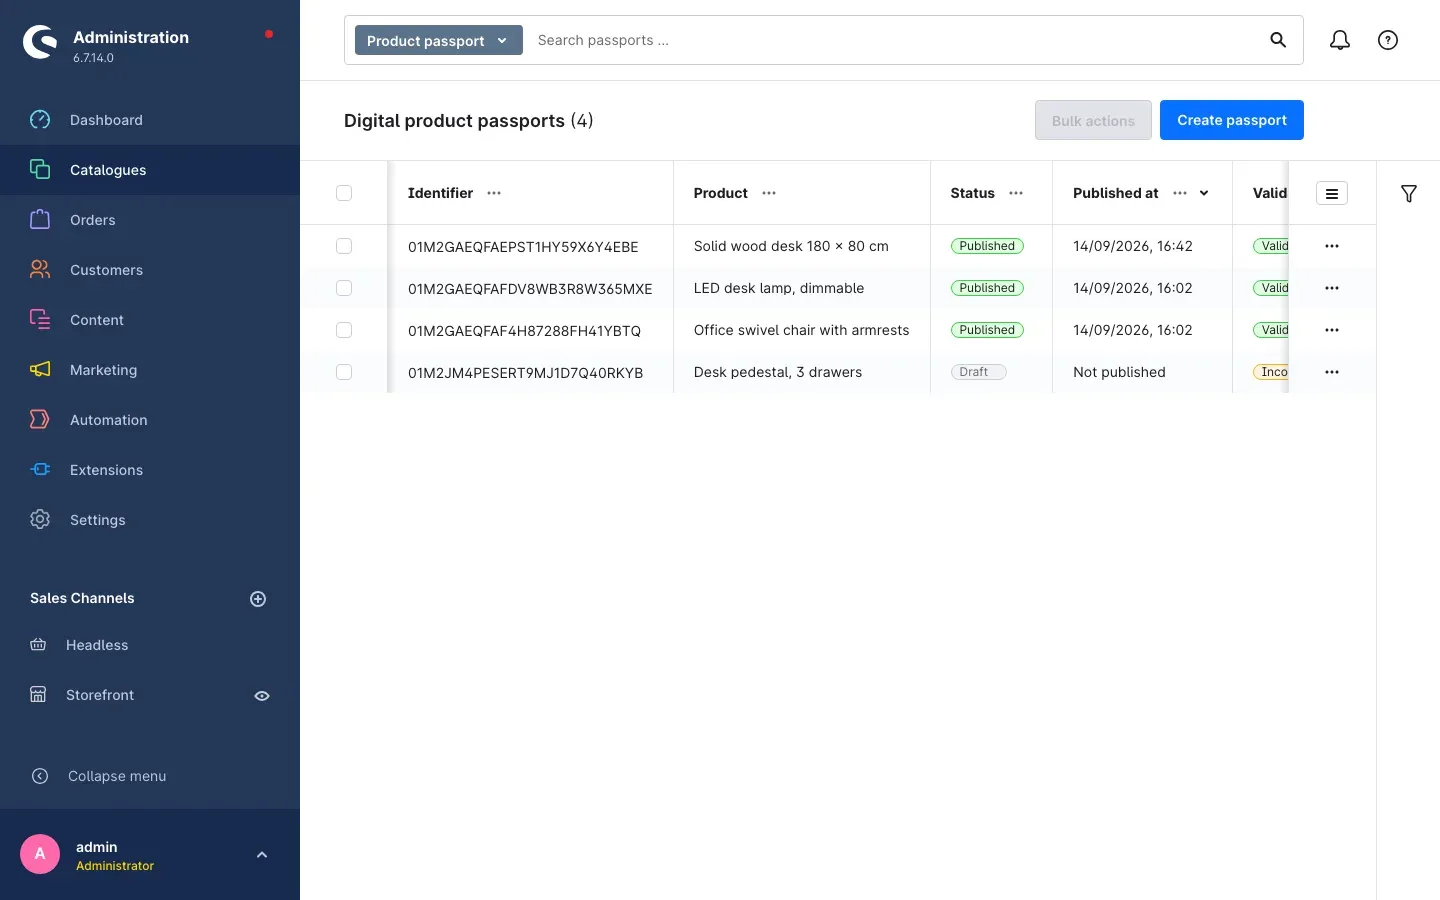 Fig. 10: The “Digital product passports” list across the full page width — three published passports and one draft
The list uses the full page width. By default it shows Identifier, Product, Status, Published at and Validation state — so the list fits on screen without scrolling sideways. Using the column settings of the list — the button above the table on the right — you additionally show Schema, Version, Granularity, Registry and Sales channel. The funnel icon next to it filters by status, validation state, schema, registry, sales channel, granularity and publication period.
Creating a passport
What this gives you: A product from your catalogue becomes a product passport with a permanent address that you can fill in and publish.
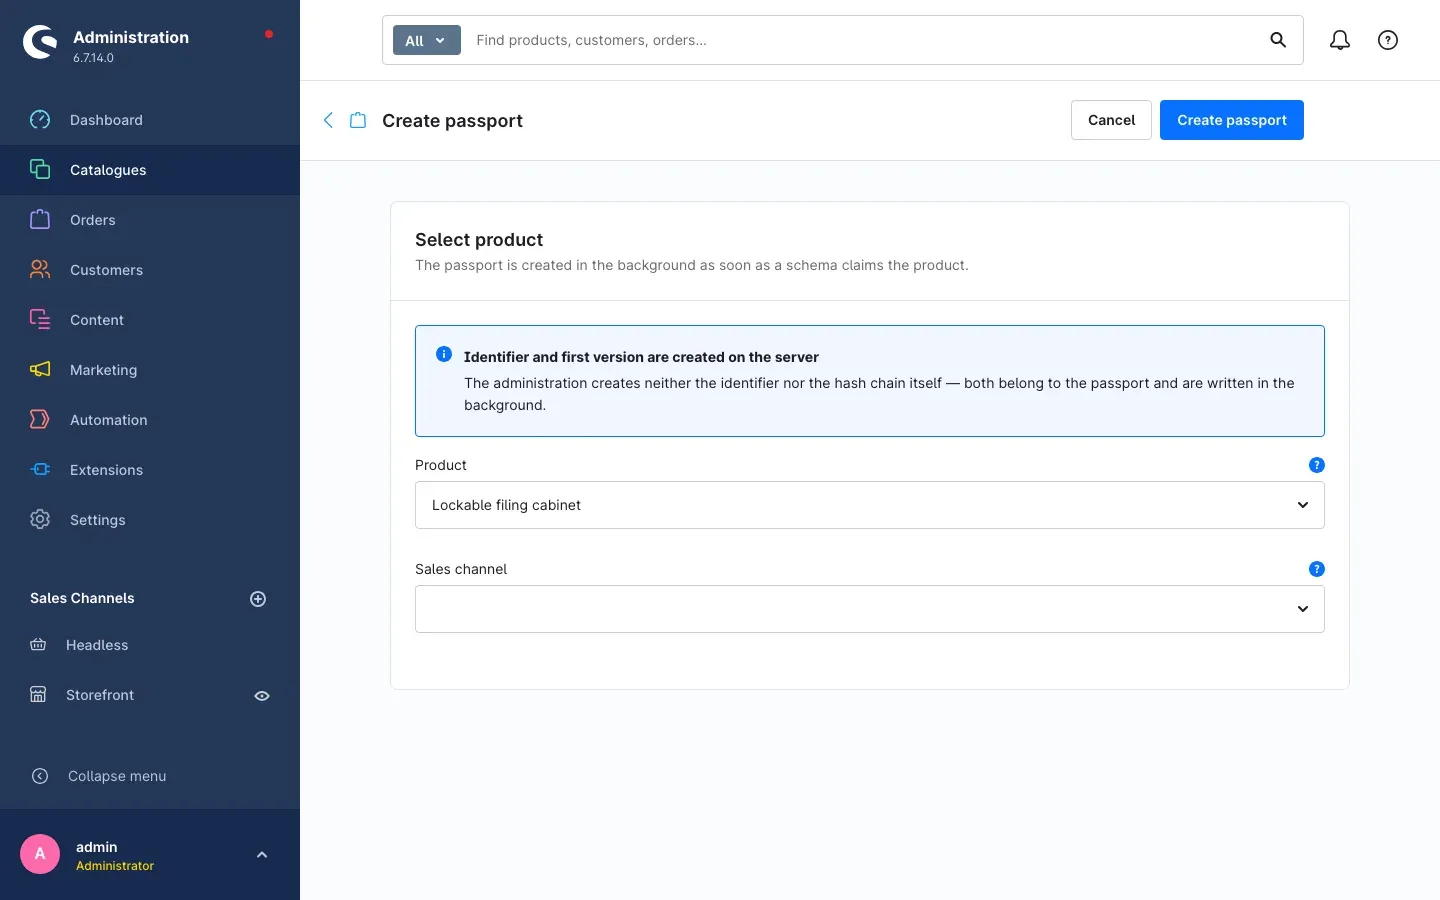 Fig. 11: “Create passport”: selecting a product that has no passport yet
Step by step
- Go to Catalogues → Digital product passport → Passports.
- Click Create passport in the top right.
- In the Select product card, choose the product the passport is for under Product.
- If you leave Sales channel empty, the passport applies to all sales channels. Only select one if the passport is to apply in a single shop.
- Click Create passport.
The passport is written in the background and appears in the list once it is ready. The identifier and the first version are created on the server — the administration does not produce them itself.
There is also a way without any clicking: as soon as you save an article, the plugin queues a work item and creates the passport, provided a schema is in charge of the article. Both routes run through the same queue (Keeping an eye on compliance and the queue).
Tip: If the product already has a passport, the page tells you so and offers Open existing passport. Take that offer: a second passport would create two addresses for the same product.
If an article does have several passports, for example one for each of two sales channels, every channel decides for itself: it shows the published passport bound to it, otherwise the published passport without a sales channel. Passports bound to another sales channel never appear there — neither on the product page nor on the product passport sheet or when items are assigned to an order.
Important: A passport is only created if an active schema is in charge of the product. If no passport arrives, check the schema assignment first (Schemas) and then the queue.
Where the data of a new passport comes from
What this gives you: A new passport is not empty. You correct instead of typing.
As soon as a passport is created, the plugin takes over what your shop already knows: product name, model identifier, manufacturer, product category and the date it was placed on the market. If your schema carries several languages, it takes every entry from the matching translation of the article — so the German passport text comes from the German article description, the English one from the English description. If a variant has no translation of its own, it inherits the one of the parent article.
For everything that is not part of the article master data, the plugin supplies a field set called Digital product passport. You find it on the product under Specifications in the Custom fields card on the Digital product passport tab — and on the manufacturer as well.
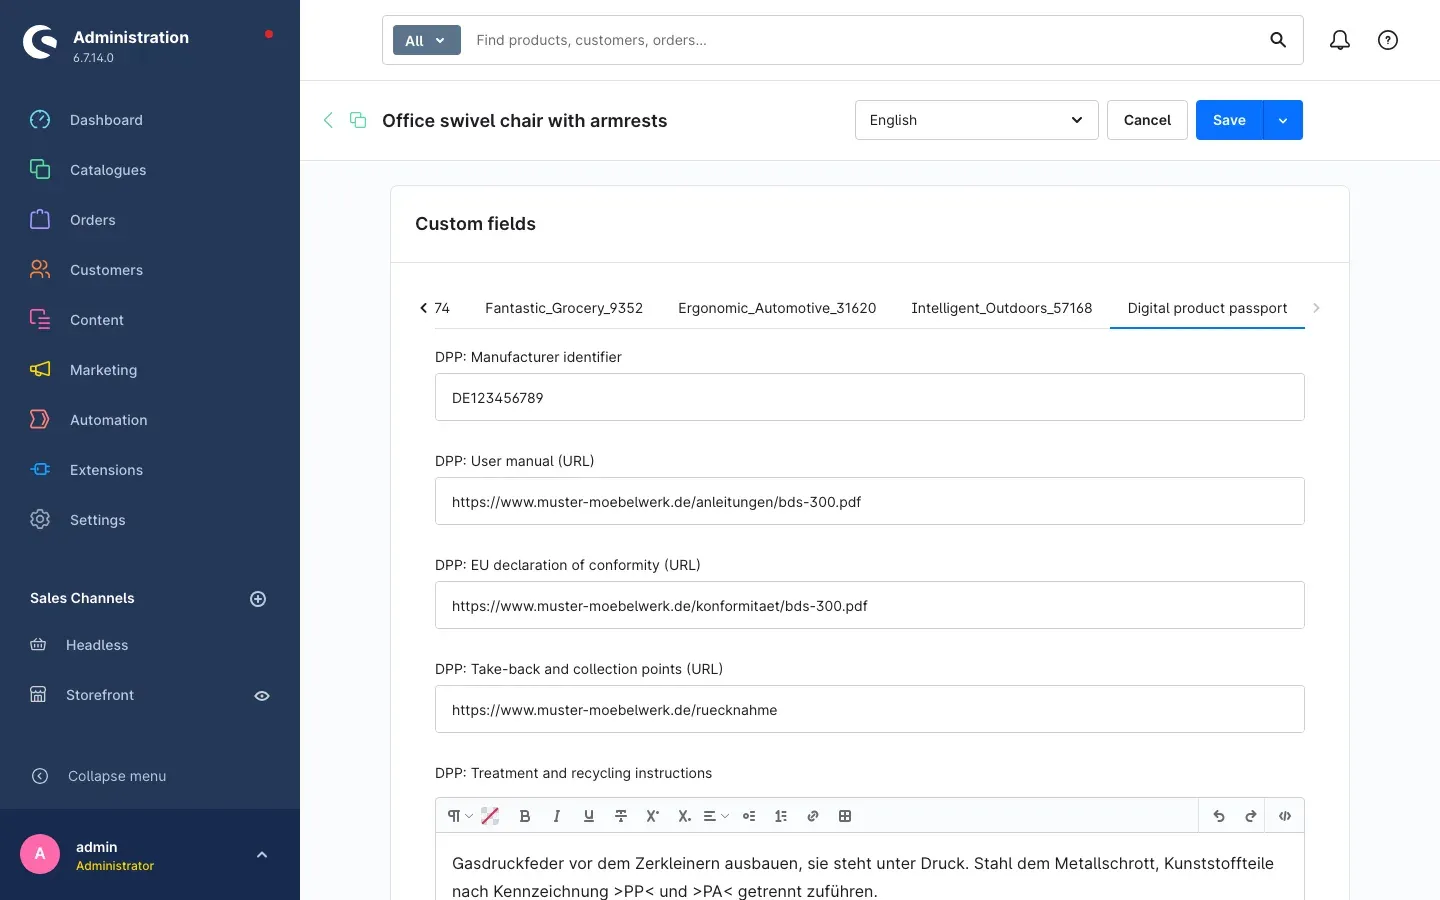 Fig. 12: The “Digital product passport” field set on the product, fully filled in
It contains eight fields:
- DPP: Manufacturer identifier
- DPP: User manual (URL)
- DPP: EU declaration of conformity (URL)
- DPP: Take-back and collection points (URL)
- DPP: Treatment and recycling instructions
- DPP: Separate collection required
- DPP: Expected lifetime (years)
- DPP: Carbon footprint total (kg CO₂e)
Which source wins when several supply something: first the value on the article, then the one on the manufacturer, and last the default from the settings (Settings). That way you maintain a manufacturer identifier once on the manufacturer, and a deviating recycling instruction only on the one article that needs it.
What is left in practice: Of the fourteen mandatory entries of the ESPR base schema, five fill themselves from the article master data alone. Three more are covered by the defaults from the settings. Five come from the field set — if your ERP writes into it, they appear by themselves too. Exactly one entry cannot be derived from anything: the list of Substances of concern. It is a structured list and needs at least one entry; an empty list counts as a missing mandatory value.
Important: Prefilling happens only when the passport is created. If you later change the article name or the manufacturer details, an existing passport does not change with it — nor should it, because a published version must not change unnoticed. Enter the change in the passport form; it is written as a new version.
Filling in the data and reading the validation state
What this gives you: The fields the law requires for your product group are there as a form — you fill in what applies and see at any time what is still missing.
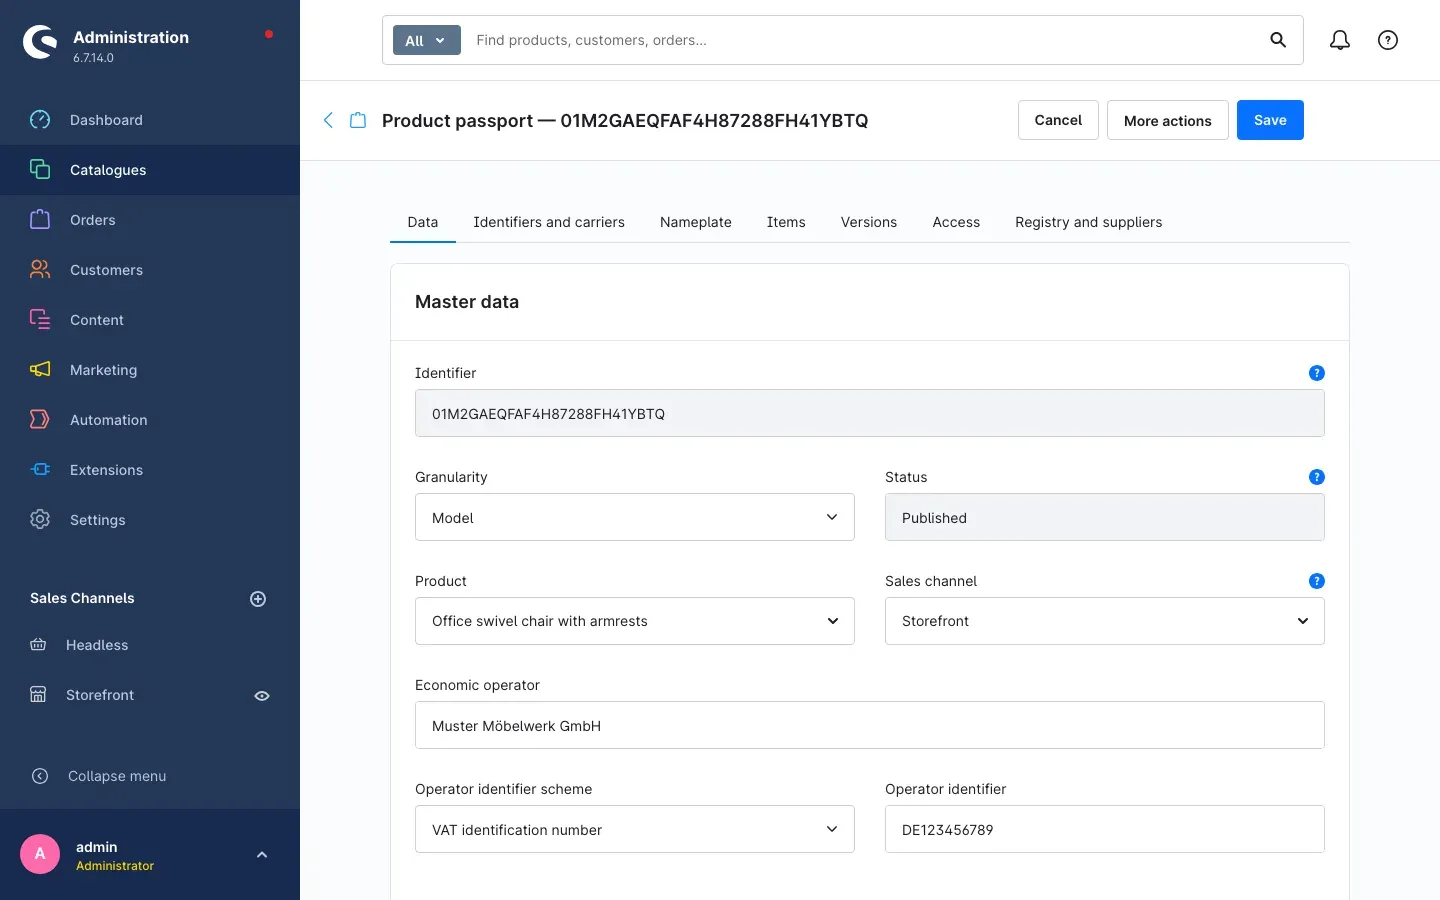 Fig. 13: “Data” tab of a published passport: master data and the schema form
Open the passport from the list. The Data tab shows the Master data at the top — identifier, granularity, status, product, sales channel and the Economic operator with its identifier — then the State, and below that the form of your schema. Which fields appear is determined by the schema alone.
Using Language of the passport content you switch the display between the languages your schema carries. This selection only changes which language version you are editing — not the language of the administration. If a value comes from a different language, the form points that out with Value comes from another language.
Dates and times appear everywhere in the plugin in the format of your user language.
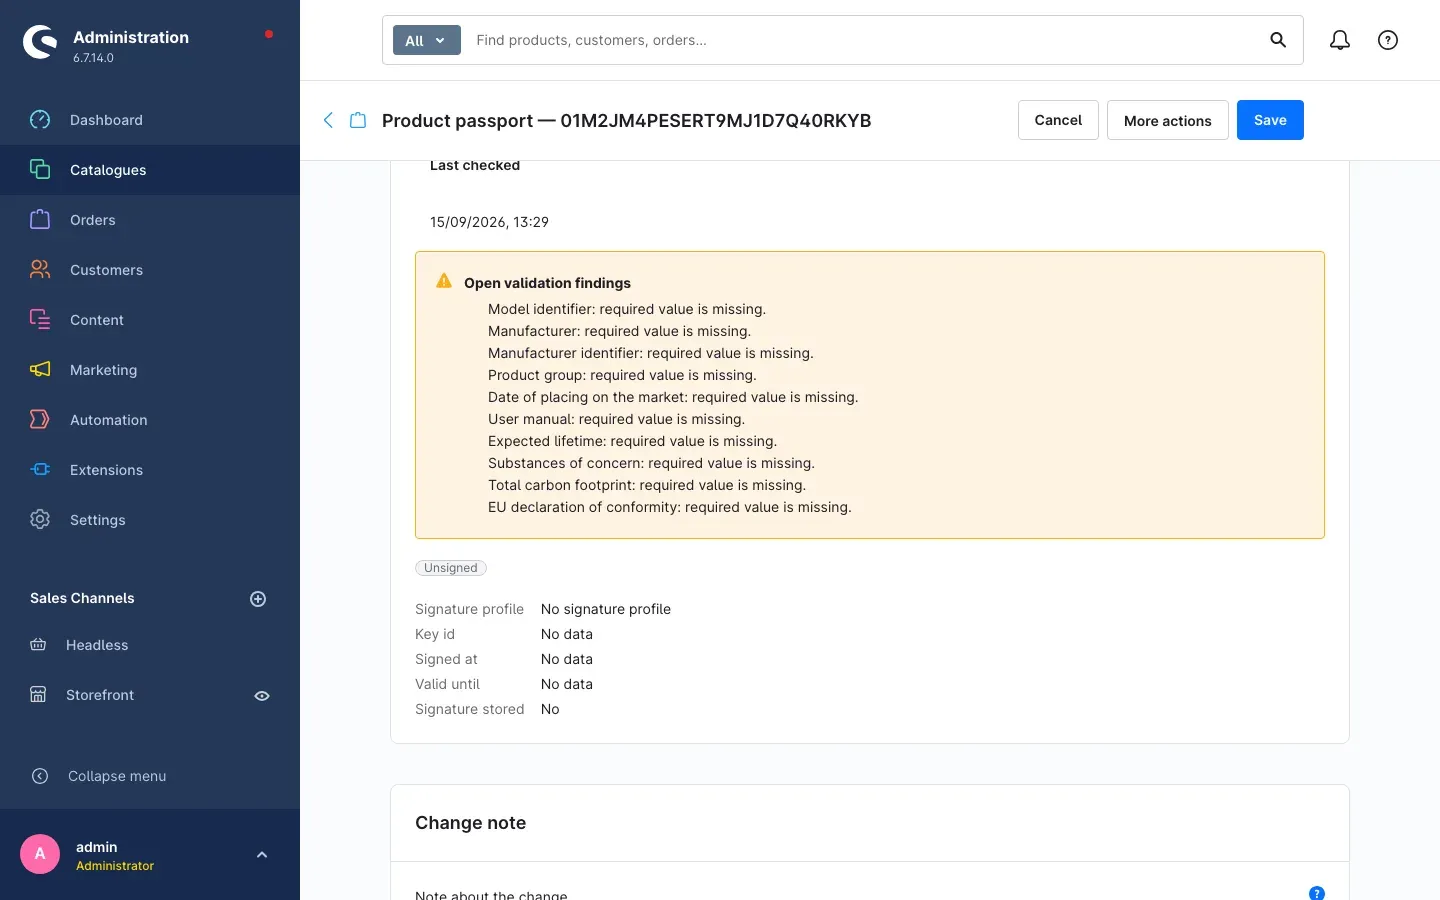 Fig. 14: “Data” tab of a draft with open validation findings
If something is missing, the passport lists it in the Open validation findings banner — in plain language and in the language of your administration, for example “Model identifier: required value is missing.” The Validation state next to it sums that up in one word:
- Valid — every mandatory entry is present and every value is in order. Only in this state can the passport be published.
- Incomplete — mandatory entries are missing.
- Invalid — values have been entered that are not permitted: an address without
http://orhttps://, too many decimal places, a value below the permitted minimum, a GTIN with the wrong number of digits, or a mandatory entry missing in the default language of the schema. - Unchecked — the passport has not been validated since the last change.
Before you save, you can record in one sentence what you changed, in the Change note card under Note about the change. The note travels into the new version and stays visible in the history later — which saves you a lot of searching during an audit.
Publishing and withdrawing
What this gives you: Only a published passport is publicly reachable through the QR code. A draft is not.
At the top of a passport’s detail page you find Cancel, More actions and Save. Behind More actions are Publish, Sign, Verify, Withdraw, Export archive and Create label sheet.
- Check that the validation state reads Valid and that no open findings are reported any more.
- Open More actions and click Publish. The passport then carries the status Published and the publication date is set.
If you have to take a passport off the market, choose Withdraw under More actions and enter a Reason. The reason is recorded in the version history. A withdrawn passport stays resolvable — it is merely marked as withdrawn. That is intentional: otherwise printed labels would lead nowhere.
Important: A published passport can no longer be deleted, only withdrawn. Deleting is possible for drafts that were never published.
In the list you can also select several passports at once and use Bulk actions to publish, sign, withdraw or export them together, or to produce their labels.
Versions and change history
What this gives you: Every change stays traceable. You can show at any time what the passport said and when — and that nobody tampered with it afterwards.
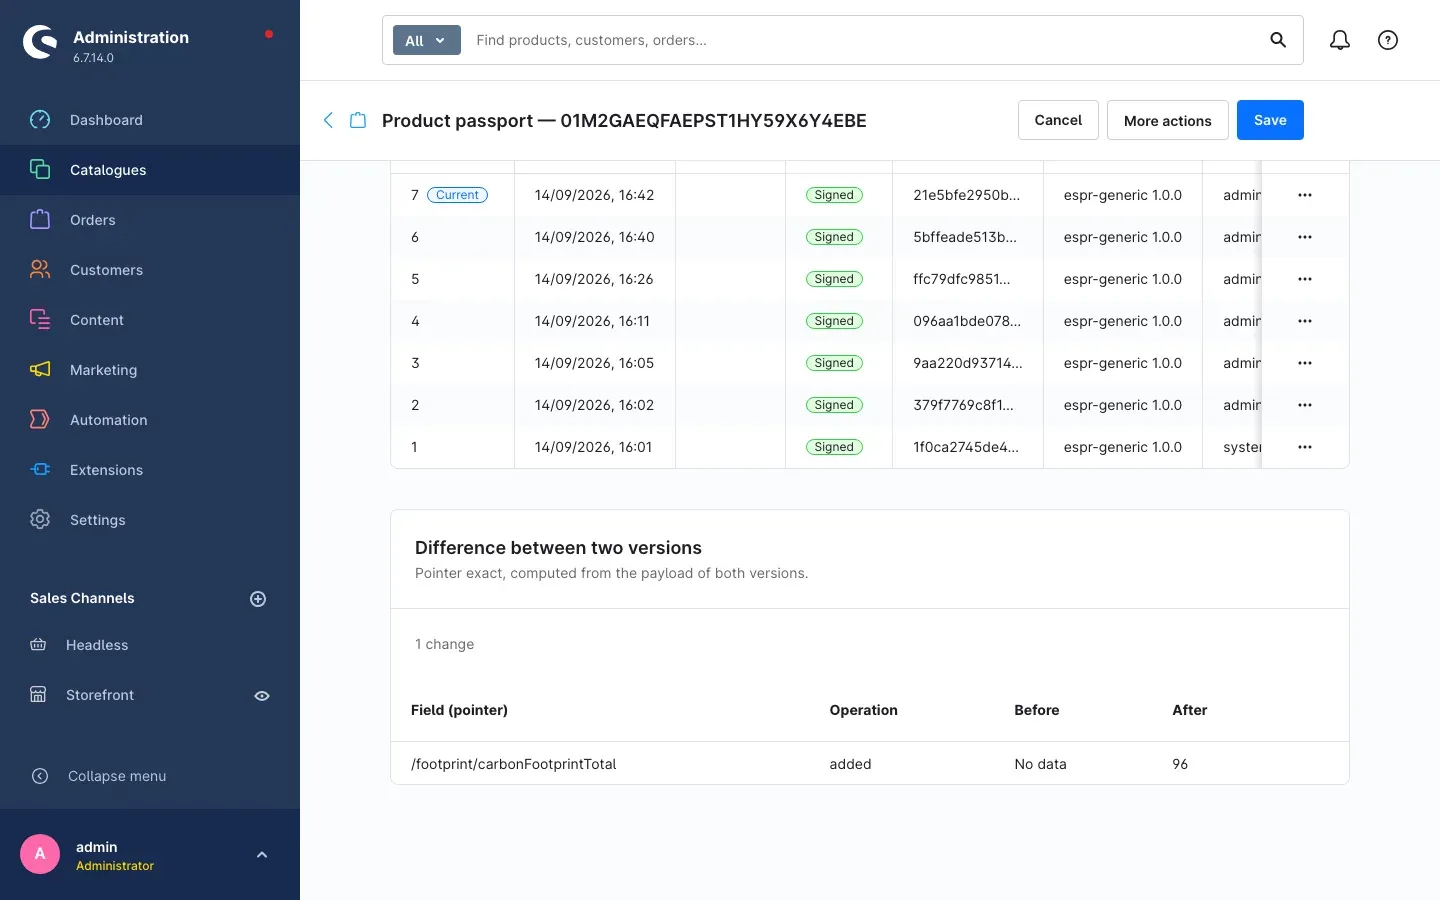 Fig. 15: “Versions” tab: history and the automatically prepared comparison of two versions
The Versions tab lists every version of the passport with its number, validity period, signature, chain hash, schema, author and note. The current one carries the Current badge. Every new version is appended to the previous one and chained to it by a hash; nothing is ever overwritten.
Below that sits Difference between two versions. The two most recent versions are already preselected there — so you see the last change immediately, without setting anything. Using Compare from and Compare with you pick any other pair. For each row the table names the operation, the field concerned and the value before and after.
Signing and verifying authenticity
What this gives you: Whoever opens the passport can check for themselves that the content is genuine and that the version chain was not interrupted.
The prerequisite is a configured signature profile (Settings). Once it is set up, choose Sign under More actions on the detail page. The plugin signs the versions and reports how many were signed and how many were queued.
Using Verify — also under More actions — you produce a Verification report. It names the number of versions checked, whether the chain is intact and, if it is not, from which version it breaks.
If a signature expires, the passport marks that as Signature expired. Sign it again so that verification keeps succeeding.
Identifiers, data carriers and labels
Understanding and adding identifiers
What this gives you: The identifier is the address under which your passport is found. It is printed on every label.
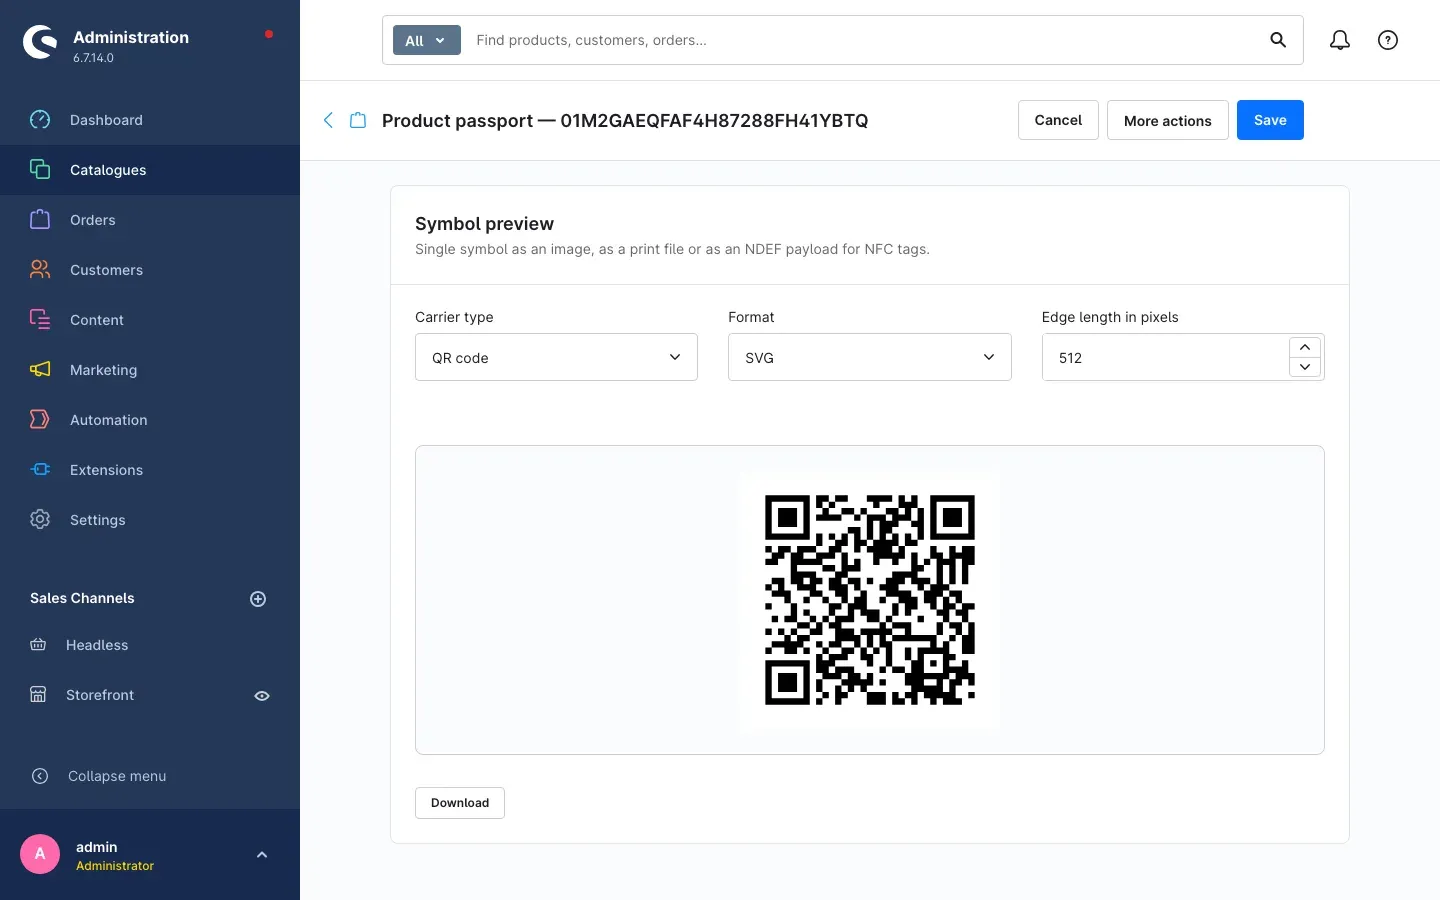 Fig. 16: “Identifiers and carriers” tab with the symbol preview of a QR code
Every passport automatically receives an Identifier when it is created. It is minted once and stays the same for the entire life of the passport.
On the Identifiers and carriers tab the Identifiers card shows all addresses of this passport together with their identifier scheme, carrier type and resolver address. With Add identifier you add another one — a GS1 Digital Link address with GTIN and Serial number alongside the self-assigned identifier, for instance. You can mark one identifier as the Primary identifier; that one is preferred for labels.
When you add a GS1 Digital Link identifier, the plugin checks the check digit of the GTIN immediately. A mistyped number is therefore not saved, instead of showing up later on the printed label.
The Resolver address is built from your settings when the identifier is created and then stored permanently. A stored address wins over later changes to the settings — because it is already printed on labels.
Below that sits the Symbol preview. Using Carrier type, Format and Edge length in pixels you set what is produced; Download saves the result as a file.
Important: If you delete an identifier, data carriers already printed with it will no longer resolve the passport. Only delete an identifier if you can prove that nothing was ever printed with it.
Printing a whole label sheet
What this gives you: Instead of downloading symbols one by one, you produce a print-ready A4 sheet with many labels at once.
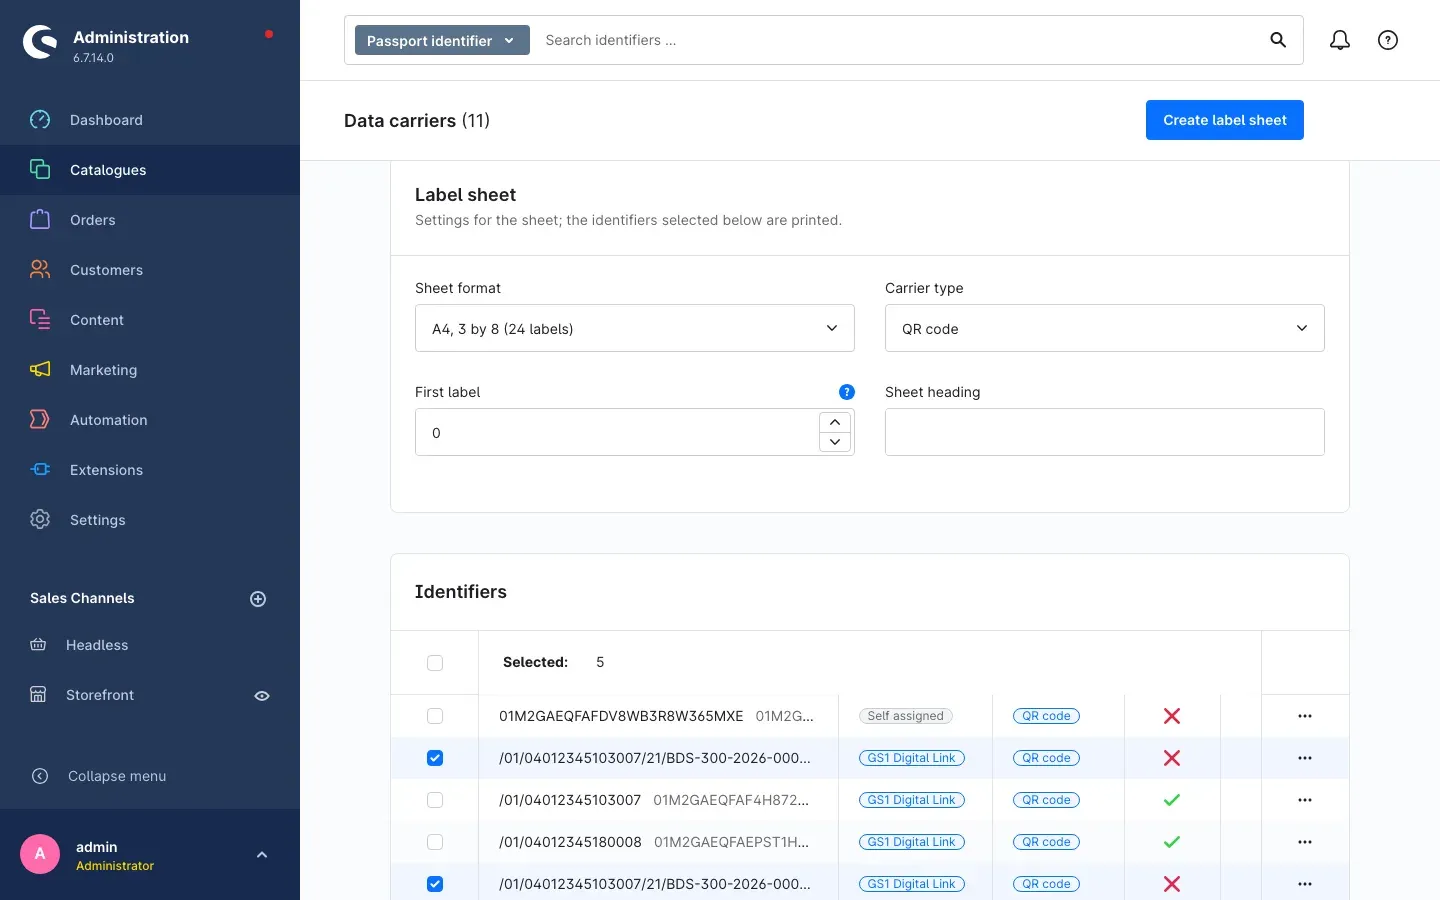 Fig. 17: The “Data carriers” page: label sheet settings and the selected identifiers
Step by step
- Open Catalogues → Digital product passport → Data carriers.
- In the Label sheet card, set the Sheet format and the Carrier type.
- Enter a Sheet heading if you want one.
- If your sheet is already partly used, state under First label how many fields should stay blank.
- In the Identifiers card below, tick the identifiers to be printed. The number selected is shown above the table as you go.
- Click Create label sheet in the top right. The button only becomes active once at least one identifier is selected.
The search bar at the top of the page finds individual identifiers; at the end of each row the context menu offers Show symbol for a preview of a single symbol.
The same route exists from the passport list: select several passports and use Create label sheet from the bulk actions. What gets printed is then the primary identifier of every selected passport.
The nameplate
What this gives you: You produce a finished product plate with manufacturer and conformity details, CE marking and a printed data carrier — as an image file for engraving, printing or handing to your label manufacturer.
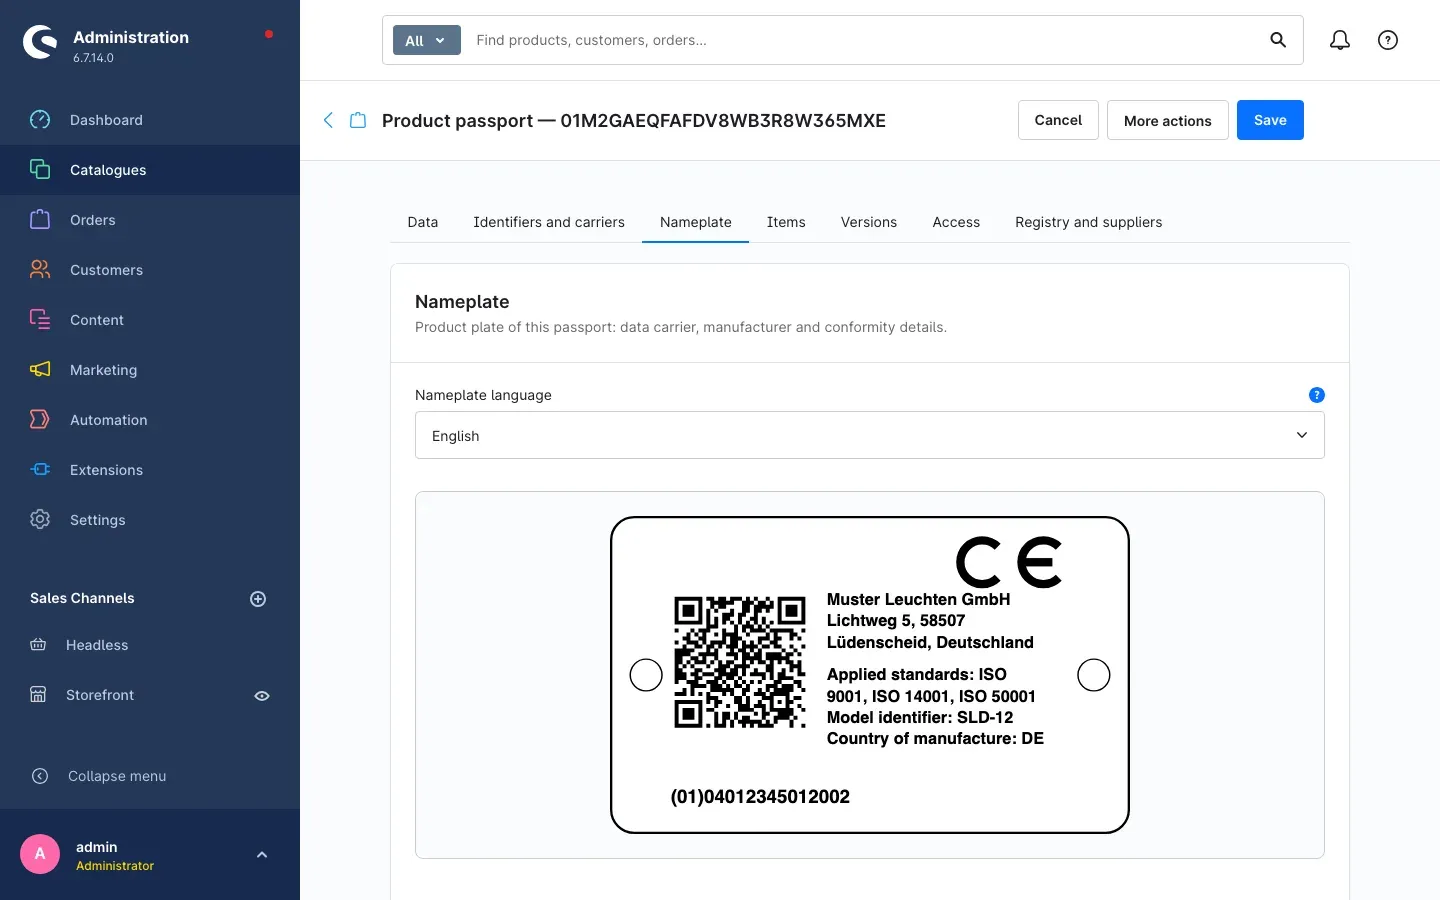 Fig. 18: “Nameplate” tab: nameplate language and preview of the plate
Open a passport and switch to the Nameplate tab. The Nameplate card with the preview of the plate is at the top, the Layout card below it. As long as nothing is stored for the schema, the Default layout notice tells you that what you see is the default.
Choosing the nameplate language
Above the preview sits Nameplate language. It determines the language of the captions on the plate — in the preview, in the download and in what is stored in the media library. The languages offered are exactly those your schema carries; the language of your administration is preselected.
The selection only appears if the schema knows more than one language. If it carries only one, there is nothing to choose.
What this is good for: You work in the English backend but deliver the plate to a Dutch production site. You switch the language once, download the file — and send a nameplate everybody there can read.
Setting up the plate
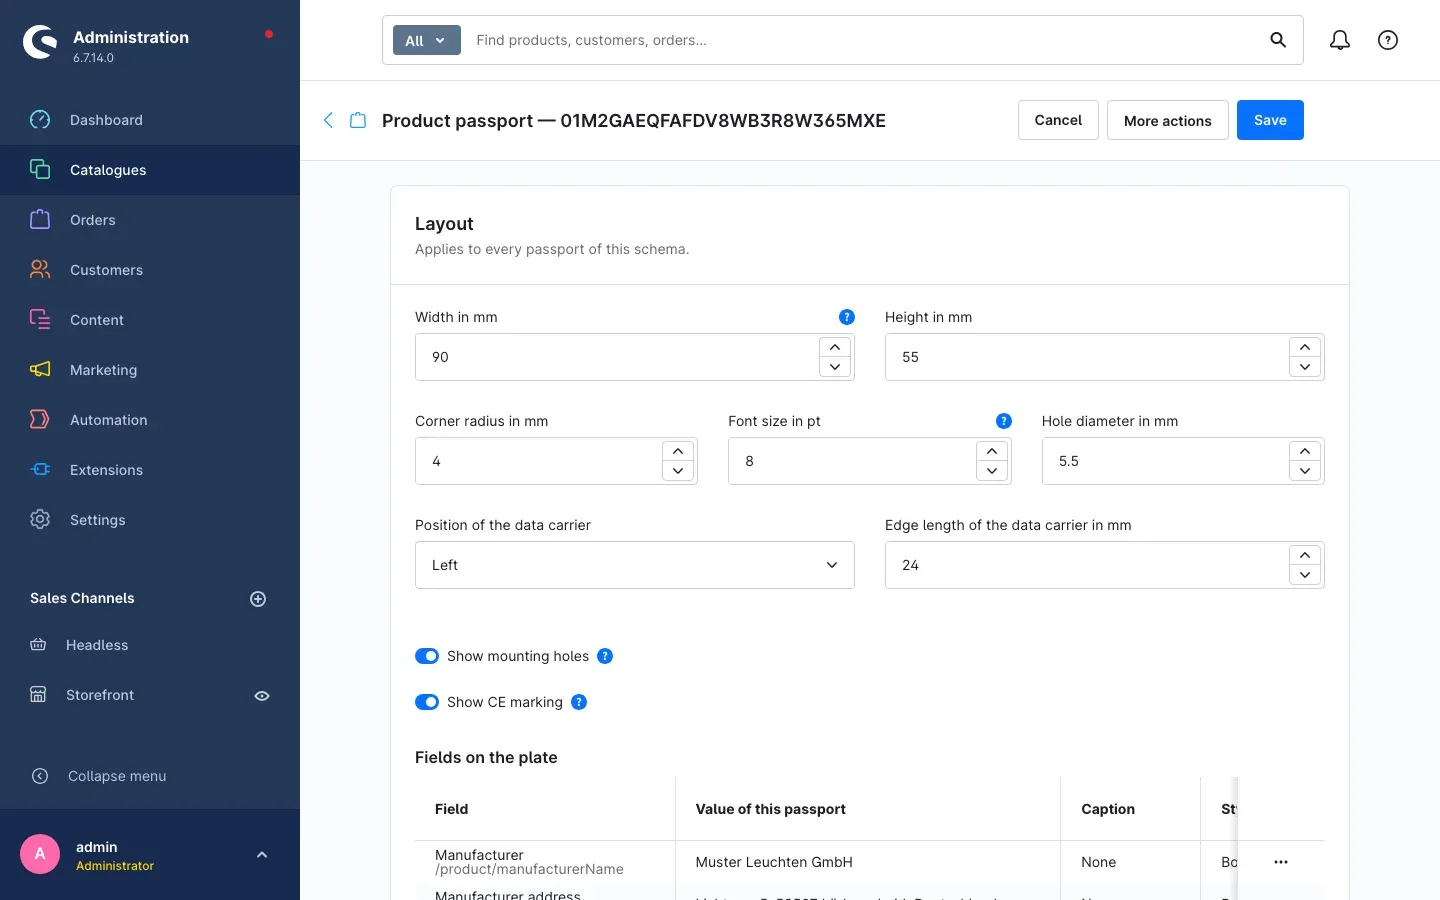 Fig. 19: “Nameplate” tab, layout editor: plate size and fields on the plate
In the Layout card you define the physical dimensions: Width in mm, Height in mm and Corner radius in mm. Show mounting holes adds two holes left and right — the text keeps clear of them by itself; you state the Hole diameter in mm next to it.
You set the Position of the data carrier to Left, Right or Without data carrier, and the Edge length of the data carrier in mm determines its size. Show CE marking only takes effect if the passport states that the CE marking is affixed.
The Font size in pt is a starting value: if the text does not fit the plate, the nameplate reduces it itself.
Putting fields on the plate
Under Fields on the plate you determine what is printed. With Add field you choose from the fields your schema declares — plus the details of the passport itself, such as Passport identifier (UID), Economic operator, Identifier of the economic operator and Identifier scheme of the economic operator.
For each row you set:
- Caption: None prints the value only, Field name puts the label from the schema in front, Own text takes a caption you choose.
- Area: Main area or Footer.
- Style: Normal or Bold.
- Gap above: separates blocks from each other, for instance the address from the technical details.
With Move up and Move down you order the rows. The Value of this passport column shows you what actually ends up in the preview.
Saving the layout and producing the nameplate
The layout applies to every passport of the same schema. As long as you have not saved anything, the plugin works with a default layout and says so. Save layout fixes your version; Reset to default removes it again.
There are three ways to output it:
- Download PNG — image file for print shops and label manufacturers.
- Download SVG — scalable without loss, the right choice for engraving and laser work.
- Save to media library — stores the nameplate in your Shopware media library in the folder Digital Product Passport, so you can reuse it from the shop.
Refresh preview recalculates the view without saving anything.
Tip: When you change the layout, check the preview with your longest product name. You immediately see whether the font is scaled down and whether that is still legible.
Important: Changing the layout requires the permission to edit schemas. Without it you can view and download the nameplate but not rebuild it — the View only notice tells you so.
Who may see which information
What this gives you: Not every entry in a passport belongs in public. You decide which recipient gets to see which level — and you keep the evidence of it.
The visibility levels
Every field of a passport belongs to a visibility level. The choices are Public, Buyer, Repairer, Recycler, Authority and Confidential. The Buyer level is meant for information only the buyer should see — serial number, reference to the proof of purchase, warranty. Whoever proves an order gets to see it; an unrelated repairer does not. Which level a field has is defined by the schema — not by you on the individual passport.
Anybody who scans the QR code without a special authorisation sees the public level only. All other fields are absent from the response entirely.
Issuing an access grant
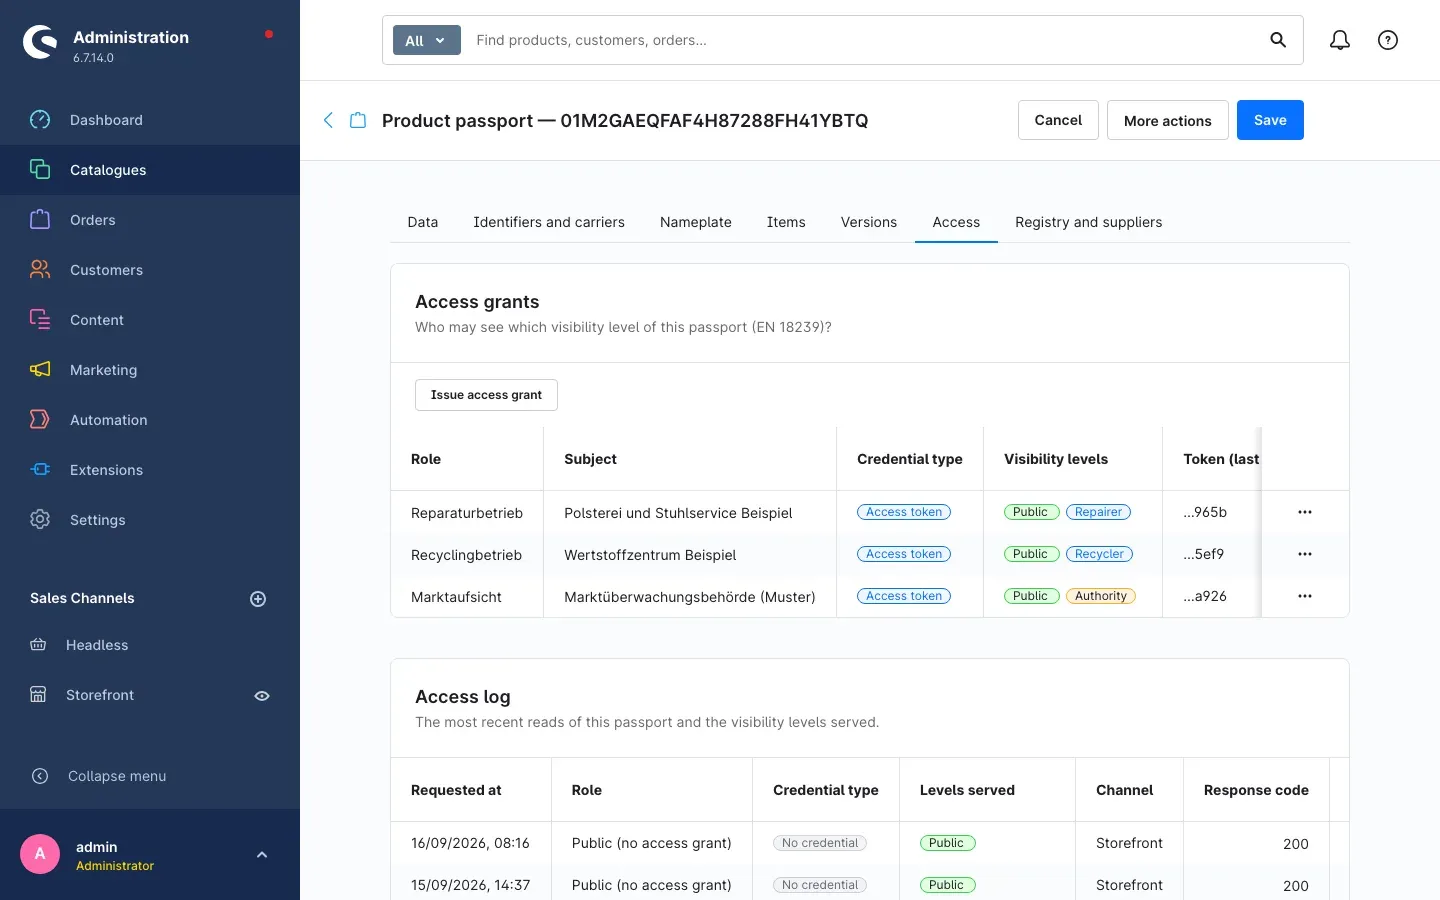 Fig. 20: “Access” tab: the access grants issued
Open the passport, switch to the Access tab and click Issue access grant in the Access grants card.
Step by step
- Enter who receives the grant under Subject.
- Under Role you choose a freely worded name of the party, for example repairer or market surveillance.
- Under Visibility levels, select exactly the levels that are to be delivered.
- Choose the Credential type — Access token, Client certificate or Order reference. This choice cannot be changed after creation.
- Set Valid from and Valid until if you need them. Without a value the grant does not expire.
- If you leave Sales channel empty, the grant applies in every sales channel. If you select one, it applies only there.
- Save.
With the credential type Access token the plugin creates the token on save and shows it exactly once in a dialog. Note it down there — only the hash is stored, and a lost token is not looked up but reissued via Reissue token.
With the credential type Client certificate you store the Certificate fingerprint of the certificate the recipient identifies with. A stored fingerprint is not shown again; a new entry replaces it. If you grant the same certificate access to several passports, it opens each of them.
With the credential type Order reference you enter the order number under Subject. The grant only applies when a request brings both: this order number and the email address the order was placed with. The order number alone opens nothing, because sequential numbers could otherwise simply be tried one after another. If the grant is bound to a sales channel, only an order from that channel counts. The email address is neither stored nor logged during the check. If an order contains several items with their own passport, the same proof unlocks every passport for which a grant with this order number exists.
A grant that should no longer apply is ended with Revoke. After that it no longer resolves any passport, and this cannot be undone.
Tracing who accessed the passport
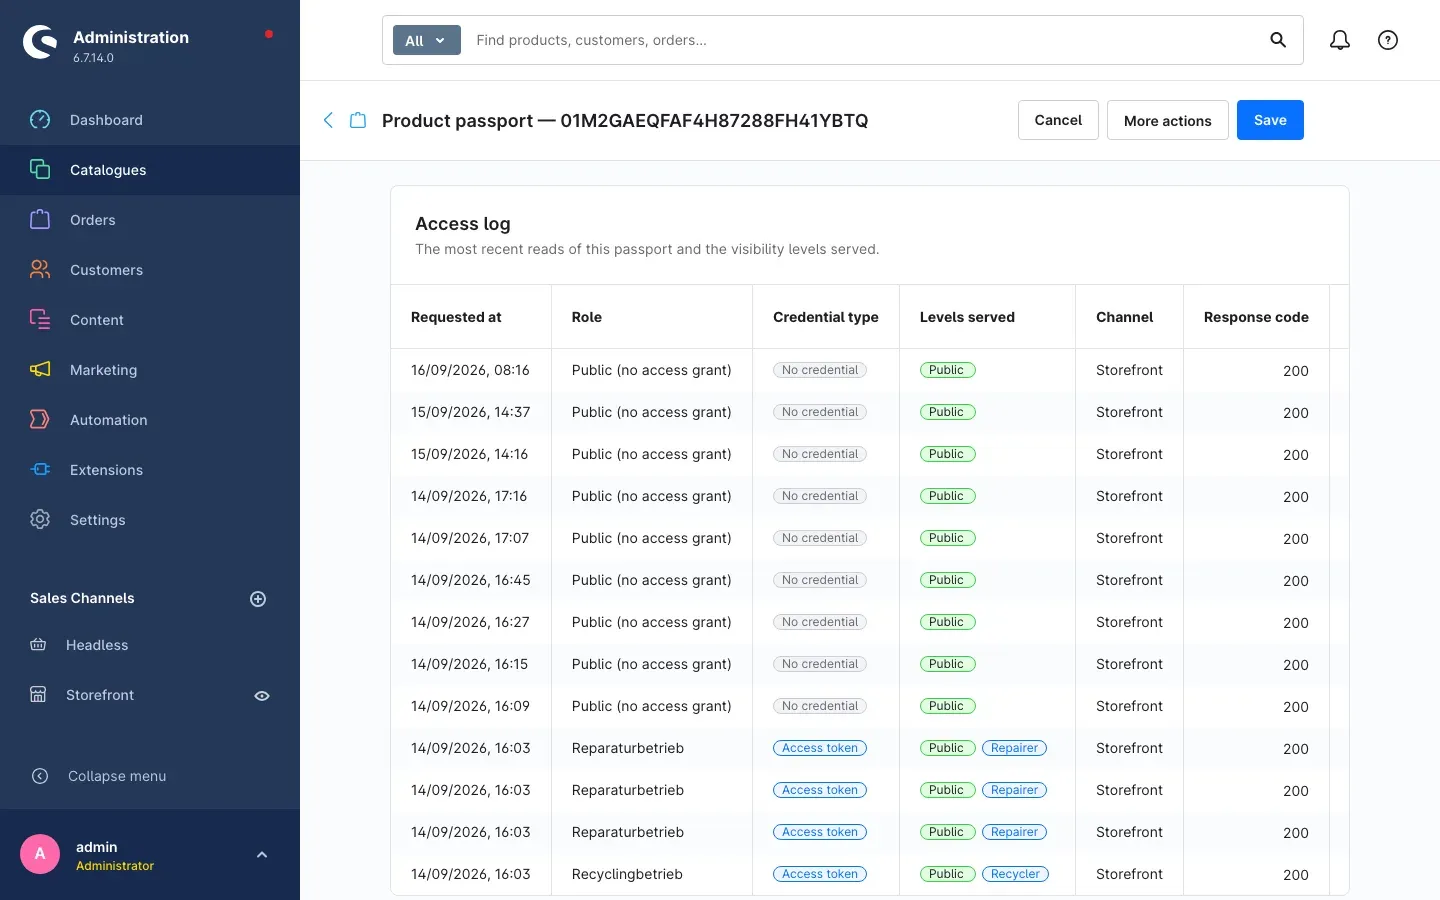 Fig. 21: “Access” tab: the access log with anonymous and identified reads
Below the access grants sits the Access log with the most recent reads of this passport: Requested at, Role, Credential type, Levels served, Language, Channel, Client and Response code. It serves as evidence towards market surveillance authorities.
All values are shown there in plain language and in the language of your administration: a read without authorisation appears with the role Public (no access grant) and the credential type No credential, a read with a token under the role you assigned and the credential type Access token. Channel shows Storefront or Store API, for instance, and Client shows Browser, Scanner, Bot or Unknown depending on the caller — with the addition with access grant for an authorised read.
Whether and how the IP address is stored is set in Settings.
Schemas
What this gives you: The schema determines which fields a passport has, which of them are mandatory, which visibility level they belong to and which products all of this applies to. Without a matching schema no passport is created.
You find them under Catalogues → Digital product passport → Schemas.
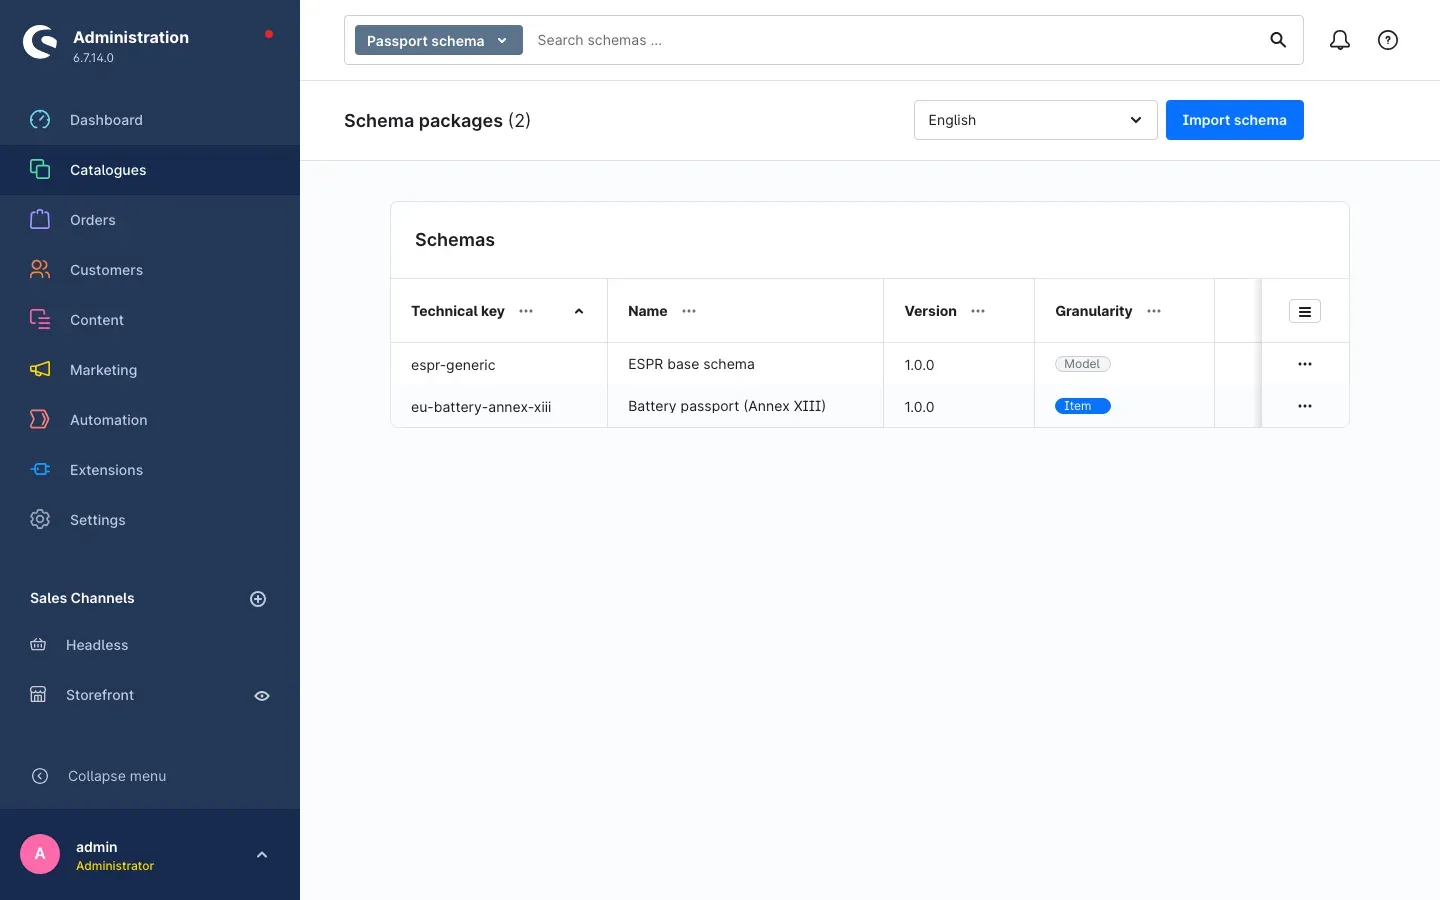 Fig. 22: The list of schema packages: ESPR base schema and Battery passport (Annex XIII)
The list shows Technical key, Name, Version, Granularity and Source for each package; you show Active, Locked and Published at through the column settings above the table on the right. The two shipped packages carry the value Shipped under Source; one you imported yourself appears as Imported, one you created as Created here.
The schemas included
The plugin brings two packages with it:
- ESPR base schema — the generic base schema for product groups without their own delegated act. It covers the information requirements of Annex III of the ecodesign regulation and applies per model. Its sections range from Product and manufacturer through Durability and reliability, Repair and upgradability, Substances of concern and Resource and energy efficiency to Environmental and carbon footprint, End of life and Conformity.
- Battery passport (Annex XIII) — the digital battery passport under the EU battery regulation. It applies per individual item and is mandatory from 18 February 2027 for traction batteries, industrial batteries over 2 kWh and batteries for light means of transport.
Both packages are Locked: they ship with the plugin and are not edited. You can activate or deactivate them; changes to the document belong in a new version.
Assigning a schema to the right products
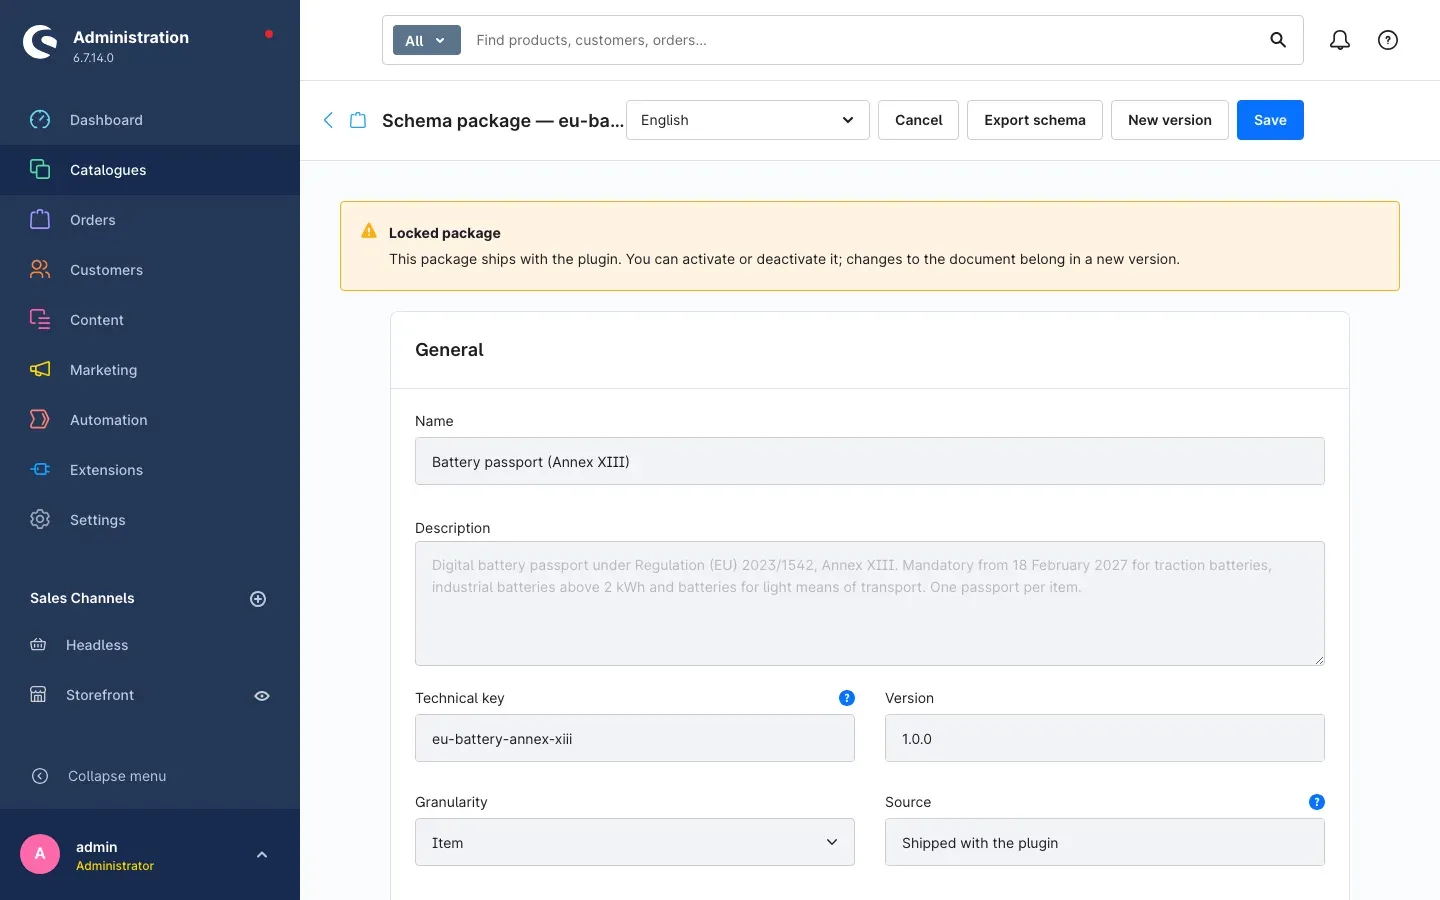 Fig. 23: Schema detail of the battery passport: the “General” card and the assignment
Open a schema from the list. The General card holds Name, Description, Technical key, Version, Granularity (model, batch or item), Source, Legal basis, Standard references and the Active toggle. Only active schemas are assigned to new passports. Using Signature profile you can enforce a different procedure than the global one for passports of this schema.
In the Assignment card you define which products the schema applies to. Under Assignment type you enter what the assignment goes by; the plugin knows five types:
| Entry in “Assignment type” | Effect |
|---|---|
manual | The schema does not claim any article by itself. Default. |
all | Every article in your catalogue. |
category | Only articles in the categories named under Assignment values. |
property | Only articles carrying one of the properties named. |
manufacturer | Only articles of the manufacturers named. |
For category, property and manufacturer you enter the corresponding identifiers under Assignment values, separated by commas.
When several schemas match, the more specific one wins. The order is: property before category before manufacturer before all articles. So a battery passport assigned by a property beats an ESPR base schema that applies via all — without you having to exclude anything.
What this is good for: You set the ESPR base schema to all once and have every article covered. For your cordless tools you place the battery passport on top via a property — and only those get the stricter passport.
Importing your own schema
If an association, a customer or an authority gives you a schema package as a JSON file, you read it in with Import schema: select the file or paste the content directly, and set Activate after import if you want. Export schema hands a package back out as a file.
Creating a new version
If you want to change something in a schema, you create a successor with New version. It takes over the document of the current one; the predecessor stays valid for every passport that names it. By default a successor starts switched off so that you can review the assignment and validation first.
Important: Never replace a version that passports have already been validated against. Their validation state would be invalidated without a trace. The right way is always a new version.
What your customers see in the shop
The passport panel on the product page
What this gives you: The ecodesign regulation requires the passport to be reachable before the purchase in distance selling. That is exactly what this panel does.
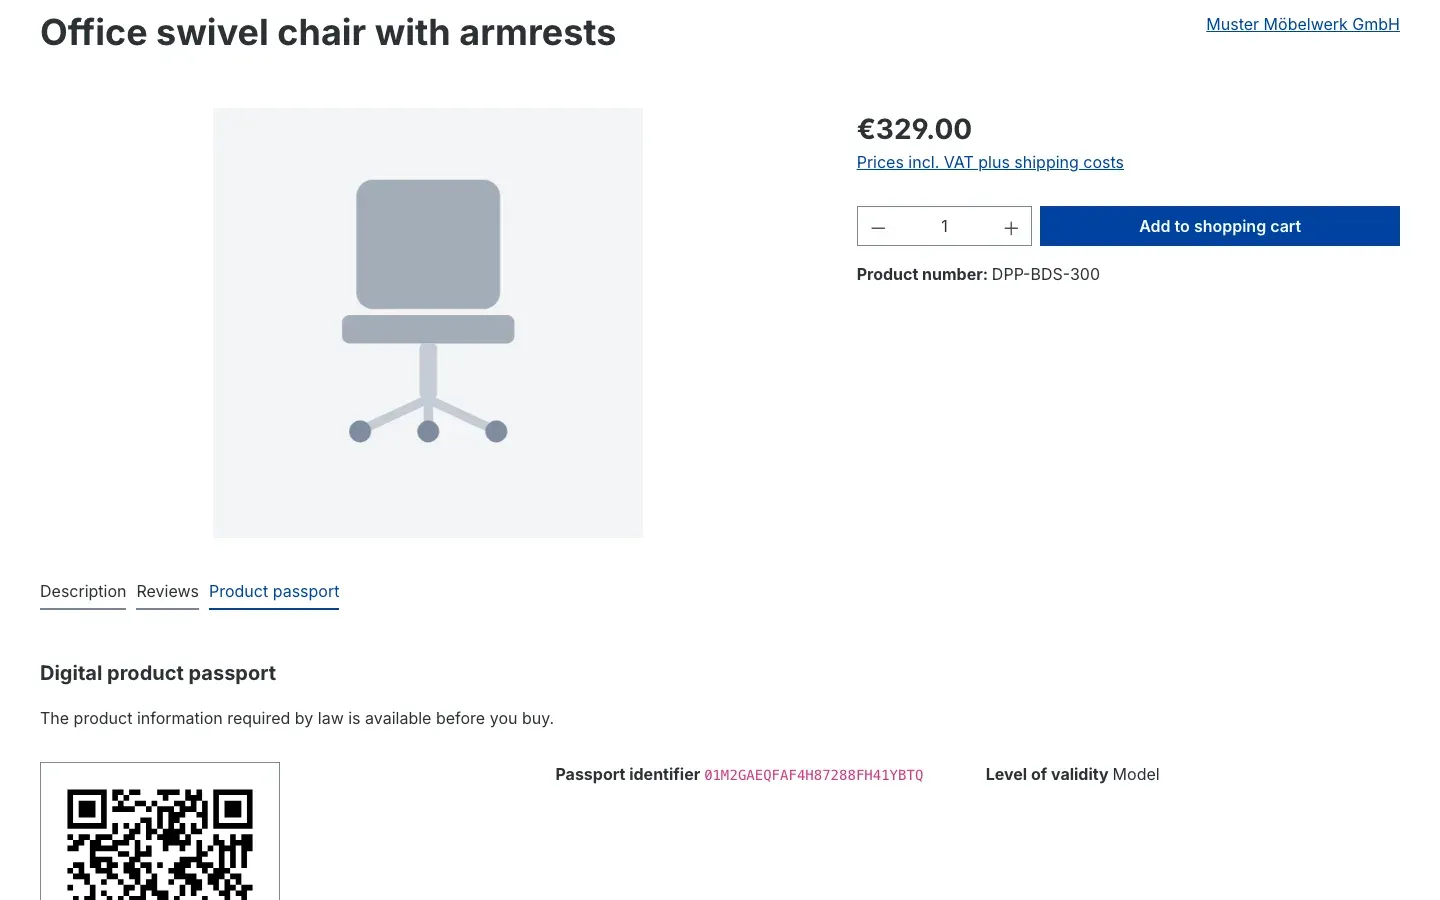 Fig. 24: Product detail page, “Product passport” area with a QR code
On the product page the Product passport area appears with the heading Digital product passport and the note “The product information required by law is available before you buy.” Where exactly it sits is set in Settings.
Visible there are the data carrier, the Passport identifier and the Level of validity. If a variant has no passport of its own, it uses the one of the parent article; the shop marks that under Origin of the information as Taken from the parent product. Open the full product passport takes visitors to the passport page.
The public passport page
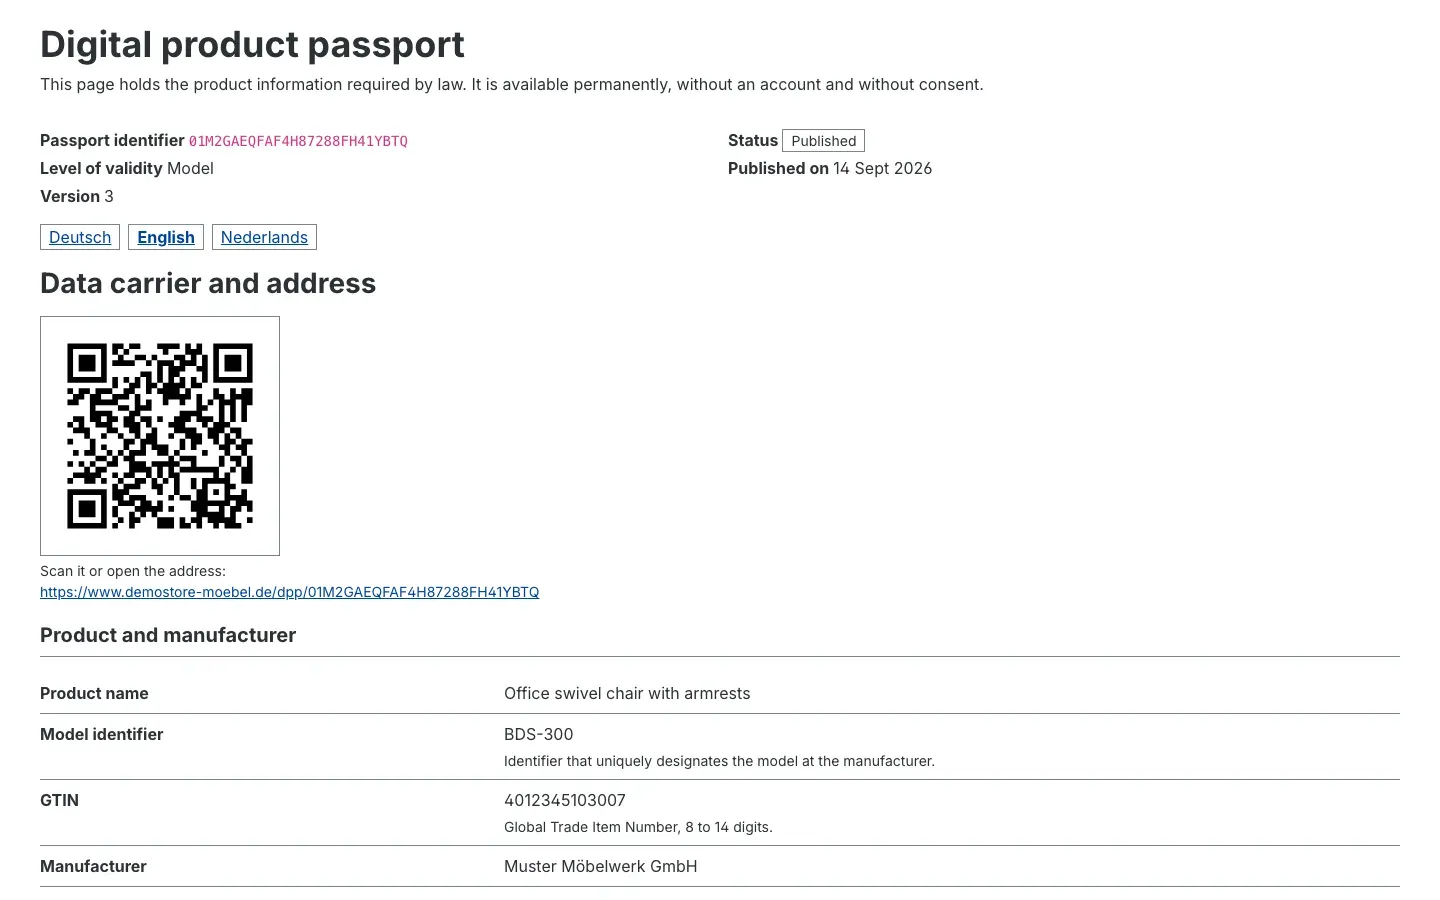 Fig. 25: The public passport page that a scan of the QR code opens
This page opens when somebody scans the QR code. It is reachable permanently, without an account and without consent — and it is prepared for printing.
At the top are the Passport identifier, Level of validity, Version, Status and the publication date, with the language selector next to them. Data carrier and address follows with the symbol and the address to type in, and below that the passport data, grouped by the sections of the schema.
Using the language selector, visitors switch between the languages the passport carries. If the language they want is missing, the fallback language from Settings applies.
Under Authenticity you find the note that every version is chained to its predecessor, and the link Check authenticity now. At the very bottom, About this page names the legal basis and the note that the address stays reachable for the entire retention period. With Retrieve as JSON any inspector can download the machine-readable version of the same data.
The authenticity check
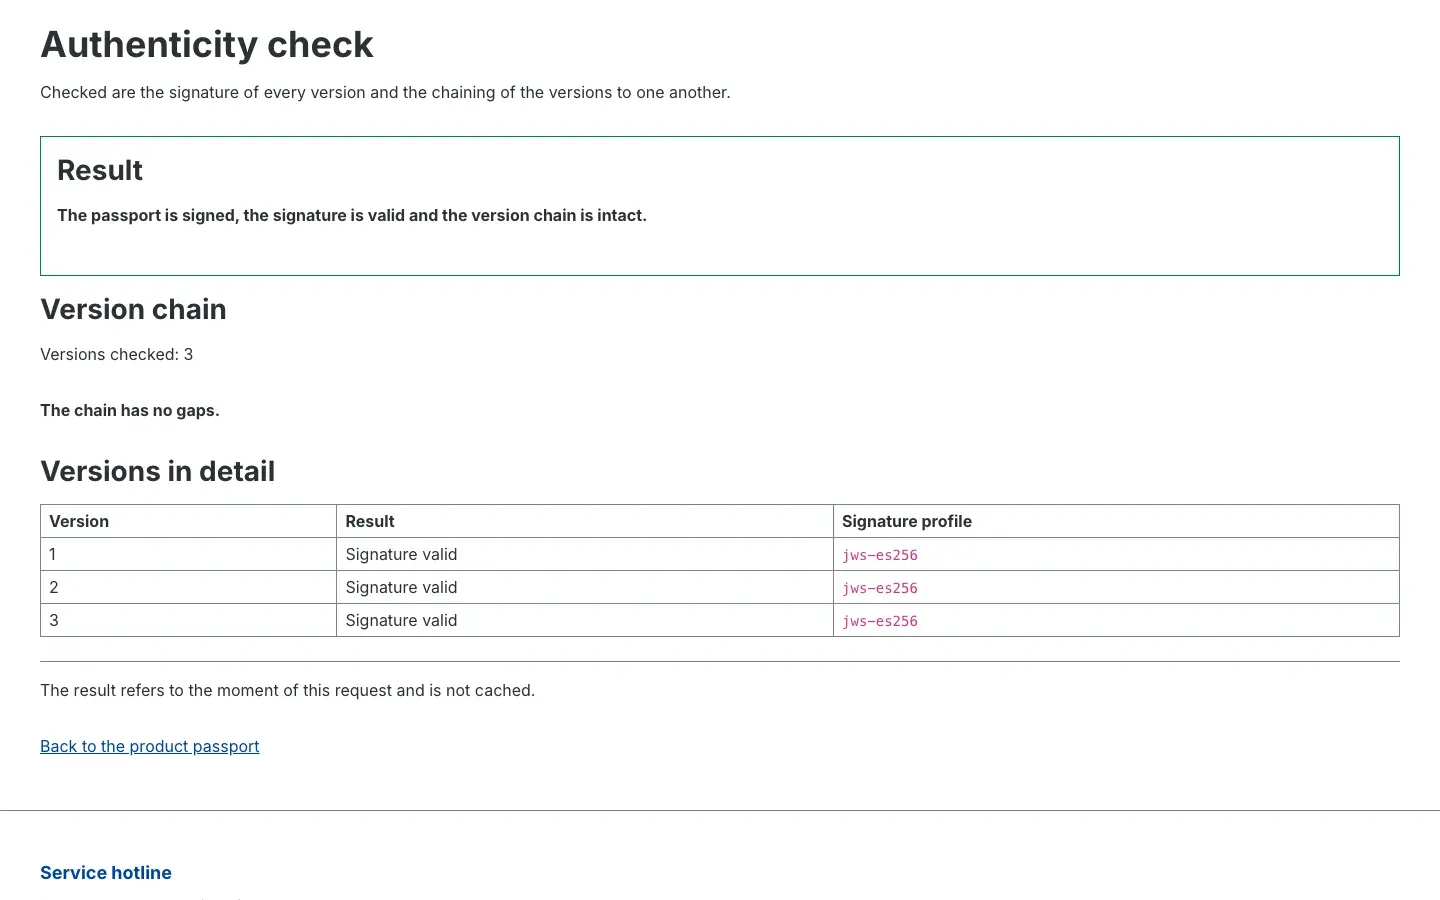 Fig. 26: The result of an authenticity check
Check authenticity now leads to the verification page. What is checked is the signature of every version and the chaining of the versions to one another. The Result is written in plain language — from “The passport is signed, the signature is valid and the version chain is intact.” to “The version chain is broken. The content may have been altered afterwards.”
Below that, Version chain names the number of versions checked and whether the chain has gaps; Versions in detail lists every version with its result and the signature profile used.
If no signature profile is set up, the page says so explicitly: the chain is intact, there simply is no signature configured. And if a check could not be carried out, the page points out that this says nothing about authenticity.
When a passport is not found
If a scan leads nowhere, a dedicated page appears with the heading This product passport cannot be shown. It shows the requested identifier under Identifier requested: and names the three cases under Possible reasons: the identifier was mistyped or the data carrier is damaged, the passport has not been published yet, or it was withdrawn or belongs to a different sales channel.
Items, orders and the passport sheet
Items and batches
What this gives you: For products with a serial number, every single piece should be traceable — when it was manufactured, when it was placed on the market, which order it belongs to.
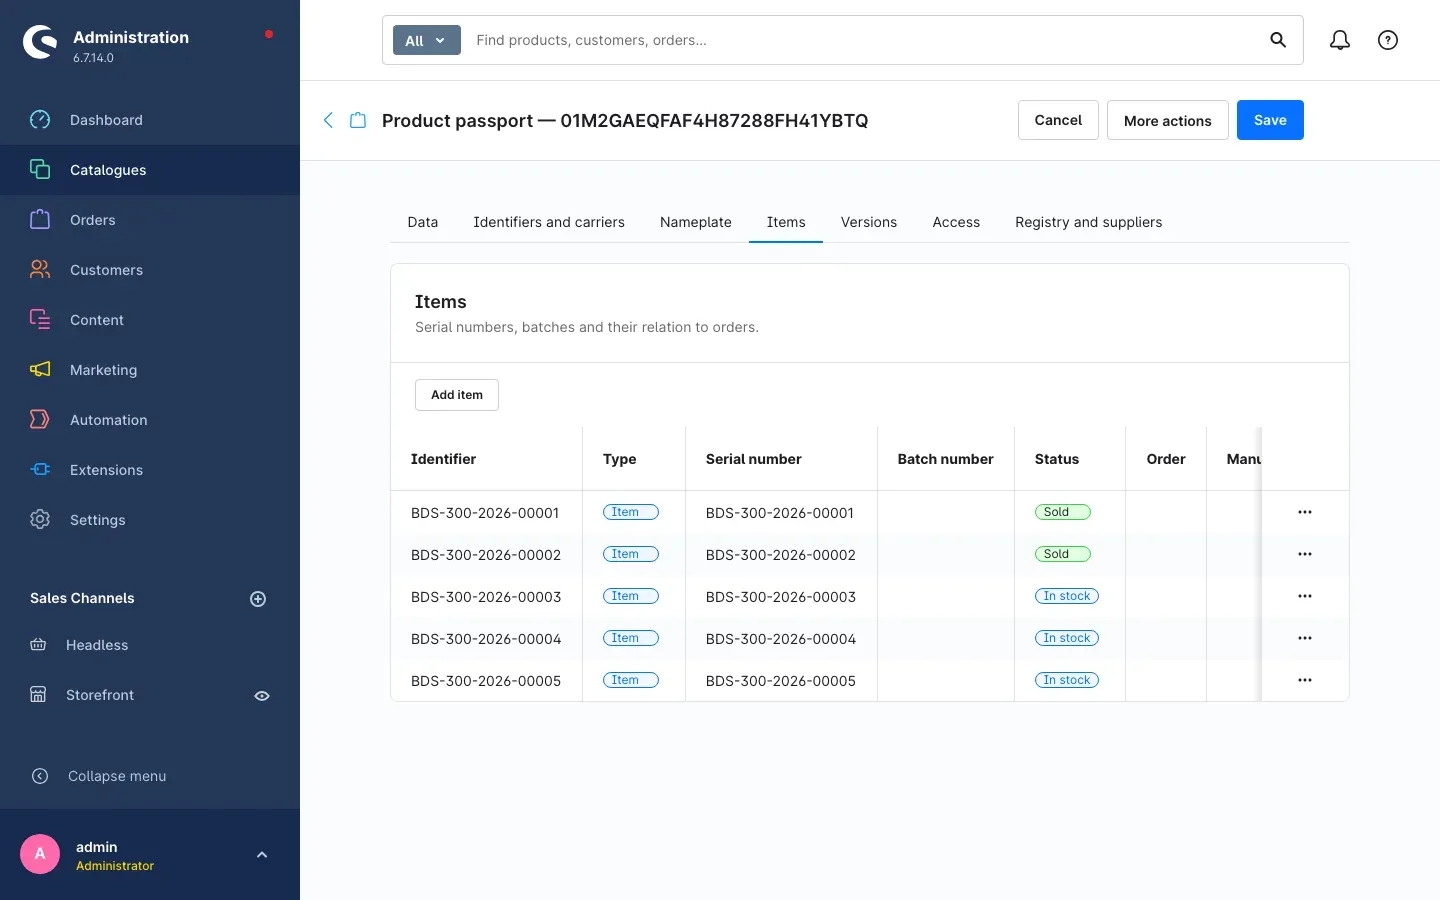 Fig. 27: “Items” tab: serial numbers and their status
Open a passport and switch to the Items tab. There you keep Serial numbers, Batch numbers and their relation to orders. With Add item you add one by hand; they are also created automatically on sale.
For every piece you record when it was Manufactured at and when it was Placed on market, and which Status it has: In stock, Sold, Returned or Recycled. The Order number is carried along in plain text so that the reference stays readable even if the order is deleted later.
The product passport tab on the product
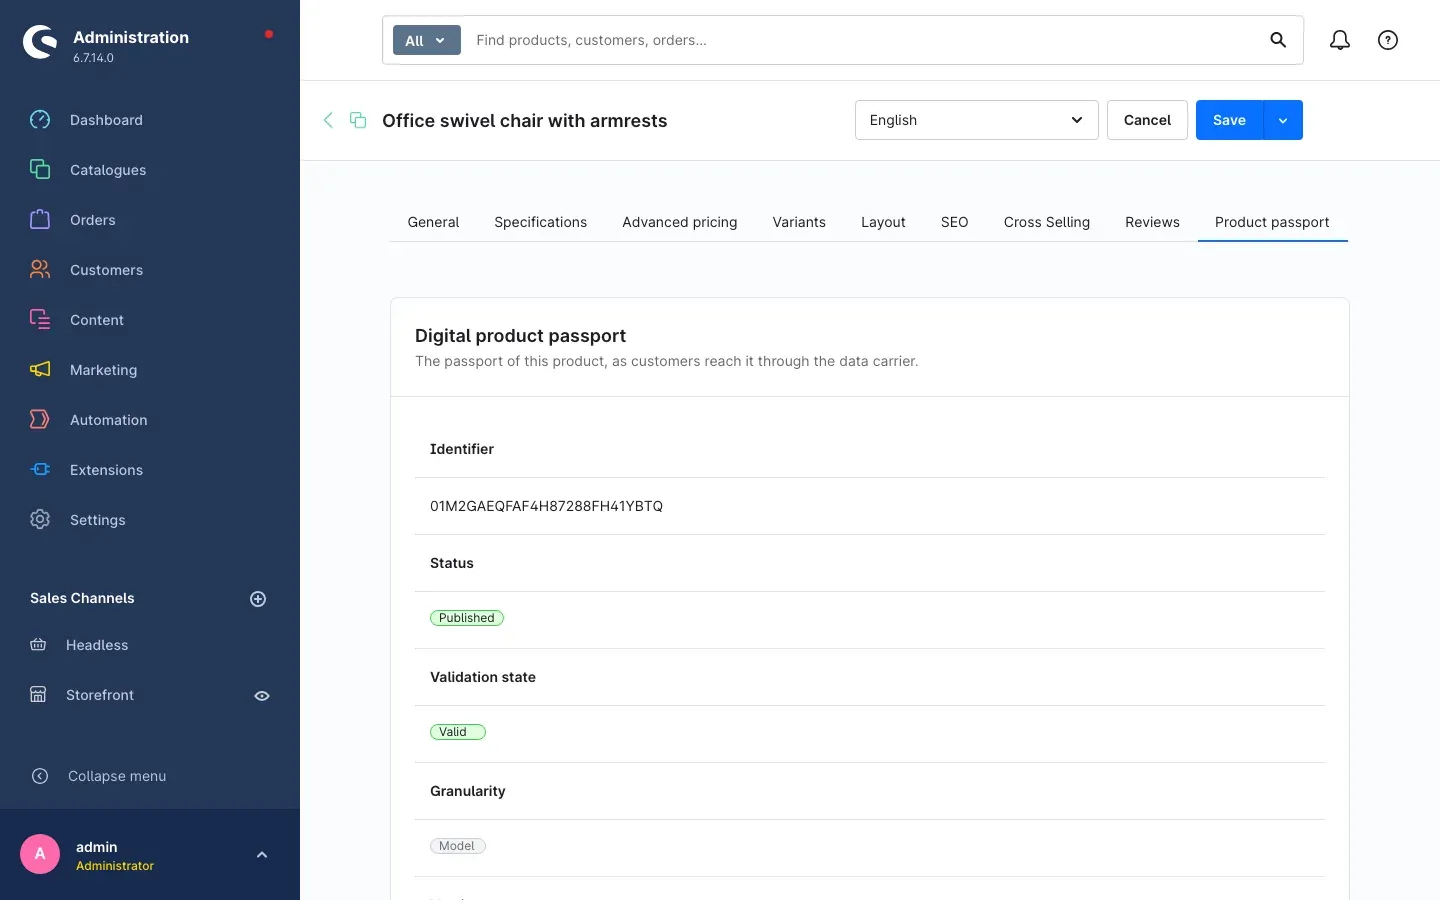 Fig. 28: The “Product passport” tab directly in product management
You do not have to switch to the passport list every time: in product management you find the Product passport tab on the product itself. It shows the identifier, status, validation state, granularity, version and publication date of the passport and offers Open passport and View passport in the shop. If there is none yet, you create it right there with Create passport.
For a variant without its own passport, the tab states under Inherited from the parent product that the passport comes from the parent article. Only create one of its own if the data really differs per variant.
If the plugin finds no schema in charge, the tab says that too — including a hint where you define the assignment.
The product passport sheet for an order
What this gives you: Your customers get it in black and white which passport belongs to which piece they bought — with the serial number and the printed code. At the same time it is your evidence that you handed over the passport when placing the product on the market.
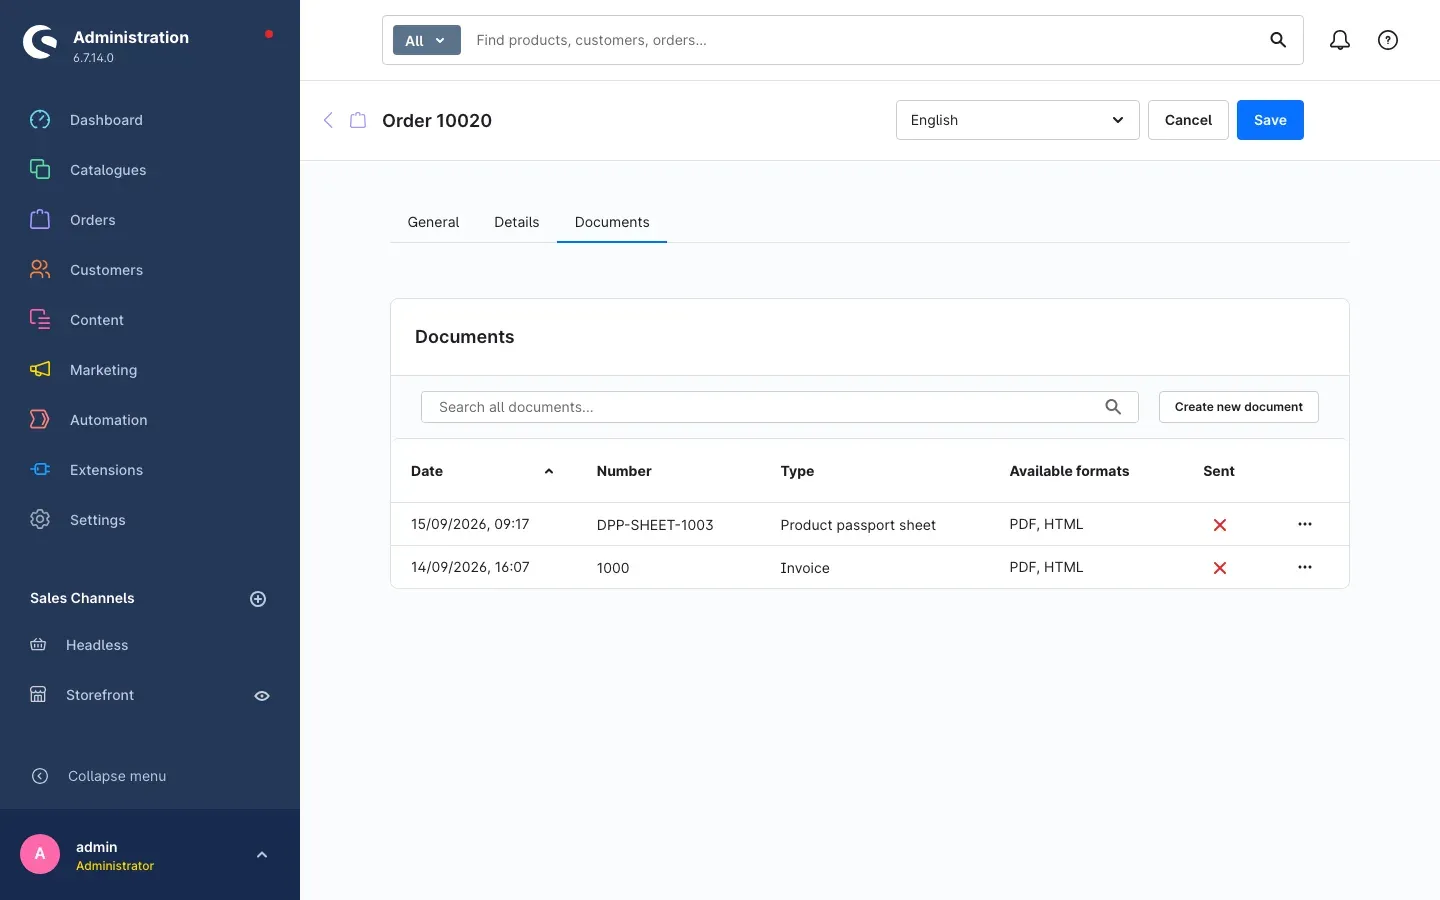 Fig. 29: Order → Documents: the generated product passport sheet
You produce the sheet like any other document on the order:
- Open the order under Orders.
- Switch to the Documents tab.
- In the Documents card click Create new document and choose the type Product passport sheet.
The result is available in two formats: as a PDF for printing and enclosing, and as an HTML version that also works with a screen reader.
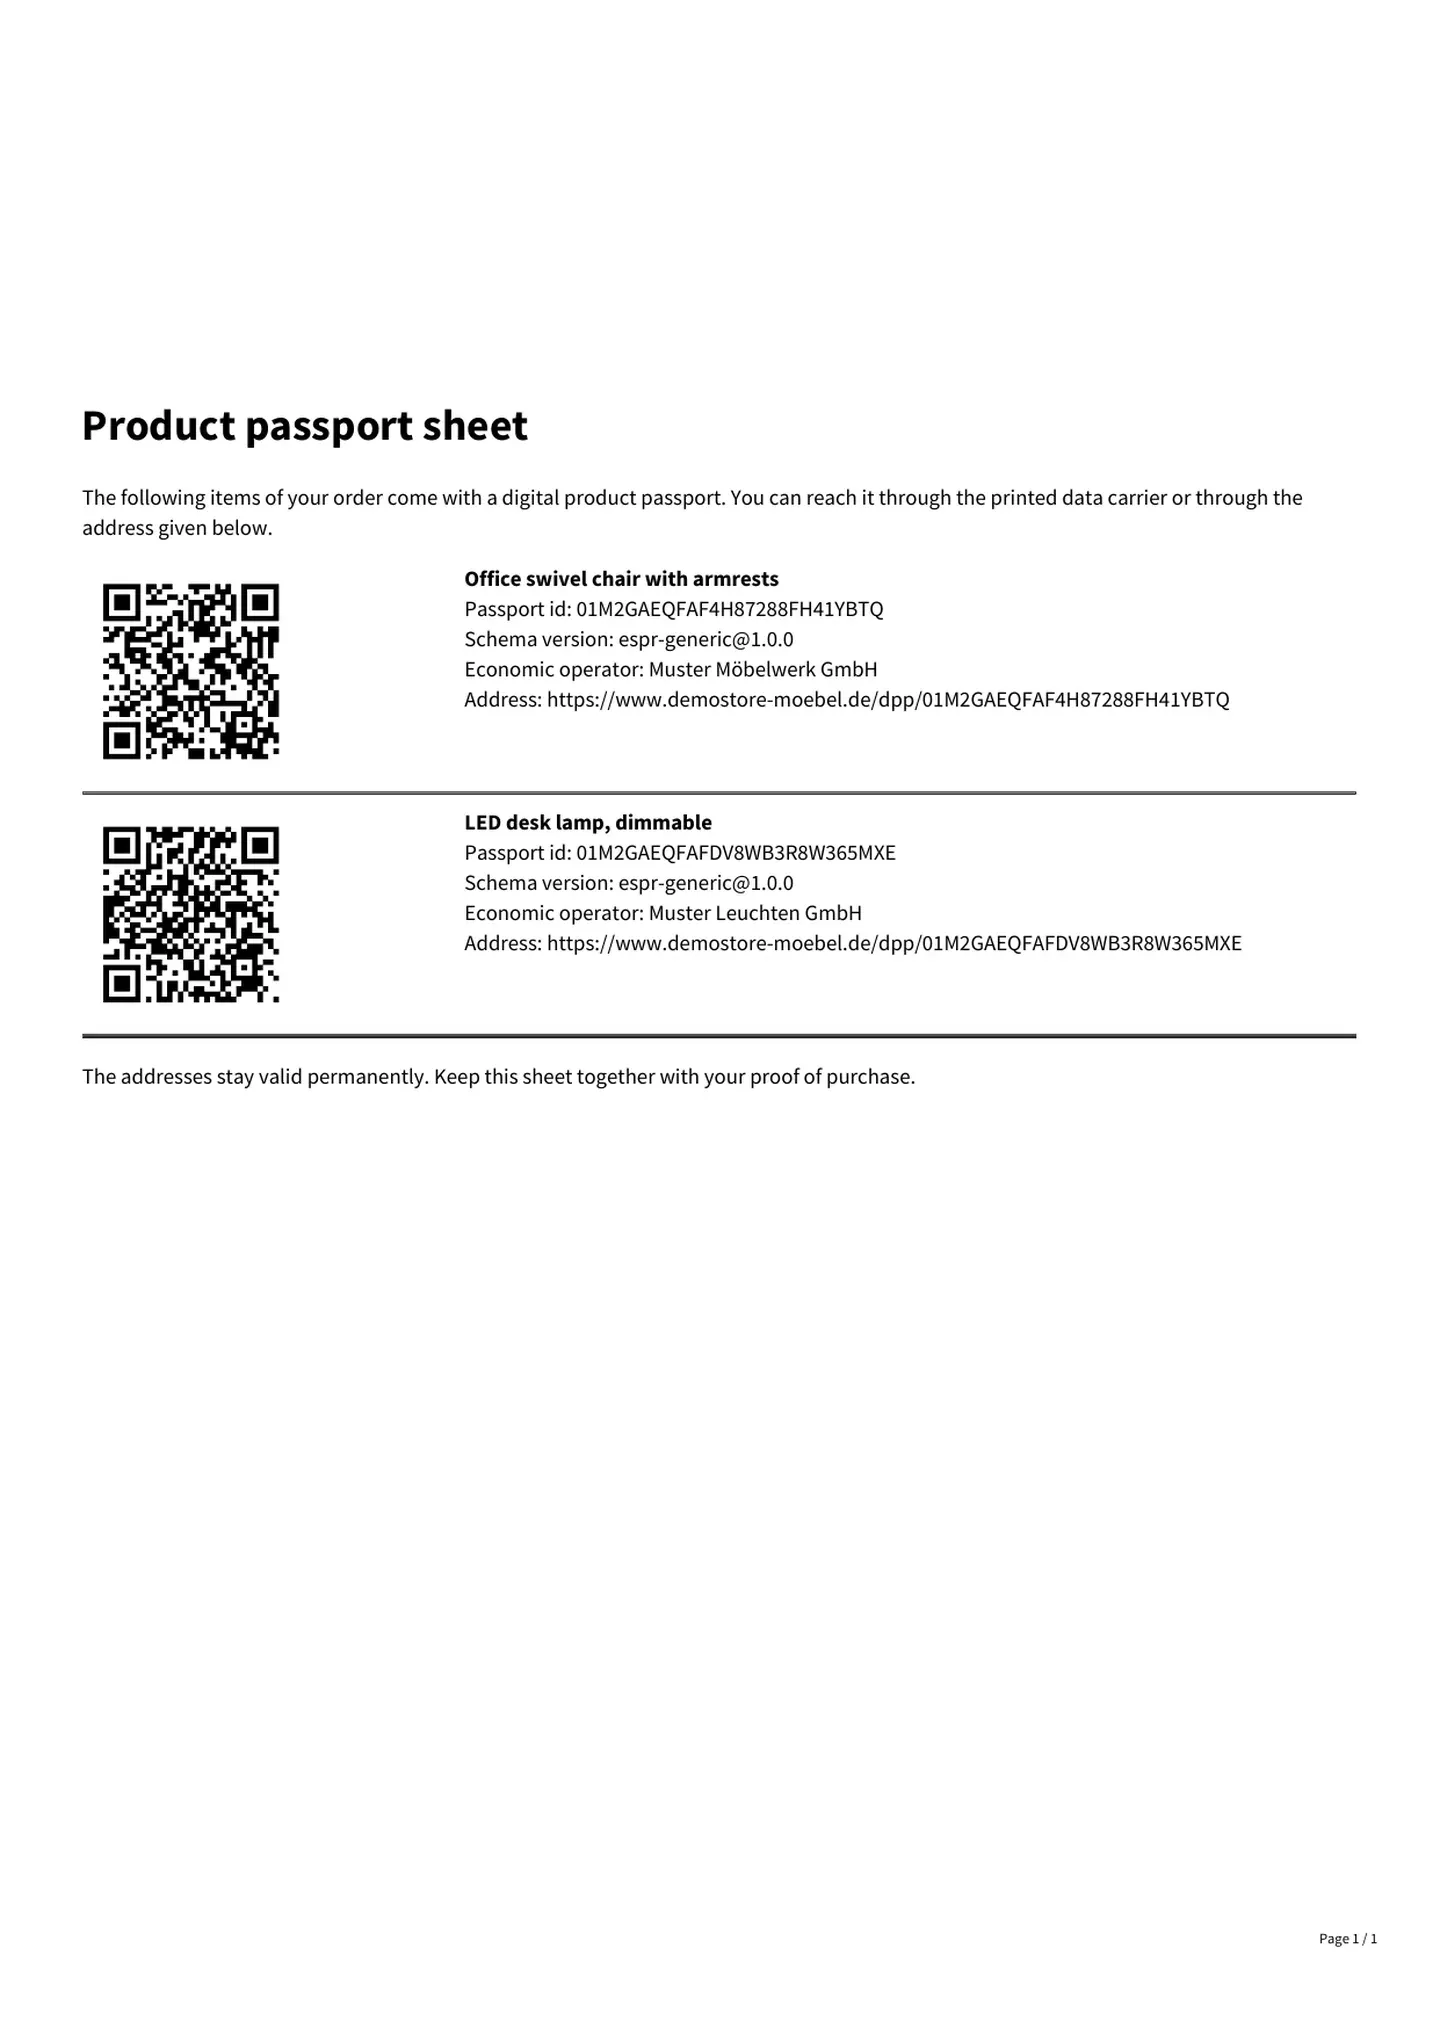 Fig. 30: First page of the generated product passport sheet
What is on the sheet: Every item sold with a serial number gets its own row. Order line items without items instead get a row for the published model or batch passport of the article — for a variant, the one of the parent article if necessary. Every row names the article name, the Passport id, the Schema version, the Economic operator and the Address, with the data carrier printed next to it as a QR code.
Important: Only published passports are listed. A draft would lead nowhere under the printed address, so it is left out. If an order contains no published passport at all, the sheet says exactly that.
Note for very large orders: From 60 printed data carriers onwards, the sheet continues with the address as text only. The passport stays fully reachable that way — and so does the file size.
The email for the order
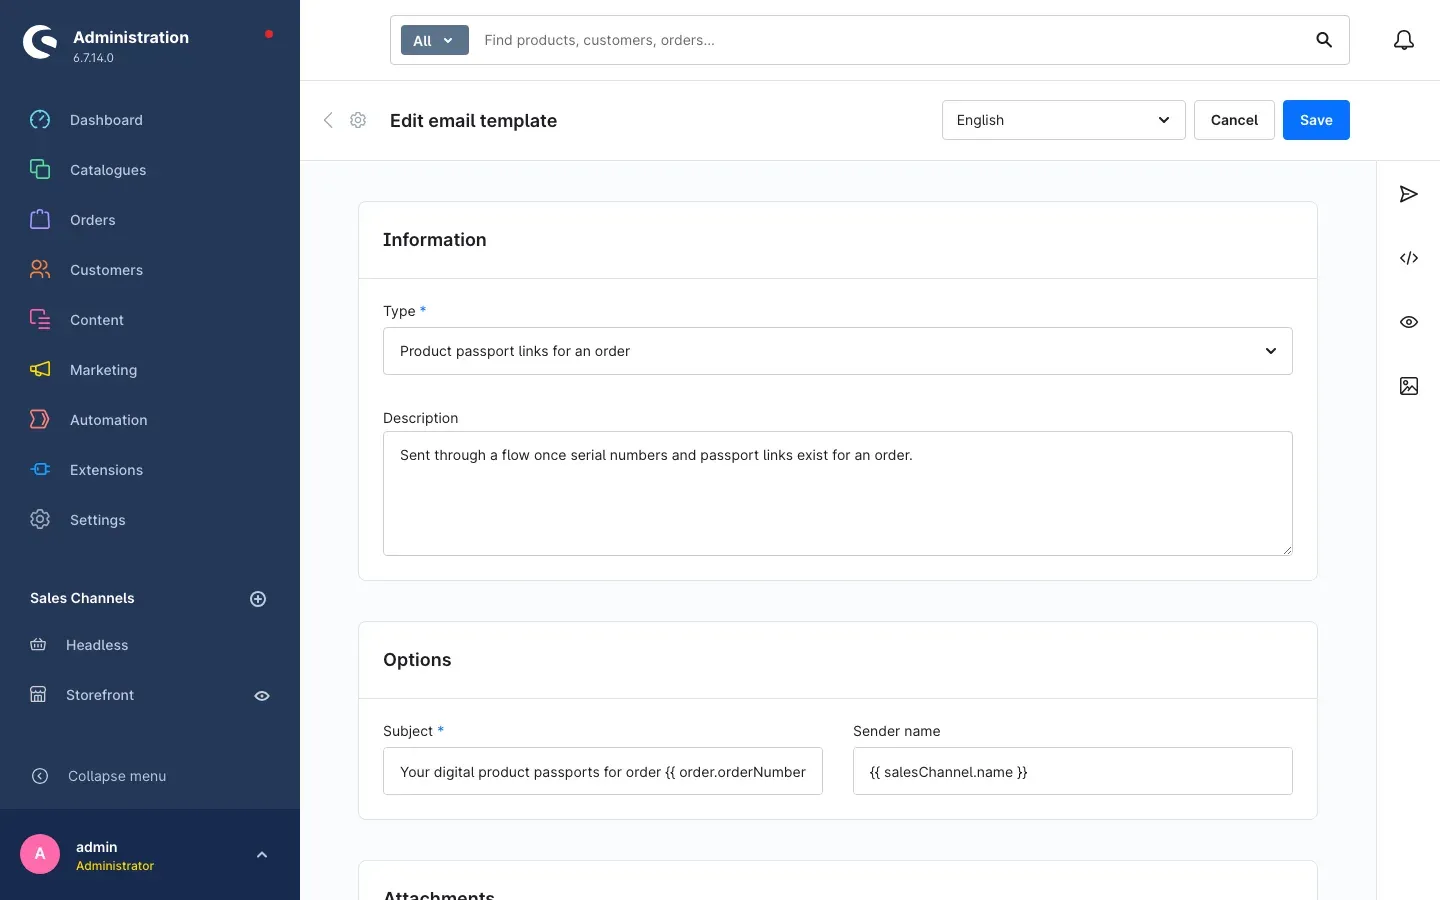 Fig. 31: The email template “Product passport links for an order”
On activation the plugin sets up the email template Product passport links for an order. It is sent through a flow as soon as serial numbers and passport links are available for an order, and it carries the order number in the subject. When exactly it goes out is configured under Settings → Flow Builder; you adjust the text itself under Settings → Shop → Email templates.
Importing and exporting passport data
What this gives you: If your product data comes from a spreadsheet, a test laboratory or a supplier data sheet, you transfer it into many passports in one go — instead of typing field by field.
Open Catalogues → Digital product passport → Import.
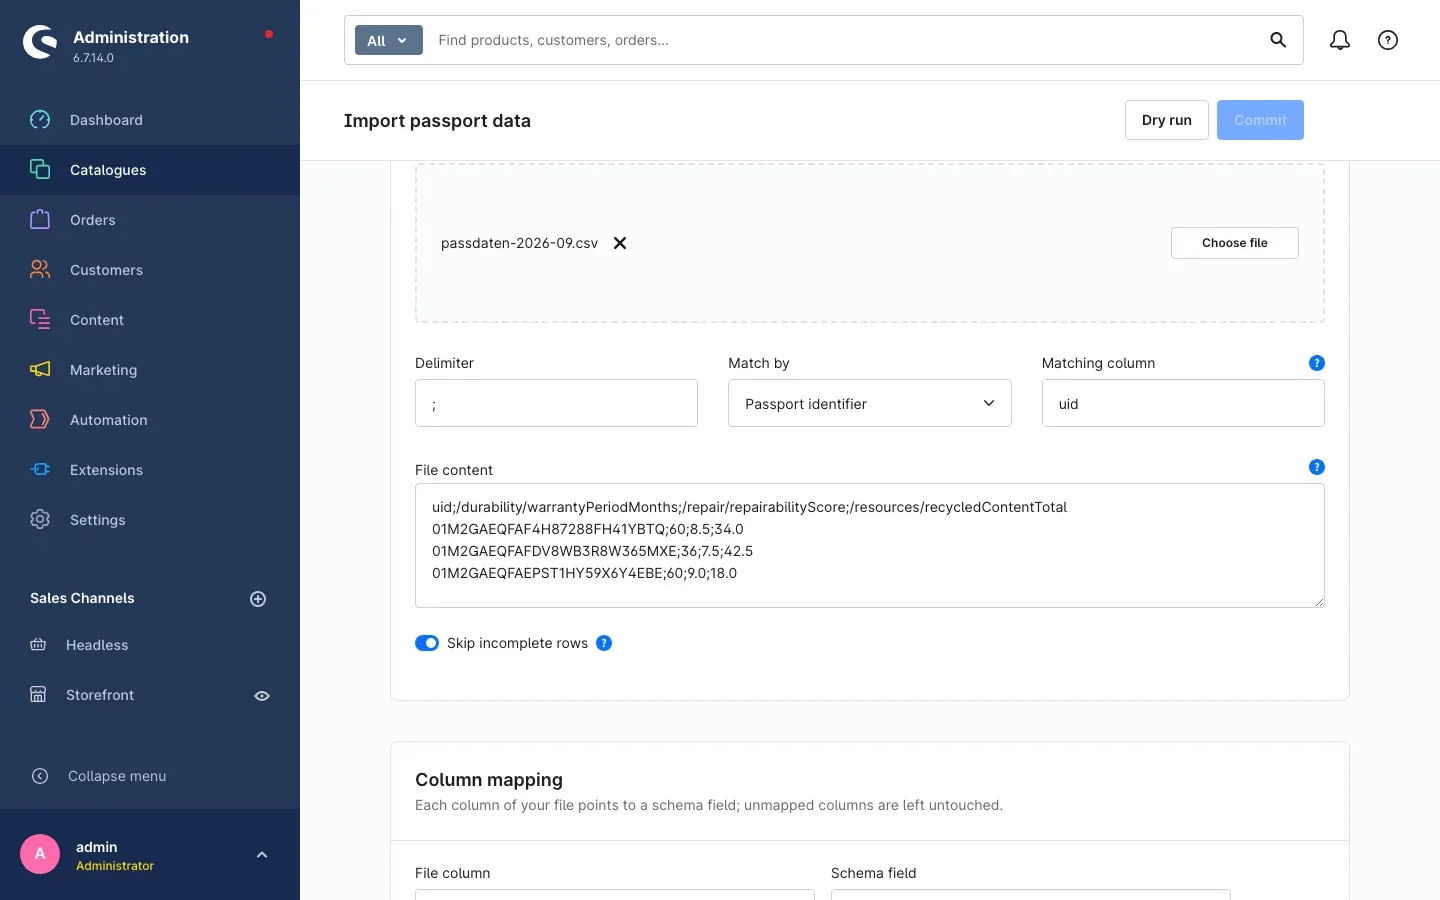 Fig. 32: Import: source and the start of the column mapping
Step by step
- In the Source card, choose under Schema which schema applies. It determines which fields may be written at all.
- Select your CSV file via the file selection, or paste the content directly under File content. The first line is the header.
- Set the Delimiter.
- Under Match by, choose how rows are matched to a passport — by Product number or by Passport identifier — and enter under Matching column the name of the column that carries this value.
- In the Column mapping card, assign a Schema field to every File column. The fields are listed there with their plain names in the language of your administration — so you do not have to look up any technical designations. Unmapped columns are left untouched.
- Click Dry run in the top right.
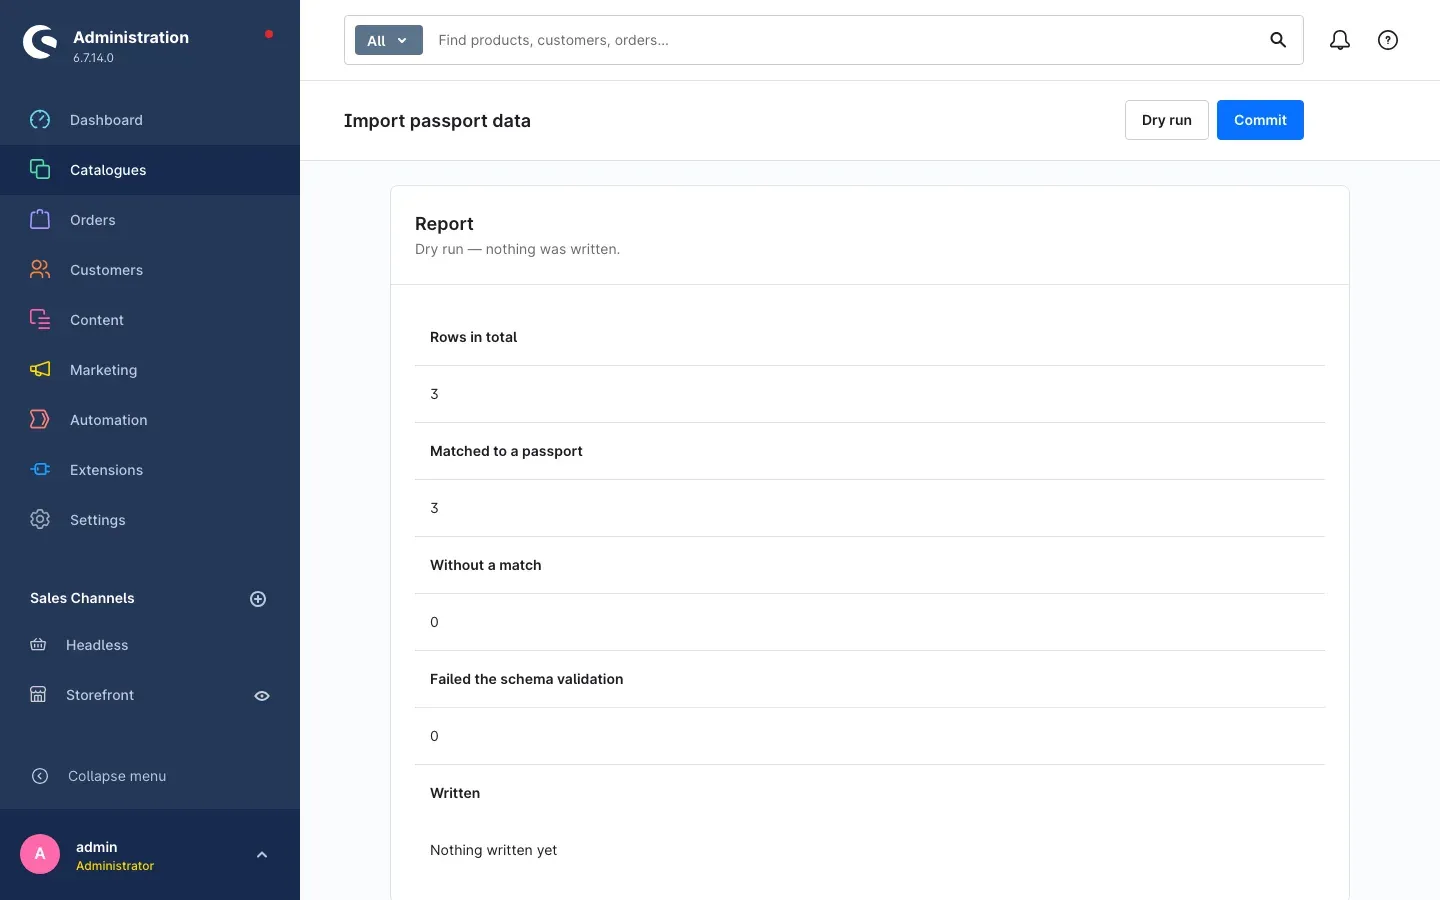 Fig. 33: Import: the report after the dry run
- Read the Report: it names Rows in total, Matched to a passport, Without a match and Failed the schema validation — and for each row the Matching value, the Validation state and the specific Findings. The findings are written in plain language, in the same wording as the open validation findings on the passport.
- If the picture is right, click Commit. The rows are written as new versions.
Tip: The dry run is guaranteed to write nothing. Always use it first — even on your tenth import. A wrongly mapped column shows up there in seconds and costs nothing afterwards.
Skip incomplete rows is the safe route. If you switch the setting off, rows that fail the schema validation are written as well — the passports concerned then carry a corresponding validation state.
There are two ways to get your data out: Export archive on the detail page of a passport (also as a bulk action for many passports at once), and the two profiles Product passport: serial numbers and Product passport: supplier links, which are available to you under Settings → Shop → Import/Export.
EU registry and supplier check
Monitoring supplier links
What this gives you: If your passport refers to a supplier’s passport, you notice when that link is dead — before an inspecting authority stumbles over it.
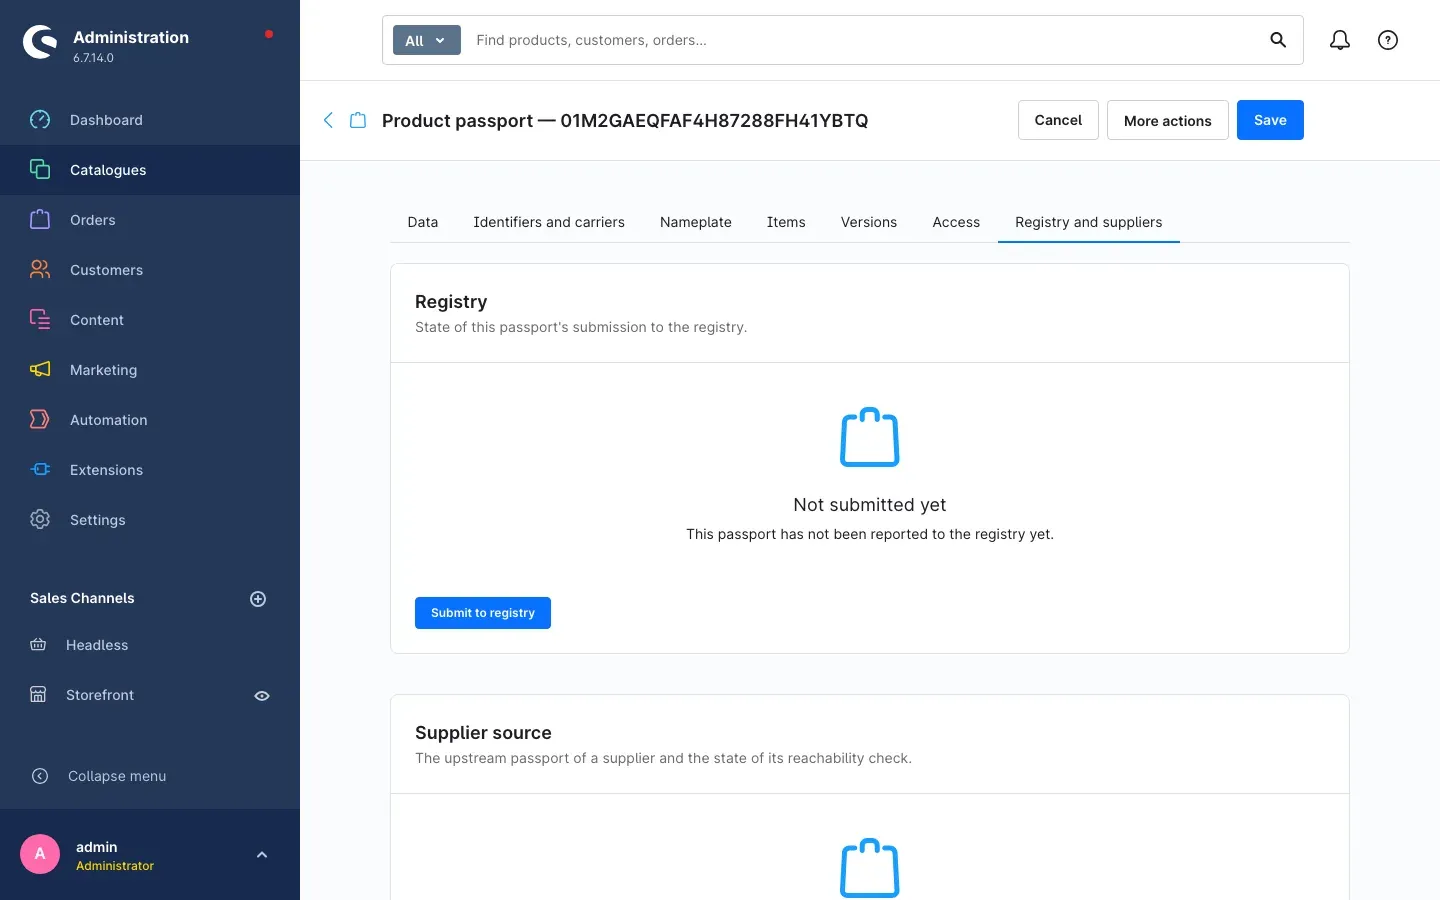 Fig. 34: “Registry and suppliers” tab of a passport
Open a passport and switch to the Registry and suppliers tab. In the Supplier source card you store the full Address or the Identifier of the supplier passport of the upstream passport with Add source, together with the name of the Supplier.
If the check is switched on (Settings), the plugin calls the address regularly and reports the result as Reachable, Warning, Broken or Unchecked, together with the response code, the response time, the time of the last and the next check, and the number of Consecutive failures. With the Check reachability toggle you switch off the check for this one source without switching it off globally.
If you have Keep a snapshot of the supplier passport switched on, Show snapshot lets you look at the stored copy of the last answer — even long after the supplier’s address has disappeared.
Submitting passports to the registry
What this gives you: As soon as your registry access is in place, you report published passports to the EU registry and see in one place which arrived and which were rejected.
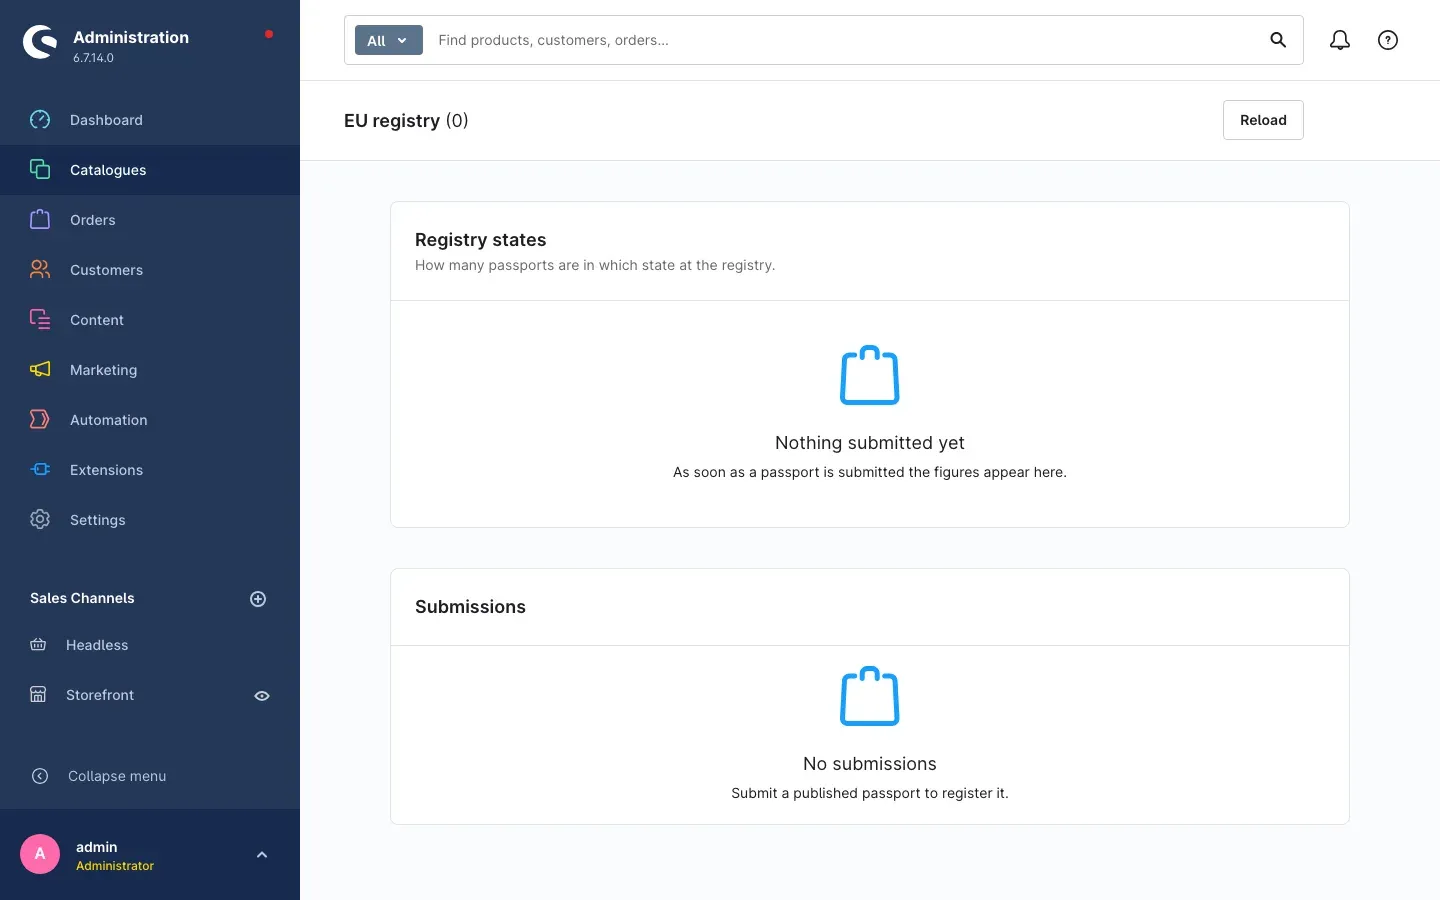 Fig. 35: The “EU registry” page with registry states and submissions
Open Catalogues → Digital product passport → EU registry. The prerequisite is the settings from Settings. As long as Report passports to the EU registry is switched off, the plugin does not contact the registry — the page then stays empty.
The page shows three cards:
- Registry states — how many passports are in which state at the registry: Not submitted, Pending, Registered, Failed or Skipped.
- Submissions — every single submission with its Registration id, State, Environment, Economic operator, number of Attempts and the times of Submitted at, Registered at and Last sync.
- Registry errors — the rejected submissions with the reported reason and Error code.
A rejected submission is sent off again with Submit again. You report a single passport directly from its detail page: the Registry and suppliers tab, then Submit to registry. The call to the registry runs in the background.
Only the fields of a passport that the schema assigns to the visibility levels Public or Authority are sent to the registry. Information on the levels Buyer, Repairer, Recycler and Confidential stays in the shop. If the schema of a passport cannot be read, the passport is not submitted and the queue names the reason.
Keeping an eye on compliance and the queue
The compliance overview
What this gives you: One page that tells you where you stand — without you having to count through lists.
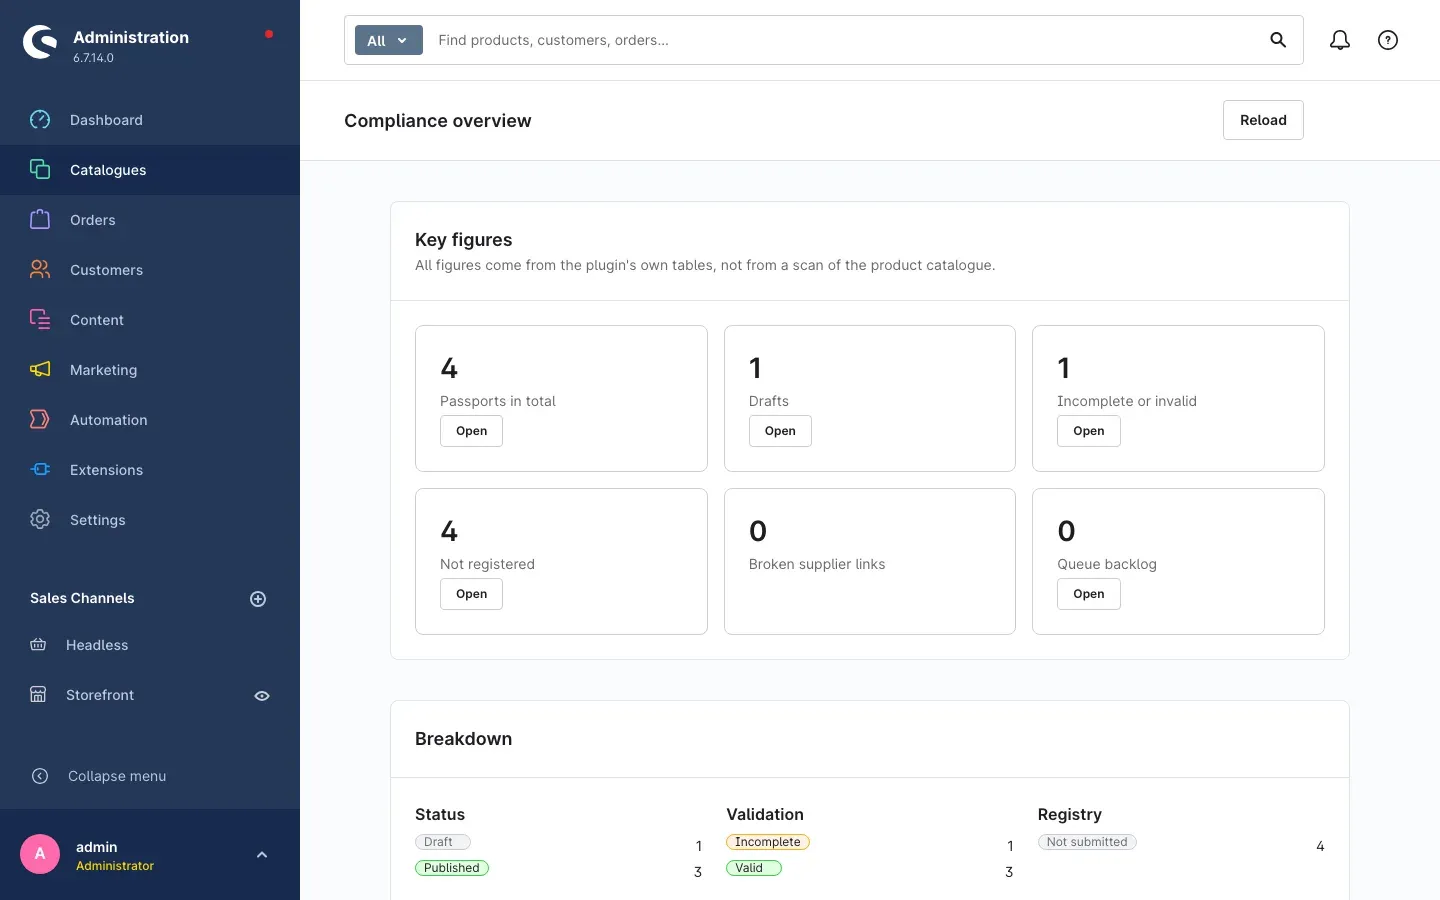 Fig. 36: The compliance overview: key figures and breakdown
Open Catalogues → Digital product passport → Compliance. Under Key figures you see at a glance: Passports in total, Drafts, Incomplete or invalid, Not registered, Broken supplier links and the Queue backlog. Below that, the Breakdown splits the figures by Status, Validation, Registry and Supplier links. With Open you jump from a key figure straight into the correspondingly filtered passport list.
All figures come from the plugin’s own tables, not from a scan of your product catalogue.
Tip: Take a look at this page once a week. Three values should stay permanently low: incomplete passports, broken supplier links and the queue backlog.
The queue
What this gives you: Everything the plugin does outside a request runs through the queue. Here you see whether it is running.
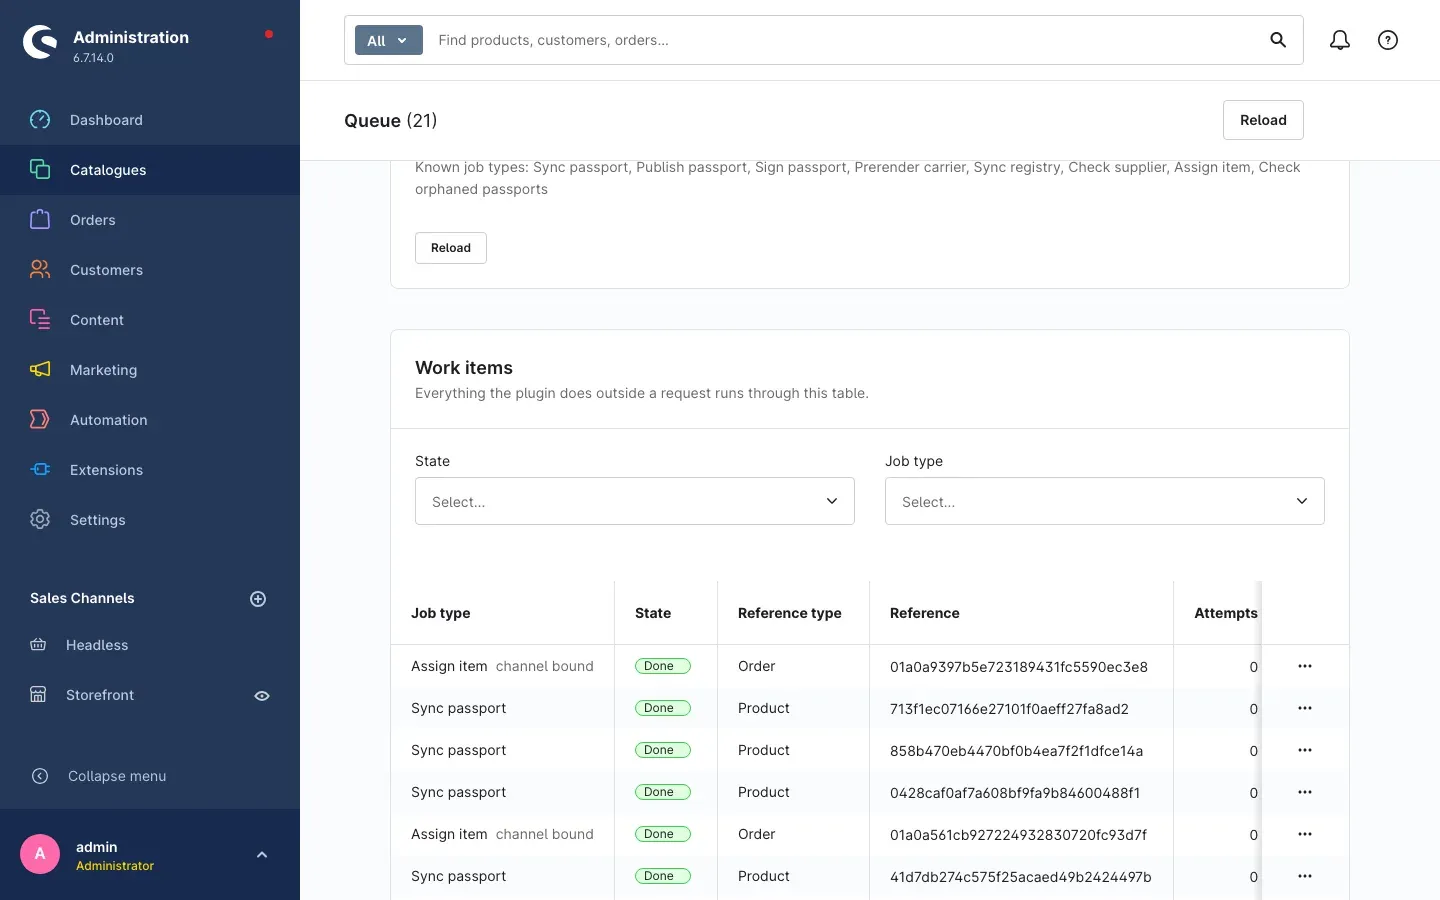 Fig. 37: The queue with completed work items
Open Catalogues → Digital product passport → Queue. The Backlog card shows Pending per job type, Failed per job type and the Oldest pending job; below that, Work items lists every single job.
The job types are written in plain language: Sync passport, Publish passport, Sign passport, Prerender carrier, Sync registry, Check supplier, Assign item and Check orphaned passports. If a job applies to one sales channel only, the addition channel bound follows its type. For each row you also see the State (Pending, Running, Done or Failed), the Reference type and Reference, the number of Attempts, Due from and the Last error. The two selection fields above filter by state and job type.
A failed job is sent off again with Requeue. Show details shows you the complete job.
A job the plugin skipped because of a switched-off sales channel is Done; the Last error column then shows the note Plugin is switched off …. After switching the channel on again you catch it up like this:
| Skipped job | How to catch it up |
|---|---|
| Sync passport (new passport) | save the article again or use Create passport |
| Publish passport | More actions → Publish on the passport |
| Sync registry | Submit to registry on the passport, for many passports the command swp-dpp:registry:sync |
| Check supplier | nothing — the hourly check picks up due links again by itself |
| Assign item | not caught up — orders from a switched-off channel deliberately get no item passports |
An empty queue is the normal state. If pending jobs pile up, the background process of your shop is not running — that is a case for your administrator (For administrators / technical details).
Permissions for your team
What this gives you: Your staff get exactly the rights they need. Whoever maintains the data does not have to be allowed to publish — and whoever only looks things up changes nothing.
The plugin brings three permission groups with it, which you assign to a role under Settings → System → Users & permissions:
- Digital product passport with View, Create, Edit and Delete. On top of that come the additional permissions Publish and withdraw passports, Sign passports, Issue access grants and tokens, Create data carriers and labels, Import passport data and Export archive.
- Product passport schemas with View, Create, Edit and Delete, plus the additional permission Import, export and version schemas.
- EU registry for product passports with View and the additional permission Submit, reconcile and acknowledge errors.
A proven split: Product maintenance gets View, Create and Edit. Publishing, signing and issuing access grants stay with the person who is answerable for compliance. Dispatch gets View only, plus the right to create data carriers and labels.
If somebody lacks a right, the corresponding button is greyed out and the note “You do not have permission for this action.” appears.
Troubleshooting
The installation stops with a Composer message
What causes it: The plugin has Shopware download the QR code library via Composer during installation. For that the shop needs write access to its project directory and enough memory. Some hosting packages do not allow this.
How to fix it:
- Ask your hosting provider to grant write access to the shop directory or to raise the memory limit for PHP.
- Alternatively, your hosting provider or agency installs the plugin from the command line (see For administrators / technical details).
The “Digital product passport” menu entry is missing
What causes it: The plugin is not activated yet, your user has no permission, or the cache is out of date.
How to fix it:
- Open Extensions → My extensions and check that the plugin is active.
- Check under Settings → System → Users & permissions whether your role holds the Digital product passport → View right.
- Clear the cache: Settings → System → Caches & indexes → Clear cache.
I click “Create passport” but no passport appears
What causes it: No active schema is in charge of the product, or the job is still in the queue.
How to fix it:
- Open Catalogues → Digital product passport → Schemas and check that at least one schema is Active.
- Check in the Assignment card of that schema whether your articles are covered by the Assignment type. If it still reads
manual, the schema claims no article (Schemas). - Look under Catalogues → Digital product passport → Queue to see whether the job is waiting there or has failed.
A passport does not appear at all, or only after a long time
What causes it: Passports are not created at the moment you click but through the queue. If the background process of your shop is not running, the job stays there.
How to fix it:
- Open Catalogues → Digital product passport → Queue and check in the Backlog card whether jobs are listed as Pending.
- If they pile up, this is not a case for the administration: give your administrator the note from For administrators / technical details — it describes what has to be set up.
The QR code leads to “This product passport cannot be shown”
What causes it: The passport is not published yet, it belongs to a different sales channel, or the identifier on the label does not match the one in the shop.
How to fix it:
- Open the passport and check the Status. If it reads Draft, publish it.
- Check under Sales channel in the passport whether it applies to the channel whose domain you are using to open the code.
- Compare the identifier on the label with the identifier on the Identifiers and carriers tab.
The passport panel is missing on the product page
What causes it: The passport panel is switched off for this sales channel, the plugin is off in the channel, or the product has no published passport.
How to fix it:
- Open Settings → Extensions → Digital Product Passport (ESPR) and select the affected sales channel at the top.
- Check Enable plugin for this sales channel and Show passport panel on the product page.
- Check on the product’s Product passport tab whether a published passport exists.
- Clear the cache.
A mandatory field stays open although the article carries a value
What causes it: Prefilling only happens when the passport is created. A value you added to the article or the manufacturer afterwards no longer travels into an existing passport by itself.
How to fix it: Enter the value in the passport form and save. It is written as a new version. For all future passports the prefilling works as usual.
”Substances of concern” keeps being reported as missing
What causes it: The field is a list and needs at least one entry. An empty list counts as a missing mandatory value — even if your product contains no such substance.
How to fix it: Open the Substances of concern section in the form and create at least one entry with Add row.
I have lost an access token
What causes it: Only the hash of the token is stored. There is no way to display an issued token a second time — that is a security property, not a fault.
How to fix it: Open the access grant and click Reissue token. Note down the new token while it is displayed and pass it to the recipient. The old one stops working.
After changing the settings, the address of printed codes does not change
What causes it: This is intentional. The resolver address is stored permanently when an identifier is created, because it is already printed on labels. A later change to the settings only affects newly created identifiers.
FAQ
Q: Do I have to create a passport for every product?
A: No. Depending on the schema, a passport applies to a model, a batch or an individual item. With the ESPR base schema one passport for the model is enough — all variants inherit it. Only if the data really differs per variant do you create one of its own.
Q: How much do I have to type into a new passport myself?
A: Less than you think. Five of the fourteen mandatory entries of the ESPR base schema come from the article master data, three from the defaults in the settings, and five from the Digital product passport field set on the article or the manufacturer. The only thing that really has to be entered by hand is the list of substances of concern.
Q: Why does my passport not change when I change the article?
A: Because a published version must not change unnoticed — traceability rests on exactly that. Prefilling applies once, when the passport is created. You enter later changes in the passport form; they appear as a new, traceable version.
Q: Which language is the data in my passport in?
A: In every language your schema carries. On creation the plugin takes translatable entries from the respective translation of the article — so the German passport version comes from the German article data. Using Language of the passport content you switch between the languages while editing.
Q: What happens to printed labels when I withdraw a passport?
A: They keep working. A withdrawn passport stays resolvable and is merely marked as withdrawn. That is intentional — otherwise products already sold would lead nowhere.
Q: Can I use the plugin without having access to the EU registry?
A: Yes, completely. Reporting to the registry is switched off on delivery and is a self-contained building block. Creating, filling in, publishing and printing passports and displaying them in the shop all work without registry access.
Q: Do I absolutely need a signature?
A: No. Without a signature the passport is complete and legally usable; only its integrity cannot then be proven by machine. The chaining of versions — and with it the traceability of your changes — works without one too.
Q: I only sell goods made by other manufacturers. Is the plugin still useful to me?
A: Yes. Set the Operating mode to Distributor. You then display your suppliers’ passports in the shop and use the supplier check to monitor whether their addresses stay reachable — without issuing passports yourself.
Q: Do all visitors see all the information in the passport?
A: No. Without an access grant only the public level is delivered. All fields of other levels are absent from the response entirely — they are not merely hidden.
Q: Can I use the plugin in one shop and not in another?
A: Yes. All settings apply per sales channel. Select the channel at the top of the settings page and switch Enable plugin for this sales channel off wherever you do not need it.
Q: Do my customers get the passport links in writing as well?
A: Yes. On the order you produce the Product passport sheet — as a PDF to enclose and as an HTML version. In addition there is the email template Product passport links for an order, which you trigger through the Flow Builder.
Q: How long are my passport versions kept?
A: The default is 120 months. If a schema demands a longer period, the longer one applies. You set this under Keep passport versions for (months).
Q: Can I use the nameplate for engraving too?
A: Yes. Download it with Download SVG — that format scales without loss and is therefore the right one for engraving and laser work. Using Nameplate language you decide beforehand which language the plate is captioned in.
Q: What is the difference between a data carrier and a nameplate?
A: The data carrier is only the symbol — QR code or Data Matrix — together with the address. The nameplate is the complete product plate: manufacturer and conformity details, CE marking, mounting holes and the data carrier on it.
Q: What happens to the passport if I delete a product?
A: The passport is kept and is withdrawn automatically as soon as the background process runs (see For administrators / technical details). It is the evidence of what you placed on the market and has to outlast the retention period. Printed data carriers still lead to the passport page, where it is marked as withdrawn.
Q: What happens to my data when I uninstall?
A: As with every Shopware extension, the plugin manager asks on uninstalling whether your data should be kept. Keep it as long as you still need the passports — the statutory retention period runs on regardless. If you decline, the plugin removes everything it created: its tables, the field set, the email and document templates, the import profiles and the scheduled tasks.
For administrators / technical details
This section is aimed at technical administrators. You do not need it for normal use of the plugin.
System requirements
- Shopware: 6.7
- PHP: 8.2 or newer
- Database: MySQL 8.0 / MariaDB 10.11 or newer
- Composer: The shop must be allowed to run Composer during installation — Shopware uses it to download the QR code library
bacon/bacon-qr-codeand removes it again on uninstall.
Installation from the command line
composer require swp/digital-product-passport-six
php bin/console plugin:refresh
php bin/console plugin:install SwpDigitalProductPassportSix --activate
php bin/console cache:clear
Background process — a prerequisite for day-to-day operation
The plugin does its longer-running work in a queue of its own: creating and syncing passports, signing and publishing them, prerendering data carriers, assigning items, syncing with the EU registry, checking suppliers and tracking down orphaned passports. This work is triggered through Shopware’s scheduled tasks.
For that to run, the message consumer and the scheduled task runner of your shop have to be running permanently. If the queue stands still, that is almost always the cause — and new passports then appear late or not at all after an article is saved.
The plugin sets up five scheduled tasks: working through the queue (every five minutes), the reachability check of supplier links (hourly), the reconciliation with the EU registry and the clean-up of the access log (daily), and the clean-up of the passport archive (weekly).
Keys and credentials
Neither the private signing key nor the credentials for the EU registry are stored in the shop. The settings only ever hold a pointer to them. Three forms are supported:
- an environment variable, such as
env:SWP_DPP_SIGNING_KEY - a file on the server, such as
file:///var/keys/dpp.pem - a hardware key store (HSM), such as
hsm://hsm.example.com/v1?key=dpp-signing— first the address of the HSM service, after?key=the label of the key; if the service needs a bearer token, append it as#env:SWP_DPP_HSM_TOKEN
The same applies to the EU registry: env:SWP_DPP_REGISTRY_SECRET or file:///var/keys/registry.pem.
Addresses of the passport pages
The public resolution of a passport runs through the address /dpp/{identifier}. Alongside it there is the language-specific form /dpp/{identifier}/{language}, the machine-readable equivalents with the .json extension, the authenticity check under /dpp/{identifier}/verify and the retrieval of the data carrier under /dpp/{identifier}/carrier.{format}.
With the GS1 Digital Link form switched on, /01/{GTIN} and /01/{GTIN}/21/{serial} are added below the domain. Before switching it on, check that these addresses are not already taken by something else in your shop.
The same data is available through the Store API for your own integrations; management runs through the Admin API. Without a credential the Store API returns the public part. It only returns more with an access token in the header swp-dpp-token, or with the order number in the header swp-dpp-order-number together with the email address of that order in the header swp-dpp-order-email.
So that sequential order numbers cannot simply be tried one after another, the plugin throttles proofs of purchase per combination of email address and IP address: the first ten attempts are free, after that 10 seconds must pass between two attempts, from the 15th attempt 30 seconds and from the 20th attempt 60 seconds. A successful proof resets the counter; otherwise it expires 24 hours after the last attempt. During a waiting period the Store API returns the public part without an error message. The values match the throttle Shopware uses for guest login; you can change them in the shop configuration under shopware.api.rate_limiter.swp_dpp_order_proof.
The plugin likewise throttles attempts to try out passport identifiers and GTINs. Only requests that come up empty are counted: an unknown or unpublished identifier on the passport page, the authenticity check or the data carrier image, a GS1 link with an unknown GTIN or serial number, a Store API request for an article the sales channel does not sell, and every missing identifier in a bundle request. Successful requests cost nothing, even when a headless frontend sends all visitors through a single IP address. Per IP address 60 misses are free; after that at most one every 10 seconds is allowed, from the 120th one per minute and from the 600th one every 10 minutes. The counter expires one hour after the last miss. While an IP address is blocked, the plugin answers every request to these addresses with status 429, including one for an existing passport — otherwise the answer would reveal which identifiers exist. The values are under shopware.api.rate_limiter.swp_dpp_resolve. If your shop runs behind a load balancer or proxy, register it in Shopware as a trusted proxy; otherwise all visitors share the proxy’s address.
The data carrier image at /dpp/{identifier}/carrier.{format} is available in edge lengths of 128, 256, 512 (default) and 1024 pixels. Other values are rounded up to the next step.
Command line commands
For maintenance and automation the plugin brings these commands with it, among others:
php bin/console swp-dpp:queue:status      # show the queue backlog
php bin/console swp-dpp:queue:run         # work through pending jobs in batches
php bin/console swp-dpp:passport:publish  # publish passports after validation
php bin/console swp-dpp:passport:verify   # check the hash chain and signature
php bin/console swp-dpp:passport:export   # export passports as an archive
php bin/console swp-dpp:carrier:render    # rerender data carriers
php bin/console swp-dpp:schema:list       # list the installed schemas
php bin/console swp-dpp:schema:import     # read in a schema package
php bin/console swp-dpp:schema:export     # write out a schema package
php bin/console swp-dpp:registry:sync     # queue the reconciliation with the EU registry
php bin/console swp-dpp:supplier:check    # queue the reachability check of suppliers
php bin/console swp-dpp:privacy:purge     # remove access log entries on an erasure request
Data protection
The plugin does not contact anything outside on its own. The two building blocks that call third-party addresses — reporting to the EU registry and the supplier check — are switched off on delivery and can each be switched individually per sales channel. To the EU registry the plugin only transmits fields on the levels Public and Authority.
The access log records which visibility levels were served, never the visitor. The IP address is stored shortened by default; storing it in full is possible but requires its own legal basis and a note in the privacy policy. For an erasure request under Article 17 GDPR the command swp-dpp:privacy:purge is available.
This manual was written for Digital Product Passport (ESPR) version 6.7.0.
More manuals
Admin Password Reminder
Admin Password Reminder: your backend users renew their passwords on time, prompted after login and by a daily email. Premium locks expired accounts until the password is changed.
Open manual Shopware 6Age Check
Tobacco, spirits, knives: visitors who do not confirm their age never see the restricted items at all. You tick a box per product, the plugin hides it everywhere.
Open manual Shopware 6AI SEO All-in-One: SEO and GEO suite for Shopware 6
Google finds your shop, ChatGPT never mentions it. This plugin checks both in one run, fills empty meta fields from templates and turns the findings into a to-do list.
Open manualNeed a team that keeps your shop running?
We have been maintaining Shopware shops for more than 20 years, including updates, hotfixes and the plugins you are configuring right now.