Google Tag Manager + GA4 E-Commerce Tracking
Add Google Tag Manager without touching your templates. The plugin feeds GA4 e-commerce data from product view to purchase and respects consent via Consent Mode v2.
On this page
- Introduction
- What this plugin does for you
- Who is this plugin for?
- Installation
- Getting started
- Step 1: Obtain the container ID
- Step 2: Select the sales channel
- Step 3: Enter the container ID and save
- Step 4: Define where consent comes from
- Configuration in detail
- The “Basic Configuration” card
- The “Cookie consent configuration” card
- The “Manipulate Tag Manager script” card
- The “Server-side purchase (add-on module)” card
- Cookie consent
- What this does for you
- The three questions
- Typical setups
- Verifying consent
- Adjusting the dataLayer
- What this does for you
- The overview page
- ”dataLayer Modules”: which page sends which data
- ”dataLayer Properties”: which values are sent
- Backing up and transferring: export and import
- Verification: is the tracking working?
- What this does for you
- Step 1: Open the shop and give consent
- Step 2: Visit typical pages
- Step 3: Check that the data arrives
- Step 4: Test the purchase path as well
- Troubleshooting
- There is no “Google Tag Manager” entry under Marketing
- No data arrives in Google Analytics
- Consent is not recognised although the visitor accepted
- Returning visitors are not measured, new ones are
- The entries are missing from the cookie banner
- Tracking does not run at all although a container ID is set
- Nothing changes after switching the container ID
- Tracking stopped working after changes on the “Manipulate Tag Manager script” card
- Clicks on products or on the wishlist do not show up
- Information is missing on category pages with very many products
- The import fails or the file cannot be selected
- An order exists in Shopware but is missing in GA4
- The add-on module is unlocked but nothing is being reported
- A purchase appears twice in GA4
- FAQ
- For administrators / technical details
- System requirements
- Installation via the command line
- Permissions
- How far the write permission reaches
- Diagnostics in the browser
- Consent Mode
- Interface for custom integrations
- Enhanced conversions
- Server-side tagging
- Server-side purchase in operation
- Support and documentation
Introduction
This plugin integrates Google Tag Manager into your Shopware 6 shop and supplies it with the data you need to analyse your business. You enter your container ID once — the plugin takes care of the rest.
What this plugin does for you
- It integrates Google Tag Manager without a single line of code in your template.
- It shows you in your reports which products are viewed, added to the cart and purchased — including name, number, price, brand and category.
- It covers the typical steps of a purchase out of the box: product lists and search results, product views, cart, checkout, shipping and payment selection, order completion and cancellation.
- It additionally records clicks on products in listings and clicks on “Add to wishlist”.
- It lets you decide per sales channel whether tracking happens at all and which container is used.
- It keeps you GDPR-compliant: the plugin tells Google up front that nothing is allowed yet, and only releases analytics and advertising after the visitor has given consent — with every common consent tool, not just Shopware’s own.
- It lets you adjust and extend the transmitted data later — directly in the Administration, without programming.
Who is this plugin for?
For shop operators and marketing managers who want to analyse their shop with Google Analytics 4, Google Ads or any other service integrated through Google Tag Manager. To get started, the container ID is enough. Anyone who wants to go deeper will find all the building blocks in the Administration — but nobody has to.
What you need outside Shopware: a Google Tag Manager account with a container. The plugin provides your shop’s data; which analysis is actually performed with it — Google Analytics 4 or Google Ads, for example — is set up inside the container, not in Shopware. Without that step in Google Tag Manager, data does leave the shop but never arrives in any report.
Installation
After purchase, the plugin is available directly in your Administration — there is nothing to download.
- Log in to your Shopware Administration.
- Open Extensions → My extensions.
- Find the entry Google Tag Manager + GA4 E-Commerce Tracking in the list and click Install next to it.
- Switch on the toggle to the left of the entry to activate the plugin.
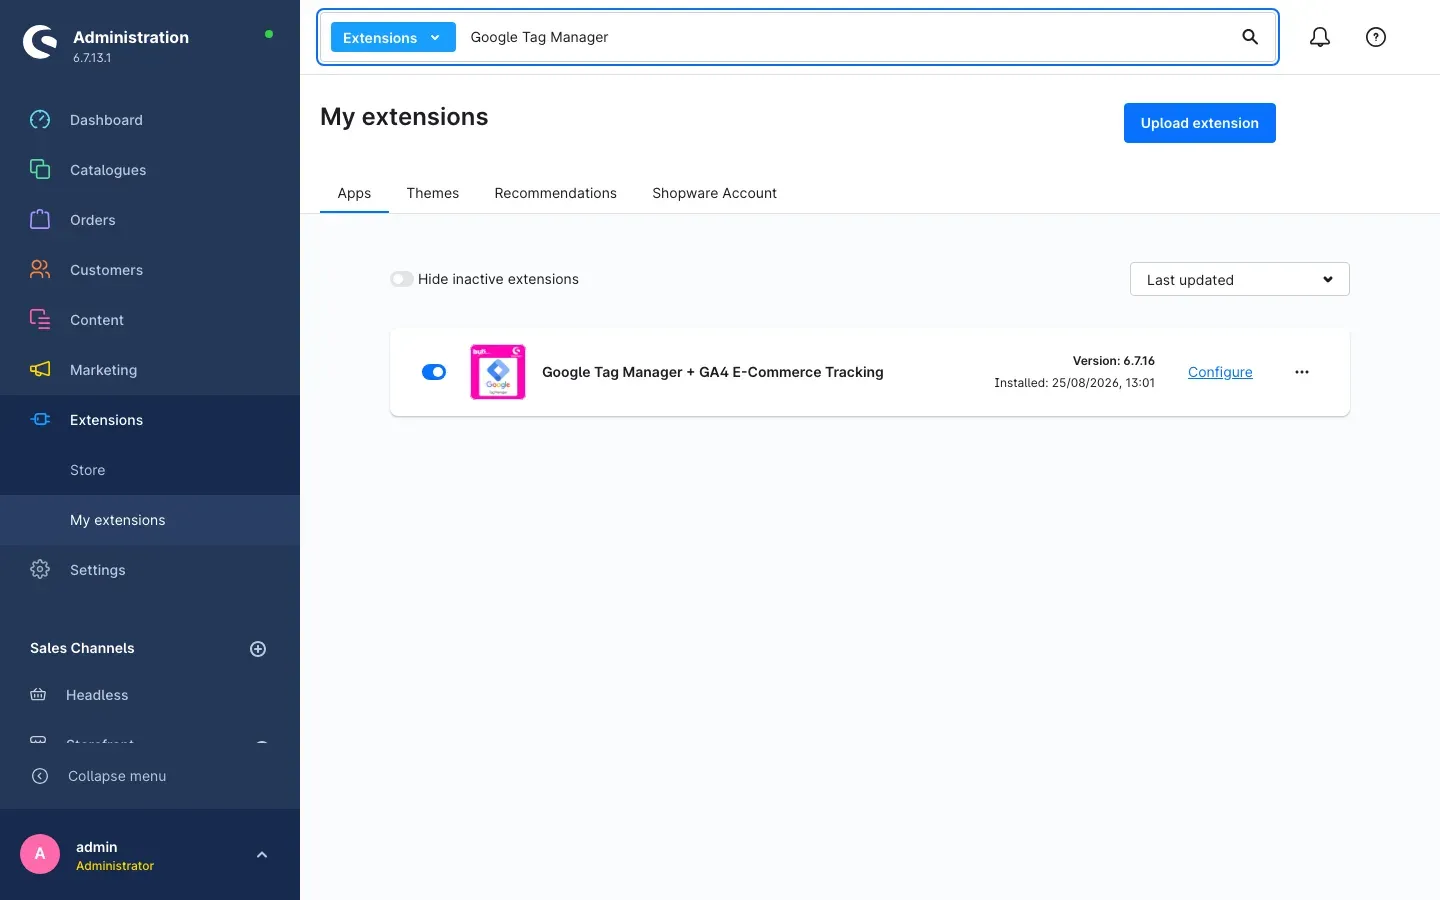 Fig. 1: The plugin is installed and activated using the toggle on the left. On the right you can see the version and the Configure link.
If the toggle is blue, the plugin is running. Configure takes you straight to the settings — you can reach the same page at any time via Settings → Extensions → Google Tag Manager + GA4 E-Commerce Tracking.
If the plugin does not appear in the list, your Shopware account is not yet connected to the shop. You can do that under Extensions → My extensions on the Shopware Account tab.
Right after installation the plugin is already preconfigured: all important shop pages are set up with the matching tracking data. Only your container ID is missing.
Note when updating from an older version: your existing settings are carried over automatically — separately for each sales channel. Your shop behaves exactly as it did before the update. The new options described in Cookie consent are something you switch on deliberately when you need them; nothing changes on its own.
Getting started
Three pieces of information are enough for Google Tag Manager to load in your shop and for your reports to receive data.
Step 1: Obtain the container ID
The container ID is issued by Google. You will find it in your Google Tag Manager account once you have created a container for your shop. It starts with GTM-.
Step 2: Select the sales channel
Open Settings → Extensions → Google Tag Manager + GA4 E-Commerce Tracking.
All settings of this plugin apply per sales channel. At the very top of the page you will find the sales channel selection, set to All Sales Channels by default. Whatever you enter with this selection applies to every channel that does not have its own value. If you switch to an individual channel at the top, the values entered there apply to that one shop only.
If you run a single shop, simply stay on All Sales Channels.
Step 3: Enter the container ID and save
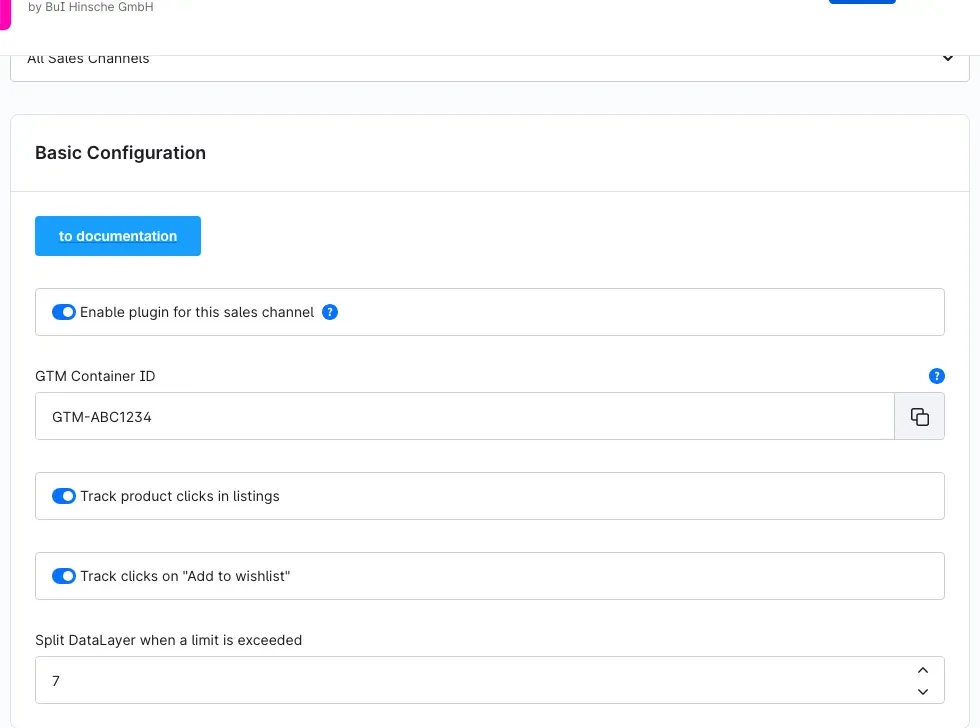 Fig. 2: The Basic Configuration card. At the top the sales channel selection, below it the to documentation button, the Enable plugin for this sales channel toggle and the GTM Container ID field.
- Enter your container ID in the GTM Container ID field (example:
GTM-ABC1234). - Make sure the Enable plugin for this sales channel toggle is switched on. It is on by default.
- Click Save in the top right corner.
As long as this field is empty, the plugin does nothing in that sales channel: no Google Tag Manager is loaded, no data is transmitted, and no additional entry appears in the cookie banner.
Step 4: Define where consent comes from
You only need to touch this step if your shop runs a consent tool other than the one that ships with Shopware.
By default, the plugin first tells Google: nothing is allowed yet. The container is loaded straight away, but its analytics and advertising tags stay blocked until somebody reports the visitor’s consent. By default the plugin reads that consent from the cookie banner that ships with Shopware — if you use that banner, there is nothing to do here. If you use a different consent tool, tell the plugin once which one.
Open the Cookie consent configuration card and set Read consent signal from accordingly:
- You use the cookie banner that ships with Shopware → Shopware cookie consent (this is the default)
- You use Cookiebot, Cookie Script, consentmanager.net or Usercentrics → the matching entry
- Your consent tool already reports consent to Google itself → Consent tool handles it
- You use a different tool → Own rule, see Cookie consent
Important: if you deliberately switch to Consent tool handles it, your tool must genuinely report consent to Google itself. If it does not, analytics and advertising remain blocked permanently — the shop works normally, but your reports stay empty. Which setting fits your shop is described in detail in Cookie consent.
That completes the setup in Shopware. What your container actually does with the data is defined in Google Tag Manager.
Configuration in detail
You will find the settings under Settings → Extensions → Google Tag Manager + GA4 E-Commerce Tracking. They are split into three cards: Basic Configuration, Cookie consent configuration and Manipulate Tag Manager script.
Remember: at the top of the page you choose the sales channel the settings apply to.
The “Basic Configuration” card
This card contains everything you need for day-to-day operation (see Fig. 2).
to documentation
At the very top of the card sits the to documentation button. It opens this manual online — in the language you use to operate the Administration.
Enable plugin for this sales channel
This toggle determines whether tracking happens at all in the sales channel selected above. When it is switched off, that channel loads neither Google Tag Manager nor the tracking data, and nothing is added to the cookie banner. Other sales channels are unaffected. The toggle is switched on by default.
What it is good for: you run an internal or B2B channel alongside your public shop and do not want to measure it. Instead of uninstalling the plugin, you simply switch it off there. Equally handy if you want to suspend tracking temporarily.
GTM Container ID
Enter the identifier of your Google Tag Manager container here, for example GTM-ABC1234. Without this entry, nothing happens in the sales channel concerned. You will find the ID in your Google Tag Manager account once the container has been created. The icon on the right of the field copies the value with one click.
What it is good for: because the setting applies per sales channel, you can use different containers for different shops — for example one container per country or brand, so that the reports do not mix.
Track product clicks in listings
When this toggle is on, the plugin reports whenever a visitor clicks a product tile — that is, anywhere products appear in lists: on category and search result pages, on home pages and shopping experiences, in cross-selling and on the wishlist. The toggle is switched off by default.
What it is good for: you see not only which products were viewed, but which lists actually led to a click. That tells you whether your sorting and your category pages put the right articles up front.
Track clicks on “Add to wishlist”
When this toggle is on, the plugin reports whenever a visitor adds a product to the wishlist — including from the cart and the off-canvas cart. The toggle is switched off by default.
What it is good for: the wishlist signals genuine purchase interest before an order is placed. Those signals help you evaluate products and steer your advertising.
Split DataLayer when a limit is exceeded
Google only processes a limited amount of data per transmission. On pages with a great many products, a single delivery would grow too large and would arrive incomplete or not at all. The value entered here is a size limit in kilobytes: if a delivery exceeds that size, the plugin automatically splits it into several smaller partial deliveries that are transmitted one after another. The default is 7. A value of 0 switches splitting off entirely.
What it is good for: normally you do not need to worry about this. Leave the value unchanged as long as nothing is missing from your reports. If product data is missing on very long category pages, reduce the value step by step.
Tip: very low values produce many small partial deliveries. This can mean that clicks on products from the earlier deliveries can no longer be attributed. So proceed in small steps and check after each change.
The “Cookie consent configuration” card
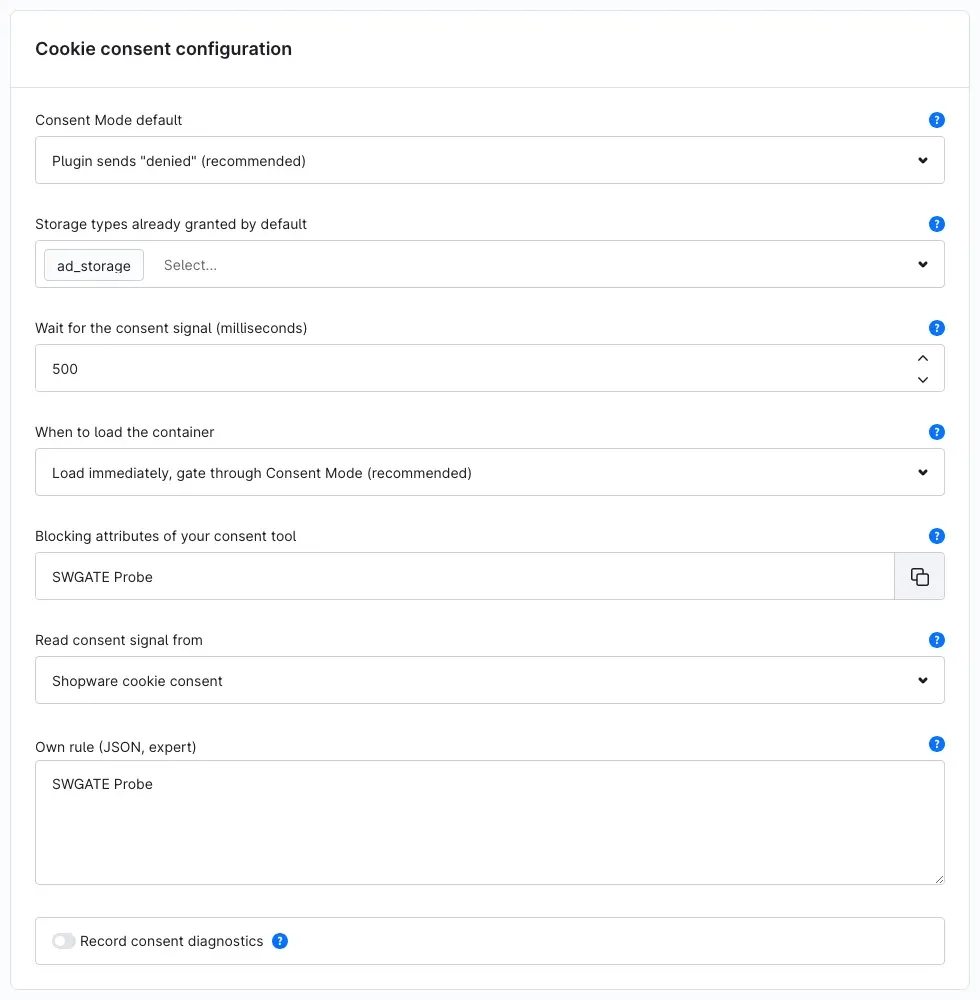 Fig. 3: The Cookie consent configuration card with its eight settings — from Consent Mode default through to Record consent diagnostics.
This card answers three questions that you now decide separately: Who tells Google that nothing is allowed yet? When is the container loaded? And how does the plugin learn that the visitor has agreed? Which combination suits your shop is shown by the worked examples in Cookie consent. This section explains what each individual setting does.
Consent Mode default
Before the container loads, Google should know that nothing is allowed yet. Without that statement, Google treats every storage type as granted, and analytics and advertising tags fire before the visitor has confirmed anything. Here you decide who makes that statement:
- Plugin sends “denied” (recommended) — the plugin tells Google of its own accord that all advertising and analytics purposes are denied for now. Works with every consent tool. This is the default.
- Consent tool sends it itself — your consent tool takes care of it, for example through its own Google Tag Manager template. Check there that the default really is “denied”: several tools ship the opposite.
- No default (legacy) — nothing is sent. Only for shops that deliberately handle this elsewhere.
What it is good for: this is the setting that covers the legally sensitive moment — the second between the page loading and the visitor deciding. Leave it on the default unless you know for certain that your consent tool handles this reliably itself.
Storage types already granted by default
Anything not listed here counts as denied to begin with and is only released once consent is given. Leave this field empty unless you have a specific, verified reason to exempt something. The setting only applies when the plugin sends the default above.
What it is good for: for special cases in which your legal advice considers a particular storage type permissible even without consent. In normal operation the field stays empty.
Wait for the consent signal (milliseconds)
This is how long the Google tags hold back and wait for consent before they proceed with the default. The default is 500. If the decision is already available, the wait ends immediately — nothing is delayed. A value of 0 switches the wait off.
What it is good for: some consent tools only restore a returning visitor’s stored decision once their own script has loaded. Without this short wait, the Google tags would already have proceeded with “denied”, and that visit would not be measured even though the visitor had long since agreed. If returning visitors are missing from your reports, increase the value step by step.
When to load the container
- Load immediately, gate through Consent Mode (recommended) — the container loads with the page, and Google decides what each individual tag may do based on the consent reported. Requires a working default. This is the default setting.
- Load only after consent — the container is not loaded at all as long as no consent arrives.
- Consent tool decides (blocking attributes) — your consent tool holds the script back and releases it itself.
What it is good for: the recommended setting measures most completely, because signals that do not require consent still arrive cleanly. If your legal advice requires that nothing at all is loaded before consent, choose Load only after consent.
Blocking attributes of your consent tool
Only effective when Consent tool decides is selected above. The content is passed on unchanged to the container integration so that your consent tool recognises it and holds it back. The exact notation is documented by your tool — for Usercentrics, for instance, data-usercentrics="Google Tag Manager", for Cookiebot type="text/plain" data-cookieconsent="statistics,marketing".
What it is good for: it lets you connect any tool that blocks scripts by such markers — even one this plugin does not know.
Read consent signal from
Here you tell the plugin how it learns about the visitor’s decision:
- Consent tool handles it — your tool reports consent to Google itself; the plugin then stays out of it.
- Shopware cookie consent — the cookie banner that ships with Shopware. The plugin adds the entries Google Tagmanager, Google Analytics and Google Advertising and Marketing to it. This is the default.
- Cookiebot, Cookie Script (cookie-script.com), consentmanager.net, Usercentrics — the plugin reads the state directly through that tool’s own interface.
- Own rule — for any other tool; you enter the rule itself in the field below.
What it is good for: this is the setting that connects your cookie banner to your reporting. Without it, everything requiring consent stays blocked.
Tip: Cookiebot, Cookie Script, consentmanager.net and Usercentrics usually support Google Consent Mode themselves. If you have switched that on there, change the setting to Consent tool handles it — you do not need two places reporting the same thing.
Own rule (JSON, expert)
An expert field that only matters for the Own rule, Usercentrics and consentmanager.net settings.
With Own rule, you describe here where your consent tool stores its decision and which value means consent. With Usercentrics and consentmanager.net, you instead enter what the Google services are called in your account — the evaluation rule itself already ships with the plugin. The presets cover the usual names; correct them only if your account uses different ones.
What it is good for: it lets you connect a tool that does not appear in the list above. The exact notation is explained by the help text on the field itself; if in doubt, our support team will help. An invalid entry is discarded and, as a precaution, releases nothing — so it can never accidentally allow too much.
Record consent diagnostics
Records which default was sent, which signal arrived and when the container was loaded. The recording is only visible in your own browser and is only read out with the developer tools — shop visitors notice nothing of it. How to read it is described in For administrators / technical details. Switch it off again once you are done checking.
What it is good for: the recording answers, in black and white, exactly the three questions you ask while setting things up — instead of guessing whether the cookie banner really reported what it displayed.
The “Manipulate Tag Manager script” card
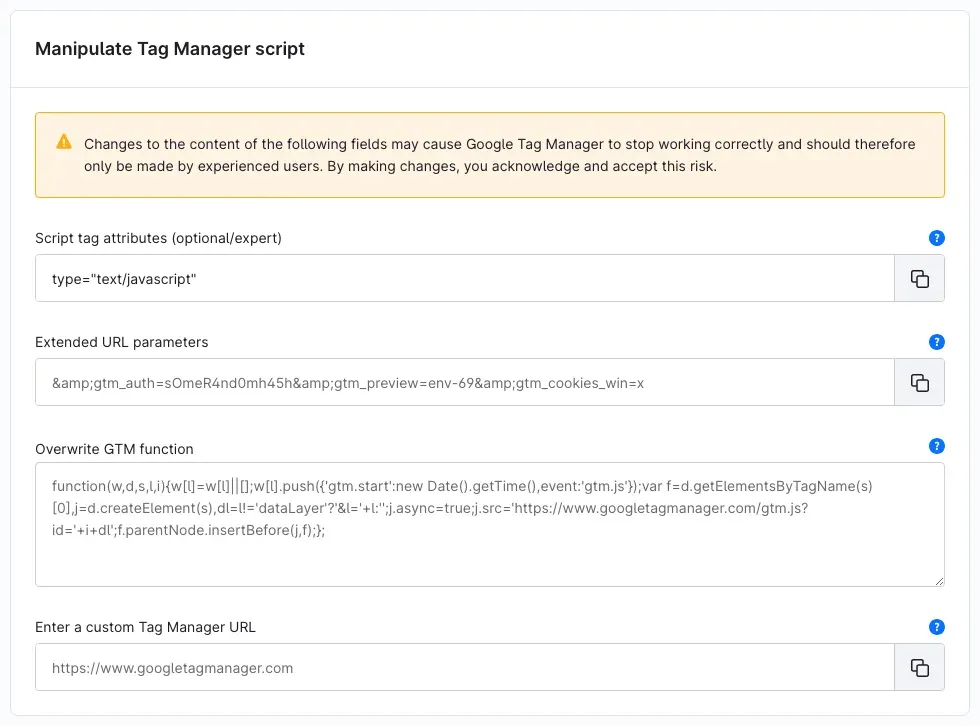 Fig. 4: The orange warning above the expert fields and the Script tag attributes (optional/expert) field.
This card is an expert area. The orange notice above it says so plainly: changes to these fields may cause Google Tag Manager to stop working correctly. You do not need them for normal operation — leave them unchanged if you are unsure.
Script tag attributes (optional/expert)
The content of this field is passed on unchanged to the embedded script. The default is type="text/javascript".
What it is good for: some consent tools or security policies require additional attributes on the script. This is where you enter them.
The attributes are only added to the script that loads Google Tag Manager. The page’s tracking data does not carry them: if your consent tool holds back everything carrying these attributes, the tracking data still stays complete and is sent to Google as soon as the tool releases Google Tag Manager.
Tip: for blocking by your consent tool there is a dedicated field, Blocking attributes of your consent tool, on the Cookie consent configuration card. Prefer that one — it targets the container specifically.
Note when updating: the former Do not apply attributes to the dataLayer script tag toggle no longer exists. Its behaviour is now built in — there is nothing you need to change.
Extended URL parameters
Whatever you enter here is appended to the address from which the script is loaded.
What it is good for: for test and staging environments. Google issues dedicated access parameters for this so that your test environment uses a different container version than the live shop. For the live shop the field stays empty.
Overwrite GTM function
If this field is filled, the entire Google Tag Manager integration code is replaced by your own. The content of Extended URL parameters is then ignored.
What it is good for: only for special cases in which your agency prescribes a different integration. When in doubt, leave it empty.
Enter a custom Tag Manager URL
If this field is filled, the script is not loaded from the usual Google address but from the one stored here.
What it is good for: for server-side tagging, where the data first passes through your own server. You will get the address from whoever operates that setup.
This is not a replacement for server-side measurement. This field only swaps the address the container is loaded from — the sender of the measurement remains the customer’s browser. If the checkout finish page never loads, no
purchaseis created here either. If what you need is for missing orders to be reported from the shop itself, the add-on module in section 4.4 is the way to go.
The “Server-side purchase (add-on module)” card
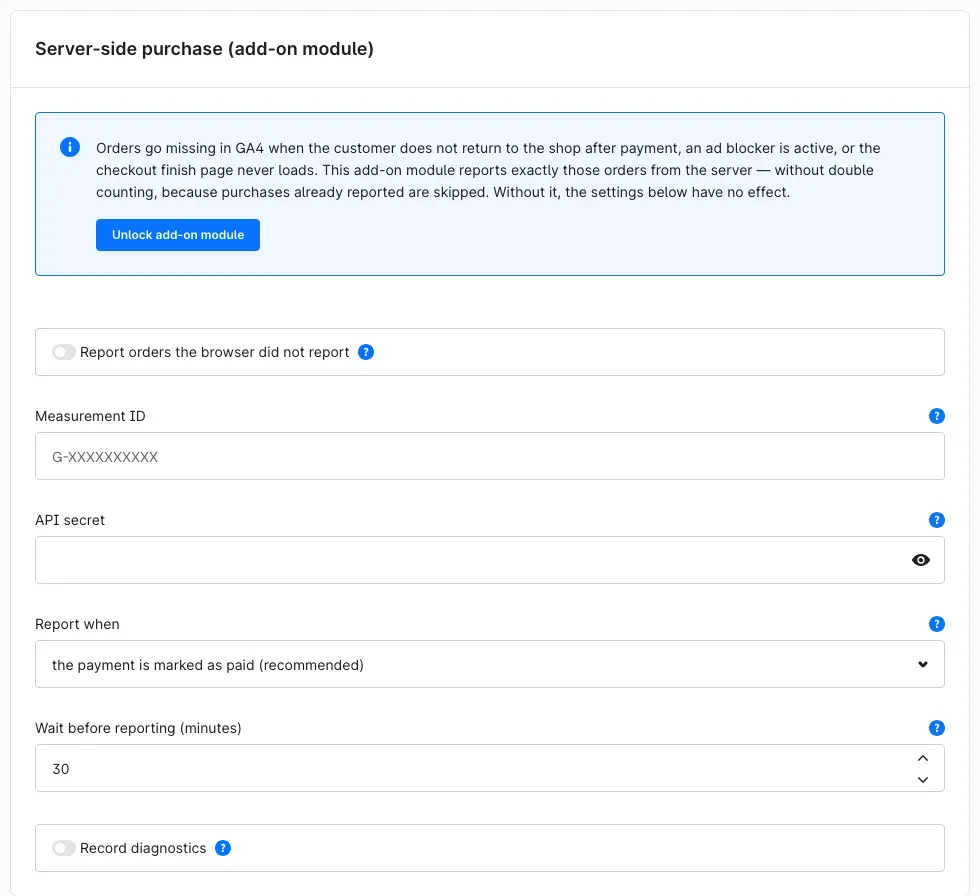 Fig. 5: The Server-side purchase (add-on module) card. At the top the notice with the Unlock add-on module button, below it the five settings — they only take effect once the module is unlocked.
This card belongs to a paid add-on module. Without unlocking it you can fill in and save the fields, but they have no effect.
The problem this module solves
The purchase event is only created when the checkout finish page loads in the customer’s browser. If that never happens, the order exists in Shopware — but is missing in GA4. Four situations cause this:
- The customer does not return to the shop after paying. With PayPal, Klarna or instant bank transfer, some customers close the window as soon as payment is confirmed. In practice this is by far the most common cause.
- An ad blocker prevents the request.
- The order was created in the administration or through an API. There is no browser there that could report anything.
- The finish page fails to load completely for some other reason.
The result is always the same: your revenue in GA4 is lower than your actual revenue, and campaign attribution no longer adds up.
How the module works
When the order is placed, the plugin stores the visitor’s GA4 identity on the order, provided the visitor has consented to analytics — still within the same page request in which the customer clicks “Submit order”. That is the last moment at which the Google cookies are reachable; whatever happens afterwards no longer matters.
After a configurable waiting time the shop checks: did the browser report this purchase? If it did, nothing further happens. If it did not, the shop reports it itself to GA4 — using your Shopware order number as transaction_id, together with value, currency, tax, shipping costs and all items.
What is sent is exactly what you configured in the backend. The server builds the event from the same data layer configuration as the browser — if you added your own fields under dataLayer properties for the checkout finish page, or changed existing ones, they are sent server-side as well. There are two mandatory deviations: the email address is removed (GA4 rejects events containing personal data; in the browser the Tag Manager processes it itself for Enhanced Conversions), and two technical session-attribution values are added that the browser does not need.
Duplicate reports are avoided. If the browser reports the purchase, the finish page records that on the order and the server-side send drops out. Reloading the finish page does not count as another report. In addition, the shop reserves every order before sending it — so a second payment status or a retry never sends it a second time.
The finish page deliberately only confirms once the GA4 tag with the measurement ID entered here has actually loaded in the browser — the Tag Manager alone is not enough. Otherwise the ad-blocker case of all things would count as “already reported” and suppress the very report it needs, for instance when a blocker stops Google Analytics but lets the Tag Manager through. The measurement ID must therefore match the GA4 tag in your container: if it differs, the finish page never confirms and the server reports every purchase a second time.
One rare case remains: if the browser’s confirmation only arrives while the server is already sending after the waiting time has elapsed, a purchase can reach GA4 twice. A longer Wait before reporting makes this case rarer.
Consent comes from your consent tool — whichever one you use. The add-on module takes over the visitor’s decision for every selection under Read consent signal from: Consent tool handles it, Shopware cookie consent, Cookiebot, Cookie Script (cookie-script.com), consentmanager.net, Usercentrics and Own rule. Only a decision the visitor has made in the consent tool counts. Defaults — including Storage types already granted by default and region-specific defaults — never count as consent for server-side reporting. The only exception: if you have set up regions without a consent requirement in Cookiebot, Cookiebot itself reports there that no consent is needed, and the add-on module adopts that classification. So that the shop knows the decision when the order is placed, the plugin keeps it in its own cookie wbm-ga4-consent. This cookie only stores whether statistics and advertising are allowed, and it is updated when the visitor changes or withdraws consent. How to enter it in your consent tool is described in Typical setups.
The add-on module follows the “Enable plugin for this sales channel” toggle. If it is off in a channel, the plugin stores nothing on the orders there and reports nothing.
Not to be confused with “Enter a custom Tag Manager URL” (card 4.3). That field only swaps the address the container is loaded from — the browser remains the sender of the measurement. If the finish page never loads, no
purchaseis created there either. Only this add-on module reports from the shop server.
What the module does NOT solve
Some cases remain open by design:
- Orders without consent stay unmeasured. Without analytics consent the plugin does not even store the GA4 identity on the order. The Measurement Protocol knows no consent mode — whatever is sent is counted. That is not a gap in the product, it is the legal situation.
- Orders from the administration or an API have never seen a Google cookie. They could only be reported as anonymous direct visits, which would distort your channel reports more than the missing order itself does.
- Not every consent tool can be re-checked by the shop when the order is placed. With Shopware cookie consent, Cookiebot, Cookie Script (cookie-script.com) and an Own rule that reads a cookie, it additionally checks the tool’s own cookie. With Usercentrics, consentmanager.net, an Own rule that reads local storage or whose decision comes through the interface for custom integrations (see For administrators / technical details), and with Consent tool handles it, that is not possible. There the shop takes over the state the plugin recorded on the visitor’s last page view.
- With “Consent tool handles it”, the add-on module depends on your tool’s report. The plugin only learns the decision if your tool reports it as an update through Google Consent Mode into the dataLayer (via
gtag('consent', 'update', …)). A default alone is not enough. If it does not, every order counts as placed without consent and is not reported. - If the connection to Google breaks off after sending, nothing is sent again. Whether Google had already received the purchase at that moment cannot be determined — and an order missing once is preferable to one counted twice. If the request provably never reached Google, the shop tries again later.
So do not expect 100% of your orders to appear in GA4 after unlocking. What you can expect is that the abandoned-return and ad-blocker cases come back.
Unlocking
Click Unlock add-on module in the card. Shopware guides you through the purchase via your Shopware account; afterwards the card shows a green confirmation instead of the notice. No restart or reinstallation is required.
What you are booking: a monthly subscription that Shopware settles together with your regular monthly Shopware invoice — not with us. You manage and cancel it in your Shopware account under your subscriptions. After cancelling, the module stays active until the end of the current billing period; the server-side reporting then stops, while your settings and the orders already reported remain untouched.
Report orders the browser did not report
The module’s main switch. Off by default — even after unlocking. Only turn it on once the measurement ID and API secret are in place.
Measurement ID
The GA4 measurement ID of the data stream that is to receive the orders — the same one your Tag Manager uses. You will find it in GA4 under Admin → Data streams.
API secret
Create it in GA4 under Admin → Data streams → your stream → Measurement Protocol API secrets.
Without a measurement ID and API secret nothing is sent, even with the module switched on. Both values apply per sales channel: if you run several channels with separate GA4 data streams, store them separately per channel.
Report when
Defines when the waiting time starts:
- the payment is marked as paid (recommended) — the usual case.
- the order is placed — the right choice for invoice and prepayment. There an order is only set to “paid” days later; otherwise the purchase would appear in GA4 with days of delay, or not at all.
Wait before reporting (minutes)
The grace period in which the browser may report first. The default is 30 minutes.
Shorter means the purchase appears in your reports sooner. Longer means fewer duplicate reports from customers who return to the shop late. For daily reports the value is irrelevant; for the realtime view it is not.
Record diagnostics
For troubleshooting only. With this switch on, events are sent to Google’s validation endpoint and its reply is recorded in the wbm_tag_manager log.
Important: events sent to the validation endpoint do not appear in GA4. Turn diagnostics off again after checking. The reason this field exists: the regular endpoint confirms every request, including one with invalid content — without the validation endpoint an error would run into the void unnoticed.
Checking: was an order reported?
Open an order in the administration and look at the Google Analytics 4 (technical) custom fields:
| Field | Meaning |
|---|---|
| GA4 client id | empty = there was no analytics consent when the order was placed, no Google cookie, the order was created without a browser, or the add-on module was not switched on in this sales channel. No report will be sent in that case. |
| Analytics consent | had the visitor given consent in the consent tool at the time of the order? |
| Reported to GA4 at | empty = not yet reported (or the waiting time is still running). |
| Reported by | browser = the customer reported it, server = the add-on module reported it. |
| Server send reserved at | The shop has started sending to GA4. If this field is set but Reported to GA4 at is empty, the send was not confirmed — for example because the background process was aborted. The order is then not sent again; the wbm_tag_manager log contains a warning with the order number. Check in GA4 whether it arrived. |
For any individual order, these five fields answer the question of why it does or does not show up in GA4.
Cookie consent
What this does for you
No consent, no tracking — that is what data protection law requires. The plugin takes care of that link for you: it tells Google up front that nothing is allowed yet, recognises your visitor’s decision, and only then releases analytics and advertising. You do not have to program anything or modify the cookie banner.
New in this version: this works with every common consent tool, not just Shopware’s own. Previously there was a single setting with three fixed values; anyone using something else was left out. Now you decide the three questions involved separately.
The three questions
You answer all three on the Cookie consent configuration card (see Fig. 3):
| Question | Setting |
|---|---|
| Who tells Google that nothing is allowed yet? | Consent Mode default |
| When is the container loaded? | When to load the container |
| How does the plugin learn about consent? | Read consent signal from |
The defaults are: the plugin sends the denial, the container loads immediately, and the signal is read from Shopware’s own cookie banner. If you use that banner, you do not have to touch any of the three questions during setup. If you use a different consent tool, the third question is the only one you really have to answer.
Typical setups
Find the section that matches your shop.
You use the Shopware cookie banner
Then there is nothing to do: Read consent signal from is already set to Shopware cookie consent, and the other two settings stay as they are as well.
Additional entries then appear in your shop’s cookie banner, which your visitors can select and deselect individually:
- in the Statistics group: Google Tagmanager and Google Analytics
- in the Marketing group: Google Advertising and Marketing
As long as nobody has given consent, analytics and advertising stay blocked. Once the visitor agrees, that is reported to Google immediately — there is no need to reload the page. If they change their selection later, that change is reported as well. The consent is stored in the visitor’s browser: the entry for Google Tag Manager for 90 days, the entries for Google Analytics and Google Advertising and Marketing for 30 days each.
The three entries only appear if the plugin is enabled for the sales channel and a container ID is stored. If either is missing, the cookie banner remains unchanged.
If the Server-side purchase add-on module (section 4.4) is also unlocked and switched on, one more entry appears in the Technically required group: Consent status for server-side Google Analytics measurement — the wbm-ga4-consent cookie. It only remembers whether statistics and advertising are allowed. Because this changes the list of cookies, Shopware shows returning visitors the cookie banner once more after the module has been switched on.
You use Cookiebot, Cookie Script, consentmanager.net or Usercentrics
Set Read consent signal from to the name of your tool. The plugin then reads the state directly from it, without you having to configure anything inside the tool.
With Usercentrics and consentmanager.net, the names of the services depend on your account. The presets cover the usual Google services. If no consent arrives, switch on Record consent diagnostics: the recording names the identifiers your account actually uses. Then adjust them in the Own rule (JSON, expert) field.
Tip: if you have already enabled Google Consent Mode inside your tool, change the setting to Consent tool handles it. You do not need two places reporting the same thing.
Important when the “Server-side purchase” add-on module is switched on: the plugin then sets the
wbm-ga4-consentcookie. Declare it in your consent tool as strictly necessary — lifetime 30 days, it only stores whether statistics and advertising are allowed. This keeps the cookie list in your tool complete.
Your consent tool reports consent to Google itself
Set Read consent signal from to Consent tool handles it. Also check once whether your tool really sends a default of “denied” — if it does not, leave the Consent Mode default with the plugin.
If you use the Server-side purchase add-on module, declare the wbm-ga4-consent cookie in your tool as strictly necessary here as well (see above). Your tool must also report its decision as an update through Google Consent Mode into the dataLayer (via gtag('consent', 'update', …)) — only then does the shop know it when the order is placed.
You use a different consent tool
Set Read consent signal from to Own rule and describe in the Own rule (JSON, expert) field where your tool stores its decision. The help text on the field contains a complete example verified against a live shop. If you get stuck, our support team will help — just tell us the name of your tool.
The same applies here: with the Server-side purchase add-on module switched on, declare the wbm-ga4-consent cookie in your tool as strictly necessary (see above). When the order is placed, the shop only re-checks the decision itself if your rule reads a cookie. If that cookie’s name contains a dot or a space, the shop cannot read it on the server, and the add-on module does not report anything. If it reads local storage, the shop takes over the state of the last page view (see The “Server-side purchase (add-on module)” card).
Nothing may load before consent is given
If your legal advice requires hard blocking, set When to load the container to Load only after consent. The container is then not loaded at all until consent arrives. Alternatively, leave the blocking to your consent tool: Consent tool decides (blocking attributes), together with the marker from its documentation in the Blocking attributes of your consent tool field.
Important: after every change to these settings, open your shop in a fresh private browser window. Only then will you see the cookie banner in its initial state, without your previous decision.
Verifying consent
Whether what the banner displays really arrives is something you can answer in two minutes:
- Switch on Record consent diagnostics and save.
- Open your shop in a private browser window and accept in the cookie banner.
- Read out the recording as described in For administrators / technical details. It shows you which default was sent, which signal arrived and when the container was loaded.
- Switch the recording off again afterwards.
Adjusting the dataLayer
What this does for you
The plugin does not ship its tracking data hard-wired; it ships it as a configuration you can inspect and change in the Administration. You can add further shop pages, rename individual values or send additional information your reporting needs — without programming in the shop.
None of this is necessary for normal operation. Out of the box, all important pages are ready to go. This chapter is for anyone who wants to go further, and for agencies asked to reproduce an existing measurement setup.
The overview page
You will find this area under Marketing → Google Tag Manager.
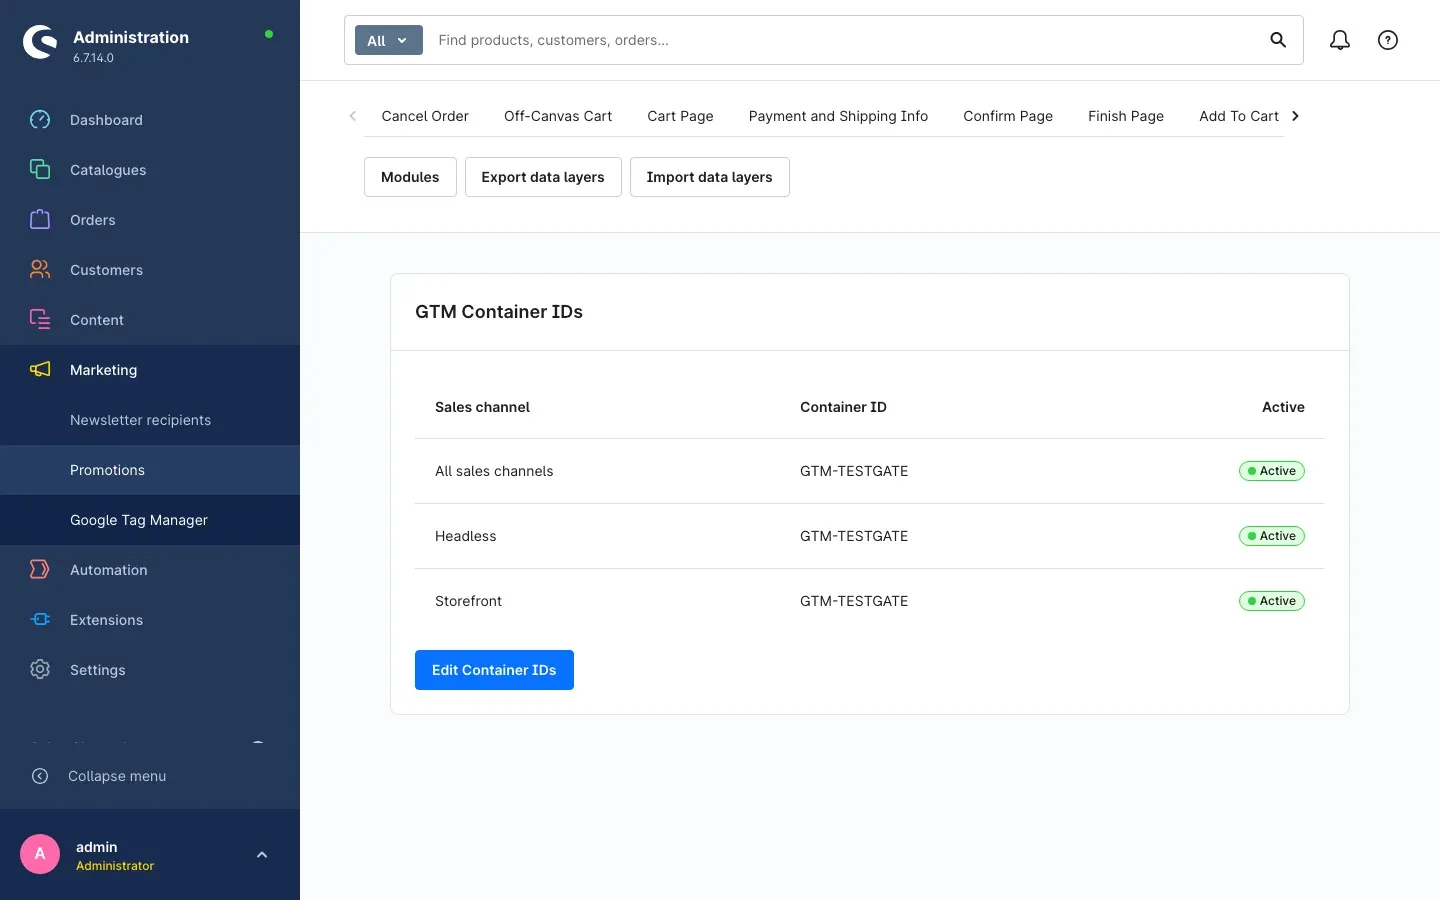 Fig. 6: At the top the tabs of the configured mappings and the Modules, Export data layers and Import data layers buttons, below them the GTM Container IDs card with one row per sales channel.
The GTM Container IDs card shows every sales channel in the columns Sales channel, Container ID and Active, together with the container ID currently in effect there. The Active column shows Active or Inactive. Inactive means: the Enable plugin for this sales channel toggle is off, or no container ID is stored — no tracking takes place in that channel. The All sales channels row represents the value that applies wherever no dedicated one is stored. Edit Container IDs takes you straight to the plugin settings.
What it is good for: you can see at a glance which shop measures with which container — without stepping through the configuration page channel by channel.
Along the top run the tabs of the mappings already set up (Cancel Order, Off-Canvas Cart, Cart Page, Payment and Shipping Info, Confirm Page, Finish Page, Add To Cart and more). Use the arrows at the edge to page through the list.
Below the tabs are three light buttons:
- Modules — takes you to the list of all configured mappings.
- Export data layers — downloads the entire configuration as a file.
- Import data layers — loads such a file back in.
”dataLayer Modules”: which page sends which data
In this plugin, a module is the mapping “on this shop page, this data is sent”. That is the term used in the interface — it does not refer to the plugin itself, but to one individual mapping of this kind.
On the overview page, click Modules.
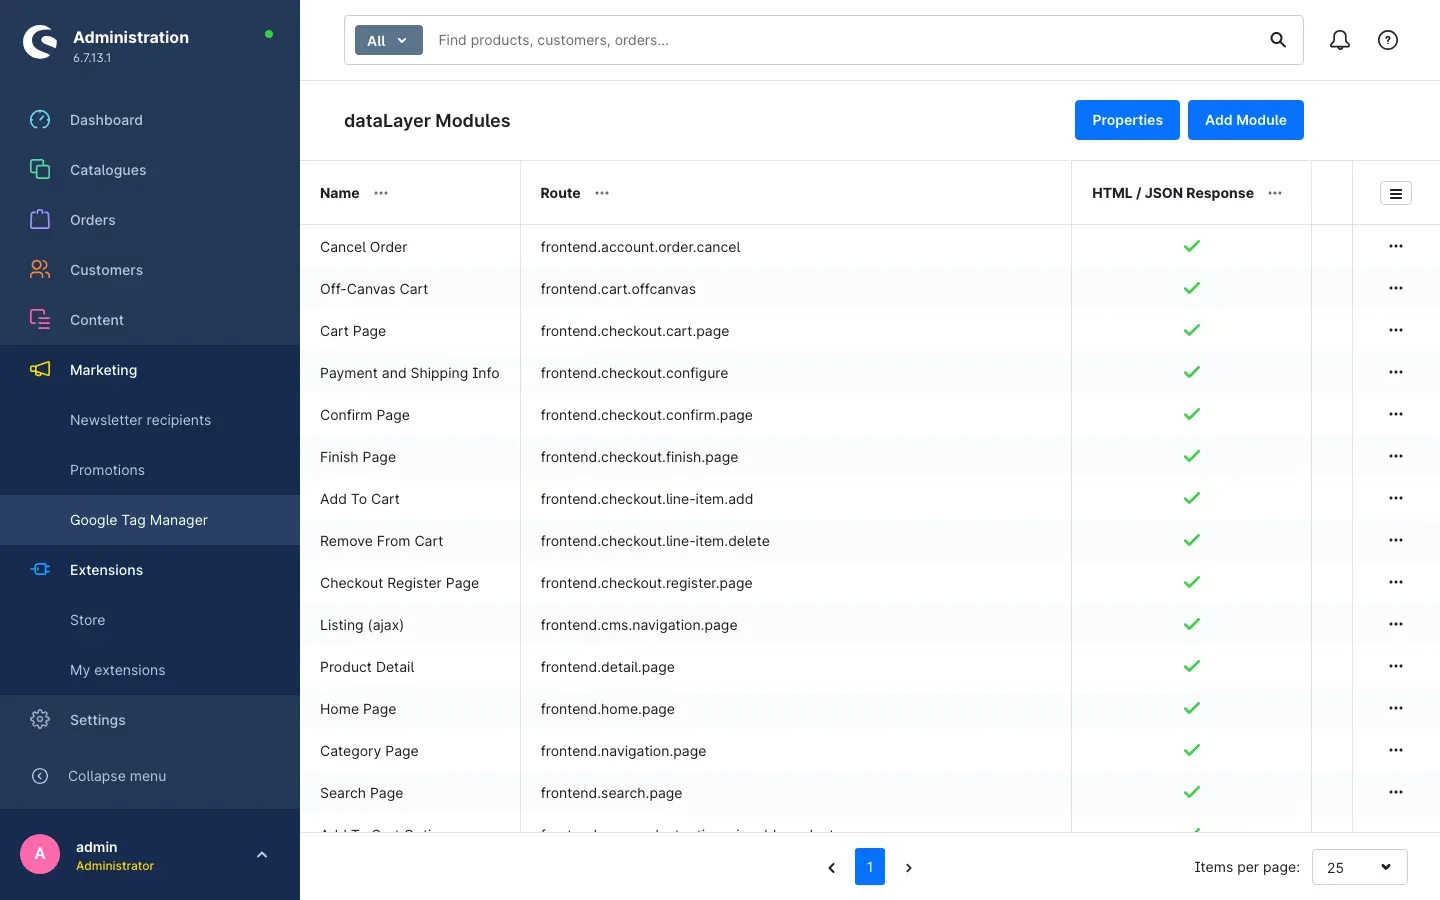 Fig. 7: The dataLayer Modules list. The Name column names the shop page, Route is its technical address within the shop.
The list shows which pages are already covered — among them Product Detail, Category Page, Search Page, Listing (ajax), Home Page, Off-Canvas Cart and Cart Page, Add To Cart and Remove From Cart, Checkout Register Page, Payment and Shipping Info, Confirm Page, Finish Page (order completion) and Cancel Order.
The columns mean:
- Name — the label under which you find the mapping again. Freely selectable.
- Route — the technical address of the shop page the mapping refers to.
- HTML / JSON Response — a tick here means this is a normal page. The toggle is only switched off where the shop does not deliver a page at this point but plain data — with forms, for example.
Two buttons sit in the top right: Properties leads to the values of the selected mapping, Add Module creates a new one. The menu at the right-hand edge of a row (the three dots) lets you edit an existing entry.
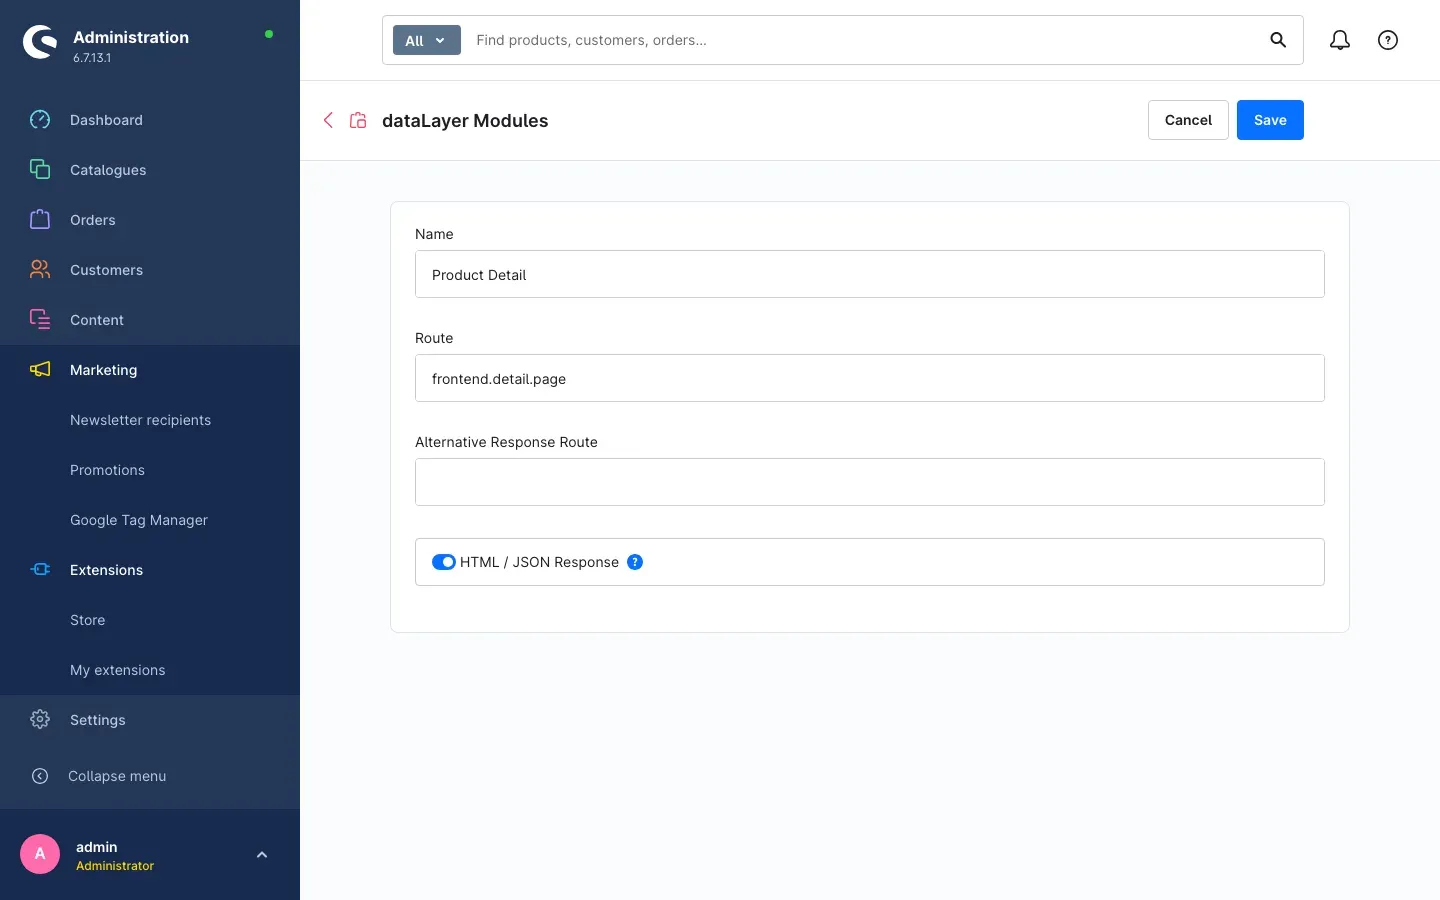 Fig. 8: The detail view of the Product Detail mapping.
In the detail view you maintain:
- Name — the label in the list.
- Route — the shop page, here
frontend.detail.pagefor the product detail page. - Alternative Response Route — for actions after which the shop delivers a different page than the one requested. For Add To Cart, for instance, this points to the off-canvas cart, because that is what the visitor sees after adding an item. For simple page views such as the product detail page, the field stays empty.
- HTML / JSON Response — as described for the list.
Save applies your change, Cancel discards it.
Good to know: a mapping that reports a product list is only triggered if there really are products on the page. A shopping experience, a manufacturer page or an information page without a product list therefore no longer sends an empty list. This keeps your list reports clean and avoids empty signals in your advertising.
”dataLayer Properties”: which values are sent
Every mapping has a set of values attached to it. You reach them via the Properties button or via the mapping’s tab on the overview page.
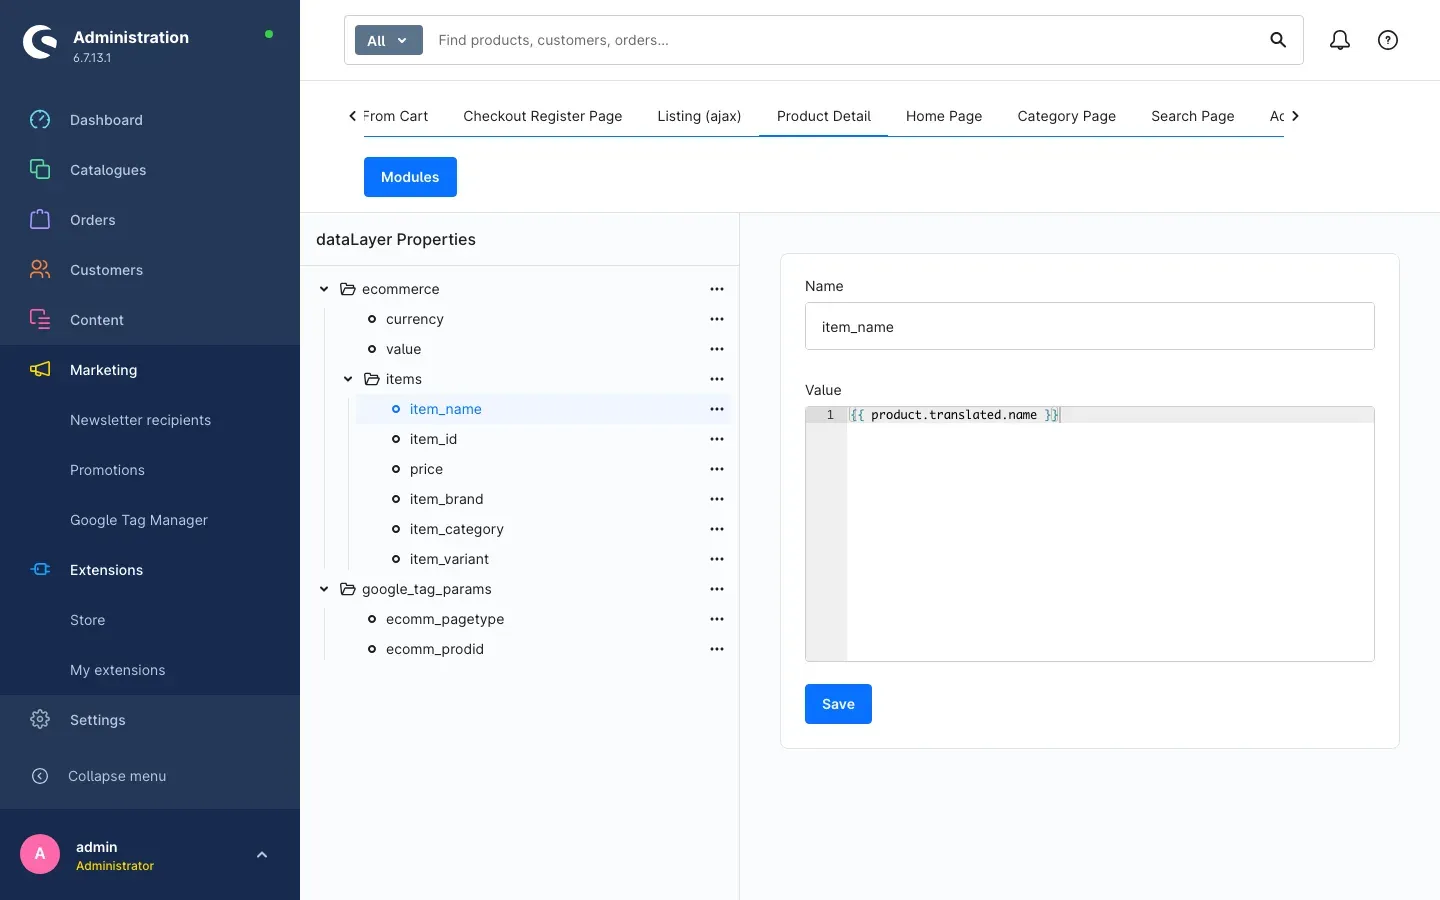 Fig. 9: On the left the dataLayer Properties tree for Product Detail, on the right the editor for the selected item_name property.
On the left you see the values as an expandable tree. For the product detail page this includes, under ecommerce, the entries currency and value, and under items the product details item_name, item_id, price, item_brand, item_category and item_variant.
Click an entry and the editor opens on the right:
- Name — the label under which the value is transmitted. It has to match what your reporting expects.
- Value — where the content comes from. This is not fixed text but a placeholder that is filled with real data when the page is called. In the example,
{{ product.translated.name }}supplies the product name in the visitor’s language. - Push as separate event — this option only exists for the top-level entries of the tree. When set, the part below it is not transmitted together with the page but as a separate, subsequent message. If the Eventname field then appears, enter the name of that message there.
Save applies your change. The menu at the right-hand edge of a row (the three dots) lets you add further entries or remove existing ones.
Important: only change labels if you know which ones your Google Tag Manager container expects. A renamed entry will otherwise no longer arrive in your reports — the shop itself continues to work regardless.
Tip: before any larger change, download the current state via Export data layers. That way you can always go back.
What value contains
value is the monetary value of an event: the sum over the items, price times quantity — without shipping and without tax. Both are sent as parameters of their own beside it on purchase and refund (shipping and tax), the way Google defines it for GA4.
Whether the amounts are gross or net follows the customer: Shopware shows net customer groups net prices and everyone else gross prices, and the dataLayer carries exactly that. On a tax-free delivery there is no tax to begin with.
Note for shops running a version before 6.7.16: up to and including 6.7.15,
valuealso contained the shipping costs. Since 6.7.16 this is corrected — the revenue reported to GA4 is therefore lower by the shipping costs. That is the correct figure, not a loss of data; a step in the chart at the update date is expected. If you edited the template yourself it stays untouched, so the correction does not apply to it and you can switch it topositionPriceby hand if you want.
Backing up and transferring: export and import
Export data layers downloads the complete configuration — all mappings including their values — as a file. You receive it under the name dataLayer.json.
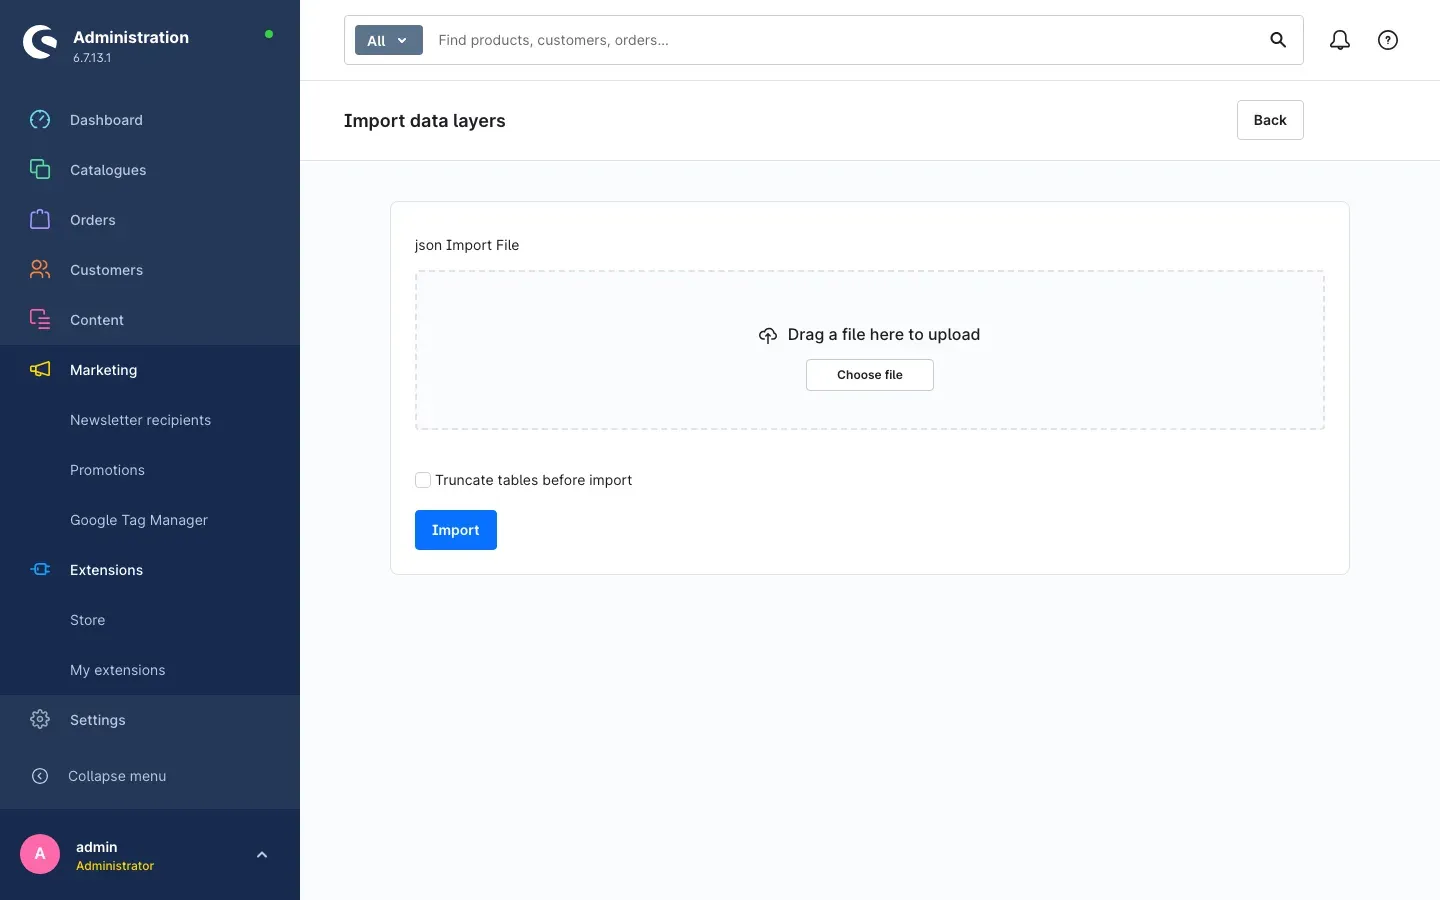 Fig. 10: The Import data layers page with the json Import File field and the Truncate tables before import option.
To load a file back in, click Import data layers:
- Drag the file into the dashed area or select it via Select file. Files of this format up to 5 MB are accepted.
- Use Truncate tables before import to decide how the existing state is handled:
- Ticked: the previous state is removed completely beforehand and replaced by the contents of the file. This is the clean way to adopt an existing setup one to one.
- Not ticked: the contents of the file are added to the existing state. Entries that already exist remain unchanged — so this route cannot be used to overwrite existing values.
- Click Import. Back leaves the page without importing.
If something goes wrong — wrong file format, damaged file, missing permission — the message tells you the reason, and your existing configuration is kept in full. Any skipped rows are reported along with it.
What it is good for: this is how you move a finished, agreed setup from your test shop to your live shop without re-entering everything by hand — and it gives you a backup before you start experimenting.
Important: an import with the box ticked removes your existing configuration completely, including the defaults that ship with the plugin. Download an export first.
Tip: if the shop still shows the old data after an import, clear the cache under Settings → System → Caches & indexes.
Verification: is the tracking working?
What this does for you
After setting things up you want to know whether data really flows — before you rely on your reports. The following steps show you that in a few minutes.
Step 1: Open the shop and give consent
Open your shop in a new private browser window and accept in the cookie banner. Without consent, anything requiring consent stays blocked — that is not a fault but the intended privacy setting.
Step 2: Visit typical pages
Call up the pages whose measurement matters to you, one after another. For a first test, a category page and a product page are enough.
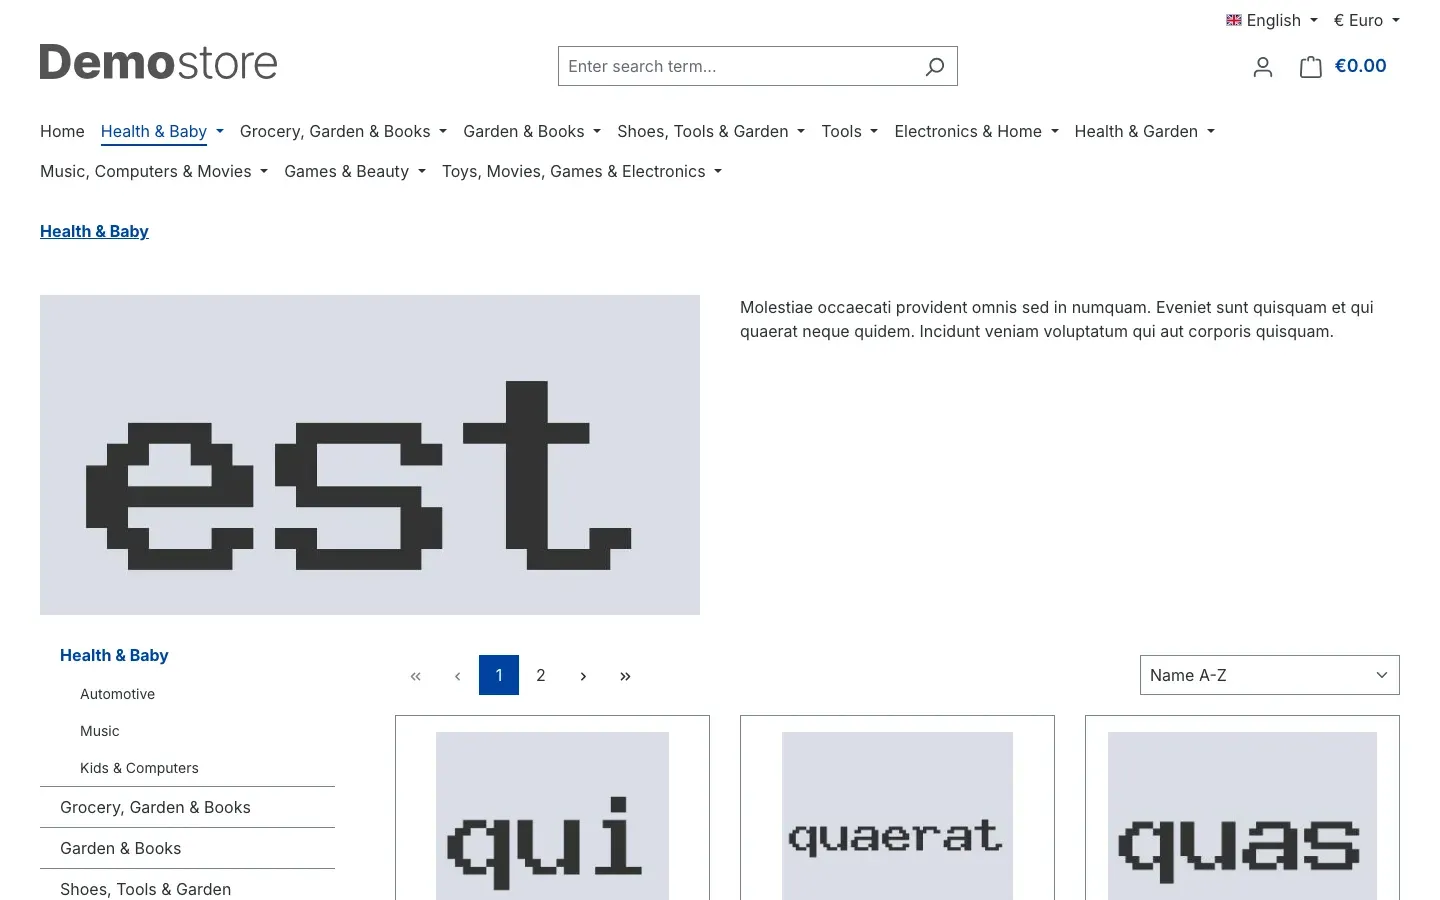 Fig. 11: A category page. The Category Page mapping applies here and reports the product list on display.
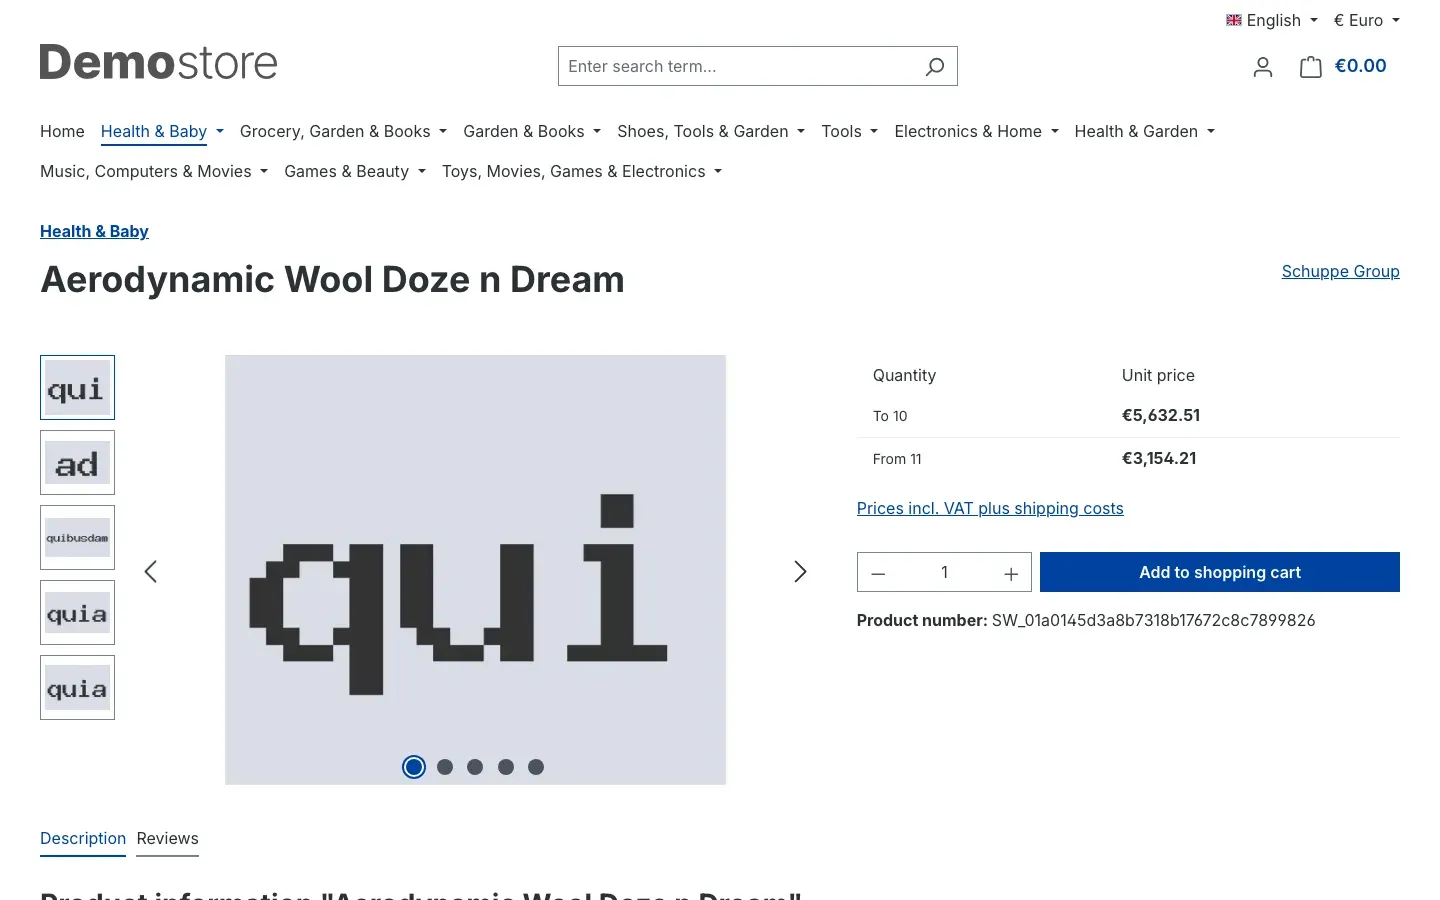 Fig. 12: A product detail page. The Product Detail mapping applies here and reports the product view.
Step 3: Check that the data arrives
The quickest way to see the result is the preview function of your Google Tag Manager container: for each page view it shows you which data arrived from your shop.
Alternatively, check directly in the browser. On a product page, open your browser’s developer tools (usually with the F12 key), switch to the Console and enter:
window.dataLayer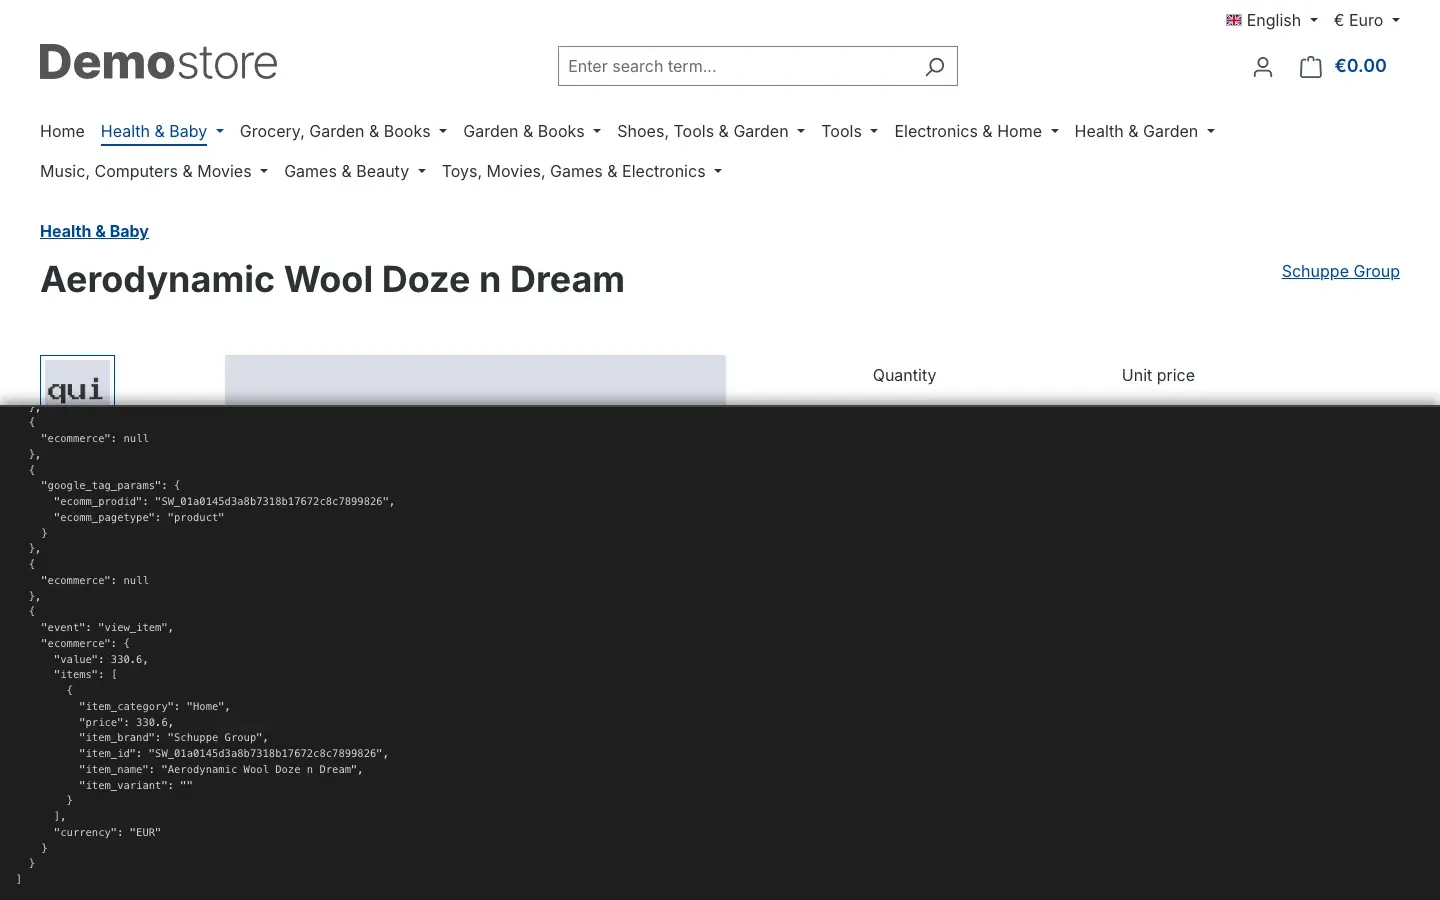 Fig. 13: The data actually transmitted by a product page — with the
 view_item message, the product name, the article number, the price, the brand and the currency.
If you find an entry with your product name there, as in Fig. 12, everything is in order: the data is leaving your shop correctly. Whether it then arrives in Google Analytics depends on how your container is set up — see Troubleshooting.
Step 4: Test the purchase path as well
For a complete check, add a product to the cart and place a test order through to the confirmation page. That verifies the messages for the cart, the checkout, the shipping and payment selection and the purchase in one pass. If you also want to check cancellation, cancel the test order afterwards in the customer account.
Troubleshooting
There is no “Google Tag Manager” entry under Marketing
What causes it: the plugin is not activated yet, or the Administration cache is out of date.
How to fix it:
- Open Extensions → My extensions and check that the toggle next to the plugin is switched on.
- Clear the cache: Settings → System → Caches & indexes.
- Reload the Administration in your browser.
If the entry still does not appear, your user account lacks the permissions for this area (see For administrators / technical details).
No data arrives in Google Analytics
Work through these points in order:
- Is the container ID entered? Check it on the Basic Configuration card — with the sales channel you are testing selected at the top. A common case: the ID is stored under All Sales Channels, but the channel being tested has its own, empty value.
- Is the “Enable plugin for this sales channel” toggle on?
- Does the plugin know where consent comes from? Check Read consent signal from on the Cookie consent configuration card. If Consent tool handles it has been selected while your consent tool does not report consent to Google itself, analytics and advertising stay blocked permanently. See Cookie consent.
- Did you accept in the cookie banner? Without consent, anything requiring consent stays blocked.
- Does the data arrive in the shop at all? Check as described in Verification: is the tracking working?. If you see your product data there, the plugin is working correctly — the cause then lies in the Google Tag Manager setup.
- Is your container configured and published? Google Tag Manager only forwards data if a matching tag has been created there and the version has been published. That is the job of your agency or your GTM setup, not of the plugin.
Consent is not recognised although the visitor accepted
What causes it: either the selection under Read consent signal from does not match the consent tool in use, or the tool reports its decision under different identifiers than the plugin expects — which happens with Usercentrics and consentmanager.net, because those identifiers depend on the account.
How to fix it:
- Switch on Record consent diagnostics and save.
- Open the shop in a private browser window and accept.
- Read out the recording (see For administrators / technical details). It shows you whether a signal arrived at all — and, for Usercentrics and consentmanager.net, which identifiers your account uses.
- Enter any differing identifiers in the Own rule (JSON, expert) field.
- Switch the recording off again.
Returning visitors are not measured, new ones are
What causes it: your consent tool only restores the stored decision once its own script has loaded. By then the Google tags have already proceeded with “denied”.
How to fix it: increase the value under Wait for the consent signal (milliseconds) step by step, to 1000 or 1500 for example, and check after each change. More than a few seconds makes no sense — no visitor waits that long.
The entries are missing from the cookie banner
What causes it: three conditions have to be met — and one of them is not.
How to fix it: check the following for the affected sales channel:
- Read consent signal from is set to Shopware cookie consent. With any other selection the plugin deliberately does not add these three entries to the Shopware banner — your own consent tool handles the display instead.
- The Enable plugin for this sales channel toggle is on.
- A container ID is entered in the GTM Container ID field.
Then save and open the shop in a fresh private browser window.
Tracking does not run at all although a container ID is set
What causes it: the container ID is not in the format Google issues. The plugin only accepts GTM- followed by capital letters and digits — anything else is discarded and Tag Manager is not loaded in the first place. Typical causes: a Google Analytics ID (G-… or UA-…) instead of the container ID, a pasted code snippet, or lower case.
The same applies to Enter a custom Tag Manager URL: expected is http:// or https:// with a host and an optional path, without a query part — the plugin appends /gtm.js?id=… itself. Any other entry is discarded and Google’s default address is used.
How to fix it: enter into GTM Container ID exactly the value shown in Google Tag Manager next to the container name (in the form GTM-XXXXXXX). Whether a value was discarded is recorded in your shop’s log under the channel wbm_tag_manager, including the affected sales channel.
Nothing changes after switching the container ID
What causes it: the page is still being served from the cache, or your browser is showing a stored version.
How to fix it: clear the cache under Settings → System → Caches & indexes and reload the shop in a private browser window.
Tracking stopped working after changes on the “Manipulate Tag Manager script” card
What causes it: the fields on this card intervene directly in the integration. A single typo is enough to stop everything loading.
How to fix it: reset the fields to their initial state — Script tag attributes (optional/expert) to type="text/javascript", all other fields empty. Save, clear the cache, check again.
Clicks on products or on the wishlist do not show up
What causes it: the two toggles on the Basic Configuration card are independent of the rest of the tracking and are switched off by default.
How to fix it: switch on Track product clicks in listings or Track clicks on “Add to wishlist” respectively — for the sales channel you are testing.
If only individual clicks are missing afterwards, and only on very long listing pages, the splitting of large data deliveries may be the cause. In that case, try increasing the value under Split DataLayer when a limit is exceeded.
Information is missing on category pages with very many products
What causes it: the data delivery exceeds the amount Google processes per transmission.
How to fix it: reduce the value under Split DataLayer when a limit is exceeded step by step and check again after each change.
The import fails or the file cannot be selected
What causes it: a file in the wrong format or an oversized file is being used.
How to fix it: only use a file previously produced via Export data layers. It may be no larger than 5 MB. The message always names the reason for the rejection, and your existing configuration is kept.
An order exists in Shopware but is missing in GA4
This is the most common reason for a gap between your Shopware figures and GA4 — and usually not a fault but the way measurement works: the purchase event is only created when the checkout finish page loads in the browser.
How to narrow it down: look at the payment method of the missing order. If it is a redirect payment (PayPal, Klarna, instant bank transfer), the customer very likely closed the window after paying without returning to the shop. The finish page was then never called — and without it there is no purchase, regardless of your settings.
What helps:
- Immediately and at no extra cost: set When to load the container to Load immediately, gate through Consent Mode (recommended). Google then supplies modelled conversions for visitors who do not consent, which closes part of the gap.
- For the remaining cases: the Server-side purchase add-on module (section 4.4). It reports exactly those orders the browser did not report.
Whether an individual order was reported, and by which route, is shown by the Google Analytics 4 (technical) custom fields on the order.
The add-on module is unlocked but nothing is being reported
Work through these points in this order — the check inside the shop follows the same sequence:
- Is Report orders the browser did not report switched on? The switch is off initially, even after purchase.
- Is Enable plugin for this sales channel switched on in this channel? If the toggle is off, the plugin stores nothing on the orders there and reports nothing.
- Are the measurement ID and API secret stored for this sales channel? Both values apply per channel.
- Has the waiting time already elapsed? The default is 30 minutes after the triggering event.
- Does the order carry a GA4 client id? If it is empty, there was no analytics consent when the order was placed, no Google cookie, or the order was created without a browser — this deliberately rules out a report.
- Has the visitor really made a decision in the consent tool? Defaults do not count as consent — not even Storage types already granted by default or region-specific defaults (exception: Cookiebot regions without a consent requirement, see The “Server-side purchase (add-on module)” card).
- Does the consent reach the shop? Is the
wbm-ga4-consentcookie declared as strictly necessary in your consent tool (see Typical setups)? With Consent tool handles it, additionally: does your tool report its decision as an update (gtag('consent', 'update', …)) into the dataLayer? Otherwise every order counts as placed without consent. - Did you clear the cache after unlocking (Settings → System → Caches & indexes)? Pages that were already cached before will otherwise not record the consent (see For administrators / technical details).
- Does Reported to GA4 at already show a timestamp with Reported by: browser? Then the customer reported it themselves and the server-side send was correctly skipped.
If it is still unclear why nothing arrives: switch on Record diagnostics, place a test order and check the wbm_tag_manager log. Google states there in plain text what it objects to. Turn diagnostics off afterwards — events sent to the validation endpoint do not appear in GA4.
A purchase appears twice in GA4
First check whether the order really was counted twice or whether GA4 is showing the same transaction in two reports. For a genuine duplicate, look at the Reported by field on the order. If it says server even though the customer saw the finish page, there are two possible reasons:
- The measurement ID differs. If the measurement ID in the add-on module does not match the one in the GA4 tag of your container, the finish page never confirms and the server reports every purchase a second time. Align the measurement ID.
- The customer returned late. Their confirmation from the browser arrived while the server was already sending after the waiting time had elapsed. This rare remaining case cannot be ruled out entirely. A longer waiting time makes it rarer.
Reloading the finish page, on the other hand, does not create a second report.
Worth knowing: GA4 does not reliably deduplicate identical transaction_id values on its own.
FAQ
Q: Why is my revenue in GA4 lower since the update to 6.7.16?
A: Because the shipping costs are no longer part of the event value. Google defines value as the sum over the items and expects shipping and tax as parameters of their own — which the plugin sends anyway. Up to 6.7.15 the shipping was inside value as well, so the reported revenue was too high. Since 6.7.16 it is correct. It comes out lower by exactly the shipping costs; a step in the chart at the update date is normal and happens once. If you let Google Ads optimise on revenue, it now bids on the right figure.
Q: Do I need my own Google account?
A: Yes. You need a Google Tag Manager account with a container. The plugin integrates that container but does not replace it.
Q: Do I have to program anything or modify my template?
A: No. The plugin ships with all important pages ready configured. Entering the container ID and defining once where consent comes from is enough.
Q: Is the plugin alone enough for working reporting?
A: No. The plugin provides your shop’s data. What happens with it — which tags fire in Google Analytics 4 or Google Ads — is defined in the Google Tag Manager container.
Q: Can I use a separate container for each of my shops?
A: Yes. All settings apply per sales channel. Switch to the desired channel at the top of the configuration page and enter a dedicated container ID there. You can see which channel currently uses which ID at a glance under Marketing → Google Tag Manager.
Q: Can I switch tracking off for an individual sales channel?
A: Yes, using the Enable plugin for this sales channel toggle. The plugin stays installed; the channel concerned then loads neither Google Tag Manager nor the tracking data.
Q: What happens to my data when I uninstall the plugin?
A: When you uninstall, Shopware asks whether you want to Remove all app data permanently. If you leave that switch off, your settings, your dataLayer setup and the GA4 details on your orders are kept. If you switch it on, the plugin removes its settings and the entire dataLayer setup — and also removes the Google Analytics 4 (technical) details from all orders. The orders themselves are kept. If you want to keep your dataLayer setup, download a backup via Export data layers first.
Q: Which consent tools are supported?
A: Shopware’s own cookie banner, Cookiebot, Cookie Script, consentmanager.net and Usercentrics are supported directly. Any other tool can be connected via Own rule, provided it stores its decision in the browser. And tools that already drive Google Consent Mode themselves are simply left to do so — for those you change the setting to Consent tool handles it.
Q: I updated from an older version. Do I have to change anything?
A: No. Your previous setting is carried over per sales channel and your shop behaves unchanged. The new options are something you switch on deliberately when you need them.
Q: Are filters, sorting and paging in categories recorded as well?
A: Yes. When a product list refreshes without the whole page reloading, the plugin reports the new list again.
Q: Why does an information page or shopping experience not report a product list?
A: Because there are no products on it. Pages without a product list deliberately do not send an empty list — that would otherwise clutter your list reports and your advertising with signals that have nothing behind them.
Q: Are cancellations recorded?
A: Yes, the Cancel Order mapping is preconfigured for this.
Q: Can I add a shop page that is not covered yet?
A: Yes, via Marketing → Google Tag Manager → Modules → Add Module. You will need the technical address of the page; use the existing entries in the list for orientation.
Q: I have messed up the values in the properties tree — how do I get back?
A: Use Import data layers to load a previously downloaded export back in. Which is why: always export before making larger changes.
Q: Which languages does the plugin support?
A: The interface and the texts in the shop are available in German, English and Dutch. The language shown follows the language in which the Administration or the shop is operated.
For administrators / technical details
This section is aimed at technical administrators. You do not need it for normal use.
System requirements
- Shopware: 6.7
- PHP: 8.2 or newer, with the JSON extension enabled
Installation via the command line
composer require webmatch/tag-manager-analytics
bin/console plugin:refresh
bin/console plugin:install --activate WbmTagManagerAnalytics
bin/console cache:clear
Updating an already installed version:
bin/console plugin:refresh
bin/console plugin:update WbmTagManagerAnalytics
Permissions
The plugin ships its own permissions under the label WBM Tag Manager, graded into read, edit, create and delete. You assign them within a role under Settings → System → Users & permissions. Read permission is sufficient to download an export; an import requires write permission.
Important: these permissions alone are not enough. A user additionally needs the usual basic Administration permissions, otherwise they cannot enter the interface at all.
How far the write permission reaches
Write permission on the dataLayer properties is a far-reaching permission. Grant it only to people you would also give access to your shop’s database.
The reason lies in how the plugin works: the dataLayer properties are not plain text fields but templates that are executed in the shop. That is exactly what makes the plugin so flexible — you can calculate any value instead of picking from a fixed list. It also means that anyone allowed to change these templates is storing instructions that run on every page of the shop.
There are two points you should be aware of:
- The templates can access shop data. The plugin provides a query function for this, which fetches values from the database — not only from the plugin’s own tables. A carefully crafted property can therefore also read information that has no place in tracking, such as customer data.
- Whatever is written into the dataLayer leaves the shop. The dataLayer is handed to Google Tag Manager and from there to the services you have set up. A property that accidentally passes on personal data is therefore not merely a shop defect but a data protection incident.
In practice this means:
| Role in the team | Recommended permission |
|---|---|
| Marketing, reporting, verifying the tracking | read only — enough for the overview and for the export |
| Maintaining the tracking, adjusting the templates | edit, plus create/delete where needed |
| External service providers without database access | read only; changes via an import that you review together |
The import deliberately requires the same write permission: an import file can carry the same templates as the interface does. So review a file from an outside source before you import it — the same care you would apply to a plugin from an unknown origin.
Diagnostics in the browser
The plugin writes nothing to the browser console — neither errors nor notices. Shop visitors therefore never see any output. The diagnostic messages go into a recording in the browser’s memory instead, which is only filled when the debug flag is set.
To switch it on — enter this once in the console of the developer tools, then reload the page:
localStorage.setItem('wbmTagManagerDebug', '1')To view the entries:
window.wbmTagManagerDebug.dump()To switch it off:
localStorage.removeItem('wbmTagManagerDebug')Every entry consists of a timestamp, a level and a message. Messages from the storefront code carry the prefix [WbmTagManagerAnalytics], those from the consent runtime the prefix [wbm-consent] — the latter only appear if the Record consent diagnostics plugin setting is switched on as well. The recording holds 200 entries; older ones drop out, so a forgotten flag never consumes unlimited memory. The flag only takes effect in the browser in which it was set.
In addition, every entry is emitted as the storefront event wbmTagManagerDiagnostic. A shop can attach its own monitoring to it without modifying any plugin file:
document.$emitter.subscribe('wbmTagManagerDiagnostic', (event) => {
    // event.detail = { time, level, args }
});
Consent Mode
The plugin drives Google Consent Mode: before the container loads it sends a default with denied for all advertising and analytics storage types, reports the visitor’s decision as an update, and additionally pushes a wbm_consent_update event into the dataLayer, which the container can use to fire a page view within the same visit. The wait_for_update delay is controlled by Wait for the consent signal (milliseconds).
For this to have any effect, the Google Tag Manager container itself must be configured to be consent-aware — that is, set up so that its tags respond to these signals. That is the job of the GTM setup or the agency looking after it, not of the plugin.
Interface for custom integrations
For consent tools the plugin does not know, the window.wbmTagManager interface is available in the browser. It lets you build an integration from a customising plugin, from a tag in Google Tag Manager, or from a snippet of the tool itself:
// Report individual storage types
window.wbmTagManager.setConsent({ analytics_storage: 'granted', ad_storage: 'denied' });

// Grant everything or deny everything
window.wbmTagManager.grantAll();
window.wbmTagManager.denyAll();

// Load the container manually (with "Load only after consent")
window.wbmTagManager.loadGtm();
Alternatively, report the decision as an event — handy when there is no direct access to the object:
document.dispatchEvent(new CustomEvent('wbm-tagmanager:consent', {
    detail: { analytics_storage: 'granted' }
}));
Repeated, unchanged reports are suppressed, so nothing is sent twice.
Enhanced conversions
For logged-in customers, the plugin additionally transmits contact details in encrypted (hashed) form so that Google can attribute purchases more reliably. Whether and how this data is used is decided by the configuration on the Google side. Before going live, check that this transmission fits your privacy policy and your consent concept.
Server-side tagging
If a server-side tagging setup is in place, enter its address in the Enter a custom Tag Manager URL field on the Manipulate Tag Manager script card. The script is then loaded from there instead of from Google’s standard address.
Server-side purchase in operation
Several servers or worker hosts. To make sure an order is never sent twice, the add-on module protects every “send or not” decision with a Shopware lock. By default these locks are stored as files on the respective server (LOCK_DSN=flock). If web servers or workers run on several hosts, they cannot see each other’s locks — within a very small time window a duplicate send is then possible. In that case, set LOCK_DSN on all hosts to a shared store, for example Redis:
LOCK_DSN="redis://redis-host:6379"Clear the HTTP cache after unlocking. So that the shop knows the consent when an order is placed, the plugin delivers the transfer of the consent into the wbm-ga4-consent cookie on every page once the module is unlocked. Pages that were already in the HTTP cache do not contain it yet. Clear the cache under Settings → System → Caches & indexes after unlocking.
Support and documentation
- Documentation: https://www.bui-hinsche.com/en/documentation/google-tag-manager-ga4-e-commerce-tracking
- Manufacturer: BuI Hinsche GmbH — https://www.bui-hinsche.com/
- Shopware Community Store: ratings and comments on the plugin page
You can also reach the documentation at any time directly from the Administration via the to documentation button on the Basic Configuration card.
This manual was created for Google Tag Manager + GA4 E-Commerce Tracking version 6.7.16.
More manuals
Age Check
Tobacco, spirits, knives: visitors who do not confirm their age never see the restricted items at all. You tick a box per product, the plugin hides it everywhere.
Open manual Shopware 6AI SEO All-in-One: SEO and GEO suite for Shopware 6
Google finds your shop, ChatGPT never mentions it. This plugin checks both in one run, fills empty meta fields from templates and turns the findings into a to-do list.
Open manual Shopware 6Area Calculation
Area calculation on the product page: your customer knows the square metres, not the number of packs. The plugin works it out, adds the offcut and fills the quantity field.
Open manualNeed a team that keeps your shop running?
We have been maintaining Shopware shops for more than 20 years, including updates, hotfixes and the plugins you are configuring right now.