Product availability notification
Automatically notifies your customers by email as soon as a sold-out product is back in stock. Includes double opt-in, an overview in the customer account and control per sales channel.
On this page
- Introduction
- What this plugin does for you
- How your customers stay protected
- Who is this plugin for?
- Installation and activation
- Configuration per sales channel
- Activate plugin for this channel
- Customer gets notified automatically
- Should the customer be able to get notified again after a period of time?
- Customer can get notified again after (minutes)
- What it takes for the form to appear
- How your customers experience the notification
- The customer signs up
- Visitors without a customer account
- The confirmation email
- When no confirmation email arrives
- The availability email
- Other messages in the shop
- The overview in the customer account
- Managing notifications in the administration
- The product list
- Viewing registrations and sending notifications
- Registrations on the product itself
- When nothing was sent
- Adapting the email texts
- Troubleshooting
- No form appears on the product page
- The customer does not receive a confirmation email
- The shop reports “You have already signed up for a notification for this product!”
- The shop reports “We are already waiting for confirmation via the link in the email.”
- The item is back, but nothing goes out automatically
- Sending in the administration stops with a message
- The entry is missing from the customer’s account navigation
- Frequently asked questions
- For administrators / technical details
- System requirements
- Automatic sending and the message queue
- Console command for a cron job
- Data protection
- Uninstalling
Introduction
A sold-out product is the quietest way to lose revenue: the customer is right there, ready to buy — and then leaves. Usually for good, because hardly anyone comes back day after day to check whether new stock has arrived.
This is exactly where Product availability notification comes in. When an item can no longer be ordered, a small form takes the place of the buy area on the product page. Your customer leaves an email address and receives a message as soon as the item is available again. One click in that email takes them straight back to the product.
What this plugin does for you
- You no longer lose demand simply because something is temporarily out of stock.
- Your customers do not have to keep checking the product page — they are informed actively.
- You can see in black and white which sold-out items your customers are waiting for. That is very direct input for your reordering.
- You decide whether the messages go out automatically or whether you send them yourself.
- Every sales channel is controlled separately — you can use the feature in one shop and leave it out in another.
How your customers stay protected
Nobody is contacted without being asked. Every registration has to be confirmed first via a link in an email. Only then is the notification active. Logged-in customers can see their registrations in their own account at any time and delete them there themselves.
Who is this plugin for?
For every shop where items are temporarily sold out and restocked later — fashion, spare parts, handmade goods, seasonal ranges. You do not need any technical knowledge: install it, set one switch, done.
Installation and activation
After your purchase, the plugin is available directly in your administration — there is nothing to download and nothing to upload.
- Log in to your Shopware administration.
- Open Extensions → My extensions.
- Find the entry Product availability notification in the list and click Install next to it.
- Once the installation has finished, switch the plugin on using the toggle next to the entry.
The plugin is now present in your shop. Your customers cannot see it yet, though — for that you also need the switch described in chapter 3. This is intentional: it lets you set everything up in peace before anything shows up in the shop.
If Product availability notification does not appear in the list, your Shopware account is not yet connected to this shop. Log in with your Shopware account under Extensions → My extensions; the plugin will then appear automatically.
Configuration per sales channel
You reach the settings via Extensions → My extensions: open the three-dot menu next to the Product availability notification entry and choose Configuration.
At the very top of the page you select the sales channel. This is the most important point in this chapter: all of the following settings only ever apply to the channel currently selected there. If you run several shops, set them up one after another. The settings themselves are in the card Configuration Channel.
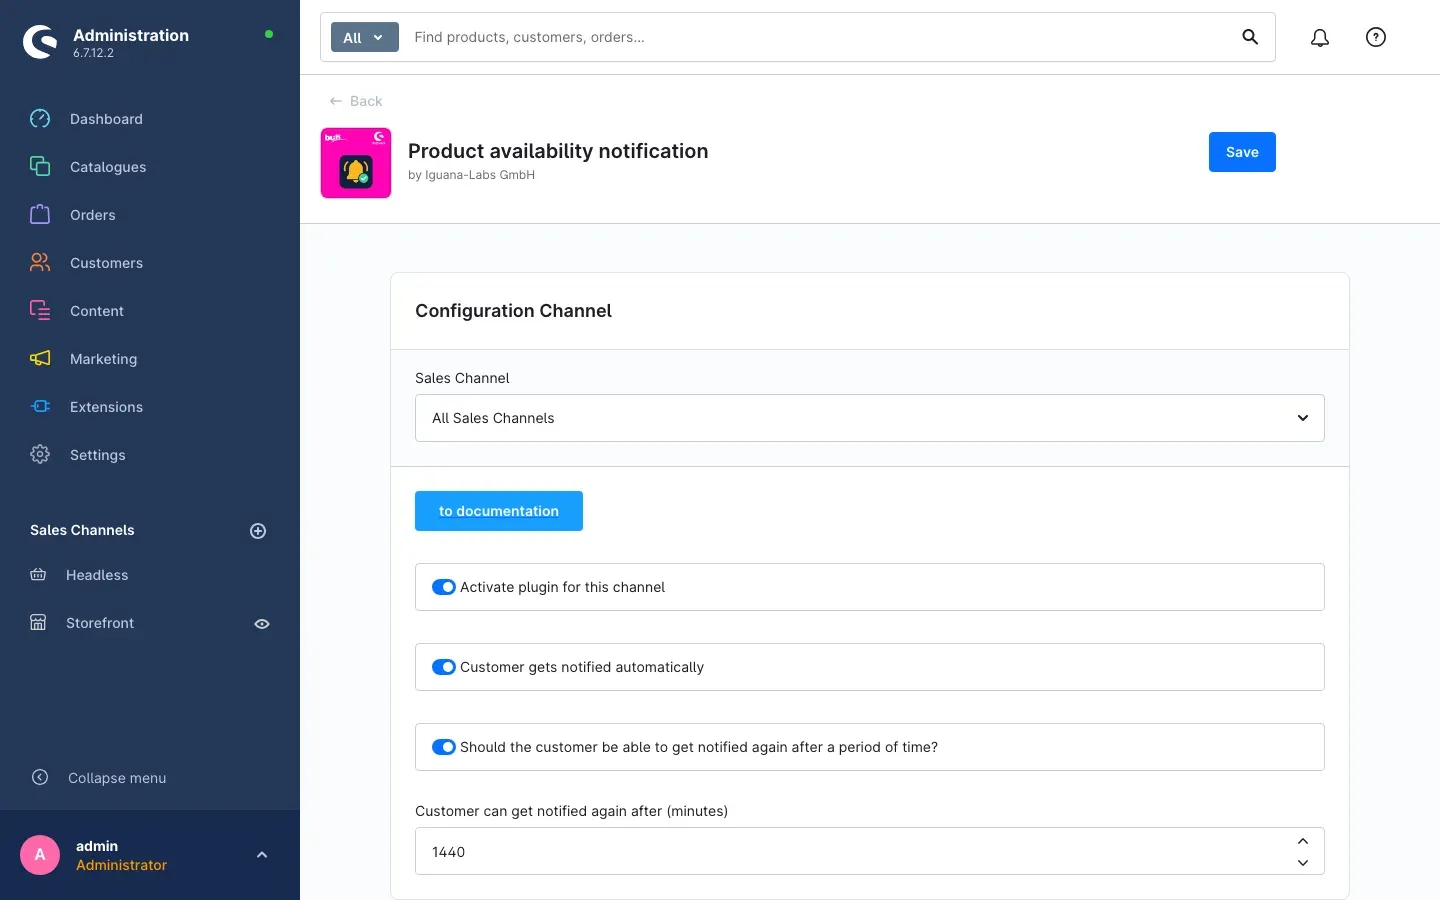 Fig. 1: The “Configuration Channel” card with all settings and the button to the online documentation.
The button to documentation opens the online documentation at any time.
Activate plugin for this channel
This switch is the master switch. As long as it is off, nothing in your shop changes: no form, no entry in the customer account, no emails. Turn it on and the feature becomes active in exactly this sales channel.
It is switched off on delivery.
Why this is useful: you can install the plugin, prepare everything calmly and only release the feature once you are happy with it. And you can use it selectively, in the channels where it really makes sense — for example in your consumer shop but not in your trade portal.
Customer gets notified automatically
This is where you decide who triggers the sending.
If the switch is on, the shop takes care of it for you: as soon as an item’s stock is positive again, the notifications go out to all waiting customers. You do not have to do anything.
If it is off, nothing happens by itself. Registrations keep being collected, but you decide in the administration when the messages go out (chapter 7).
It is switched off on delivery.
Why this is useful: automatic sending is convenient and fast — the customer learns straight away that the item is back. Manual sending, on the other hand, gives you control: you can wait until the delivery has really been unpacked and checked, instead of contacting customers on the back of a brief stock correction.
Should the customer be able to get notified again after a period of time?
Normally a registration applies only once: the customer is notified, and that is that. If you switch this setting on, a registration stays in place and can lead to another notification later.
It is switched off on delivery.
Why this is useful: for items that repeatedly sell out for short periods, customers do not have to sign up again every single time.
Customer can get notified again after (minutes)
Here you enter, in minutes, how much time should pass at minimum between two notifications to the same customer. The value belongs to the setting above it and only takes effect when that setting is switched on.
It is set to 0 on delivery.
Why this is useful: the interval protects your customers from repeated messages. If a stock level bounces up and down within a short time, nobody receives three emails in a row because of it. For orientation: one day is 1440 minutes, one week is 10080 minutes.
Tip: start with the master switch alone. Leave “Customer gets notified automatically” off for the first few days and send the first notifications yourself. That way you see exactly what reaches your customers before you turn on the automation.
What it takes for the form to appear
This is where most questions come up, so let us be very explicit: the notification form does not appear on every product page, only when an item genuinely can no longer be ordered by your customers. Three things have to be true at the same time.
First: the plugin is switched on for the sales channel. The switch Activate plugin for this channel has to be on for exactly the channel in which you are opening the product page (chapter 3).
Second: the item is a clearance item. The Shopware product setting Clearance sale has to be switched on for the item. That setting tells Shopware: “when the stock is used up, that is the end of it.” Without it, the item stays perfectly orderable even at stock 0 — in which case there is nothing to wait for, and a notification form would only confuse the customer.
Third: the stock is no longer enough for an order. The available stock has to be below the item’s minimum order quantity. For most items the minimum order quantity is 1, so this simply means: stock 0. If, however, you only sell an item in packs of four, the form already appears once fewer than four pieces are left, because nobody could buy them anyway.
When all three points are met, the notification form replaces the normal buy area on the product page. The customer therefore no longer sees a buy button, but the sign-up field instead. If even one of the three points is missing, the product page stays completely unchanged.
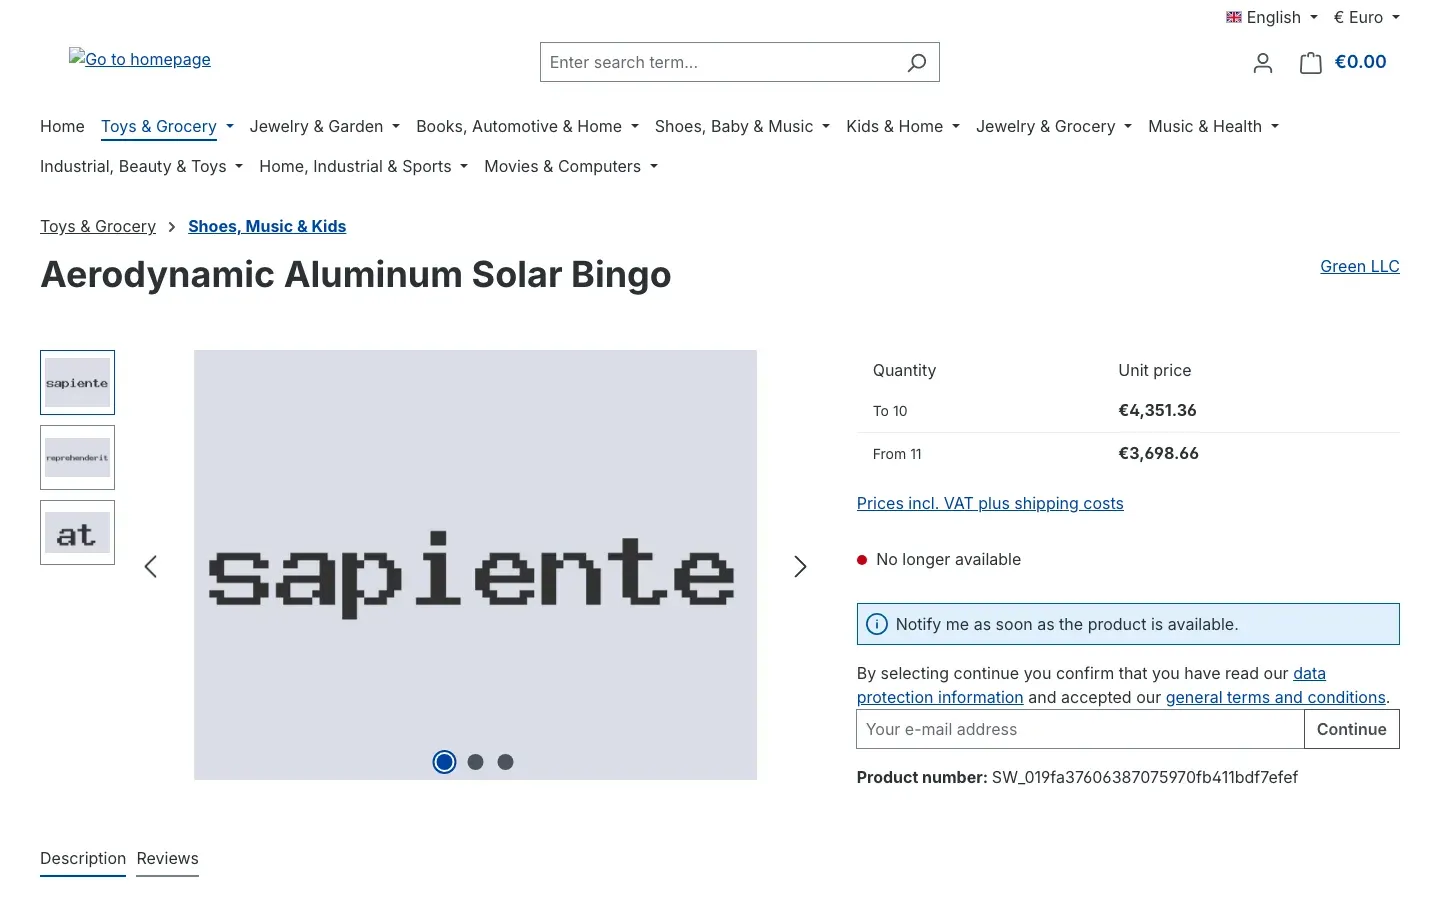 Fig. 2: For a sold-out clearance item, the notification form takes the place of the buy area.
How to test it in two minutes: take a test product, switch on Clearance sale in its settings and set the stock to 0. Save, open the product page in the shop — the form has to be there.
How your customers experience the notification
This chapter shows the complete journey from your customers’ point of view. You do not have to do anything here, but knowing the sequence helps a great deal when a customer question comes in.
The customer signs up
Above the input field there is the note “Notify me as soon as the product is available.”. Below it there is a field with the placeholder “Your e-mail address” and, next to it, the Continue button.
If the customer is logged in to their account, their address is already in the field — all they have to do is click Continue. Below the field you will also find your shop’s captcha and privacy notice, exactly as you have set them up in Shopware.
On a smartphone everything works the same way, just stacked vertically:
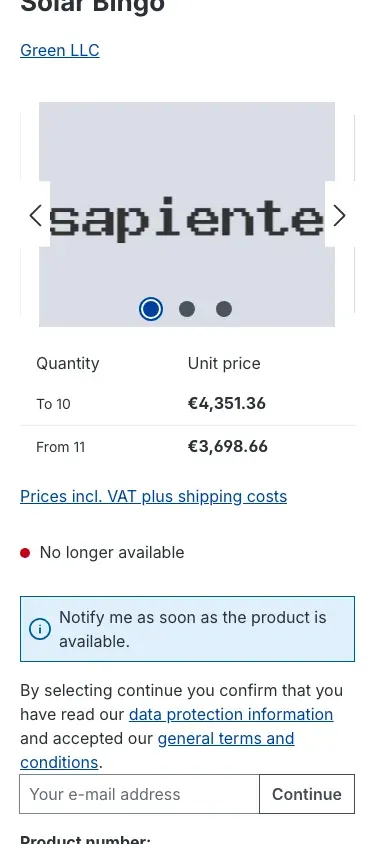 Fig. 3: On narrow screens the note, the input field and the button move underneath each other.
Visitors without a customer account
Visitors without a customer account can sign up too. When a visitor who is not logged in clicks Continue, a window first opens with the title “Product notification” and the text “You are not logged in! Would you still like to receive the notification as a guest?”.
They then have two options:
- Continue — they sign up as a guest, without an account.
- Login — they are taken to your shop’s login page.
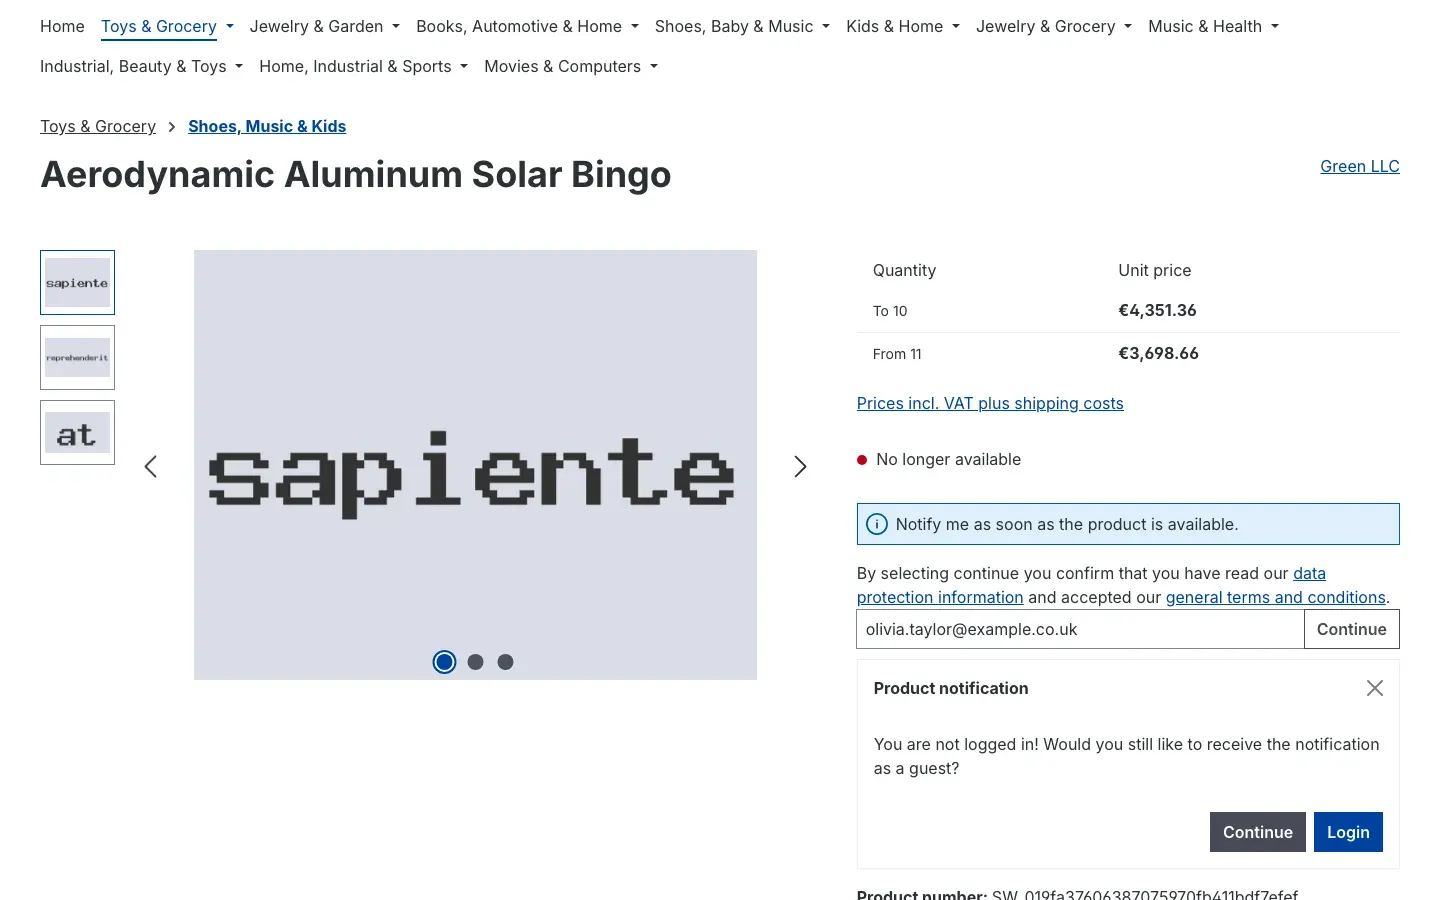 Fig. 4: Visitors who are not logged in decide for themselves whether to sign up as a guest or log in first.
Why this matters to you: logging in is a good moment for creating an account — the customer has a genuine interest right now. At the same time you do not lose anyone who does not want to log in, because the guest route stays open. There is one difference, though: only logged-in customers can see their registrations in the customer account later on (chapter 6).
The confirmation email
After submitting, this message appears on the product page:
Confirm the link in the e-mail we have just sent you. We will then notify you as soon as the product is available again.
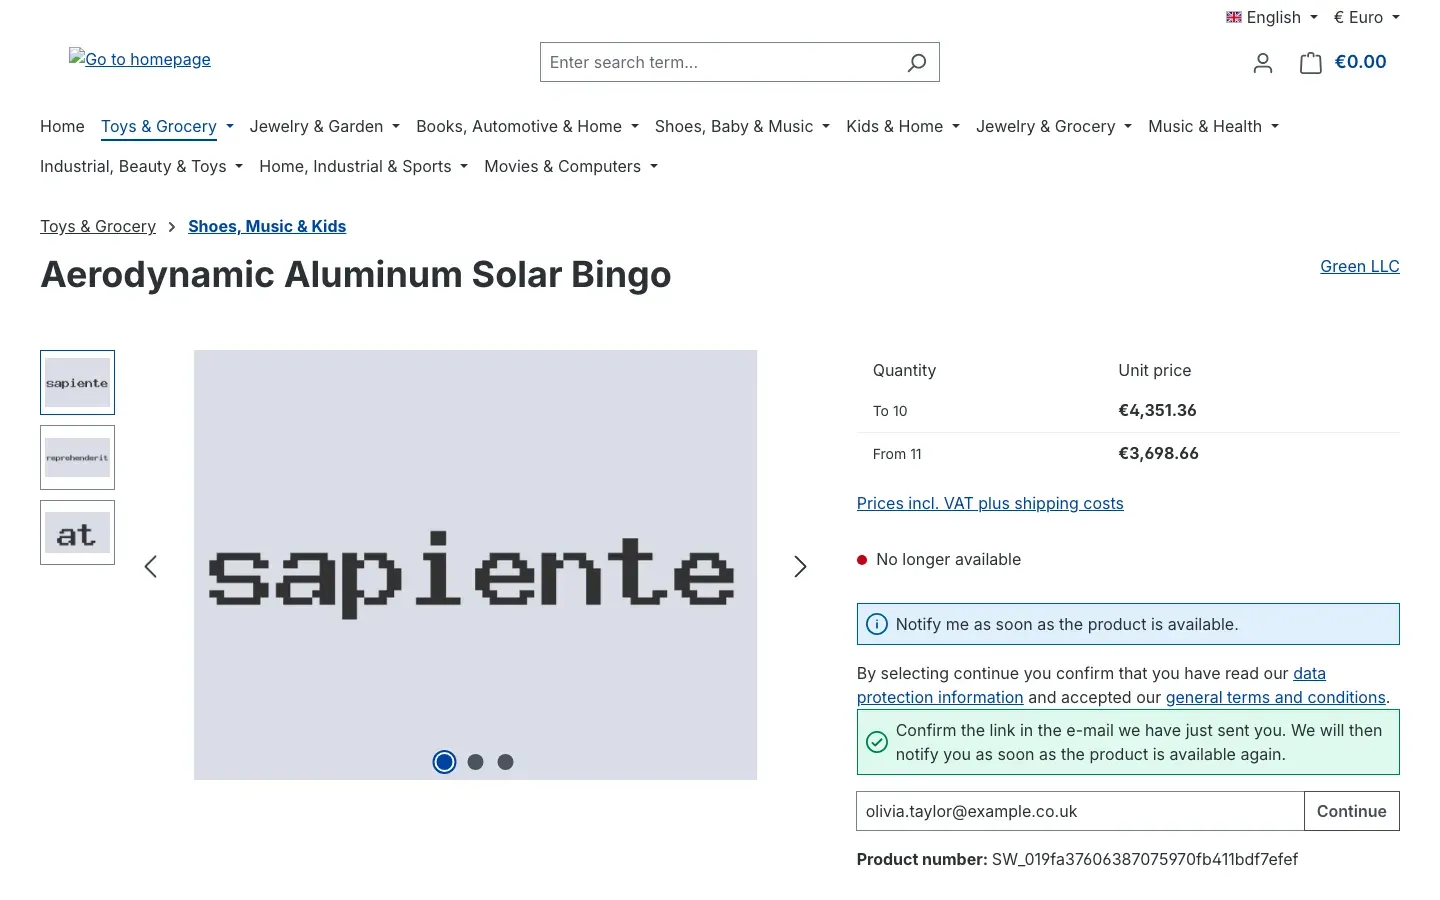 Fig. 5: After submitting, the shop points out that the email confirmation is still missing.
At the same time an email with the subject “Please confirm your e-mail notification” goes to the address that was entered. It contains a confirmation link.
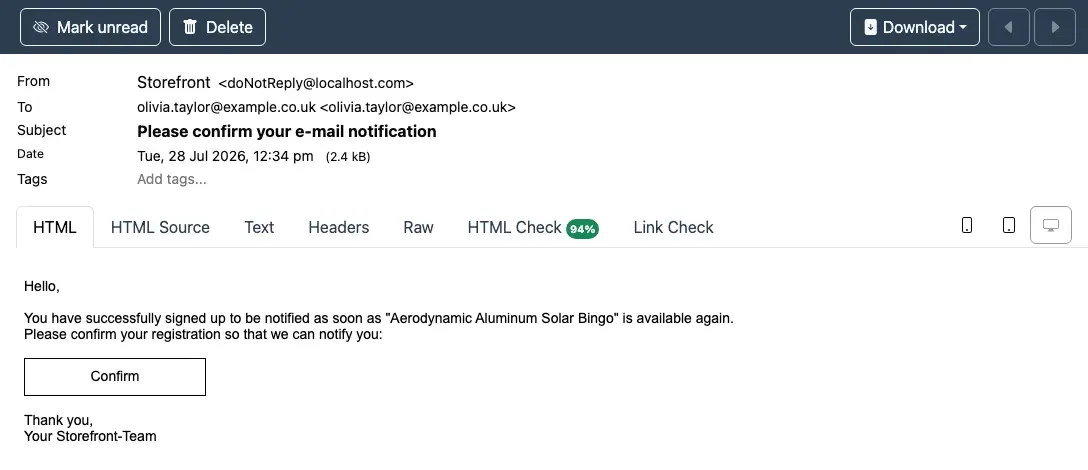 Fig. 6: The confirmation email with the link that makes the registration valid in the first place.
Only once this link has been clicked is the registration valid. The link leads back into the shop, where the customer reads:
Thank you very much! We have saved your request. You will be notified as soon as the product is available again.
This intermediate step is deliberate. It makes sure nobody can be signed up with someone else’s email address — and it keeps your recipient list clean, because only genuine, reachable addresses end up on it.
When no confirmation email arrives
If a customer tries to sign up a second time while their confirmation is still outstanding, the shop replies:
We are already waiting for confirmation via the link in the email.
Immediately below it, the button Resend confirmation email appears. One click sends the confirmation email again; the shop then confirms with “The confirmation email was successfully resent.”.
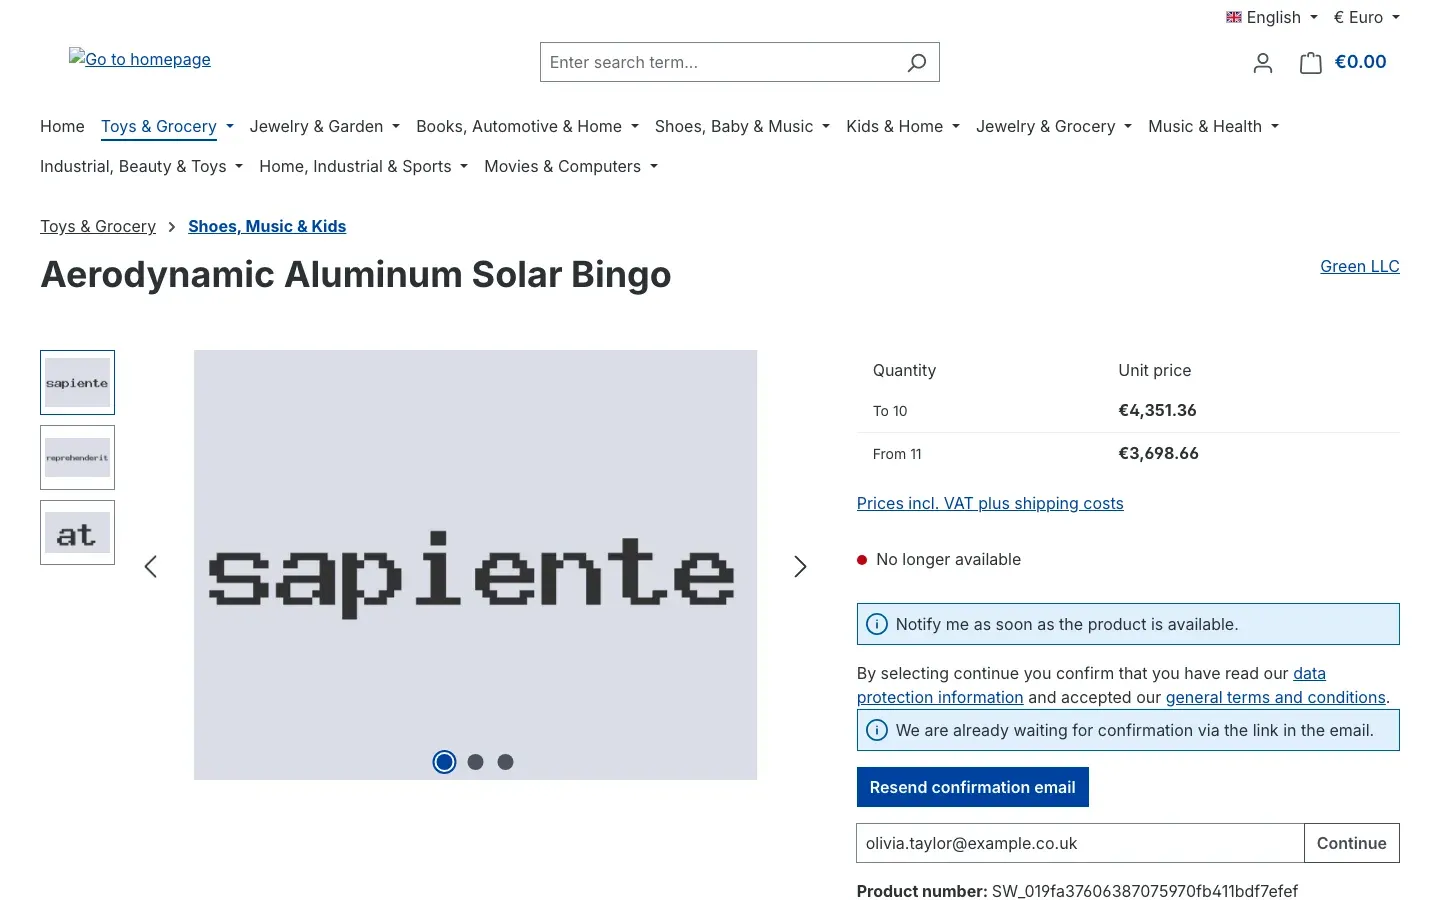 Fig. 7: If the confirmation email does not arrive, customers can have it sent again themselves.
This is your first answer to the most common customer question of all: “I did not get an email.” The customer solves it themselves, without you having to step in.
The availability email
Once the item is back, the actual notification goes out — automatically or triggered by you, depending on your setting. It carries the subject “Your item is available again” and takes the customer straight to the product.
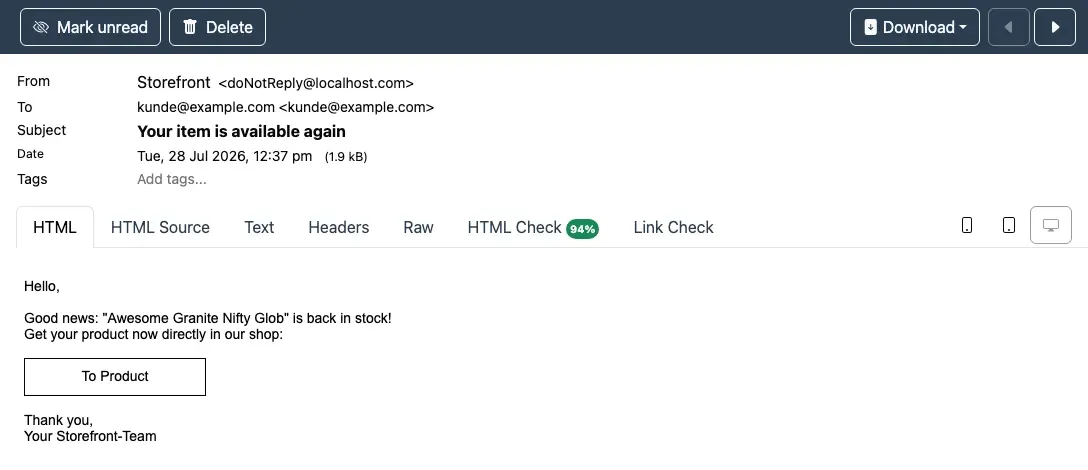 Fig. 8: The message your customer has been waiting for.
Other messages in the shop
Your customers may also come across these messages:
- “Please enter a valid e-mail address” — the entry is not a usable email address, usually a typo.
- “You have already signed up for a notification for this product!” — there is already a registration for this item and this address. There is nothing left to do; the notification will come.
The overview in the customer account
Logged-in customers keep track of their registrations themselves. The customer account navigation contains the entry Product availability notification for this.
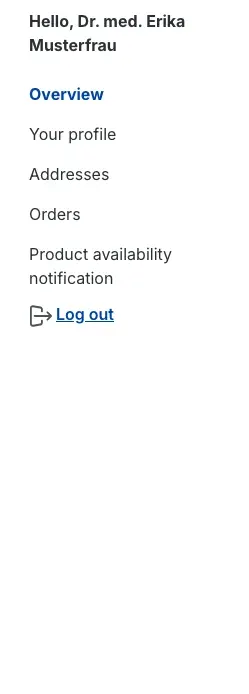 Fig. 9: Customers reach their overview via the account navigation.
The page splits the registrations into two areas:
- “The following products are available again:” — the items for which the notification has already gone out.
- “The following products are not yet available again:” — the registrations that are still waiting for news.
For every row the customer sees the Product, the Product number, the stored email and the date under Registered on. On the far right there is delete: with it, customers remove a registration themselves if they no longer need the item.
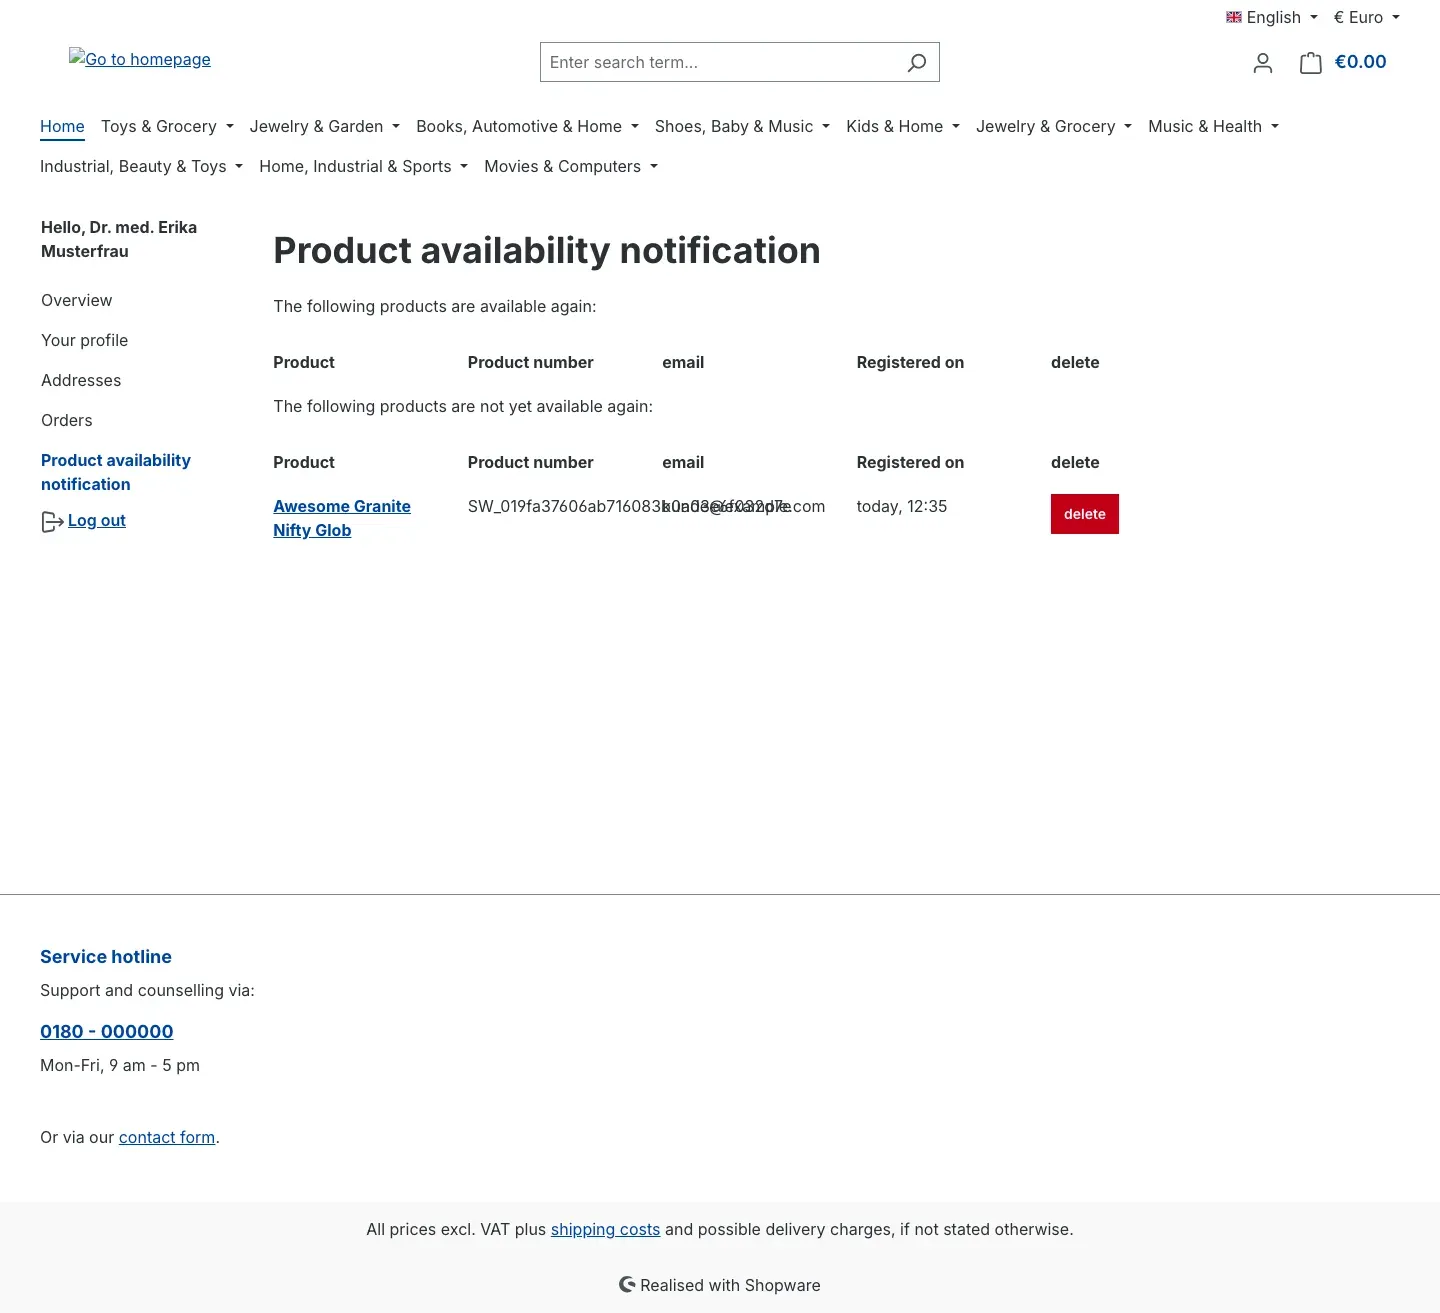 Fig. 10: The overview separates completed registrations from those still pending.
If a customer has no registrations, the page shows “No availability notification.”.
Two things are worth knowing: the entry in the account navigation only appears if the plugin is switched on in the relevant sales channel. And it is only there for logged-in customers — anyone who signed up as a guest does not have such an overview.
Managing notifications in the administration
For you there is a dedicated menu item in the administration: Catalogues → Product availability notification. That is where you see everything your customers have signed up for, and where you send notifications manually.
The product list
The menu item opens a list in which every row stands for one item:
- Product — the product name.
- Product number — the item’s number.
- Registered — how many customers have signed up for this item in total.
- Not already notified — how many of them are still waiting for their message.
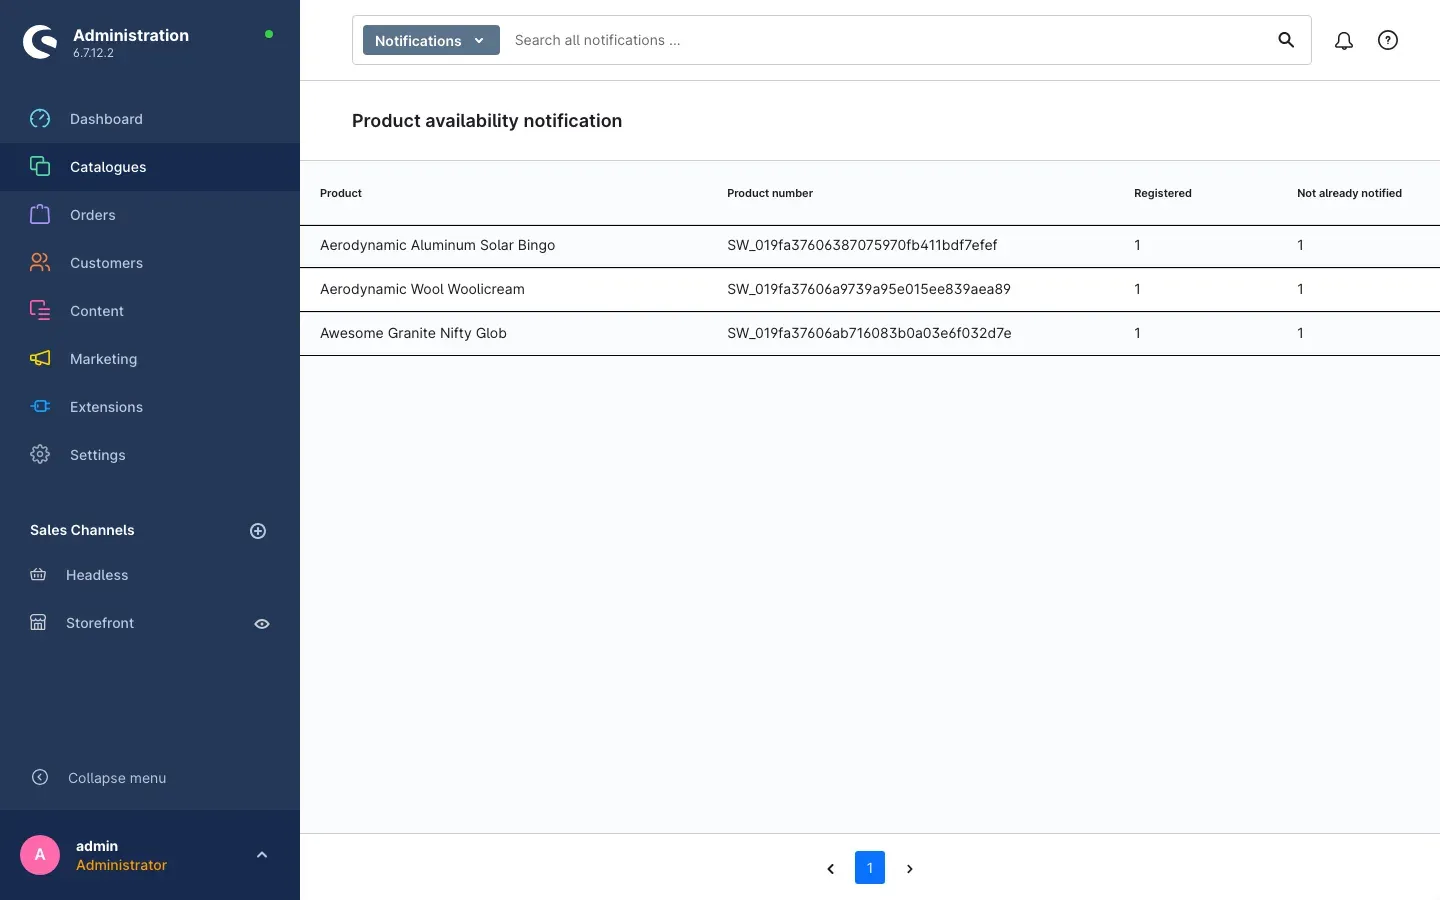 Fig. 11: Every row stands for an item that customers are waiting for.
Use the search bar at the top to search all notifications. If there are no registrations yet, the page reports “There are no notifications yet.”.
What makes this list valuable: the Registered column is an honest demand statistic. What sits at the top is what you should reorder first — that is where most customers are waiting with a finger over the buy button.
Viewing registrations and sending notifications
Clicking a row opens the window Registrations for this product. It lists every single registration for this item with Registered on, E-Mail and Notified. In the Notified column a tick means this customer has already received their message; a dash means it is still pending.
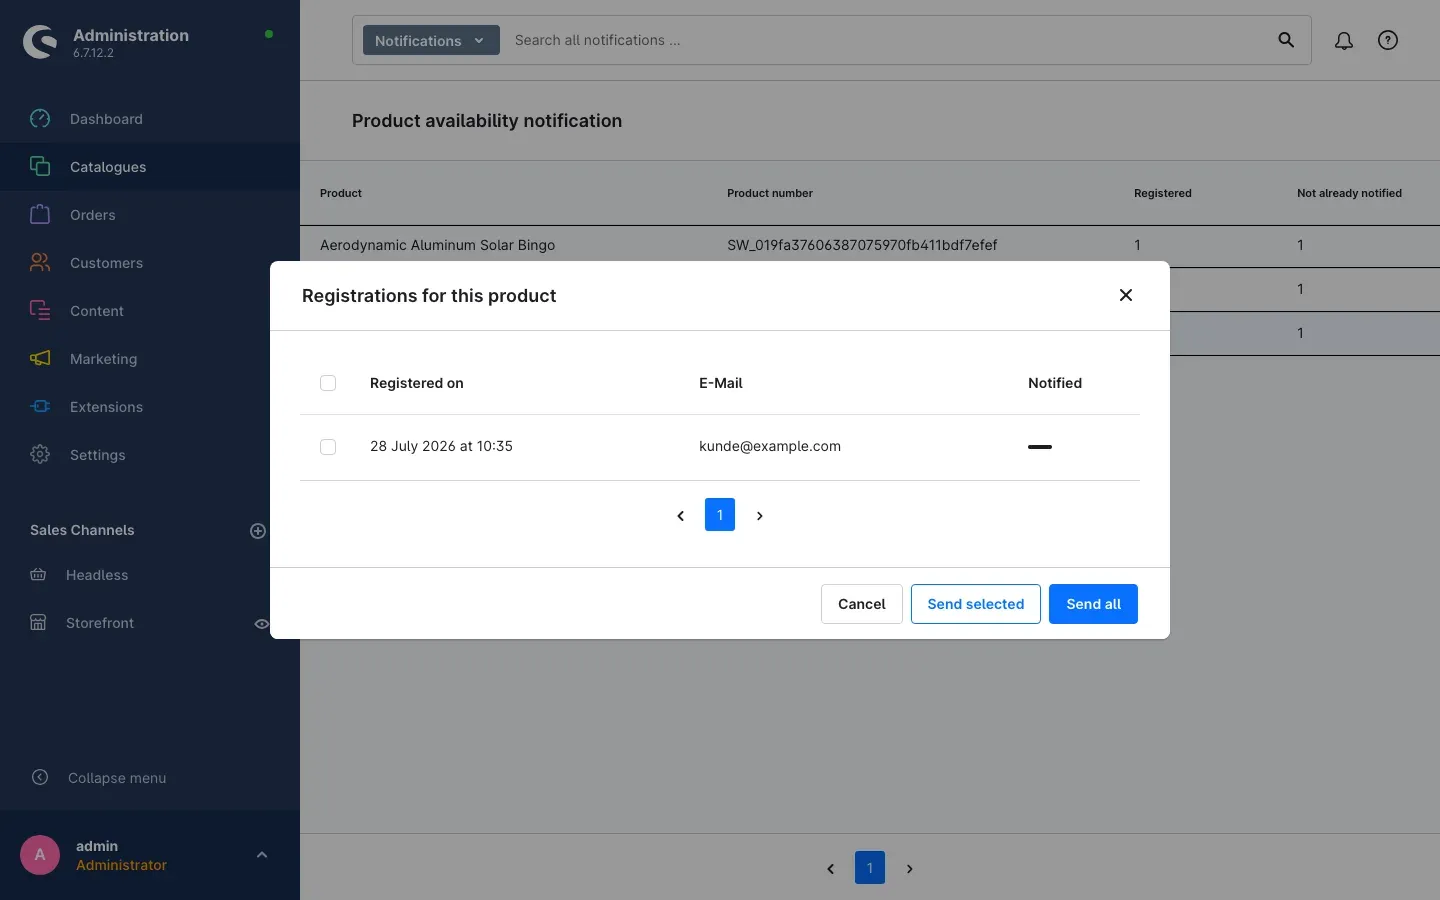 Fig. 12: In the “Registrations for this product” window you see every registration individually and trigger the sending.
At the bottom of the window you have these options:
- Send selected — sends the notification to the rows you have ticked beforehand. This is the way to go when only a partial delivery has arrived and you want to serve the first people in line.
- Send all — sends the notification to every registration for this item.
- Cancel — closes the window without sending anything.
Once sending has finished, the administration confirms it with “One notification has been sent.” or with the number, for example “5 notifications have been sent.”.
Important: customers who have already received their notification are not contacted a second time — not even when you choose Send all. So you cannot break anything. If there is no pending notification left for your selection, the administration tells you so explicitly (section 7.4).
Registrations on the product itself
For a single item you do not have to take the detour via the list. Open the product as usual under Catalogues → Products — there you will find an additional Notifications tab containing the Availability notifications card. It shows the same details, but only for this one item: Registered on, E-Mail and Notified.
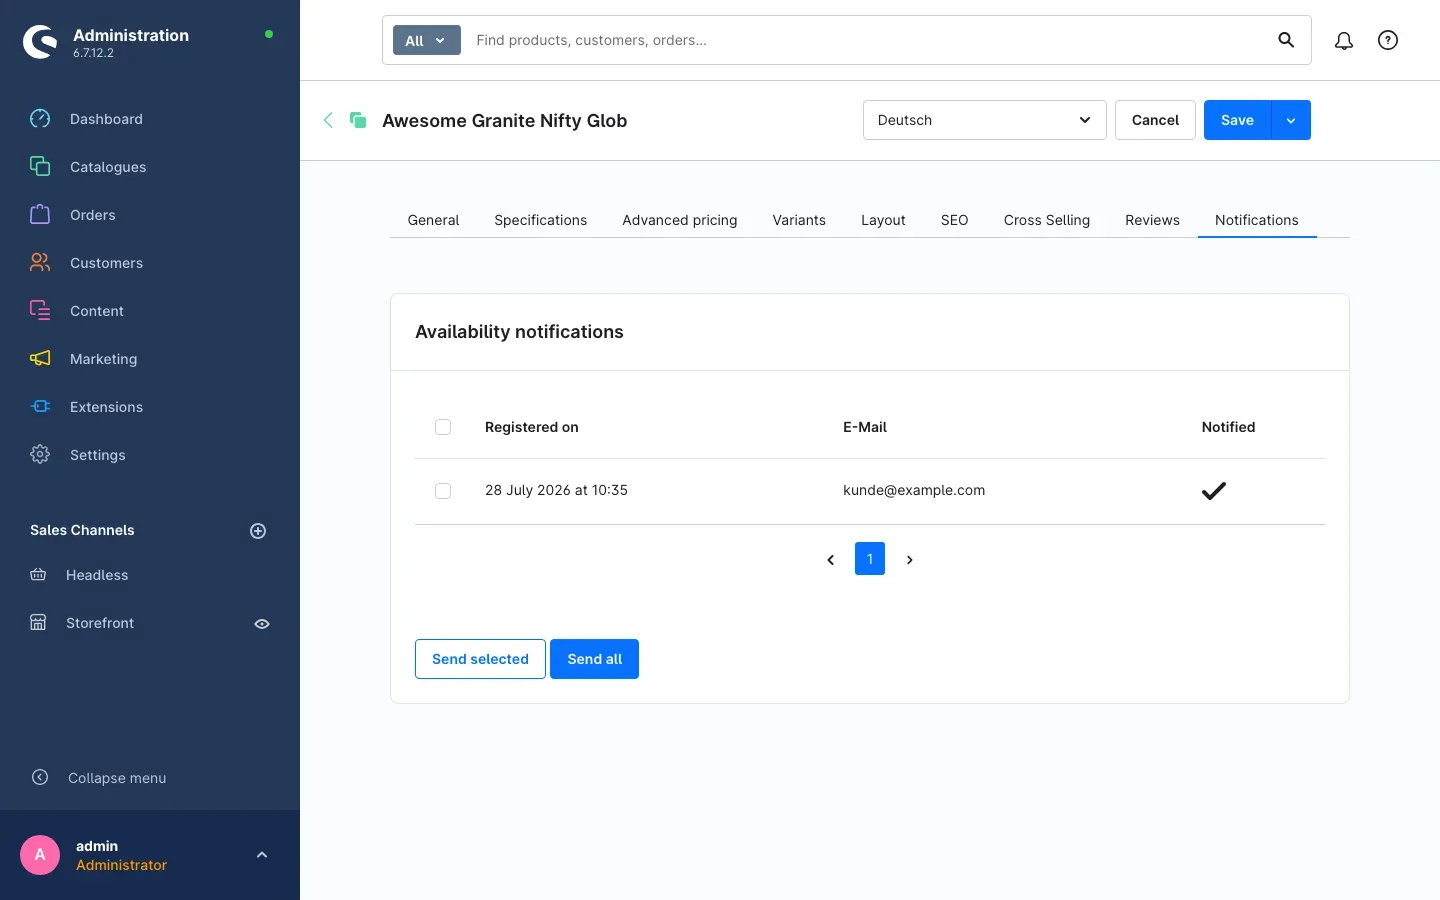 Fig. 13: On the product itself you see immediately how many customers are waiting for exactly this item.
Why this is useful: if you are working on stock levels anyway, one glance tells you whether reordering is worth it.
When nothing was sent
Sometimes you trigger the sending and nothing goes out. The administration always tells you why:
| Message | What you can do |
|---|---|
| ”Please select at least one entry.” | You clicked Send selected without ticking any rows first. Tick the rows you want, or use Send all. |
| ”Nothing was sent: the stock is too low, the product does not count as available yet.” | As far as the shop is concerned, the item is not available yet. Enter the actual stock level and try again. |
| ”Nothing was sent: the availability notification is disabled in the plugin settings.” | The Activate plugin for this channel switch is off. Turn it on in the configuration (chapter 3). |
| ”Nothing was sent: there is no pending notification for this selection.” | All selected customers have already received their message. There is nothing to do. |
| ”Nothing was sent: sending the mail failed. Please check the log and your mailer settings.” | The shop could not send an email. This is down to your shop’s email sending, not to the registrations — see chapter 9. |
| ”The notifications could not be sent. Please check the log.” | An unexpected error occurred while sending. Pass this message on to your administrator or to support. |
Adapting the email texts
Both emails the plugin sends are yours — you can rewrite them completely so they match your tone of voice and your layout. You will find them under Settings → Email templates:
- the confirmation of the registration with the subject “Please confirm your e-mail notification”,
- the availability message with the subject “Your item is available again”.
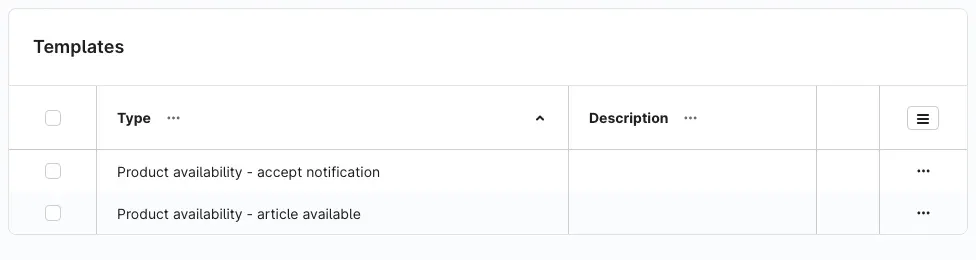 Fig. 14: Both templates sit among the other email templates of your shop.
Both templates are supplied in German, English and Dutch. Your customers receive the message in the language they signed up in. The sender name is the name of the respective sales channel — so the message arrives under the name your customers know.
To adapt a template, open it, change the subject and the text and save. The new text applies from the next send onwards.
Important: be sure to keep the confirmation link in the confirmation email. Without it, nobody can confirm their registration — and without confirmation there will be no notification later on. Use the preview before you save a changed template.
Tip: the actual sending runs through your shop’s email settings, exactly like order confirmations. If your order confirmations arrive, these messages will arrive too.
Troubleshooting
No form appears on the product page
What causes it: one of the three conditions from chapter 4 is missing.
How to fix it: work through them one by one.
- Is the Activate plugin for this channel switch on for exactly this sales channel? Check which channel is selected at the top of the configuration.
- Is the Shopware setting Clearance sale switched on for the item? Without it the item stays orderable and the form never appears.
- Is the available stock really below the item’s minimum order quantity? Pay particular attention to items with a minimum order quantity greater than 1.
- If nothing changes, clear the cache under Settings → System → Caches & indexes.
The customer does not receive a confirmation email
What causes it: almost always the message ends up in the spam folder, or your shop’s email sending is not set up properly.
How to fix it:
- Ask the customer to check their spam or promotions folder.
- Point them to the Resend confirmation email button, which appears on the product page when they sign up again.
- Check your shop’s email settings under Settings → System → Mailer. If your order confirmations do not arrive either, that is where the problem is — not in the plugin.
- Check the template under Settings → Email templates: is the confirmation link still in there?
The shop reports “You have already signed up for a notification for this product!”
What causes it: there is already a registration for this item and this email address.
How to fix it: nothing to do — the notification will come. A logged-in customer can remove the registration in the customer account under Product availability notification using delete if they no longer want it.
The shop reports “We are already waiting for confirmation via the link in the email.”
What causes it: the registration exists, but the confirmation link has not been clicked yet. As long as that is the case, no notification will be sent.
How to fix it: the customer clicks Resend confirmation email and confirms the link in the new message.
The item is back, but nothing goes out automatically
What causes it: usually automatic sending is not switched on, or the stock is not really positive.
How to fix it:
- Check the Customer gets notified automatically switch in the configuration — for the right sales channel.
- Check the item’s stock. It has to be genuinely positive.
- Automatic sending runs in the background and can take a moment. Wait briefly and reload the list under Catalogues → Product availability notification.
- If nothing changes, let your administrator know: background sending depends on your shop’s message queue, which has to be running (chapter 11).
- As an immediate solution you can always send the notifications manually (chapter 7).
Sending in the administration stops with a message
What causes it: the administration always tells you the reason in plain language.
How to fix it: the table in section 7.4 lists every message together with the matching solution.
The entry is missing from the customer’s account navigation
What causes it: either the plugin is not switched on in this sales channel, or the customer is not logged in.
How to fix it: check the Activate plugin for this channel switch. The entry is deliberately only there for logged-in customers; anyone who signed up as a guest does not see it.
Frequently asked questions
Q: Do I have to configure something for every single item?
A: No. You switch the plugin on once per sales channel. Whether the form appears then follows automatically from the stock level and the Clearance sale setting of the item in question.
Q: Can visitors without a customer account sign up as well?
A: Yes. They are asked whether they want to log in or continue as a guest, and can choose either. Only the overview in the customer account is reserved for logged-in customers.
Q: Is anyone contacted without being asked?
A: No. Every registration has to be confirmed via a link in an email. Without that confirmation no notification goes out.
Q: Will a customer receive the message more than once?
A: Not by default — every registration leads to exactly one notification. Only if you switch on Should the customer be able to get notified again after a period of time? can a registration take effect again later. The minimum interval you enter in minutes then prevents messages in quick succession.
Q: Can I send the notifications only once the goods are really on the shelf?
A: Yes. Leave Customer gets notified automatically switched off. The shop then collects the registrations and you trigger the sending under Catalogues → Product availability notification whenever it suits you.
Q: I only received a partial delivery. Can I contact just some of the customers?
A: Yes. Open the Registrations for this product window, tick the rows you want and click Send selected.
Q: In which language does the customer receive the email?
A: In the language they signed up in. The templates are supplied in German, English and Dutch.
Q: Can I change the text of the emails?
A: Yes, completely. Both templates are under Settings → Email templates and can be edited like any other template in your shop. Just leave the confirmation link in the confirmation email.
Q: What happens to the registrations when a customer deletes their account?
A: They are removed together with the account — including registrations that are still unconfirmed. You do not have to take care of that.
Q: Can I use the plugin in one channel and not in another?
A: Yes, that is exactly what the per-sales-channel setting is for. You select the channel at the top of the configuration and set the switches separately for each channel.
Q: Can I see which items my customers are waiting for?
A: Yes. The list under Catalogues → Product availability notification shows, per item, how many customers have signed up under Registered. That is a good basis for your reordering.
For administrators / technical details
This section is aimed at technical administrators. You do not need it for day-to-day work with the plugin.
System requirements
- Shopware: 6.7 or newer
- PHP: 8.2 or newer
Automatic sending and the message queue
Automatic sending is tied to the shop’s message queue and runs asynchronously. This is deliberate: stock changes often arrive in bulk from an ERP or import run, and sending mail synchronously would slow such runs down.
Practical consequence: automatic sending requires the shop’s queue to actually be processed. If it stands still, the jobs pile up without any error message appearing in the administration. Manual sending from the administration is not affected by this.
Console command for a cron job
In addition, a console command is available that sends pending notifications:
bin/console productavailabilitynotification:cronIt is well suited as a regular cron job — for example in environments where stock levels are updated by an overnight import and the notifications are meant to go out at a fixed time.
Data protection
When a customer account is deleted, the plugin automatically removes the associated registrations and any outstanding confirmations along with it. No manual clean-up is needed.
Uninstalling
When uninstalling, the Shopware option for keeping user data applies. If you keep the data, the collected registrations remain in place and are available again after a re-installation. If you decide against it, they are removed together with the uninstall.
This manual was created for Product availability notification version 6.7.0.
More manuals
Admin Password Reminder
Admin Password Reminder: your backend users renew their passwords on time, prompted after login and by a daily email. Premium locks expired accounts until the password is changed.
Open manual Shopware 6Age Check
Tobacco, spirits, knives: visitors who do not confirm their age never see the restricted items at all. You tick a box per product, the plugin hides it everywhere.
Open manual Shopware 6AI Media Labelling
AI labelling for images and videos: flag a media item once in the media manager and the badge with your notice appears wherever it shows up in your shop. No template work needed.
Open manualNeed a team that keeps your shop running?
We have been maintaining Shopware shops for more than 20 years, including updates, hotfixes and the plugins you are configuring right now.