Product configurator
Sell configurable items without building a variant for every combination: shoppers pick options with surcharges on the product page and the price updates as they choose.
On this page
- Introduction
- What this plugin does for you
- Who is this plugin for?
- Installation
- Getting started
- Open and check the settings
- Create the selection fields and the choices
- Bundle groups into a set
- Check the result in the shop
- Settings
- Configuration Channel
- Display the configuration in the shop
- Other Settings
- Cart Settings
- How to set up your configurator
- How to create a selection field (group)
- How to create choices with surcharges (options)
- How to bundle groups into a set
- How to assign a configuration to a product
- How to change many options at once
- How to import and export assignments
- What your customers see
- Choosing on the product page
- Carrying the choice into the cart
- The configurator on a smartphone
- The configuration in the order
- The configuration on invoices and delivery notes
- Troubleshooting
- No option selection appears on the product page
- A single choice is missing in the shop
- The surcharge does not show up in the price breakdown
- The surcharge is charged too often or not often enough
- The previous selection is still there after closing the cart
- The “configurable” badge is missing in the listing
- The Product configurator entry is missing from the Catalogues menu
- Shipping costs look too high for configured items
- FAQ
- For administrators / technical details
- System requirements
- Installation via the command line
- Bundled console commands
- Permissions for editor roles
- Import and export
- Uninstalling
Introduction
The Product configurator lets you sell customisable items without creating a separate variant for every possible combination.
Your customers choose the properties they want directly on the product page — the colour and size of a T-shirt, for example. Surcharges are calculated and displayed instantly, and the chosen configuration travels with the order all the way to the invoice and the delivery note.
What this plugin does for you
- You avoid the variant explosion. Instead of maintaining a separate record for every colour and size combination, you create the choices once and assign them to as many products as you like.
- You earn from extra wishes. Every choice can carry a surcharge — a larger size, a special colour, an engraving.
- Your customers see the price immediately. Below the product image, the shop shows how the price is made up of the item price and the selected surcharges.
- Configurable items stand out. In your category and search result lists, such items can be marked with a configurable badge.
- The selection reaches your documents. Cart, order, invoice and delivery note list every chosen option separately — your warehouse and your accounting know exactly what to do.
- You decide per sales channel. If you run several shops, you enable the configurator only where you need it.
Who is this plugin for?
Anyone selling items with choices: clothing and promotional goods retailers, furniture and kitchen suppliers, print shops, manufacturers of made-to-measure parts, sellers of personalised gifts. No technical knowledge is required — everything is set up in the Shopware Administration.
Installation
After your purchase the plugin is available in your Administration straight away — there is nothing to download.
- Log in to your Shopware Administration (
YourShop.com/admin) - Open Extensions → My extensions
- Find the Product configurator entry and click Install
- Switch on the toggle to the left of the entry — the plugin is now active
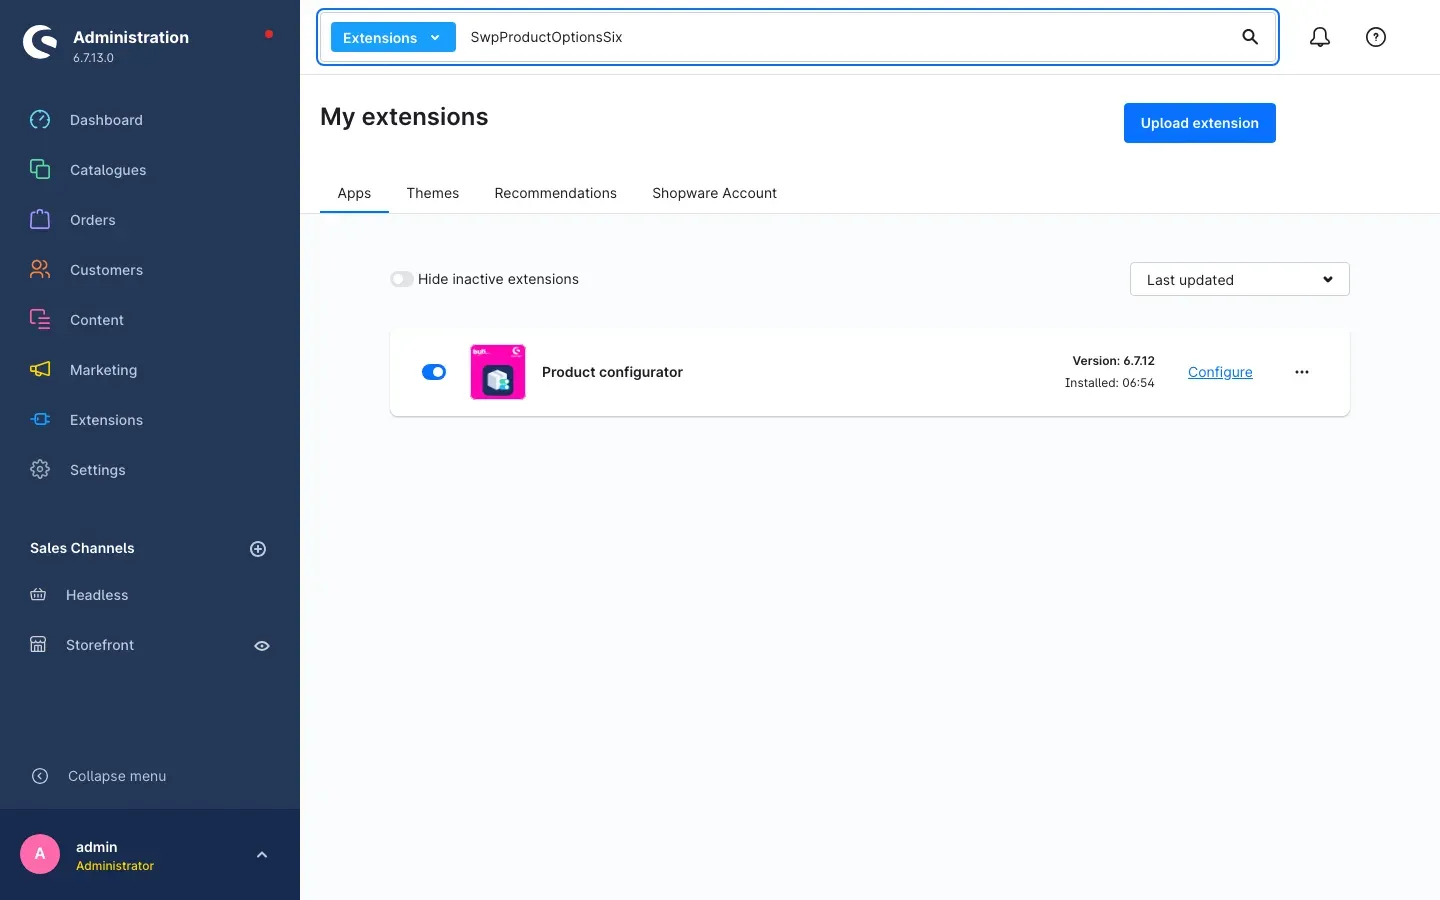 Fig. 1: The activated entry in My extensions. On the right you can see the version and the Configure link.
Note: If Product configurator does not appear in the list, your Shopware account is not yet connected to this shop. You can connect it under Extensions → My extensions on the Shopware Account tab.
Once activated, two new places appear in your Administration:
- The main menu entry Catalogues → Product configurator, where you manage sets, groups and options.
- An additional Product configurator tab on every product.
A note on the interface language: The Administration is fully translated, with one exception. On the group detail page the label above the selection field reads Fieldtyp instead of Field type, and the same wording appears as a column heading on the Product configurator tab of a product. This is purely cosmetic — the field works exactly as described in this manual. In the group overview list the heading is correctly shown as Field type.
Getting started
The quickest route to a working configurator takes four steps. Allow about 15 minutes.
Open and check the settings
Open Extensions → My extensions and click Configure to the right of the Product configurator entry.
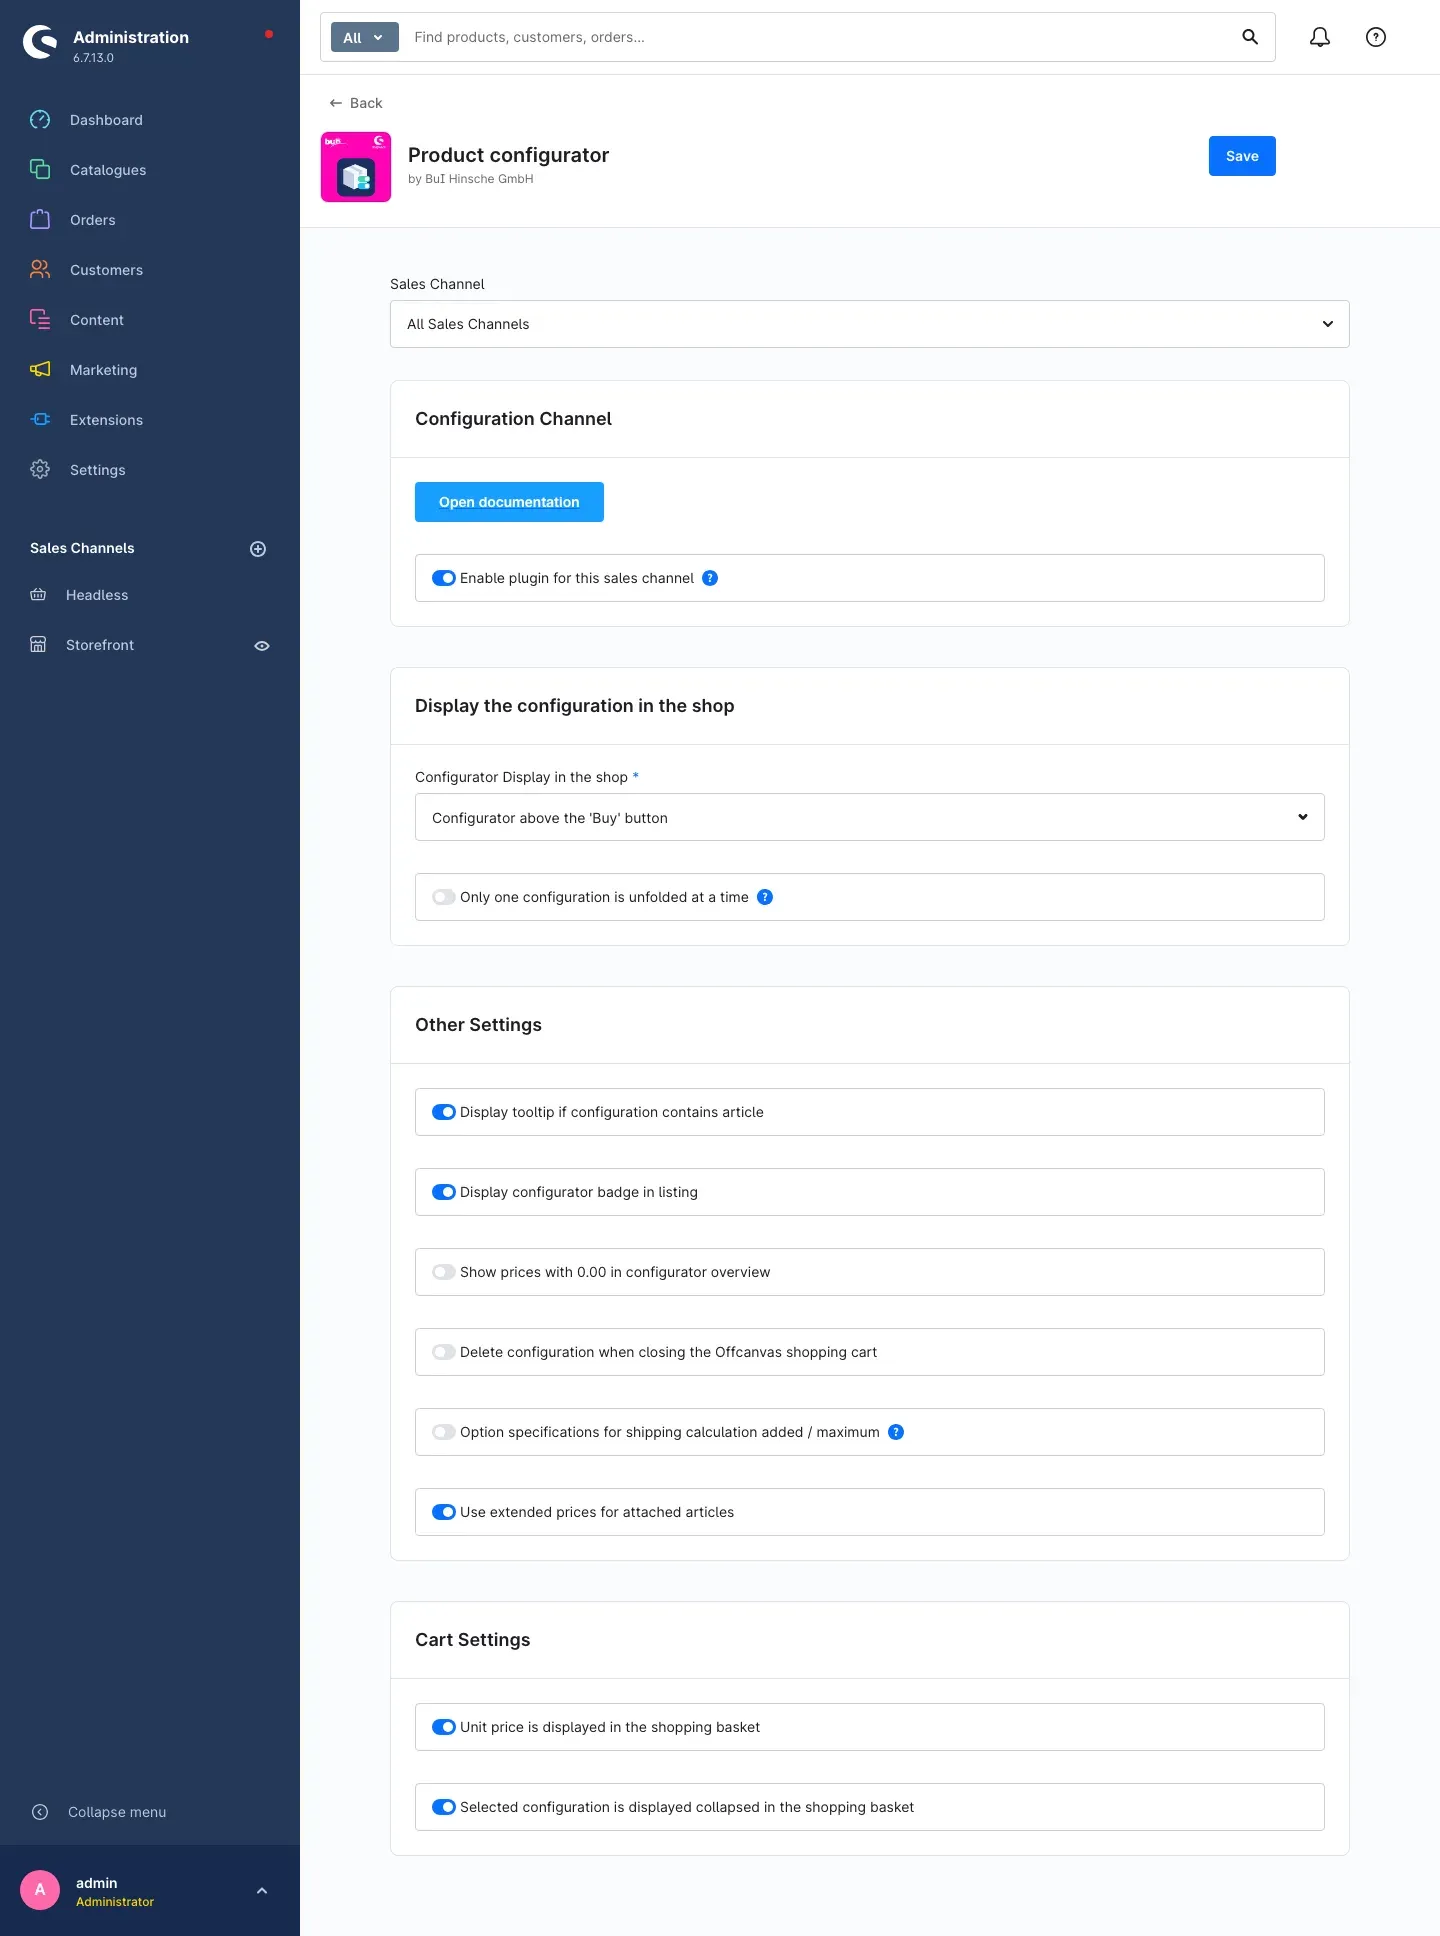 Fig. 2: The configuration page with its four areas: Configuration Channel, Display the configuration in the shop, Other Settings and Cart Settings.
To begin with you can leave all defaults as they are. Just make sure Enable plugin for this sales channel is switched on. Settings explains what the other settings do.
Create the selection fields and the choices
Under Catalogues → Product configurator you first create a group (a selection field in the shop, for example “Colour”) and then the individual options for it (the choices “Red”, “Blue”, “Black”). How to set up your configurator covers each step.
Bundle groups into a set
A set combines several groups — for example “Colour” and “Size” into Standard-Konfiguration. The set is the template you later use to equip many products in one go.
Check the result in the shop
Assign the set to a product and open the product page in your shop. Above the Add to shopping cart button you now see the heading option selection with your selection fields, and below the product image the breakdown Calculation of your configuration:.
Settings
You reach the settings via Extensions → My extensions and the Configure link next to the Product configurator entry.
At the very top, the Sales Channel field decides which shop the settings apply to. All Sales Channels sets the baseline for your whole installation; select an individual channel instead and you override that baseline for exactly that shop. Changes only take effect once you click Save in the top right.
The Open documentation button at the top of the first card takes you to the current online version of this manual at any time.
Configuration Channel
Enable plugin for this sales channel
Enable plugin for this sales channel decides whether the configurator works at all in the shop selected above. When switched off it stays completely inactive: no options on the product page and no option line items in the cart. The switch is on by default.
Why this is useful: You run a B2B and a B2C channel and want to offer configuration to business customers first. Switch the configurator off for the consumer shop without uninstalling the plugin or losing any data.
Display the configuration in the shop
Configurator Display in the shop
Configurator Display in the shop determines where the selection fields appear on the product page and whether they are already expanded when the page opens. There are four choices:
- Configurator above the ‘Buy’ button — the selection fields sit directly above the Add to shopping cart button and everything is visible immediately. This is the default and suits most shops.
- Configurator collapsed above the ‘Buy’ button — same position, but the fields start collapsed. Useful when there are many selection fields, so the buy button does not get pushed far down the page.
- Configurator under Media / Buy Container — the selection gets its own wide area below the product image and the buy box. Good for elaborate configurations with images and long descriptions.
- Configurator collapsed under Media / Buy Container — the same wide area, collapsed at first.
Why this is useful: With two or three selection fields, customers want to see them right away. With twelve, the page would become an endless list — that is where the collapsed variant or the separate area further down pays off.
Only one configuration is unfolded at a time
If you chose one of the collapsed display modes above, Only one configuration is unfolded at a time makes every other selection field close as soon as one is opened. Customers work through the configuration step by step. The switch is off by default, so any number of fields may be open at once.
Why this is useful: In a long configuration — carcass, front, handle, fittings, plinth — customers keep their bearings because only one step is in front of them at a time.
Other Settings
Display tooltip if configuration contains article
An option can bring along real articles from your catalogue — a mounting kit that is automatically included with the choice “with wall bracket”, for instance. With Display tooltip if configuration contains article switched on, the shop reveals that content in a small note reading this option contains: as soon as the customer hovers over the choice. The switch is on by default.
Why this is useful: Customers understand what they are paying the surcharge for without you having to repeat it in every description — and you get fewer questions about what is included.
Display configurator badge in listing
Display configurator badge in listing adds a configurable badge to every configurable item in your category pages and search results. The switch is on by default.
Why this is useful: Customers can tell from the listing alone which items they can put together themselves. That drives clicks towards exactly the items with the highest margin.
Show prices with 0.00 in configurator overview
Options without a surcharge normally do not appear in the Calculation of your configuration: breakdown — only the entries that actually cost something are listed. Show prices with 0.00 in configurator overview also lists the free choices, with an amount of €0.00. The switch is off by default.
Why this is useful: If you want to make it obvious that a certain feature is included at no extra cost, this setting shows it. If you prefer a lean breakdown reduced to the essentials, leave it off.
Delete configuration when closing the Offcanvas shopping cart
After a customer has added a configured item, the shopping cart slides in from the right. Delete configuration when closing the Offcanvas shopping cart decides what happens when they close that panel again: switched on, the selection fields on the product page are cleared; switched off, the last selection stays in place. The switch is off by default.
Why this is useful: If your customers typically order several variations in a row — three T-shirts in three colours — keeping the selection saves clicks. For one-off items, switching it on prevents the same thing being ordered twice by accident.
Option specifications for shipping calculation added / maximum
You can store dimensions and a weight for every option. Option specifications for shipping calculation added / maximum decides how those values feed into the shipping calculation: switched on, the values of all selected options are added together; switched off, only the highest value counts. The switch is off by default.
Why this is useful: For options that mean additional goods (three extra boards), adding up is correct. For options that only make the same parcel bigger (length 1 m or 2 m), the highest value is correct — otherwise you charge your customers too much for shipping.
Use extended prices for attached articles
When an option brings along a real article from your catalogue, that article may have its own scale prices and customer group prices. With Use extended prices for attached articles the configurator uses exactly those stored prices instead of only the base price. The switch is on by default.
Why this is useful: Your trade prices and volume discounts apply even when the article is sold as part of a configuration — you do not have to maintain the discounts twice.
Cart Settings
Unit price is displayed in the shopping basket
Unit price is displayed in the shopping basket shows the individual amount next to each selected option in the cart. The switch is on by default.
Why this is useful: Customers see in black and white how their price is composed, which reduces cart abandonment. If you would rather communicate a single total, switch the individual amounts off.
Selected configuration is displayed collapsed in the shopping basket
With Selected configuration is displayed collapsed in the shopping basket, the selection appears in the cart as a collapsed Product Configuration area that customers can expand if they wish. Switched off, the full list is shown immediately. The switch is on by default.
Why this is useful: With extensive configurations the cart stays tidy and the route to checkout stays short. With only two choices you may as well show them straight away.
How to set up your configurator
All of the following happens under Catalogues → Product configurator. This area has three tabs at the top: Sets, Groups and Options.
Remember the order — it follows from how the pieces fit together:
- A group is a selection field in the shop (“Colour”).
- An option is a single choice within that field (“Blue”, +€2.50).
- A set bundles several groups into a template (“Standard-Konfiguration”).
- You then assign the set to a product.
The running example is the product Customisable T-Shirt with the groups Colour (Red, Blue +€2.50, Black +€2.50) and Size (S, M, L +€3.00, XL +€5.00).
How to create a selection field (group)
What this does for you: The group determines how customers choose — from a drop-down list, via selection buttons, with tick boxes or as free text. It also carries the heading and the explanatory text shown above the selection in the shop.
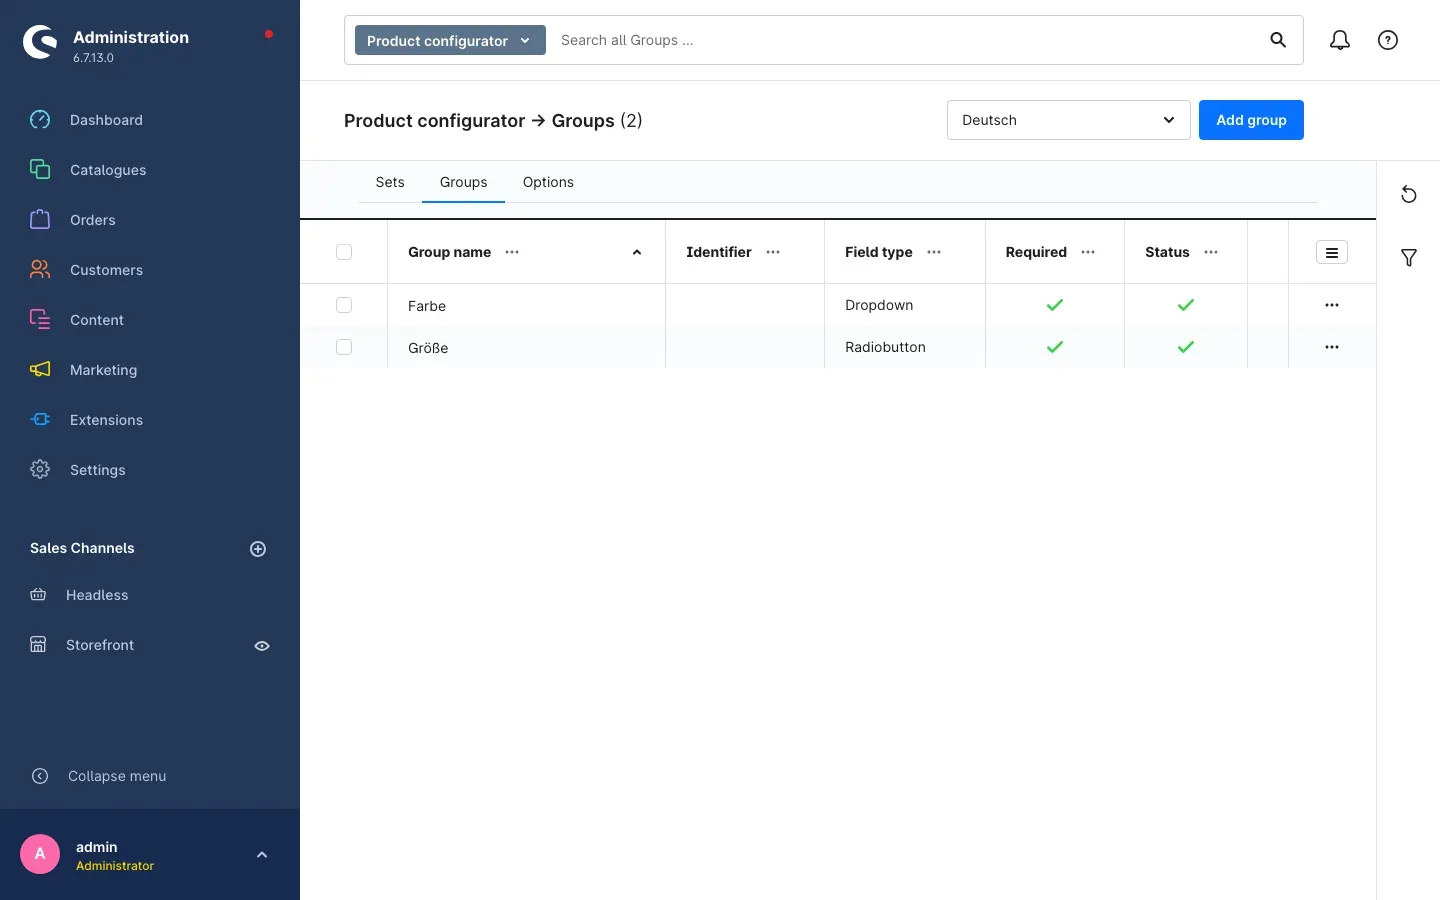 Fig. 3: The Groups tab with the two example groups and their field types.
Step by step
- Go to Catalogues → Product configurator and open the Groups tab
- Click Add group in the top right
- Fill in the Group information area:
- Group name: the heading shown above the selection in the shop — for example
Colour. This field is mandatory. - Short description: one sentence shown in the shop directly below the heading — for example
Choose your size. - Long description: a longer, formatted text that customers can expand via the help icon
- Group name: the heading shown above the selection in the shop — for example
- Define in the Settings area how the choice is made
- Click Save in the top right
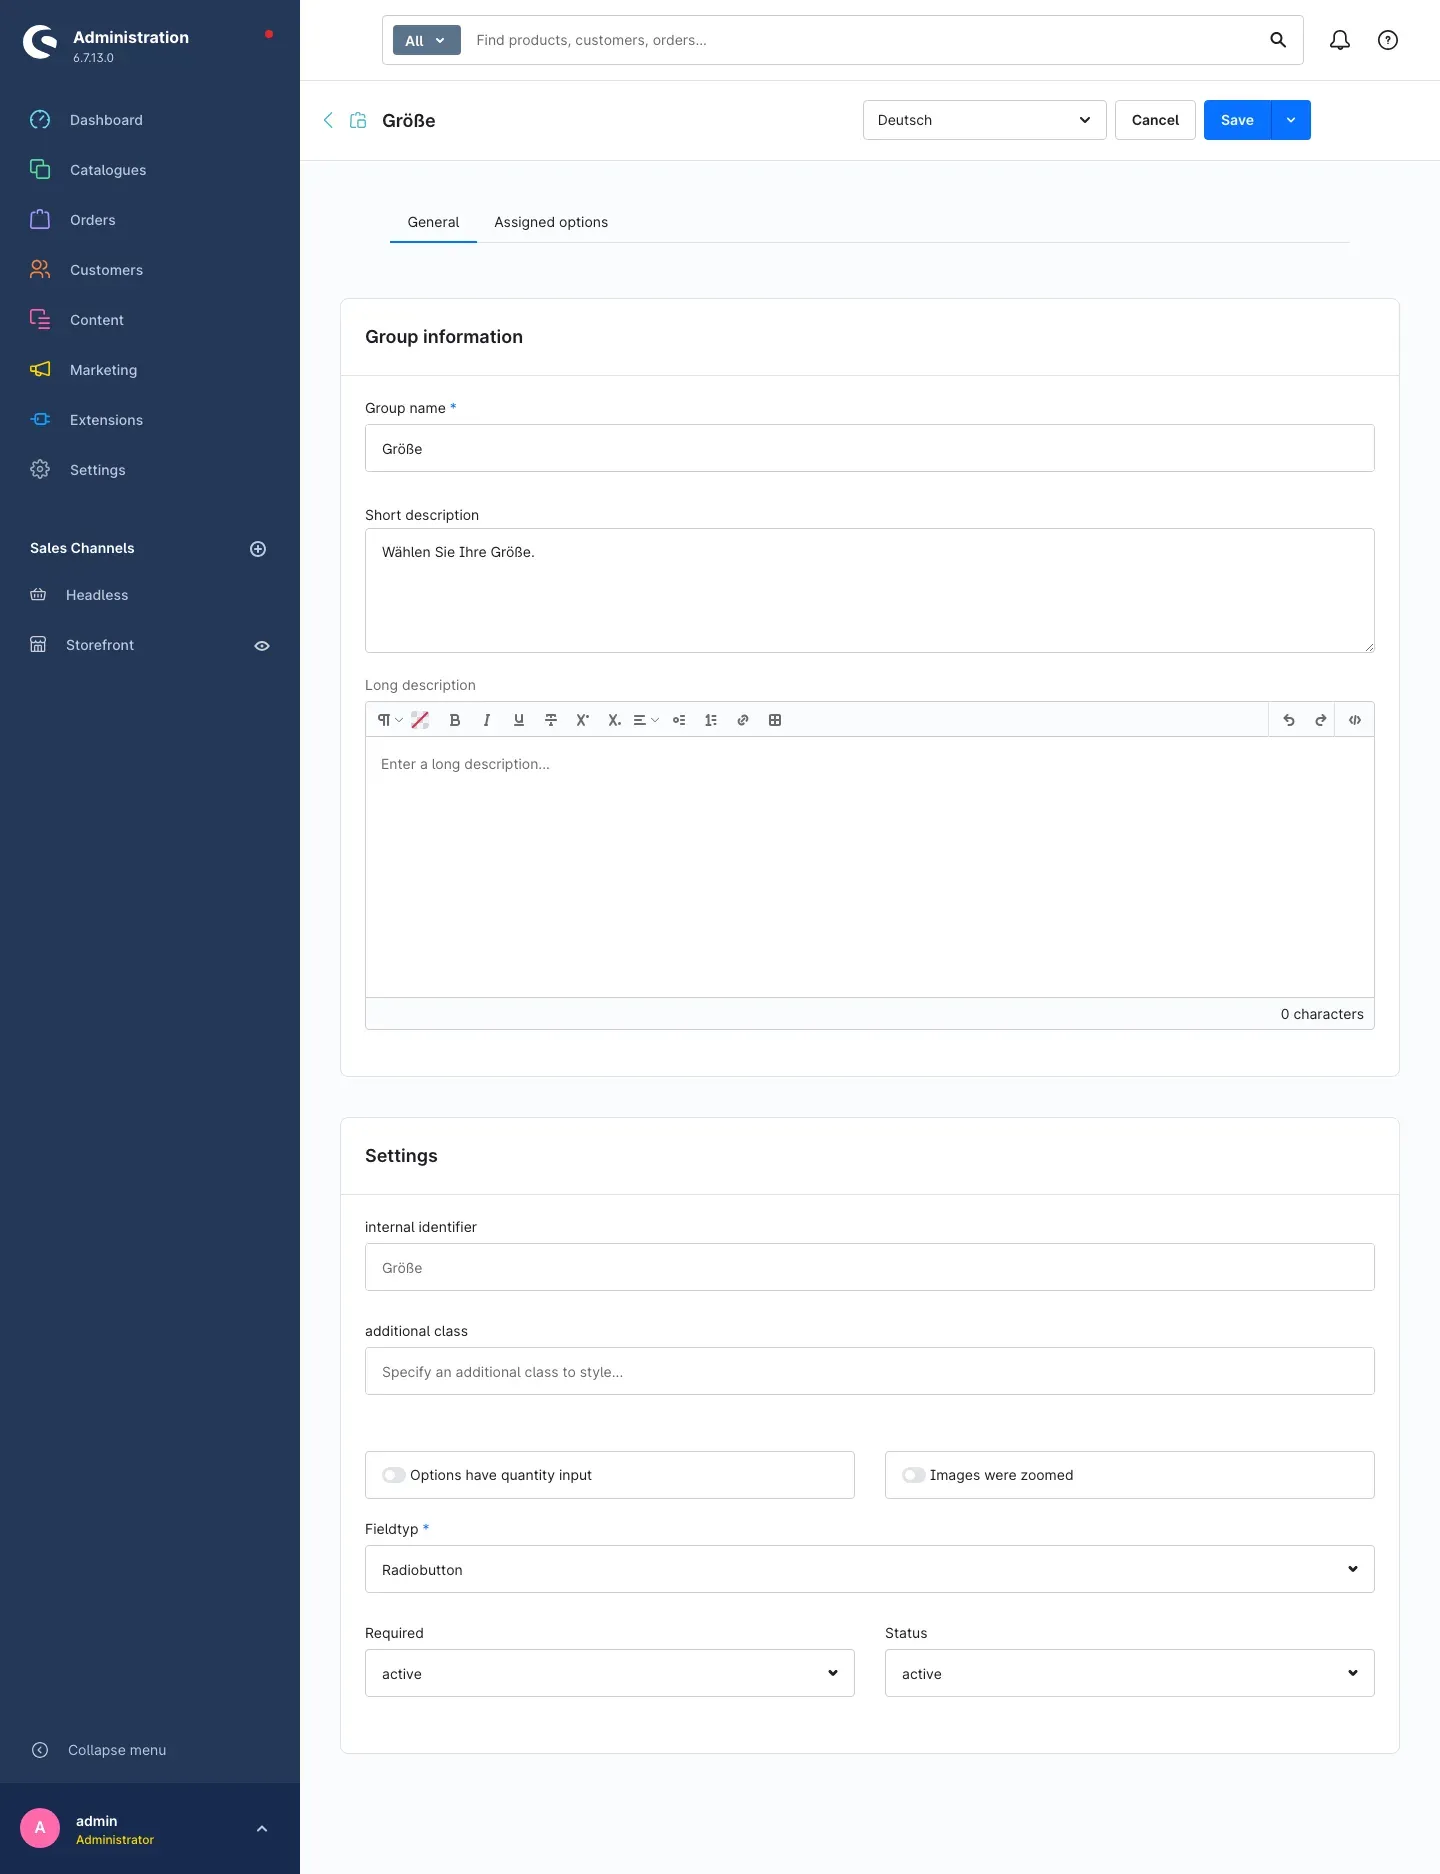 Fig. 4: The Größe (Size) group — descriptive texts at the top, the type of selection below.
Choosing the type of selection
In the Settings area, Fieldtyp determines what the selection field looks like in the shop:
- Dropdown — an expandable list. Space-saving, ideal from about five choices upwards (in the example: Colour).
- Radiobutton — all choices are listed below one another and exactly one can be selected. Ideal up to about five choices, because customers see everything at a glance (in the example: Size).
- Checkbox — multiple selection with tick boxes, for accessories where any number may be added.
- Textfield and Textarea — free text entry for engravings, names or custom wording. Textarea offers several lines.
- Numberfield and Quantityfield — entry of a value, such as a length in centimetres or a number of pieces.
- Colorpicker — customers pick a shade from a colour picker.
- Datepicker — selection of a date, for example a preferred delivery day or an event date.
- Parentgroup and Productgroup — for layered configurations in which one group contains further groups or real articles from your catalogue.
Alongside that you set:
- Required — set to
active, customers must make a choice here before they can add the item to the cart. In the shop the heading then carries a small superscript 1 and the note Is required appears below the selection. - Status — set to
inactive, the group disappears from the shop without you having to delete it. Handy for seasonal selection fields. - Options have quantity input — every choice additionally gets a quantity field, for example “5 × spare key”.
- Images were zoomed — stored option images can be enlarged in the shop.
- internal identifier — a short name shown only in the Administration that helps you tell similarly named groups apart. Customers never see it.
- additional class — only relevant if your agency needs a hook for special styling.
Tip: Keep the Group name short and plain (“Colour”, not “Colour selection of the textile body”). It appears in the shop as the heading above the selection and shows up again later in the cart, the order and the invoice.
How to create choices with surcharges (options)
What this does for you: Options are what your customers actually click. This is where you store the surcharge, the image and the description — and where you earn from every extra choice.
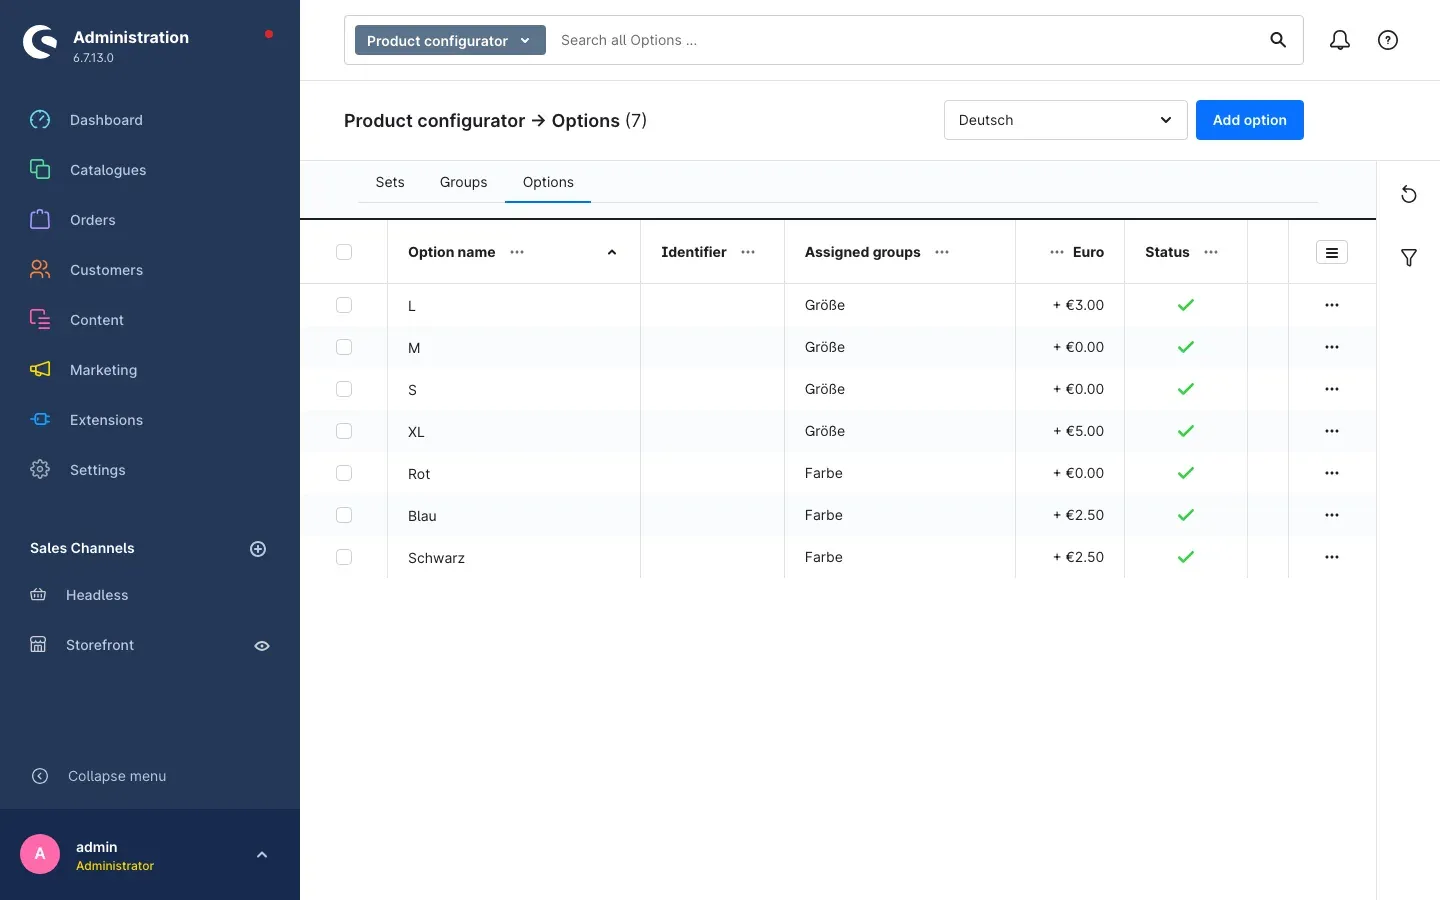 Fig. 5: The Options tab with all seven example options. The Euro column shows the surcharge, the Assigned groups column shows which selection field the option belongs to.
Step by step
- Go to Catalogues → Product configurator and open the Options tab
- Click Add option in the top right
- Enter in the Option information area:
- Option name: the text customers read in the selection — for example
XL. This field is mandatory. - Short description and Long description: explanatory text shown next to or below the selection in the shop
- Option name: the text customers read in the selection — for example
- Enter the surcharge in the Prices area (see below)
- Upload an image in the Media area if you want customers to see one for this choice
- Click Save in the top right
- Finally, assign the option to a group — either here on the Assigned groups tab or from the group via Add option
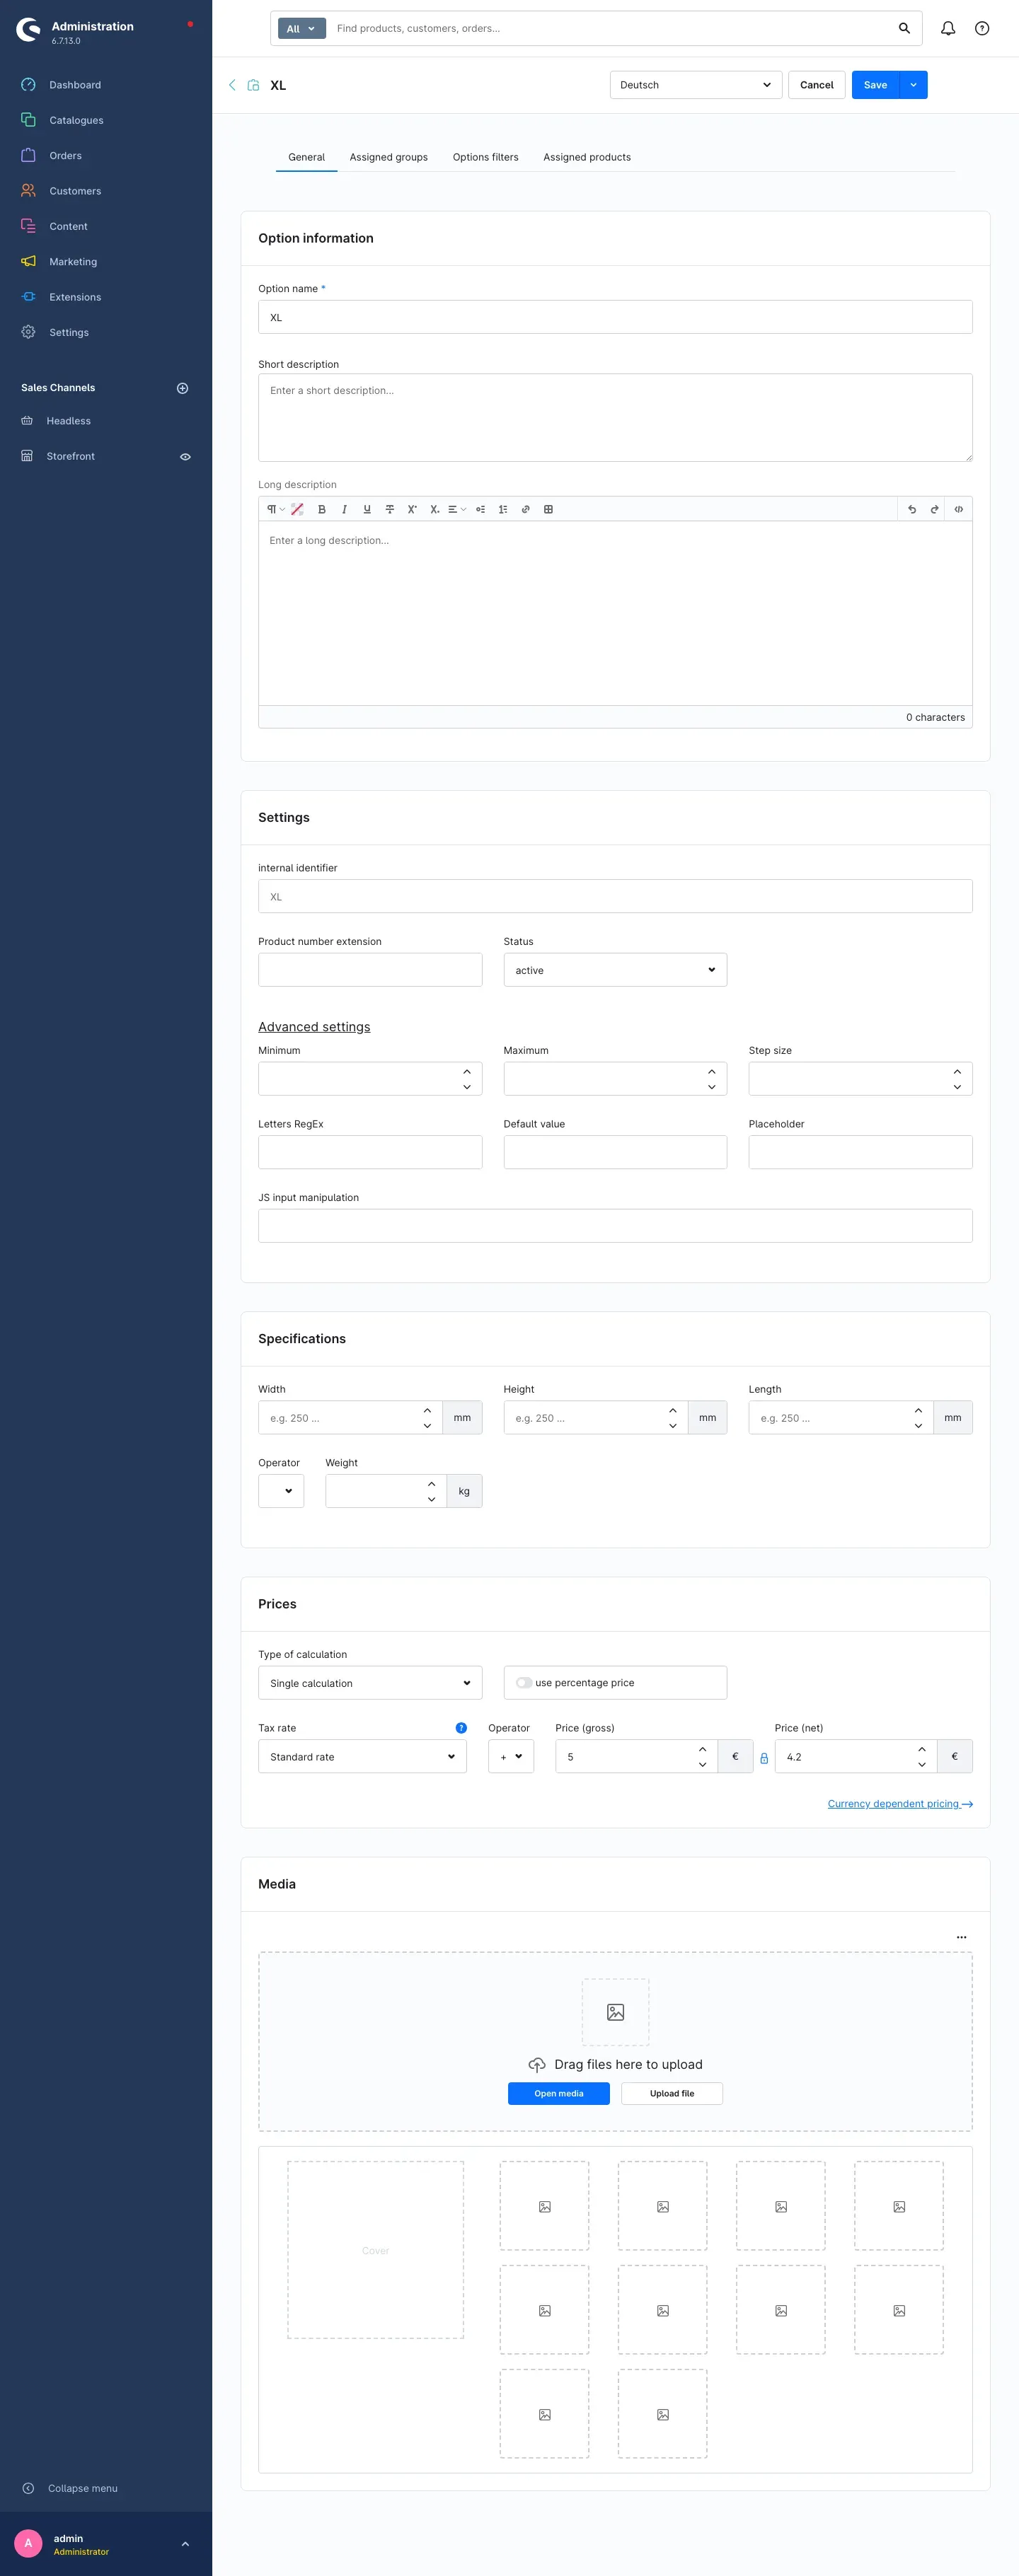 Fig. 6: The XL option — the Prices area holds a gross surcharge of €5.00.
Setting the surcharge
The Prices area defines what the choice costs:
- Type of calculation decides how often the surcharge applies. With Single calculation it is charged exactly once per order line, no matter how many pieces the customer buys — right for set-up costs or a one-off print template. With Multi calculation it applies to every piece — right for material consumed per item. Formula calculation is intended for special cases where the price is derived from entered values.
- Operator determines whether the amount is added to the item price (
+) or deducted from it (-). A minus gives a discount for a simpler specification. - Price (gross) and Price (net) — enter one of the two and the other is calculated using the selected Tax rate.
- use percentage price calculates the surcharge as a percentage of the item price instead. Useful when a finishing option should cost more on an expensive item.
- Currency dependent pricing lets you store different amounts for additional currencies.
Important: The Tax rate in this area only serves to convert conveniently between gross and net. Billing always uses the tax rate of the product the option is assigned to.
Other useful details on an option
- Product number extension appends a suffix to the product number of the order line as soon as this option is chosen. Your warehouse or ERP system can then recognise the specification straight from the number.
- The Specifications area holds the Width, Height, Length and Weight of the option. These values feed into the shipping calculation — exactly how is controlled by the Option specifications for shipping calculation added / maximum setting from Settings.
- Under Advanced settings you can constrain entries in text and number fields: Minimum, Maximum and Step size. Default value and Placeholder give the customer a starting value or a hint inside the empty field. The remaining fields in this area are meant for technical special cases and stay empty in normal operation.
- On the Assigned products tab you store real articles from your catalogue that are automatically supplied with this choice.
Tip: Deliberately create options without a surcharge as well — Red, S and M in the example. Without them customers would have no free baseline to choose from, and a mandatory field could not be satisfied without extra cost.
How to bundle groups into a set
What this does for you: A set is your template. Instead of clicking together “Colour” and “Size” on every product, you simply pick the set — with fifty T-shirts that saves you fifty rounds of manual work.
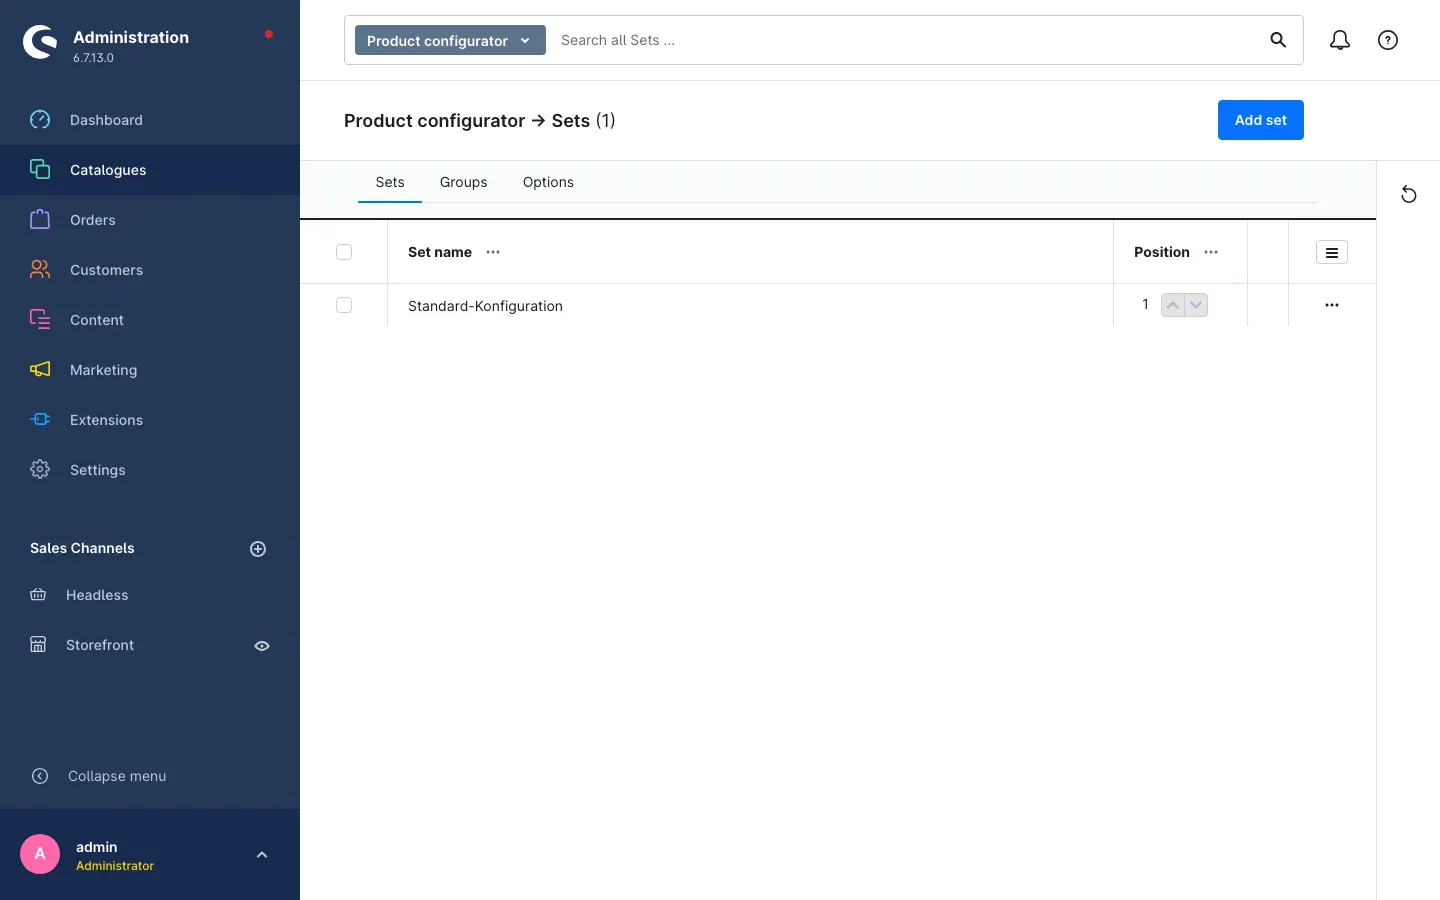 Fig. 7: The Sets tab with the example set Standard-Konfiguration.
Step by step
- Go to Catalogues → Product configurator and open the Sets tab
- Click Add set in the top right
- Enter the Set name under Set information — for example
Standard-Konfiguration. This name appears only in the Administration, never in the shop. - In the selection field under Group Assignment, pick the groups that belong to this set one after another
- Use the arrows in the Position column to put the groups into the order in which they should appear in the shop
- Click Save in the top right
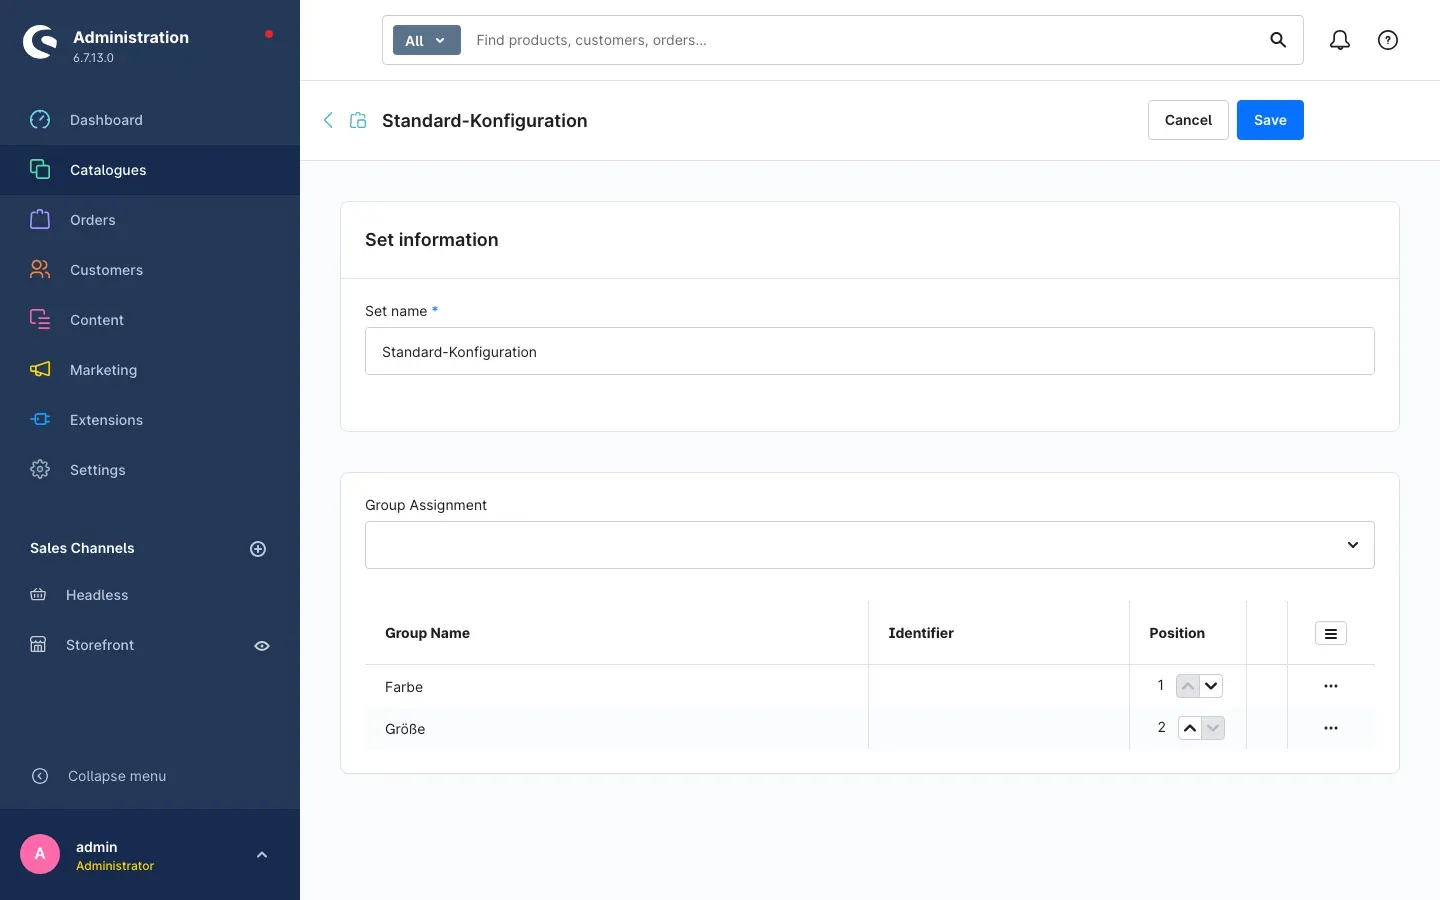 Fig. 8: The set Standard-Konfiguration with the assigned groups Farbe (Colour, position 1) and Größe (Size, position 2).
Tip: Position controls the order on the product page. Put the decision your customer makes first at the top — usually colour before size, material before finish.
How to assign a configuration to a product
What this does for you: Only this step makes your item configurable in the shop. After it, customers see the selection fields on the product page.
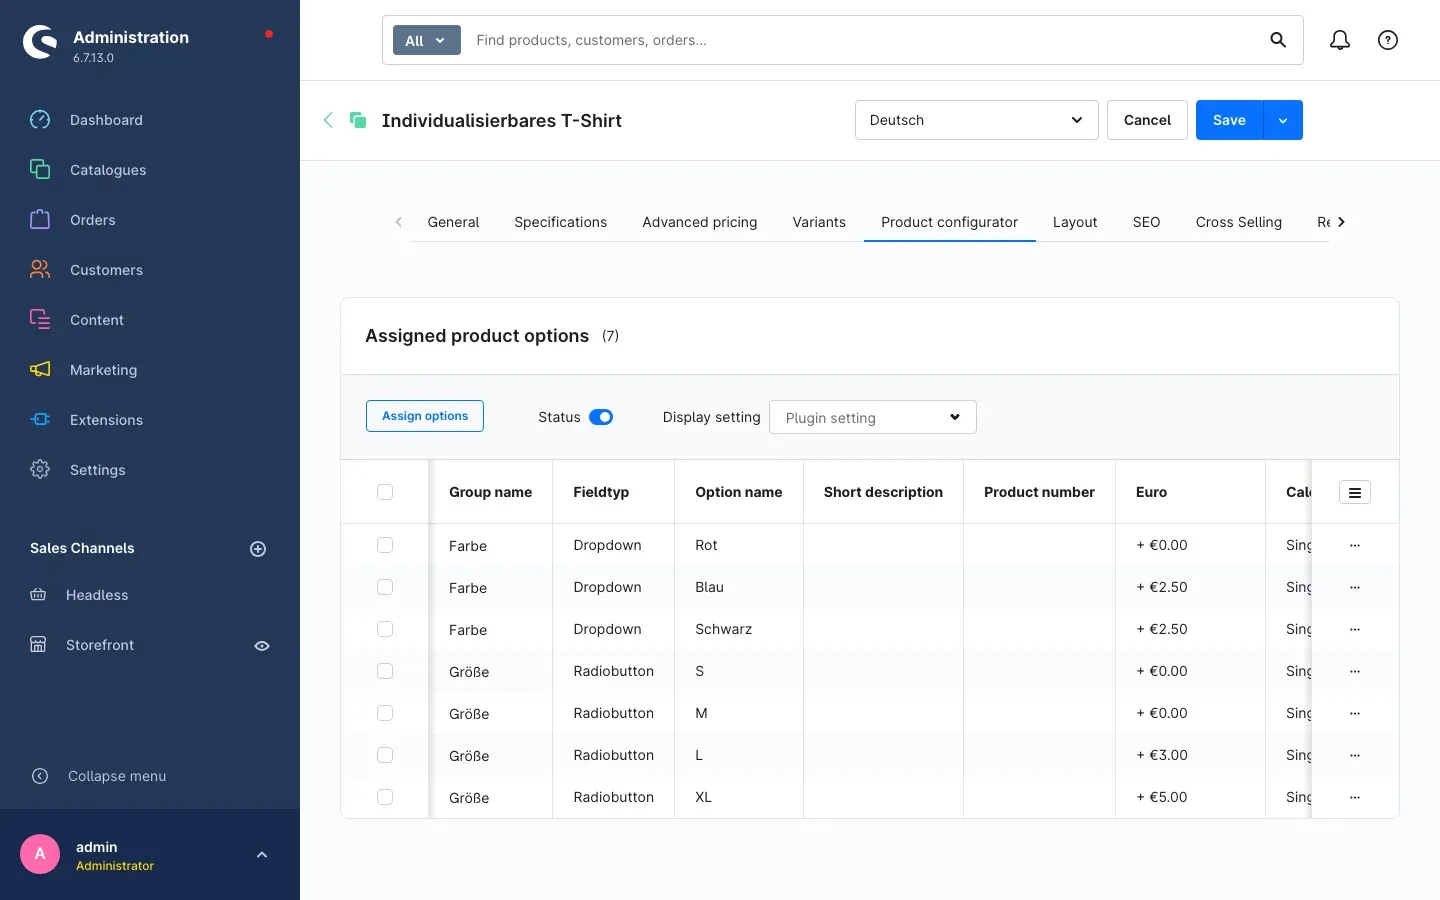 Fig. 9: The Product configurator tab on the product Individualisierbares T-Shirt with all seven assigned options.
Step by step
- Open Catalogues → Products and select your product
- Switch to the Product configurator tab
- Click Assign options
- In the Assign groups and options window, first select the set you want. Then either take over the whole template with Assign all options or tick individual groups and options — that way an item that does not come in black never offers that choice.
- Click Save assignment. The shop then shows you under Note how many options will be added or removed — confirm with Save.
- Check that the Status switch in the toolbar is on. It enables and disables the configurator for this one product.
- Save the product in the top right
Overriding the display for this product only
Next to the Status switch in the toolbar sits the Display setting field. As long as it shows Plugin setting, whatever you configured in Settings applies. For this one product you can deviate and choose Over buy button, Collapsed over buy button, Options under Media / Buy or Collapsed under Media / Buy.
Why this is useful: Your standard item has three selection fields and shows them openly. Your made-to-order item has fifteen — only that one gets the collapsed presentation.
Fine-tuning individual assignments
Via the … context menu at the right-hand end of a row, Edit option opens a window in which you override the details for this one product only — a different Option name, another Short description or a specific Product number extension. If a field shows the hint inherited from option, the central value from How to set up your configurator still applies.
Preselection determines which option is already selected when the product page opens. For products with variants, Inherit to variants controls whether all variants receive the same configuration; Cancel inheritance and Restore inheritance switch that off and on again for an individual variant.
Important: Always check the product page in your shop after assigning. If no option selection appears there, Troubleshooting will help.
How to change many options at once
What this does for you: A price increase for all engravings, deactivating a whole colour range, a new image for twenty options — instead of opening every record individually you do it in one pass.
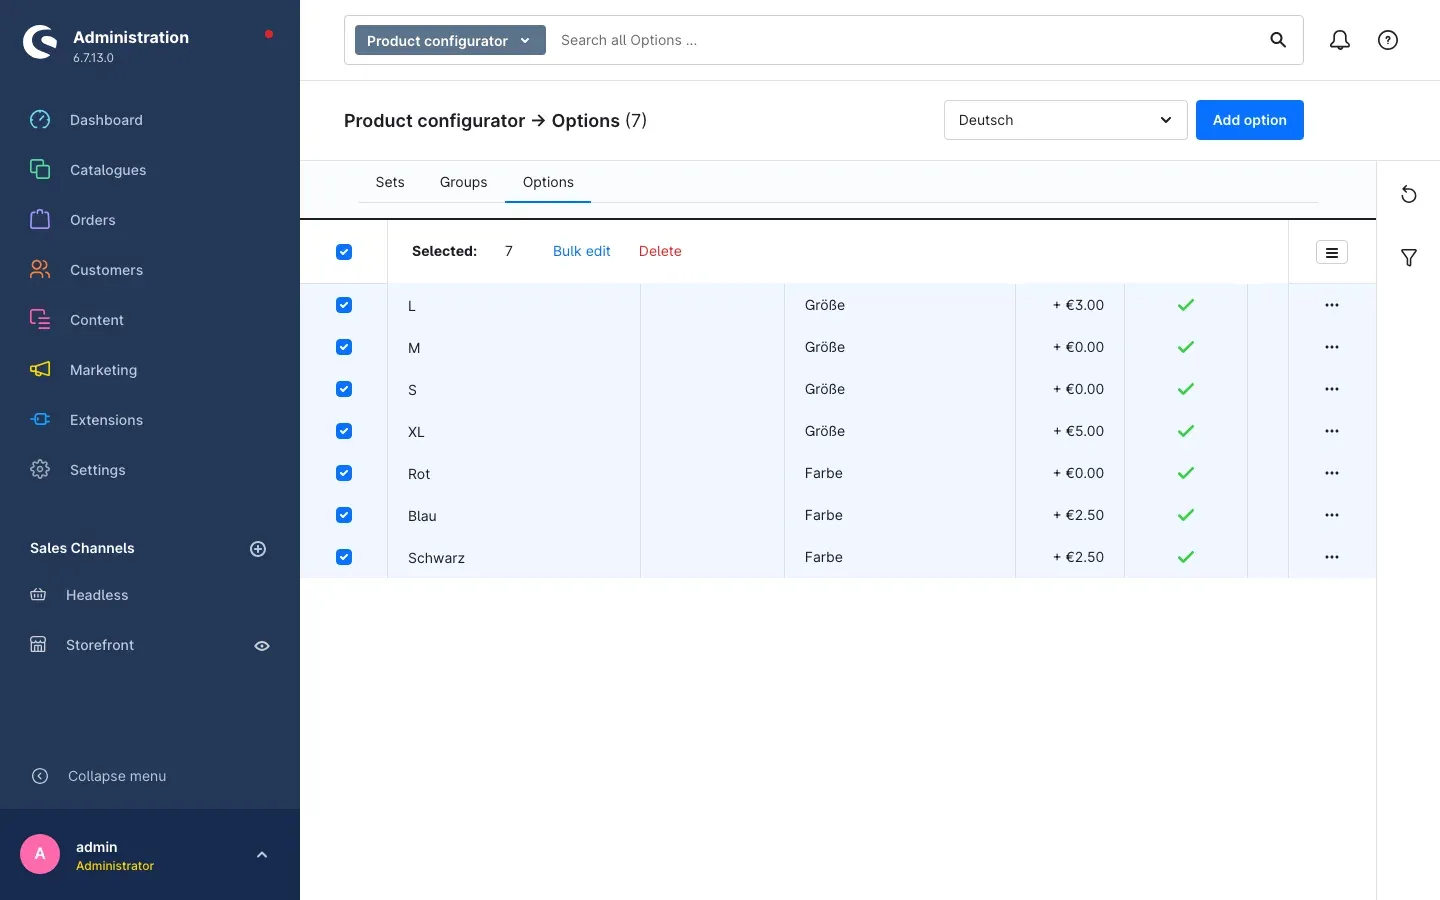 Fig. 10: Seven selected options. Above the list, Selected: 7 appears together with the Bulk edit and Delete actions.
Step by step
- Go to Catalogues → Product configurator and open the Options tab
- Tick every entry you want to change on the left of the list. The tick box at the very top selects all entries on the page.
- Click Bulk edit above the list
- In the areas General information, advanced settings, Measures & packaging, Prices, Advanced pricing, Media and Custom fields, activate exactly the rows you want to touch — each of them starts with Change:. Anything you do not activate stays unchanged.
- For images and price rules, also choose how to change them: Overwrite, Clear, Add or Remove
- Click Apply changes and confirm the Bulk edit - Apply? prompt with Apply changes
The Groups tab works the same way: select entries, click Bulk edit and, for example, set the same Fieldtyp or the same Required value for all of them.
Important: A bulk edit cannot be undone. Try it on two or three selected entries before letting it loose on a hundred. Do not close the browser tab or the window while it is running.
How to import and export assignments
What this does for you: When hundreds of items need the same options, a spreadsheet is faster than the interface.
Under Settings → Shop → Import/Export, an additional Product options data area is available when you create a profile. Use it to export existing assignments between products and options as a file, edit them in your spreadsheet application and import them again.
Tip: Always export a small existing selection first. That way you can see from a real example how the columns have to be structured before you build a file yourself.
What your customers see
Choosing on the product page
On the product page the heading option selection appears, and below it every selection field in its own block: the group name as a blue header at the top, your explanatory text below it, then the selection itself.
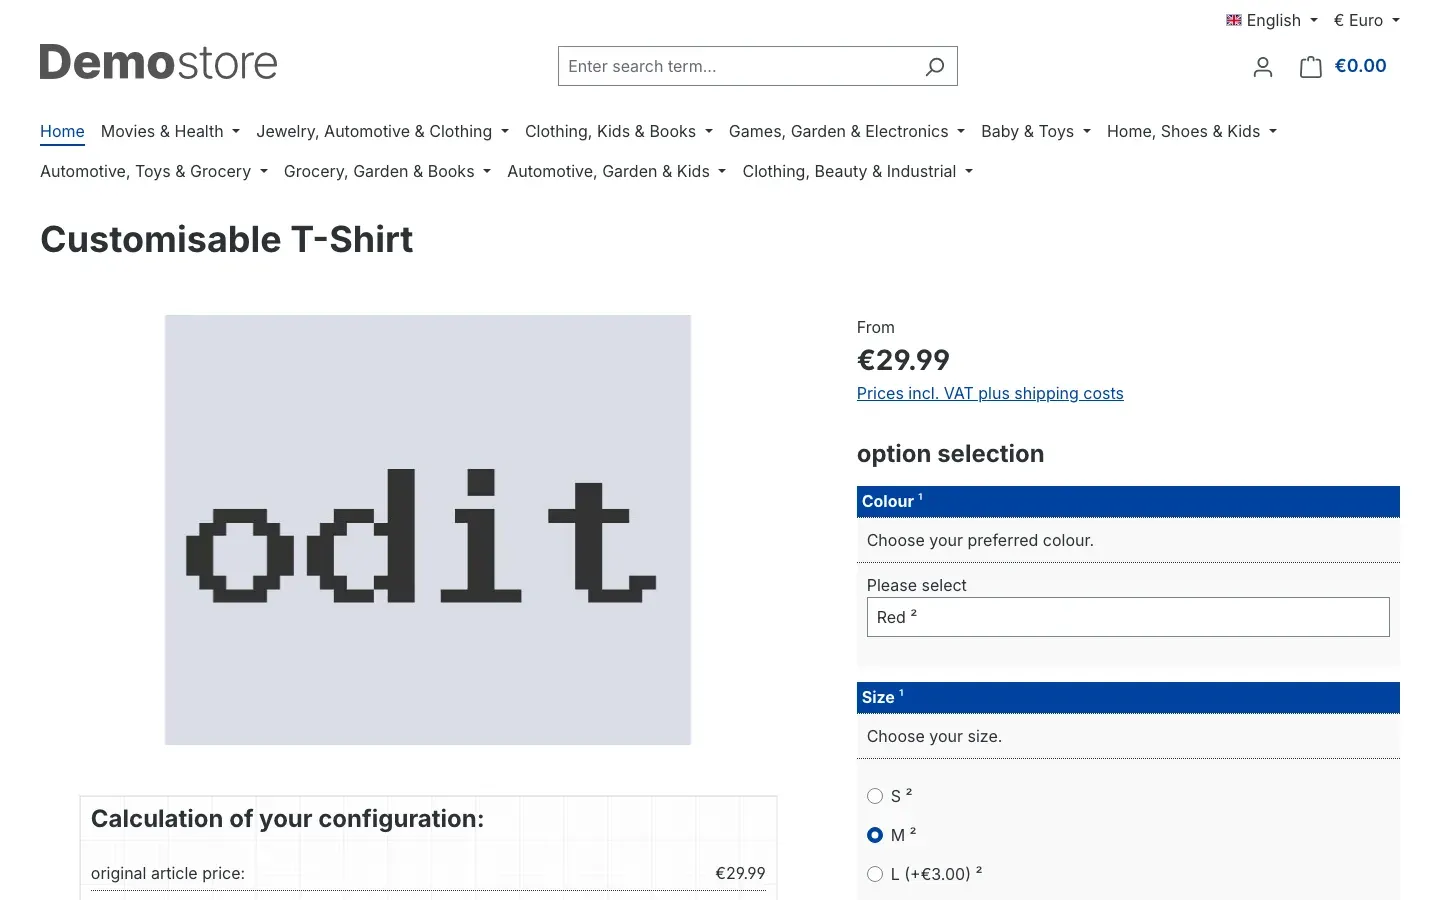 Fig. 11: The product page as it opens — Colour as a drop-down list, Size as selection buttons.
As soon as customers make a choice, the shop recalculates immediately. Surcharges appear in brackets right after the relevant choice, and below the product image the Calculation of your configuration: breakdown builds up: first the original article price, then each chargeable choice as its own line in the form Colour ⇒ Blue, and at the bottom your configured article price.
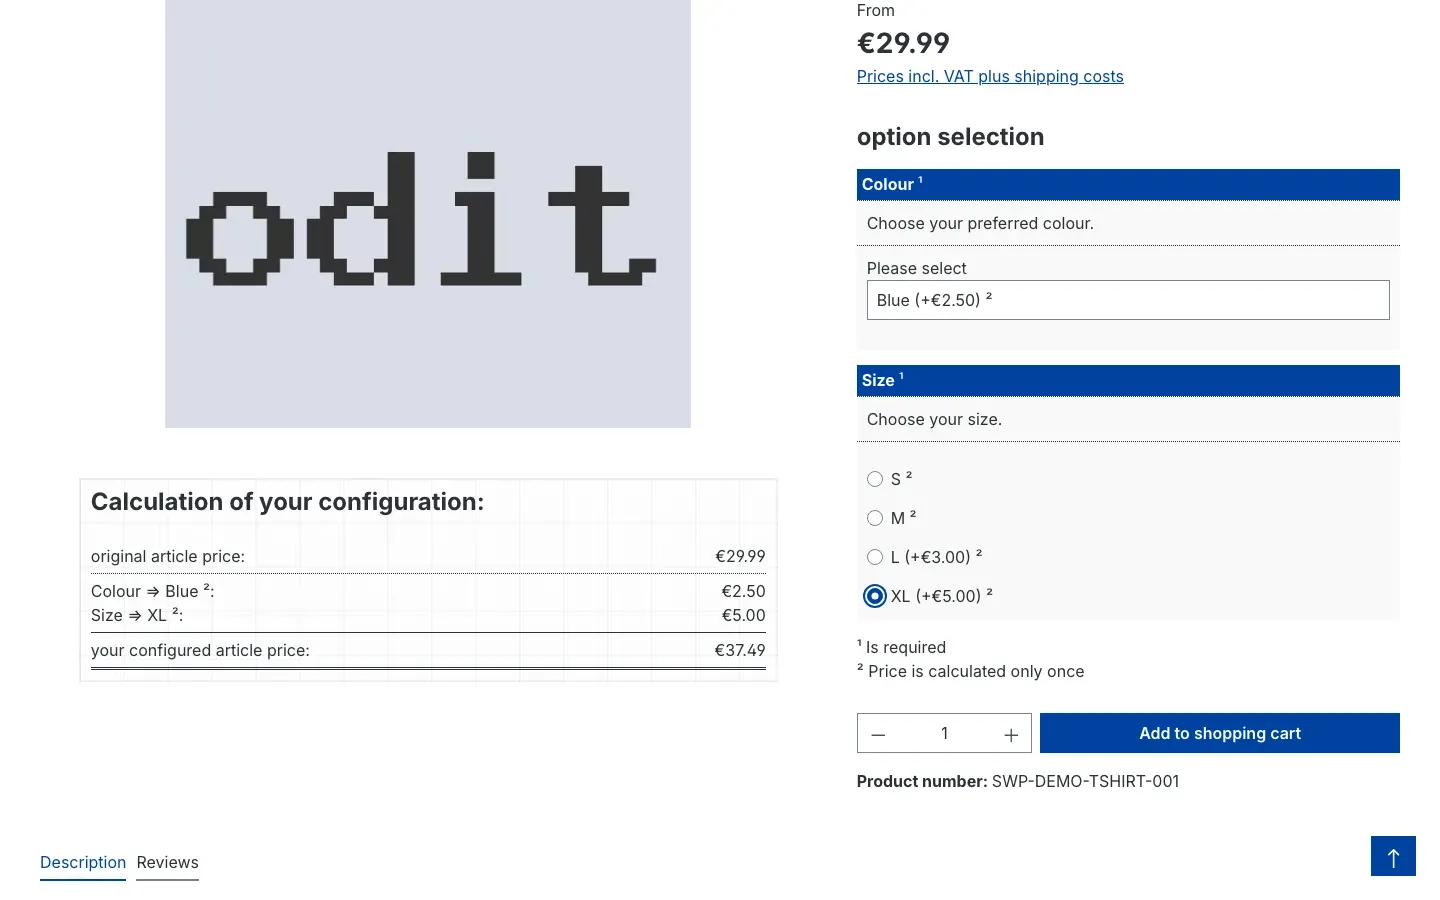 Fig. 12: After choosing Blue (+€2.50) and XL (+€5.00) the price is €37.49 instead of €29.99.
Two small superscript digits are explained right below the selection: ¹ Is required marks mandatory fields, and ² Price is calculated only once marks surcharges that apply once regardless of the order quantity.
Carrying the choice into the cart
Add to shopping cart moves the configured item into the cart. The shop confirms with the message Product with options was successfully added to shopping cart.
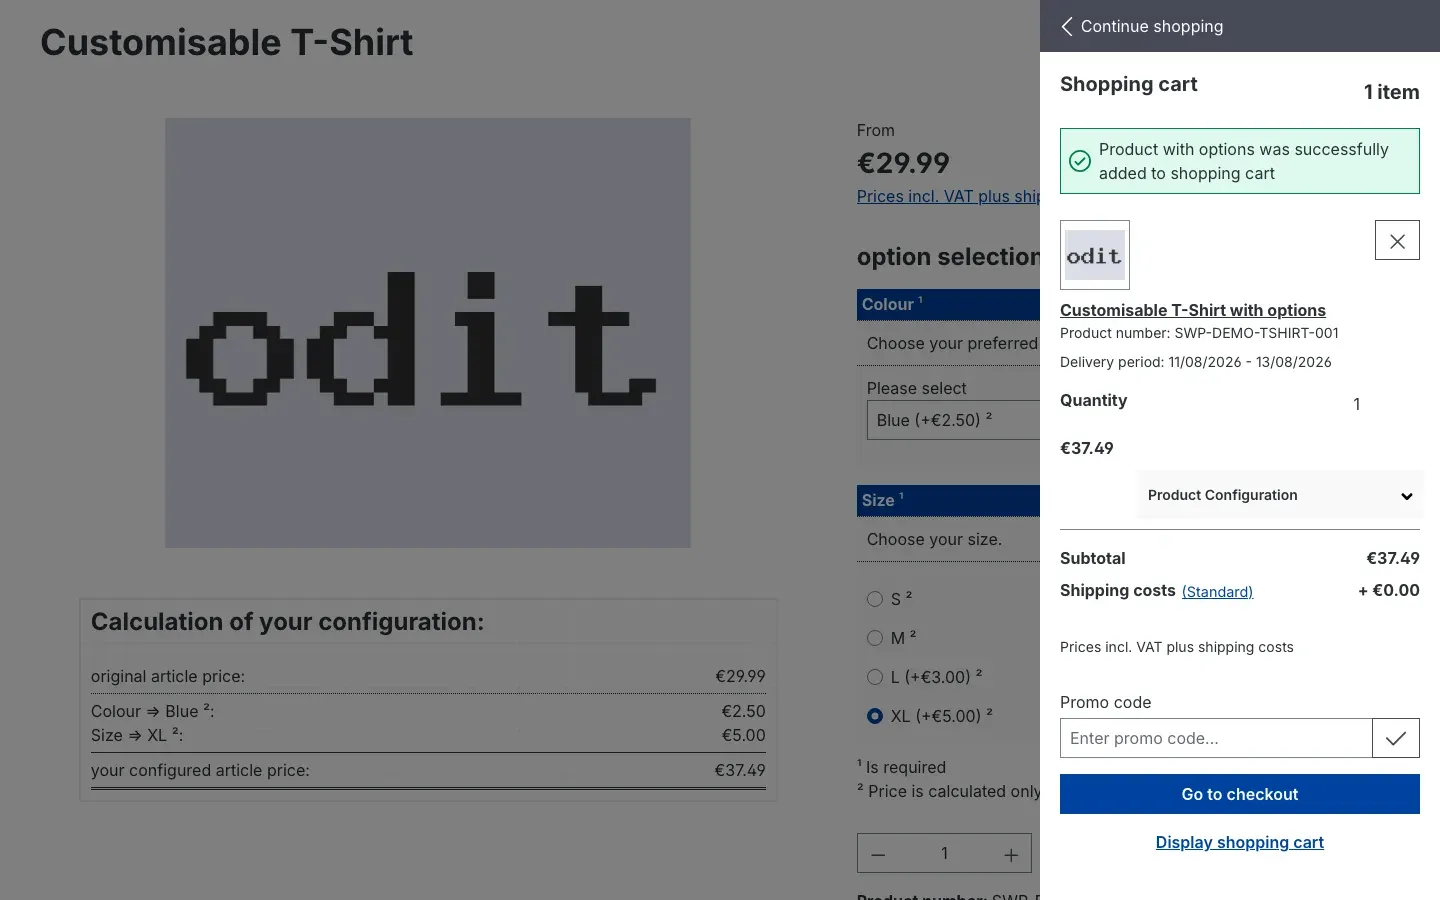 Fig. 13: The cart shows the item with the suffix with options and the configured price of €37.49.
The selected options hang below the line item as an expandable Product Configuration area. Whether that area starts collapsed or expanded, and whether each option shows its individual amount, is controlled by the two Cart Settings in Settings.
The configurator on a smartphone
The configurator adapts to narrow screens automatically: the selection blocks stack vertically and the price breakdown moves above the selection.
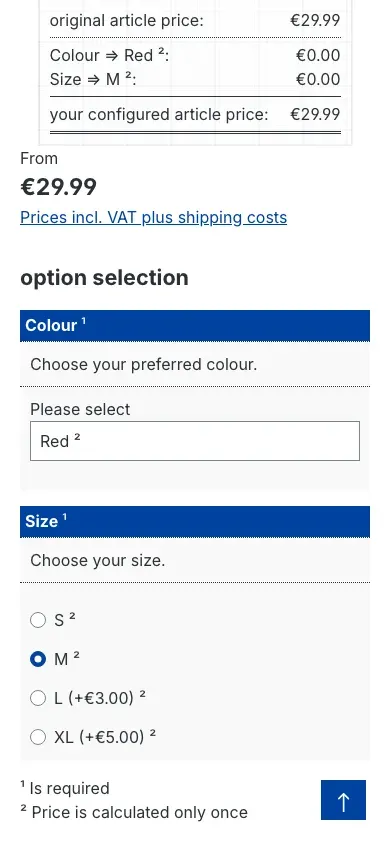 Fig. 14: The same product page on a smartphone.
The configuration in the order
When you open an incoming order under Orders in the Administration, configured line items are marked with the prefix Configured product. The context menu of the line item and the entry Show Configuration open the Selected configuration for this product window with the columns Group, Selection, Quantity, Price and Total.
Why this is useful: When a customer calls with a question, two clicks show you what they ordered — no need to rebuild the cart.
The configuration on invoices and delivery notes
When you create a document for an order — invoice, delivery note, cancellation invoice — every selected option appears as its own indented line below the main line item, in the form Group => Option. Free text entries such as an engraving are shown in quotation marks underneath.
Why this is useful: Your warehouse picks from the delivery note and your accounting bills from the invoice. Both see the complete specification without having to look it up in the shop.
Troubleshooting
No option selection appears on the product page
What is going on: In most cases the configurator is switched off for this channel or this product, or the cache is still serving the old page.
How to fix it:
- Under Extensions → My extensions, check that the toggle next to Product configurator is switched on
- Click Configure there, select the affected Sales Channel at the top and check that Enable plugin for this sales channel is switched on
- Open the product, switch to the Product configurator tab and check that options are assigned and that the Status switch in the toolbar is on
- Clear the cache: Settings → System → Caches & indexes → Clear cache
A single choice is missing in the shop
What is going on: Either the option or its group is set to inactive, or it is not assigned to the product at all.
How to fix it:
- Open Catalogues → Product configurator → Options and check the Status column for that option
- Check the same on the Groups tab for the corresponding selection field
- Open the product, go to the Product configurator tab and check whether the option is listed. If it is missing, add it via Assign options.
The surcharge does not show up in the price breakdown
What is going on: Options without a surcharge are hidden on purpose. If the amount is €0.00, this is not a fault.
How to fix it:
- Check the Euro column under Catalogues → Product configurator → Options to see whether a surcharge is stored at all
- If free choices should be listed with €0.00 as well, switch on Show prices with 0.00 in configurator overview in the settings
The surcharge is charged too often or not often enough
What is going on: The Type of calculation of the option does not match the use case.
How to fix it: Open the option and switch, in the Prices area, between Single calculation (once per order line) and Multi calculation (per piece). Then check the result in the shop with an order quantity of 2.
The previous selection is still there after closing the cart
What is going on: That is the default — the selection is deliberately kept so customers can quickly order a second specification.
How to fix it: Switch on Delete configuration when closing the Offcanvas shopping cart in the settings.
The “configurable” badge is missing in the listing
What is going on: The badge is switched off, or the page is still coming from the cache.
How to fix it:
- Switch on Display configurator badge in listing in the settings
- Clear the cache: Settings → System → Caches & indexes → Clear cache
The Product configurator entry is missing from the Catalogues menu
What is going on: Either the plugin is not activated, or your user account lacks the permissions.
How to fix it:
- Check under Extensions → My extensions that the plugin is active
- Ask an administrator to grant you the Product configurator: sets, Product configurator: groups and Product configurator: options permissions under Settings → System → Users & permissions
- Log out once and back in
Shipping costs look too high for configured items
What is going on: The stored dimensions and weights of the options are added together although only the largest value should count in your case.
How to fix it: Switch off Option specifications for shipping calculation added / maximum in the settings. Only the highest value then feeds into the calculation.
FAQ
Q: Do I have to create a variant for every colour and size combination?
A: No — that is exactly what this plugin saves you. You create the selection fields once and assign them to your products. The shop still carries one item; the customer’s choice travels with the order line as additional information.
Q: Can I assign one set to several products?
A: Yes, and that is what it is for. A set you created once can be assigned to any number of products. If you later change an option centrally, that change takes effect everywhere you have not overridden it on the product.
Q: Can an individual product deviate from the template?
A: Yes. While assigning, you pick exactly which groups and options this product receives. In addition, Edit option on the Product configurator tab lets you override name, description and pricing for this one product only.
Q: Can customers enter their own text, for an engraving for example?
A: Yes. Create a group with the field type Textfield (single line) or Textarea (multiple lines). The entered text appears in the cart, in the order and in the documents.
Q: Does the configurator affect my customer group and scale prices?
A: The item price stays the one Shopware determines for the respective customer — customer groups and scale prices apply unchanged. The option surcharges are added on top. If your options bring along real articles, those articles’ own scale prices apply as long as Use extended prices for attached articles is switched on.
Q: Can I switch the configurator off in one of two shops?
A: Yes. Select the relevant Sales Channel at the top of the settings and switch Enable plugin for this sales channel off there. All other channels remain untouched.
Q: Can my warehouse see which specification was ordered?
A: Yes. Every selected option appears as its own line on the delivery note and the invoice. In addition, the Product number extension can append a suffix to the product number.
Q: Can I hide an option temporarily without losing it?
A: Yes. Set the Status of the option — or of the whole group — to inactive. All settings and assignments are preserved and return immediately when you switch it back.
Q: What happens to my data if I uninstall the plugin?
A: When uninstalling, Shopware asks whether your data should be kept. Confirm this and you will find sets, groups, options and assignments unchanged after a later reinstall.
Q: Does the configurator work on smartphones?
A: Yes, the presentation adapts to narrow screens automatically (see What your customers see).
For administrators / technical details
This section is aimed at technical administrators. You do not need it for day-to-day work with the plugin.
System requirements
- Shopware: 6.7
- PHP: 8.2 or newer
- Storefront: The plugin extends the Shopware Storefront. In a purely headless channel the configurator is not available on the product page.
Installation via the command line
php bin/console plugin:refresh
php bin/console plugin:install SwpProductOptionsSix --activate
php bin/console cache:clear
Bundled console commands
# create sample data covering all field types, several groups and sets
php bin/console productoptions:demo
# remove the same sample data again
php bin/console productoptions:demo --cleanup

# rebuild the data behind product group selection fields
php bin/console productoptions:processing
Permissions for editor roles
Under Settings → System → Users & permissions you can control access per role. The plugin ships its own entries for this:
- Product configurator: sets
- Product configurator: groups
- Product configurator: options
- Product configurator: product assignment
- Product configurator: bulk edit — with the two additional rights Bulk edit options and Bulk edit groups
A role that should only view the area gets View in each case; anyone who maintains data additionally needs Edit, Create and Delete.
Import and export
When creating a profile under Settings → Shop → Import/Export, an additional Product options data area is available. It allows the assignments between products and options to be imported and exported as a file.
Uninstalling
When uninstalling, Shopware asks whether the plugin data should be kept. If that is confirmed, sets, groups, options and product assignments remain in the database and are available unchanged after a reinstall.
This manual was written for Product configurator version 6.7.12.
More manuals
Age Check
Tobacco, spirits, knives: visitors who do not confirm their age never see the restricted items at all. You tick a box per product, the plugin hides it everywhere.
Open manual Shopware 6Blog: Posts, Categories & Comments
Stop running WordPress next to your shop. Write posts, categories, authors and moderated comments in Shopware, then build the blog pages in Shopping Experiences.
Open manual Shopware 6Cart Extras
Your customer sees in the cart how much is missing before the free gift or the discount. Below your minimum order value, the plugin adds exactly the shortfall as a surcharge.
Open manualNeed a team that keeps your shop running?
We have been maintaining Shopware shops for more than 20 years, including updates, hotfixes and the plugins you are configuring right now.