Product Configurator DeepLink
Send a configured product as a link: the deep link pre-fills every option and the quantity on the detail page, so your customer lands straight in the configuration you built.
On this page
- Introduction
- What this plugin does for you
- Who is this plugin for?
- Installation
- Getting started
- Settings
- Basic Configuration
- Detail page Buy / Offer
- How to use the features
- How to share a configuration as a link
- What your customer sees when opening the link
- How your customers edit a cart item
- How customers find their configuration in their account
- How to set up the request form
- Troubleshooting
- The “Share configuration” button does not appear on the product page
- The link opens the product page but without the selection
- The edit path is missing on cart items
- The “Request a quote for configured item” button does not appear
- The request form cannot be submitted
- Nothing changes in the shop after switching a setting
- FAQ
- For administrators / technical details
- System requirements
- Installation via the command line (Composer)
- Cleaning up expired configurations
- Abuse protection for the request form
Introduction
Important: Add-on plugin – requires the Product Configurator (
SwpProductOptionsSix). This plugin is an extension of the base plugin Product Configurator and only works together with it. Without the installed, active and separately purchased Product Configurator from version 6.7.12, this plugin has no function.
Product Configurator DeepLink turns a finished configuration into an address you can send out. Anyone who opens it lands directly on the product page — with exactly the options and the quantity that were selected beforehand.
The plugin builds on the Product configurator (base plugin). It works wherever a product has options assigned to it.
What this plugin does for you
- You put a configuration together in your shop and send it to your customer as a link — nothing has to be rebuilt.
- Your customer shares their own configuration, for example with a colleague or with your support team. Everyone sees the same selection.
- Your customers change a cart item afterwards instead of deleting it and starting over.
- Customers find the configuration from an earlier order in their account and reopen it with one click.
- For products whose price you cannot calculate automatically, you take a request instead of an order — with a link to the configuration and the requested quantity in the email.
Who is this plugin for?
For shops that sell configurable products and talk to their customers about them: made-to-measure furniture, technical components, promotional items, signage. Anywhere a selection consists of many individual decisions and gets discussed by phone or email.
Installation
After your purchase the plugin is available directly in your administration — there is nothing to download.
The Product configurator plugin (base plugin) has to be installed and active first. Without it, Product Configurator DeepLink cannot be installed.
-
Log in to your Shopware administration (
YourShop.com/admin) -
Open Extensions → My extensions
-
Next to Product Configurator DeepLink, click Install
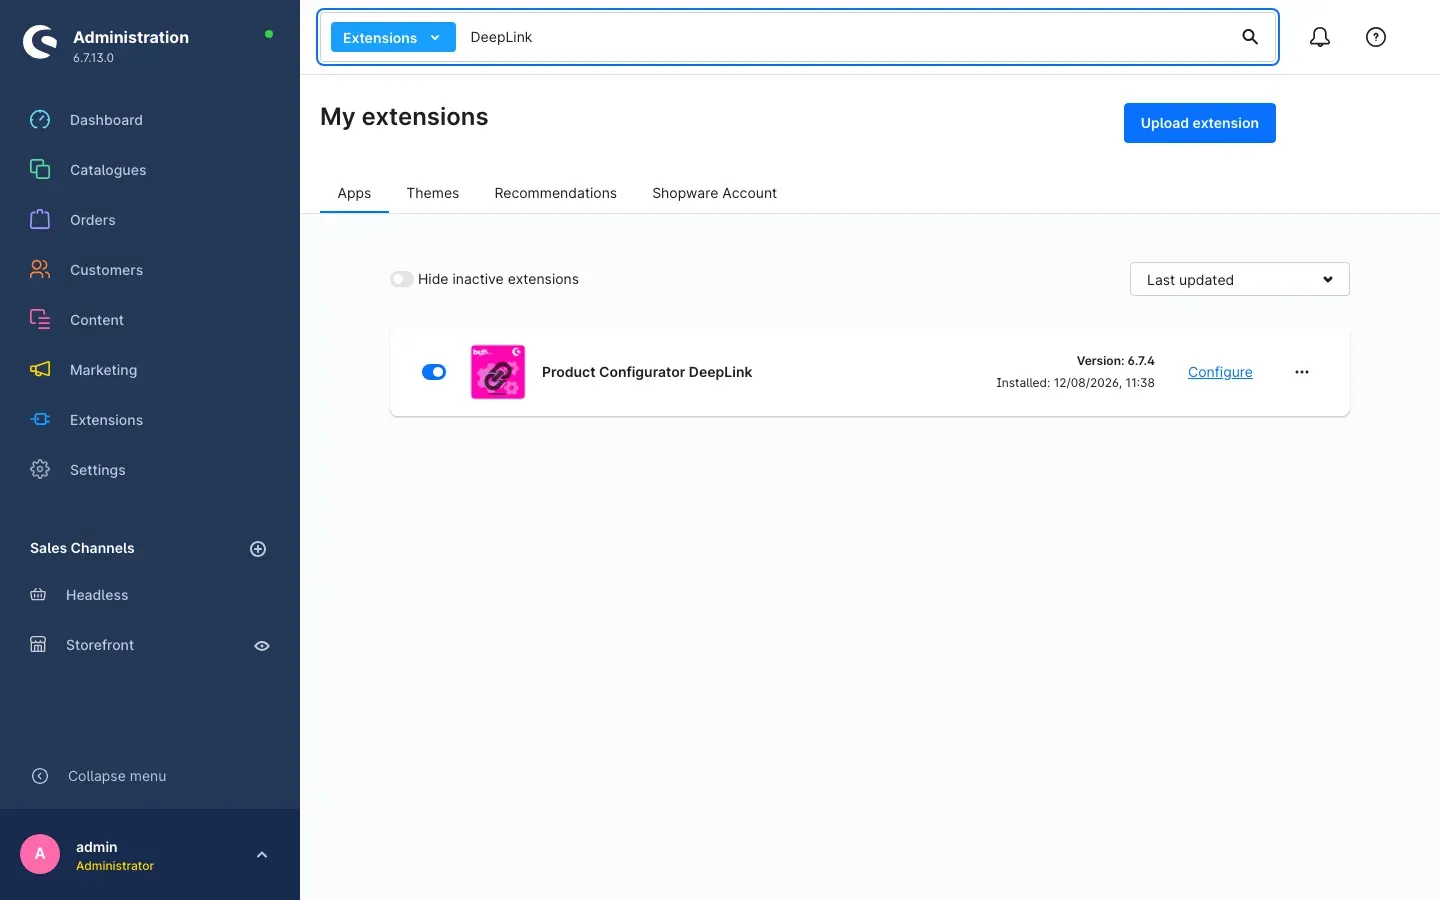 Fig. 1: The entry under “My extensions” — installed and activated
 -
Activate the plugin with the toggle next to the entry — done.
If Product Configurator DeepLink does not appear in the list, your Shopware account is not yet connected to this shop. You can do that under Extensions → My extensions by signing in with your Shopware account.
Getting started
-
Open the settings: Settings → Extensions → Product Configurator DeepLink
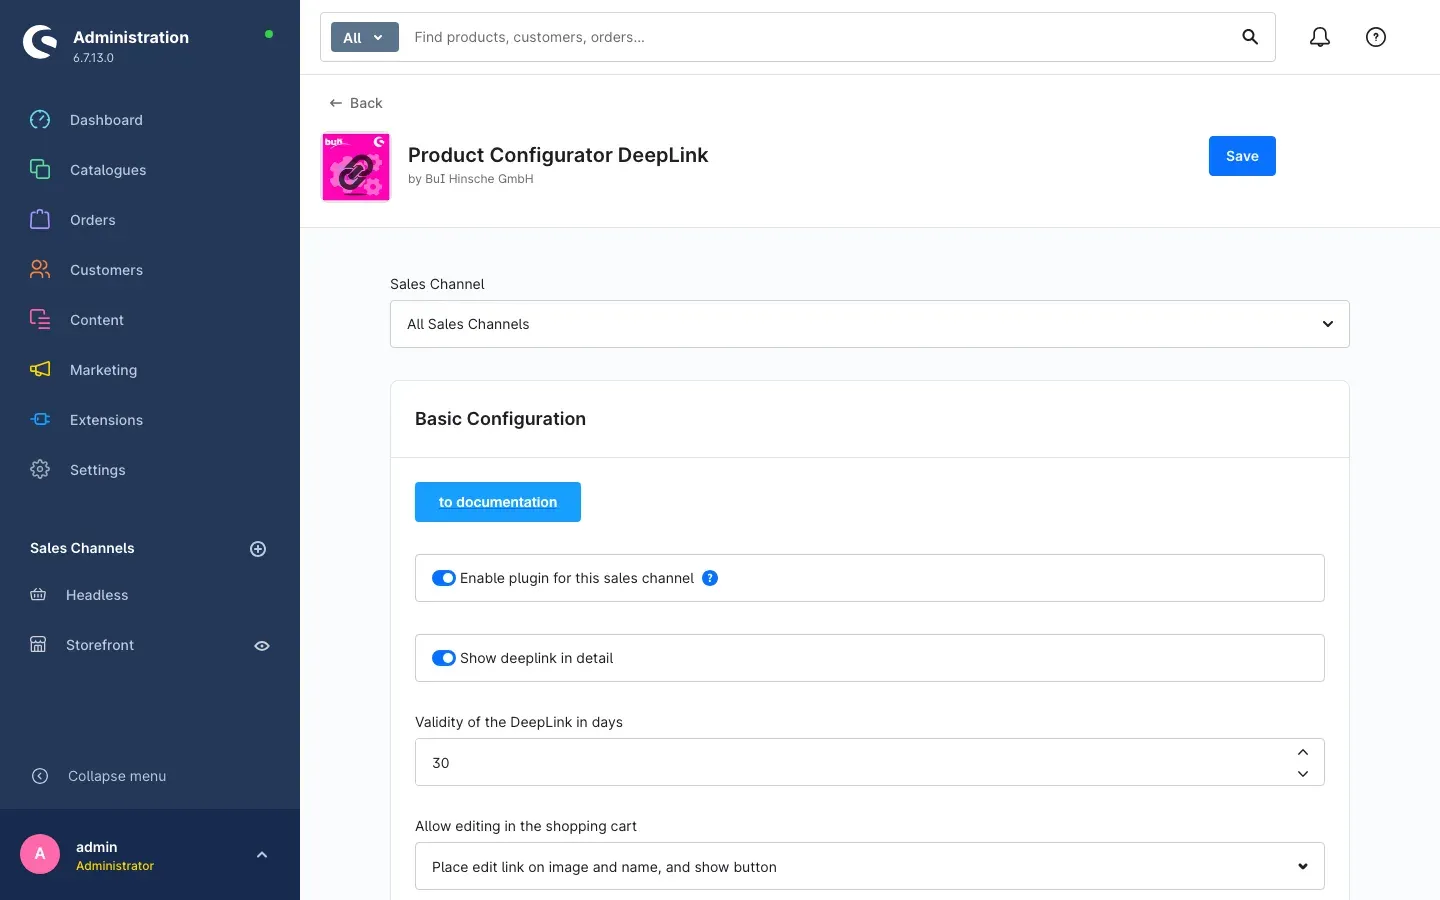 Fig. 2: The configuration page with the “Basic Configuration” card
 -
Choose the sales channel: The Sales Channel selector at the top determines which shop the settings below apply to. Every setting in this plugin can be different per sales channel.
-
Check the essentials: The Enable plugin for this sales channel toggle is on, and so is Show deeplink in detail. That puts the share button on your product pages right away.
-
Check the result: Open a product in your shop that has options assigned. The Share configuration button appears below the option selection.
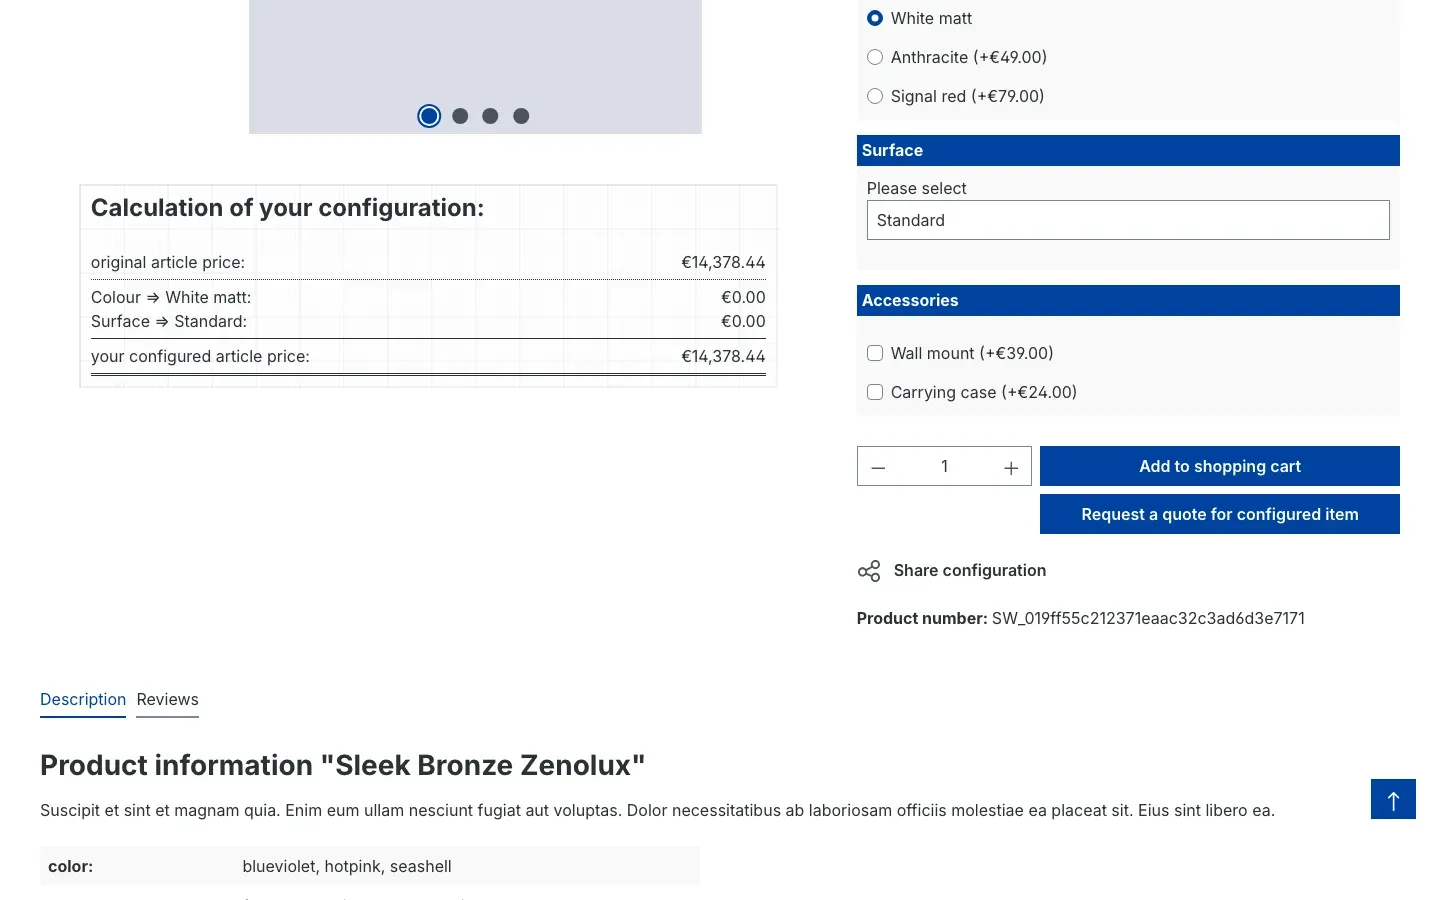 Fig. 3: The “Share configuration” button on the product detail page
Settings
You will find the settings under Settings → Extensions → Product Configurator DeepLink. They are split across two cards: Basic Configuration and Detail page Buy / Offer.
At the very top there is the Sales Channel selector. Every setting applies to the channel chosen there. If you run several shops, this is how you set them up differently.
At the top of the Basic Configuration card sits the to documentation button. It opens this manual in your browser.
Basic Configuration
Fig. 4: The “Basic Configuration” card
Enable plugin for this sales channel
Enable plugin for this sales channel switches the whole feature on or off for the selected shop. When it is off, the plugin has no effect in that sales channel: no share link on the detail page, no edit link on cart items, no offer button and no clean-up of stored configurations. It is switched on by default.
Why this is useful: You try the feature in your B2B channel first and leave your consumer shop untouched — without uninstalling the plugin.
Show deeplink in detail
Show deeplink in detail determines whether the Share configuration button appears on the product detail page. It is switched on by default. The button only shows up on products that actually have options assigned.
Why this is useful: If you do not want to offer sharing to your customers but only use the links internally, switch this off. Pre-filled links keep working — you simply create them yourself, see section 5.1.
Validity of the DeepLink in days
Validity of the DeepLink in days sets how long a stored configuration stays retrievable. The default is 30 days. Older configurations are cleaned up automatically once a day.
If someone opens an expired link, the product page still opens — with a note that the link is no longer valid, and with the product’s default selection.
Why this is useful: With seasonal prices or a changing range you do not want month-old links in circulation. For long-running projects you raise the value instead, so a quote from spring still works in autumn.
Allow editing in the shopping cart
Allow editing in the shopping cart decides how your customers get back to a configuration that is already in the cart. The choices are:
- Switch off editing — there is no way back into the configuration.
- Place edit link on the image — clicking the product image of the cart item opens the configuration.
- Place edit link on the name — clicking the product name opens it.
- Place edit link on image and name — both click paths are active.
- Show button for editing — a separate pencil button appears next to the item.
- Place edit link on image and name, and show button — everything together. This is the default.
Why this is useful: The pencil button is unambiguous and customers find it. The links on image and name feel more natural. In a roomy cart layout you combine both; in a crowded one you use the button only.
Where the edit path appears
Four more toggles decide on which pages the edit path is offered. All four are switched on by default:
- Show editing in the offcanvas shopping cart — the cart that slides in from the right after adding an item.
- Show editing on the shopping cart page — the dedicated cart page.
- Show editing on the login page — the step where the customer logs in or registers.
- Show editing on the checkout confirm page — the last page before the order is placed.
Why this is useful: The further along the checkout your customer is, the less you want to send them back to the product page. Many shops therefore allow editing in the cart and switch it off on the confirmation page.
Detail page Buy / Offer
This card covers the request form on the product detail page. It is switched off out of the box.
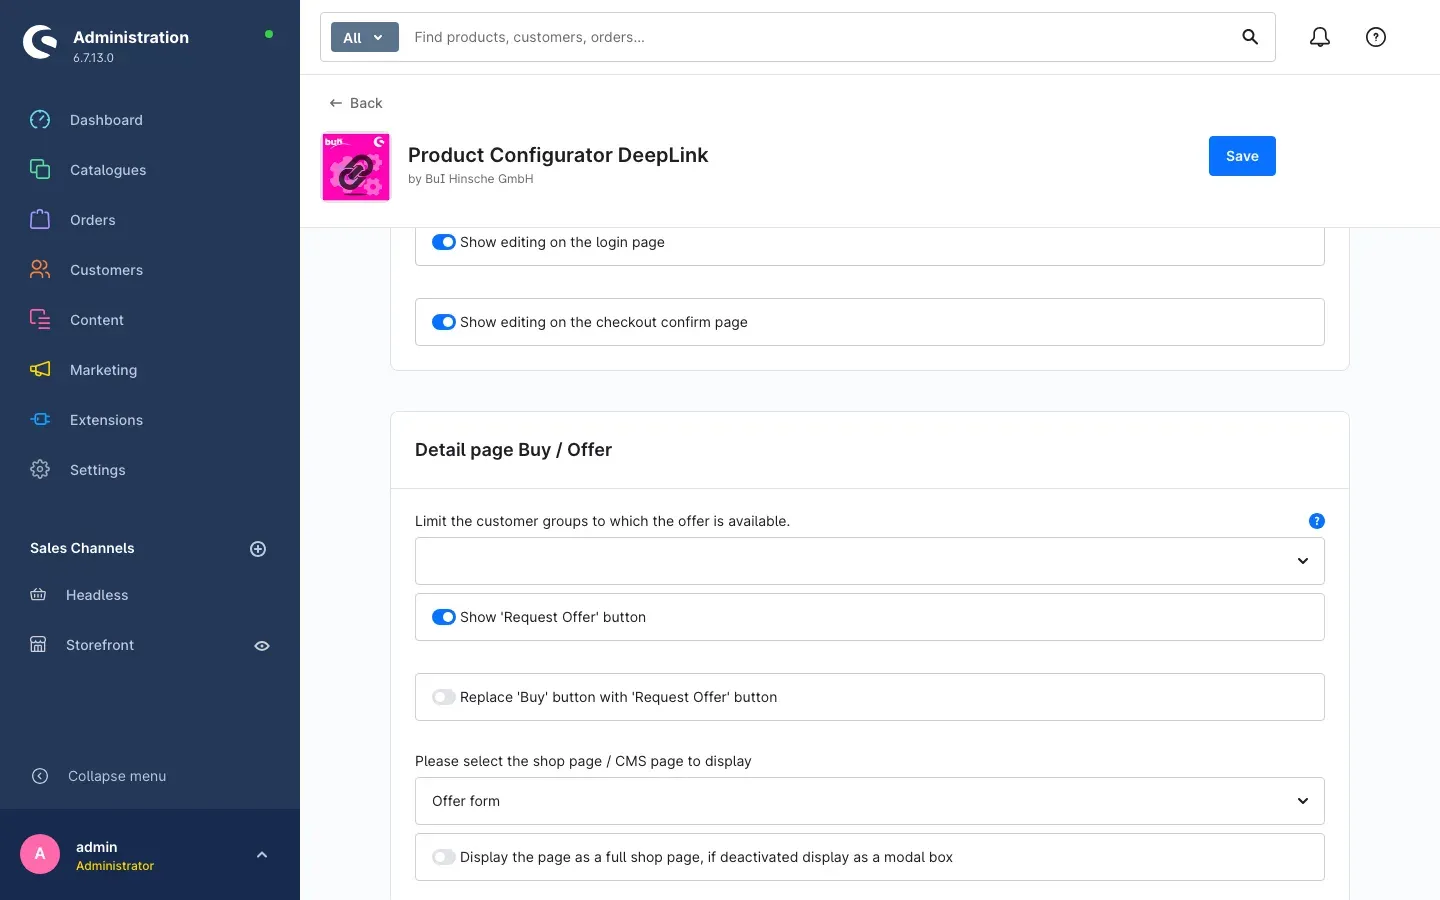 Fig. 5: The “Detail page Buy / Offer” card
Limit the customer groups to which the offer is available.
With Limit the customer groups to which the offer is available. you pick one or more customer groups. Only their members see the offer button. If the field stays empty, all customer groups see it.
Why this is useful: Your resellers should request a quote instead of buying, your consumers should order directly. Select the reseller group here and you get exactly that behaviour.
Show ‘Request Offer’ button
Show ‘Request Offer’ button puts the offer button on the product detail page. It is switched off by default. In the shop the button reads Request a quote for configured item.
For the button to appear you also need a shop page holding the request form (see below). Without that selection the button stays hidden.
Replace ‘Buy’ button with ‘Request Offer’ button
Replace ‘Buy’ button with ‘Request Offer’ button decides whether the offer button sits next to the buy button or takes its place. By default it sits next to it, so your customer has both paths.
Why this is useful: For products whose price is only fixed after a conversation, a buy button is misleading. In that case, replace it.
Please select the shop page / CMS page to display
Under Please select the shop page / CMS page to display you choose the page that holds the request form. During installation the plugin creates a ready-made page called Offer form — select that one here. You can just as well build your own page (see section 5.5).
Display the page as a full shop page, if deactivated display as a modal box
Display the page as a full shop page, if deactivated display as a modal box determines how the form opens. Switched off — the default — it appears as a window on top of the product page. Switched on, your customer moves to a page of its own.
Why this is useful: The window keeps your customer with the configuration and feels faster. A dedicated page offers more room — useful if you have extended the form with explanatory text, images or further content.
How to use the features
How to share a configuration as a link
What this does for you: You discuss a configuration on the phone, build it in the shop and send it as an address by email. Your customer clicks and sees exactly your selection — no explanation, no rebuilding.
Step by step
-
Open a product with assigned options in your shop.
-
Choose the options you want and enter the quantity.
-
Below the selection, click Share configuration.
Fig. 6: The “Share configuration” button -
A field with the finished address opens up. Select it and copy it.
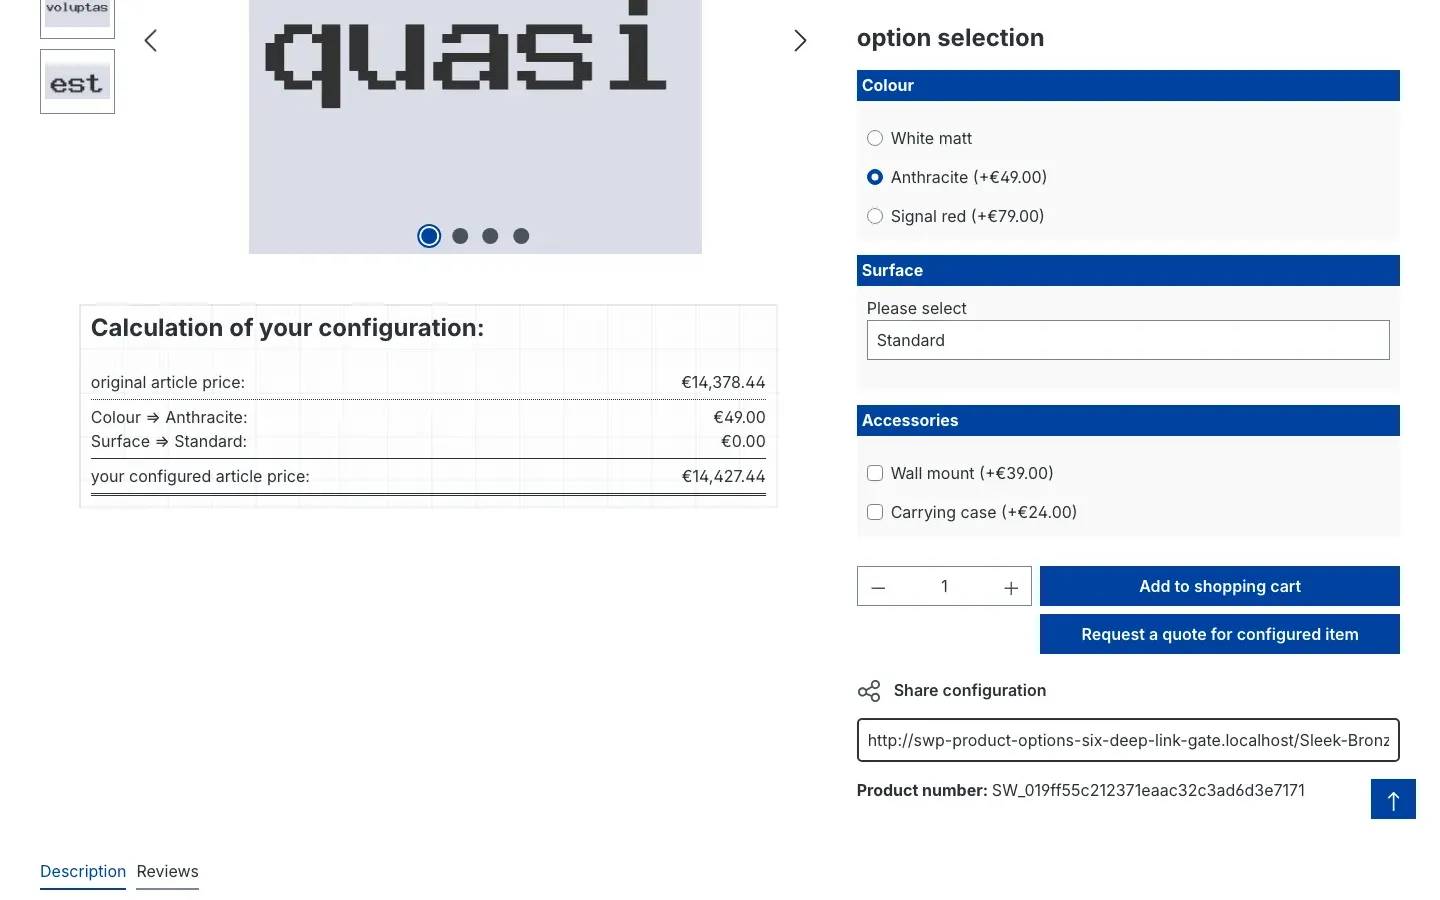 Fig. 7: The generated address, ready to copy
 -
Paste the address into your email, your chat or your quote document.
Tip: The link belongs to exactly the selection that was set when you clicked Share configuration. If you change an option afterwards, click the button again — you get a new address.
Important: How long the link keeps working is governed by the Validity of the DeepLink in days setting. The default is 30 days.
What your customer sees when opening the link
What this does for you: Your customer has nothing to understand and nothing to set. They click and they are there.
Opening the link loads the product page with all preselected options and the stored quantity. On top of it a notice appears reading “Your configuration has been loaded successfully. Please check all options.” A click on Understood closes it.
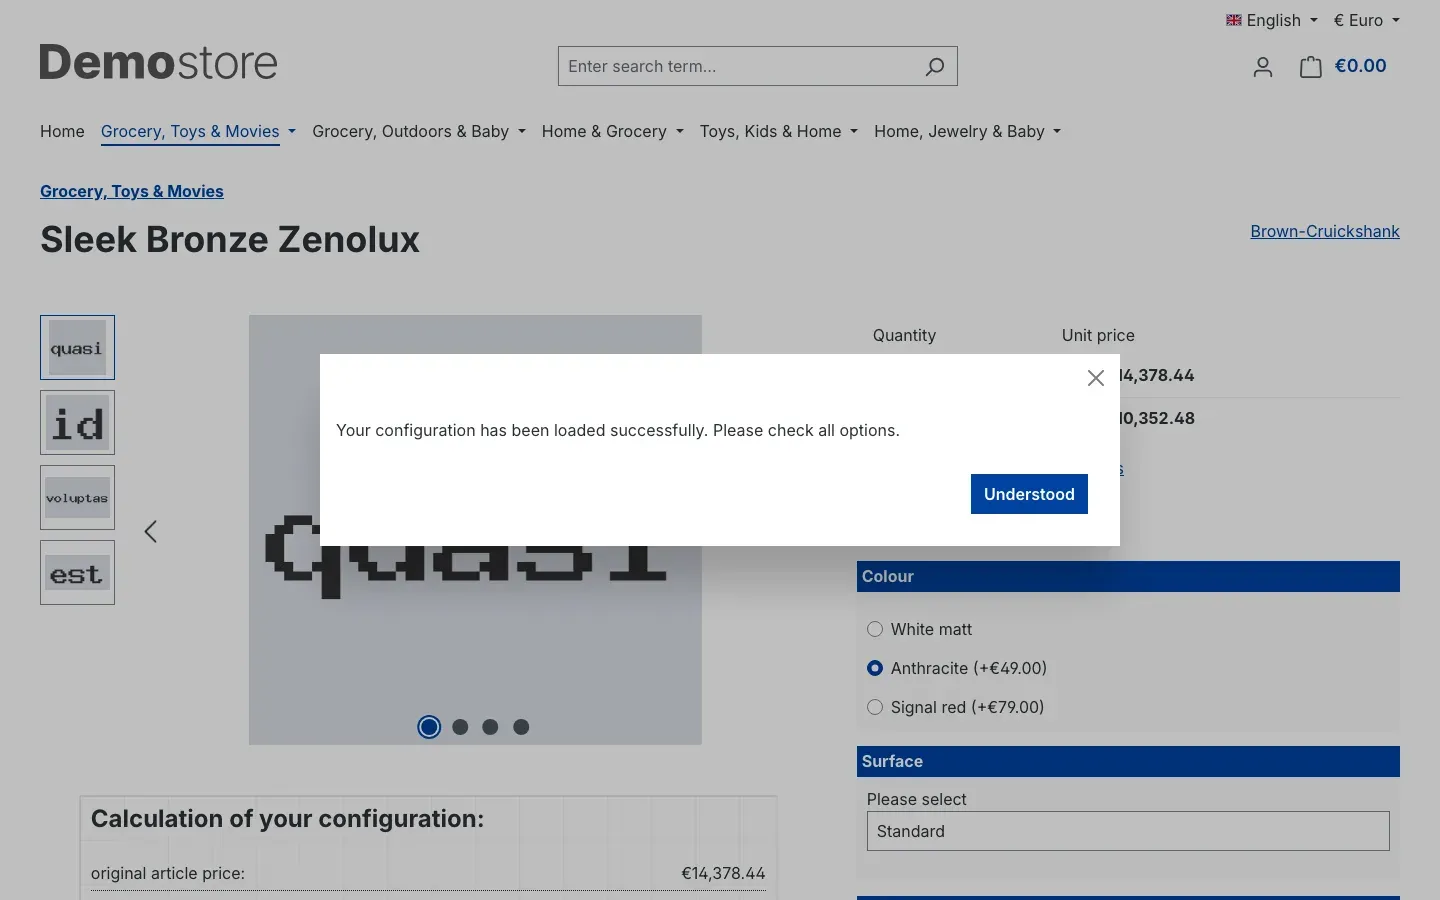 Fig. 8: The “configuration loaded” notice
From there the page behaves completely normally: your customer changes individual options, adjusts the quantity and adds the product to the cart.
If the link has expired, the same page opens with a different notice: “The link you are using has exceeded the maximum duration and is no longer valid. The default configuration is loaded.” So your customer never ends up on an error page.
How your customers edit a cart item
What this does for you: A typo in the quantity or a wrongly picked option no longer means deleting the item and rebuilding it from scratch. Fewer abandoned checkouts.
Step by step
-
Your customer adds the configured product to the cart. The cart slides in from the right.
-
Depending on your Allow editing in the shopping cart setting, the item shows a pencil button and/or a link on image and name.
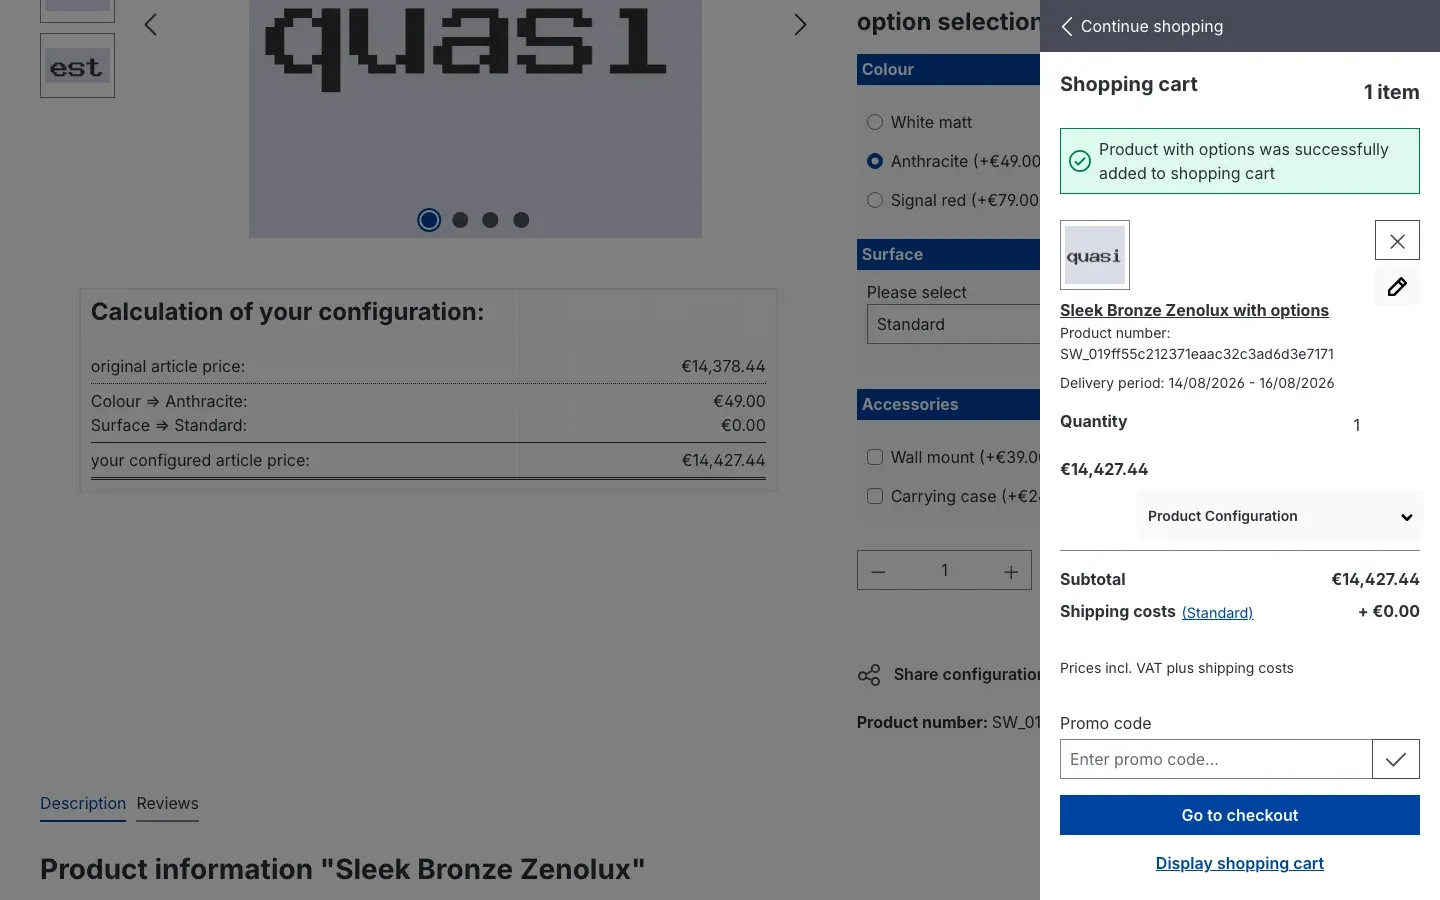 Fig. 9: The edit button in the cart that slides in from the right
 -
The same is available on the shopping cart page.
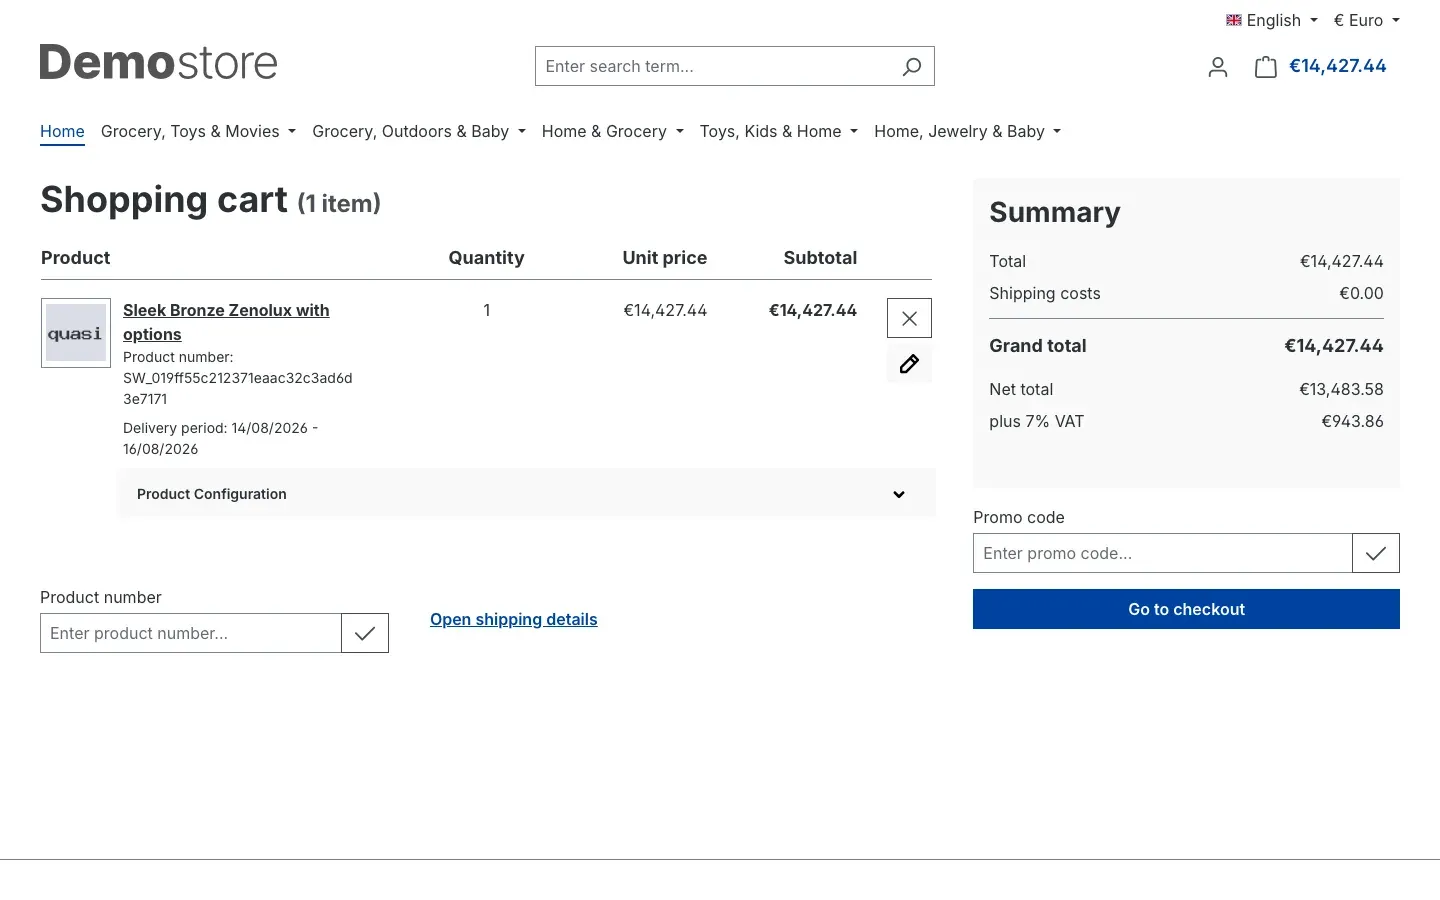 Fig. 10: The cart item with its edit button
 -
One click opens the product page with exactly that configuration and quantity. Instead of Add to shopping cart it shows the Save modified item button.
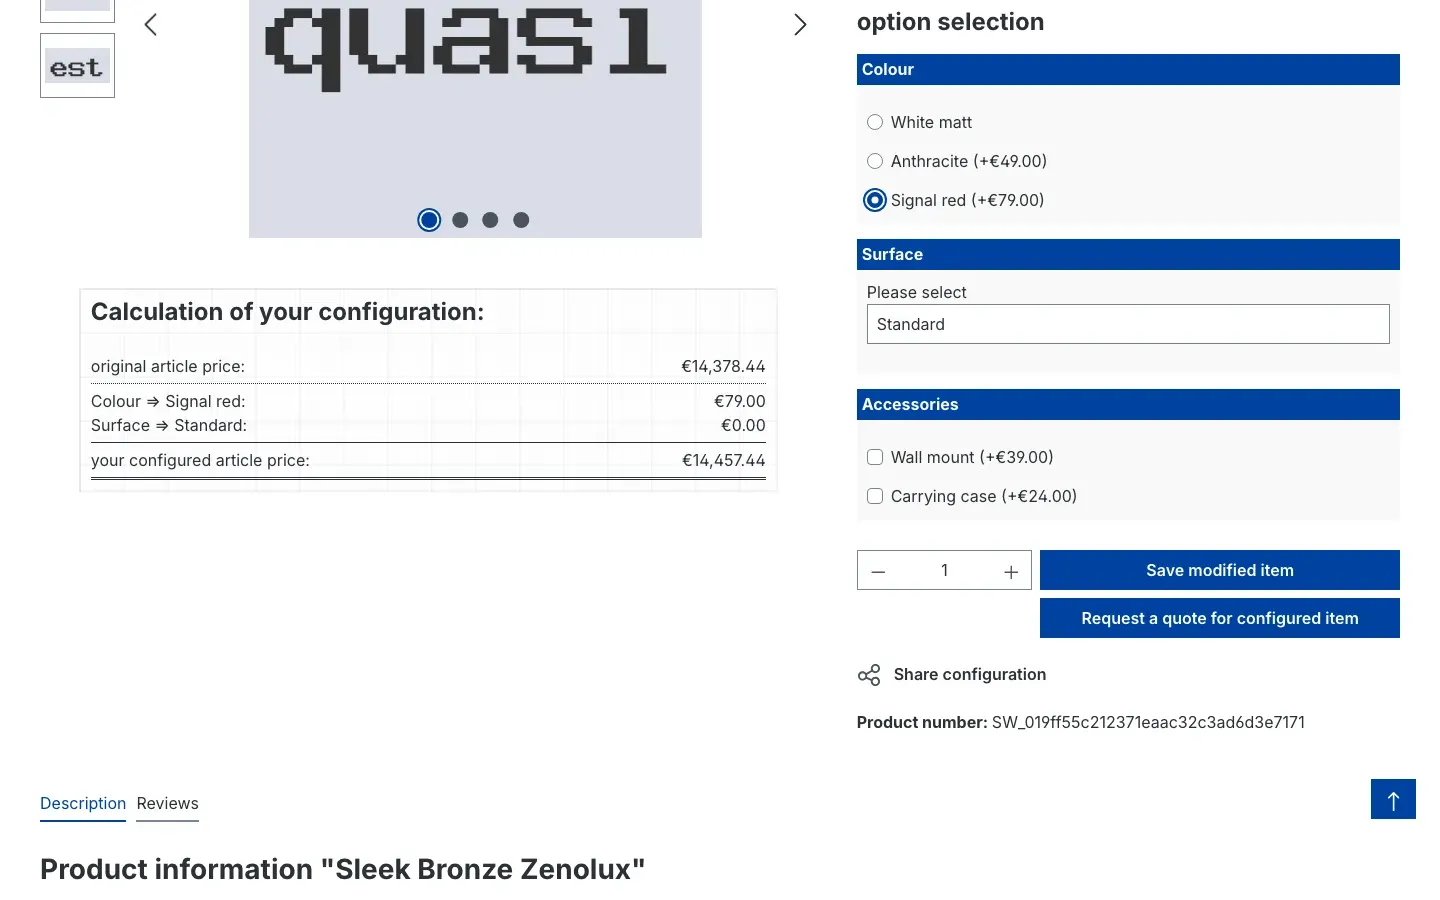 Fig. 11: The product page in editing mode
 -
After clicking Save modified item the existing cart item is replaced — no second item is created. The shop confirms this with the notice “The product … was successfully changed.”
Tip: Which pages offer this path is controlled by the four toggles from section 4.1 — the cart sliding in from the right, the cart page, the login page and the checkout confirmation page can each be switched separately.
How customers find their configuration in their account
What this does for you: Repeat orders cost you no follow-up question. Your customer reopens their earlier selection themselves.
For configured products, the customer account — both the overview and the order history — shows an Open configuration button below the order item. Clicking it loads the product page with exactly the selection that was ordered back then.
Prerequisite: the Enable plugin for this sales channel toggle is on. If you switch it off, the button disappears from older orders as well.
How to set up the request form
What this does for you: For products whose price you cannot calculate automatically, you receive a qualified request — including a link to the configuration and the requested quantity. You no longer have to reconstruct what the customer is talking about.
Step by step
- Go to Settings → Extensions → Product Configurator DeepLink and pick the Sales Channel at the top.
- Open the Detail page Buy / Offer card.
- Under Please select the shop page / CMS page to display, select the Offer form page. The plugin created this page for you during installation.
- Switch on Show ‘Request Offer’ button.
- Decide whether the buy button stays. To replace it, switch on Replace ‘Buy’ button with ‘Request Offer’ button.
- If only certain customer groups should get the form, enter them under Limit the customer groups to which the offer is available.
- Click Save.
The product detail page now shows the Request a quote for configured item button.
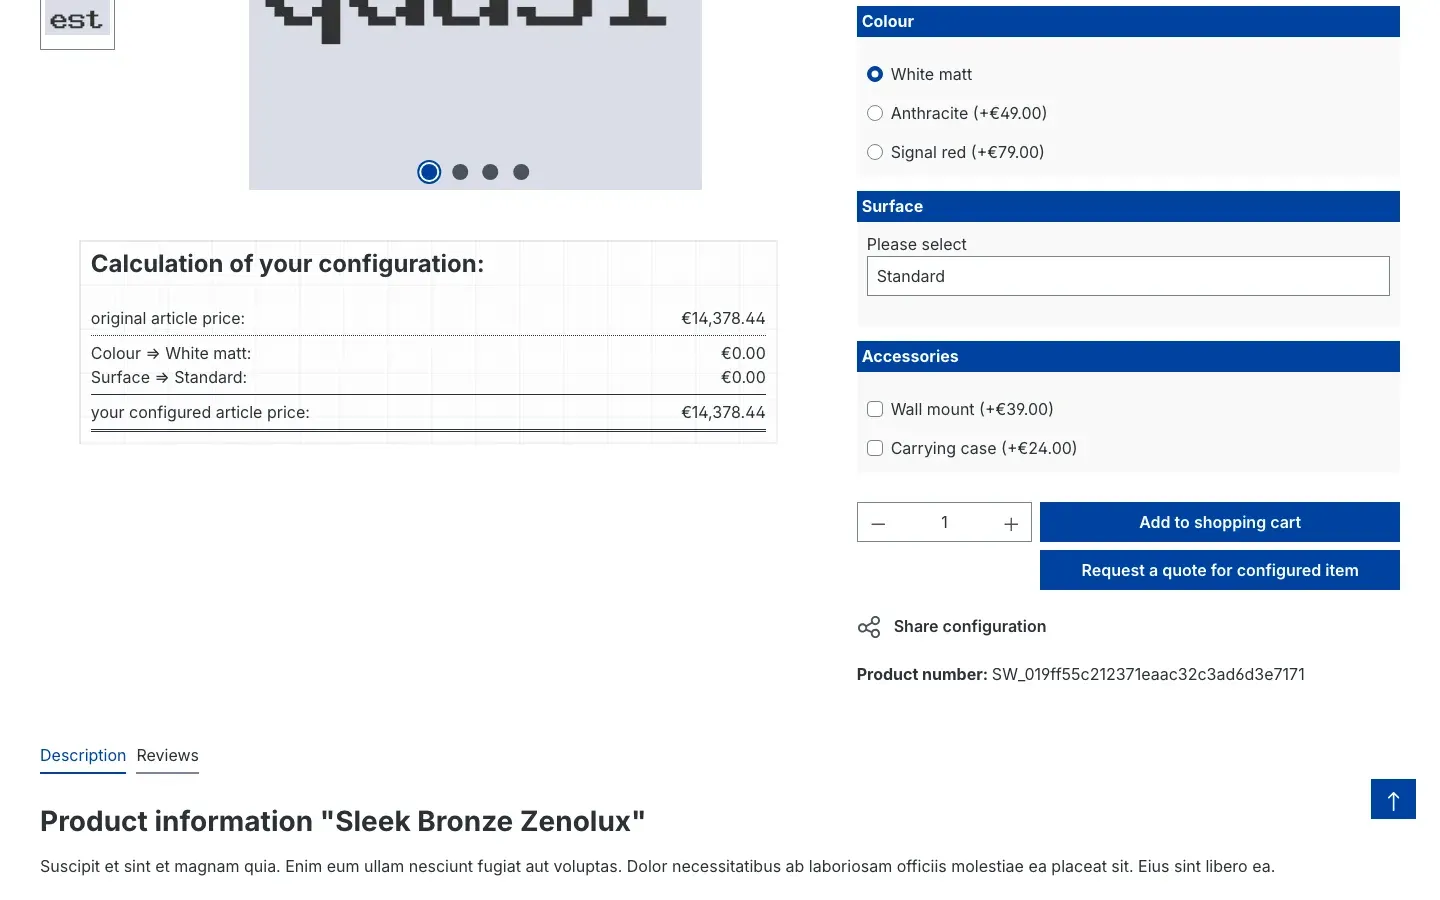 Fig. 12: The “Request a quote for configured item” button
A click opens the form. Your customer fills in salutation, first name, surname, email, telephone number, subject and message, and clicks Submit Form.
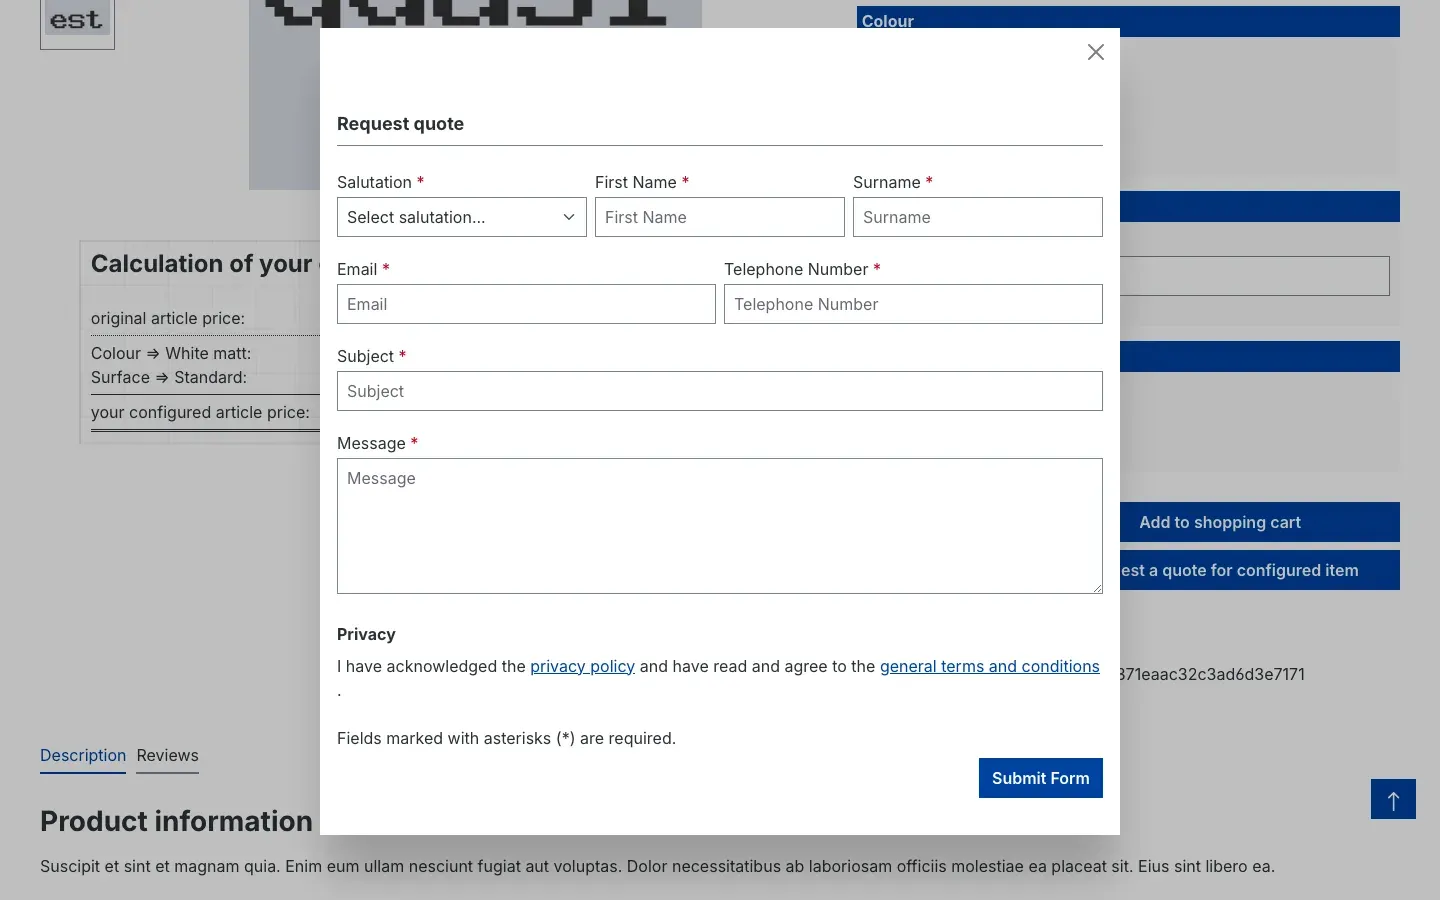 Fig. 13: The request form as a window on top of the product page
Salutation, email, subject and message are mandatory. Whether first name, surname and telephone number are mandatory follows your general shop settings — the same ones that apply to registration.
What arrives in the email
You receive your customer’s name, email address, telephone number, subject and message. Plus the quantity and — this is the point — a link to exactly the configuration in question. Open it and you see the same selection your customer sees.
The request is not stored in the database. It only goes out as an email.
Changing recipients and wording of the email
- Recipients: By default the request goes to the shop address of the sales channel. To send it elsewhere, open Content → Shopping Experiences, choose the Offer form page, click the form and enter the recipients you want in its settings.
- Wording: You edit the email itself under Settings → Shop → Email templates. The matching template is called Offer form.
- Further reactions: Under Settings → Shop → Flow Builder the trigger Offer request form is available. Use it to make something else happen on submission — sending a confirmation to the customer, for example.
Your own form on your own page
You are not tied to the page that ships with the plugin. Create a new page under Content → Shopping Experiences, add a form element and set its form type to Request a quote. Then select that page in the plugin configuration.
Important: Two brakes guard against abuse. First, the form shows the captcha you have enabled in your shop settings. Second, the shop limits how often one sender may submit: three within 30 seconds, five within 60 seconds, ten within 90 seconds. Anyone above that gets a message telling them how long to wait.
Troubleshooting
The “Share configuration” button does not appear on the product page
What causes it: Either the product has no options assigned, or one of the two relevant settings is off.
How to fix it:
- Check in the product whether options from the Product configurator base plugin are assigned to it. Without options there is nothing to share and the button stays hidden.
- Open Settings → Extensions → Product Configurator DeepLink and pick the affected Sales Channel at the top.
- Check that Enable plugin for this sales channel and Show deeplink in detail are switched on.
- Then clear the cache: Settings → System → Caches & indexes.
The link opens the product page but without the selection
What causes it: The link is older than the configured validity. The stored configuration has already been cleaned up.
How to fix it: Create a new link. If your links expire more often than you would like, raise the value under Validity of the DeepLink in days. Your customer does not get an error page in this case, but the product page with the default selection and an explanatory notice.
The edit path is missing on cart items
What causes it: Either Allow editing in the shopping cart is set to Switch off editing, or the toggle for that particular page is off.
How to fix it:
- Open Settings → Extensions → Product Configurator DeepLink, card Basic Configuration.
- Set Allow editing in the shopping cart to the variant you want.
- Check the four toggles below it — the cart sliding in from the right, the cart page, the login page and the checkout confirmation page each have their own.
- Items that were added to the cart while the plugin was switched off for this sales channel only get the edit path once they are added again.
The “Request a quote for configured item” button does not appear
What causes it: Several conditions have to come together for this button.
How to fix it: Check in this order:
- Show ‘Request Offer’ button is switched on.
- A page is selected under Please select the shop page / CMS page to display. Without a page the button stays hidden.
- If a group is entered under Limit the customer groups to which the offer is available., only members of that group see the button. Log in with a matching account to test, or clear the field.
- Both Enable plugin for this sales channel in this plugin and the corresponding toggle in the Product configurator base plugin have to be on for that channel.
- The product needs to have options assigned.
The request form cannot be submitted
What causes it: Either a mandatory field is missing, the captcha was not solved, or the form was submitted too often in a row.
How to fix it: Salutation, email, subject and message are mandatory — depending on your shop settings, first name, surname and telephone number as well. If a notice about a waiting time appears instead, the spam brake has kicked in; after the stated time it works again.
Nothing changes in the shop after switching a setting
What causes it: The page is still in the cache.
How to fix it: Clear the cache under Settings → System → Caches & indexes and reload the page in your shop.
FAQ
Q: Do I need to buy another plugin for this one?
A: Yes. Product Configurator DeepLink extends the Product configurator base plugin. Without it, it cannot be installed.
Q: Does the link work if my customer is not logged in?
A: Yes. The link does not require a customer account. Anyone who has it sees the configuration.
Q: Can I change a link after sending it?
A: No. A link belongs to exactly the selection that was set when it was created. For a changed selection, create a new link.
Q: What happens to old links?
A: After the validity you set, the shop cleans them up automatically once a day. Anyone opening such a link afterwards sees the product page with the default selection and a notice that the link has expired.
Q: Does the request form calculate a price for me?
A: No. It collects the request, the configuration and the quantity and sends everything to you by email. You still calculate the price yourself.
Q: Can I offer the quote path to resellers only?
A: Yes. Enter your reseller group under Limit the customer groups to which the offer is available. Everyone else keeps seeing only the buy button.
Q: Can I switch the feature off in one of several shops?
A: Yes. Pick the affected Sales Channel at the top of the configuration and switch off Enable plugin for this sales channel there. The other channels stay untouched.
Q: Is personal data stored?
A: For a shared configuration, only the product reference and the selected options are stored, no personal data. The entries from the request form are not stored at all, they are only sent as an email.
Q: Does the plugin send data to external servers?
A: No. Everything stays in your shop.
For administrators / technical details
This section is aimed at technical administrators. You do not need it for normal use.
System requirements
- Shopware: 6.7
- PHP: 8.2 or newer
- Additional plugin: Product configurator (
swp/productoptions-six) from version 6.7.12, installed and active
Installation via the command line (Composer)
composer require swp/productoptions-six-deeplink
php bin/console plugin:refresh
php bin/console plugin:install SwpProductOptionsSixDeepLink --activate
php bin/console cache:clear
Cleaning up expired configurations
The clean-up runs as a scheduled task once a day and follows the Validity of the DeepLink in days setting. It requires your shop’s scheduled tasks to be running. You can trigger the clean-up manually like this:
php bin/console productoptions:deeplink:cronIf several sales channels are set differently, the longest validity of all channels with the plugin switched on applies. If it is switched off everywhere, nothing is deleted.
Abuse protection for the request form
On top of your shop’s captcha, a dedicated counter limits submissions per sender: 3 in 30 seconds, 5 in 60 seconds, 10 in 90 seconds. The block resets after 24 hours.
This manual was created for Product Configurator DeepLink version 6.7.4.
More manuals
Admin Password Reminder
Admin Password Reminder: your backend users renew their passwords on time, prompted after login and by a daily email. Premium locks expired accounts until the password is changed.
Open manual Shopware 6Age Check
Tobacco, spirits, knives: visitors who do not confirm their age never see the restricted items at all. You tick a box per product, the plugin hides it everywhere.
Open manual Shopware 6AI Media Labelling
AI labelling for images and videos: flag a media item once in the media manager and the badge with your notice appears wherever it shows up in your shop. No template work needed.
Open manualNeed a team that keeps your shop running?
We have been maintaining Shopware shops for more than 20 years, including updates, hotfixes and the plugins you are configuring right now.