
Product configurator Dependencies
Combinations you cannot build never show up in the configurator. You record per option what does not go with it, and the shop hides the rest as soon as a customer picks.
On this page
- Introduction
- What you achieve with this plugin
- Who is this plugin for?
- Installation
- Configuration
- Sales Channel
- to documentation
- Enable plugin for this sales channel
- Depiction of the dependencies
- Creating and managing dependencies between options
- Step by step: creating a dependency
- The assignment always works both ways
- Removing an assignment
- When nothing has been recorded yet
- Good to know
- The result in your shop
- Starting point
- After the choice
- Mobile view
- How to test your rules
- Troubleshooting
- The “Dependencies” tab is missing on the option detail page
- The dependency has no effect in the shop
- An entire option group disappears from the form
- The option is greyed out although it should disappear (or the other way round)
- A preselected option disappears on the first click
- The plugin cannot be installed
- FAQ
- For administrators / technical details
- System requirements
- Installation via the command line (Composer)
- Permissions for restricted roles
- Behaviour after an update
- Uninstalling
- Data handling and data protection
Introduction
Important: Add-on plugin – requires the Product Configurator (
SwpProductOptionsSix). This plugin is an extension of the base plugin Product Configurator and only works together with it. Without the installed, active and separately purchased Product Configurator from version 6.7.12, this plugin has no function.
Product configurator Dependencies makes sure your customers can only pick combinations you are actually able to deliver.
You record once, per option, which other options do not go with it. As soon as a customer picks an option in the configurator, the options ruled out by that choice disappear from the form — or they stay visible but can no longer be clicked. Exactly as you configure it.
What you achieve with this plugin
- Impossible orders never happen. The customer cannot submit the combination because it is no longer selectable.
- You maintain the rules yourself — directly on the option, without a developer and without waiting for a release.
- Fewer support enquiries. The question “can I combine these?” is answered by the form itself, the moment the customer clicks.
- You decide how it looks: hide the ruled-out options or grey them out.
- Every sales channel gets its own answer. You switch the feature on or off per channel without uninstalling the plugin.
Who is this plugin for?
For everyone using the Product configurator who sells products where individual choices rule each other out: furniture, windows and doors, signage, machinery and plant engineering, configurable textiles.
Installation
After your purchase the plugin is available directly in your administration — there is nothing to download.
- Log in to your Shopware administration.
- Open Extensions → My extensions.
- In the Product configurator Dependencies row, click Install.
- Then switch the plugin on using the toggle to the left of the entry.
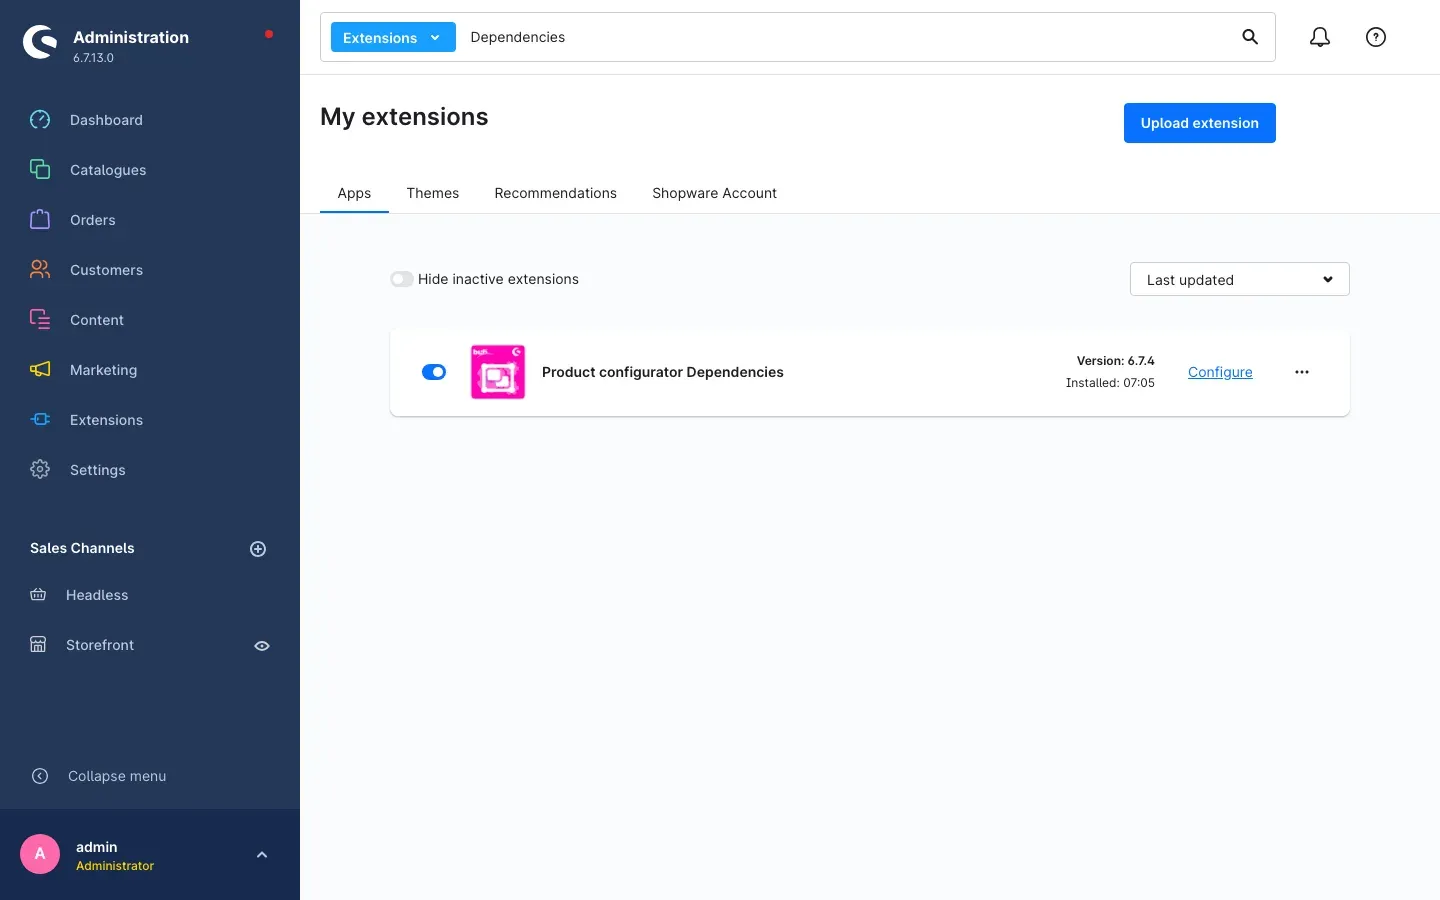 Fig. 1: the active plugin in the My extensions overview — on the right the installed version and the Configure link
Once the plugin is active, two things are available to you straight away:
- the plugin settings (see Configuration),
- the additional Dependencies tab on every option detail page of your product configurator.
Tip: if you have many extensions installed, type part of the name into the search field at the top — in the example above the list is filtered to “Dependencies”.
If Product configurator Dependencies does not appear in the list, your Shopware account is not yet connected to the shop. You can do that under Extensions → My extensions on the Shopware Account tab.
Configuration
Open Extensions → My extensions and click Configure in the Product configurator Dependencies row.
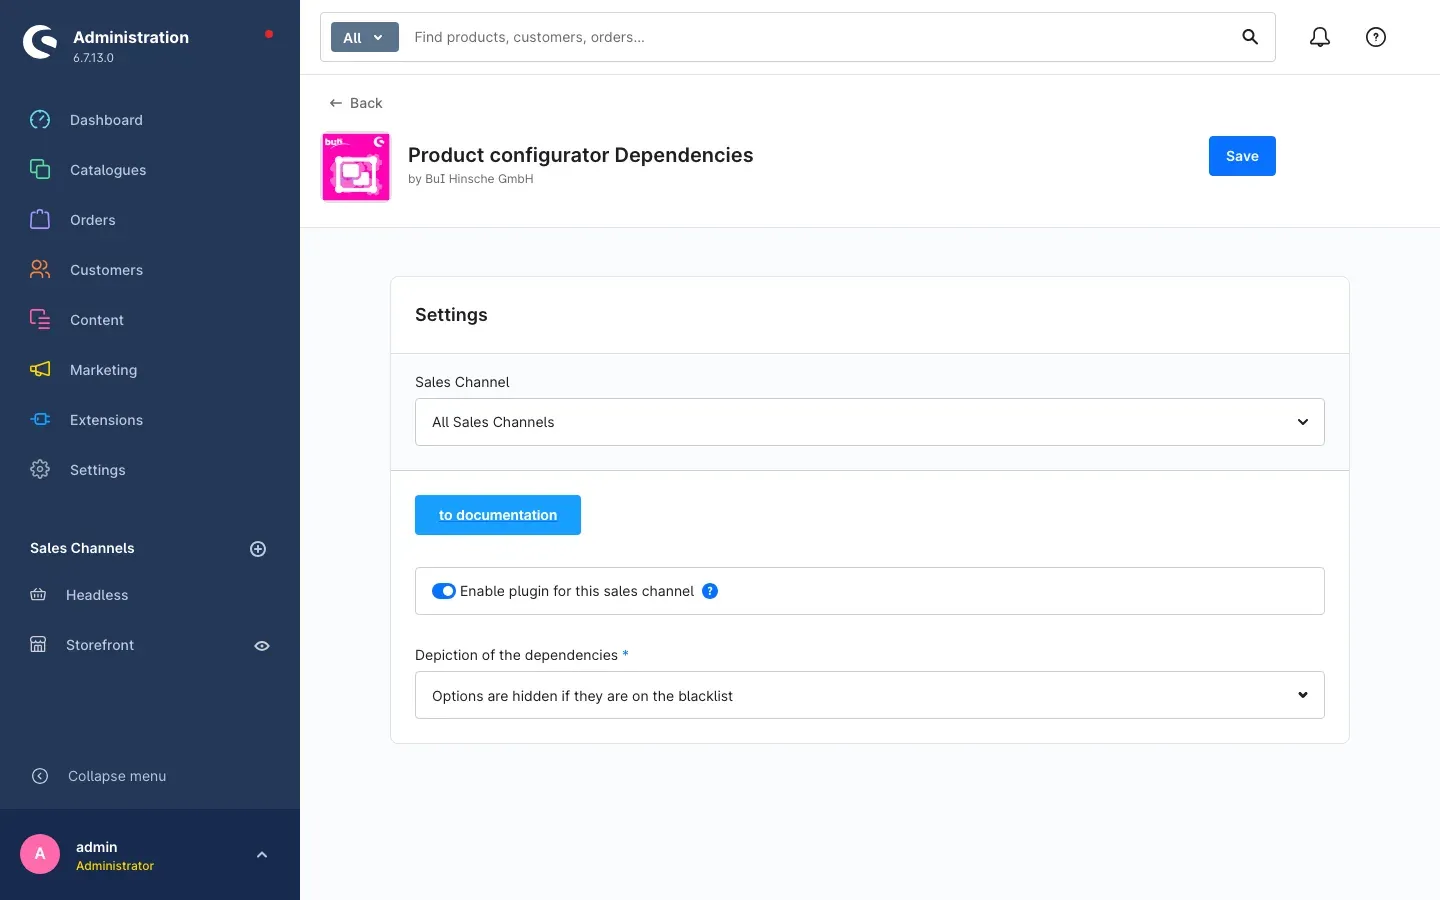 Fig. 2: the plugin settings
All settings live in the Settings card. At the top you choose which sales channel the settings below apply to. When you are done, save with Save in the top right corner.
Sales Channel
The Sales Channel selector determines which shop the settings below refer to. As long as it says All Sales Channels, your entries apply everywhere.
Why this is useful: if you run several sales channels, you can let the dependencies apply strictly in your consumer shop and switch them off in the B2B shop, where your fitters already know what fits together. Select the channel you want first, then set the values below it.
to documentation
The to documentation button opens this manual in a new browser window — in the language you use for the administration.
Enable plugin for this sales channel
The Enable plugin for this sales channel switch determines whether the recorded dependencies are evaluated in this sales channel at all. It is switched on by default.
If you switch it off, the configurator in that channel behaves exactly as if the extension were not installed: every option stays selectable. Everything you have recorded is fully preserved — it simply has no effect. The product configurator itself keeps running unchanged in any case.
Why this is useful: you can switch the effect off briefly to check something, or use the feature deliberately in selected shops only — without deleting anything and without uninstalling the plugin.
Depiction of the dependencies
Depiction of the dependencies determines what happens to a blocked option in the shop. One of the two choices is always selected — the asterisk behind the label indicates that this entry cannot be left empty:
- Options are hidden if they are on the blacklist — the blocked option disappears from the selection. If nothing is left in an entire option group, the whole group is hidden instead of leaving an empty block behind. This is the default.
- Options are grayed out if they are on the blacklist — the blocked option stays visible, is shown faded and can no longer be clicked or selected.
Why this is useful: hiding keeps the form short and clear — good when there are many options. Greying out shows the customer that the option exists in principle, just not with their current selection — good if your range would otherwise look smaller than it is.
Creating and managing dependencies between options
What this gives you: you define exactly once which two options rule each other out. From that moment on, no customer can order that combination.
You maintain this directly on the option of your product configurator, on the Dependencies tab. This plugin adds that tab — it did not exist there before.
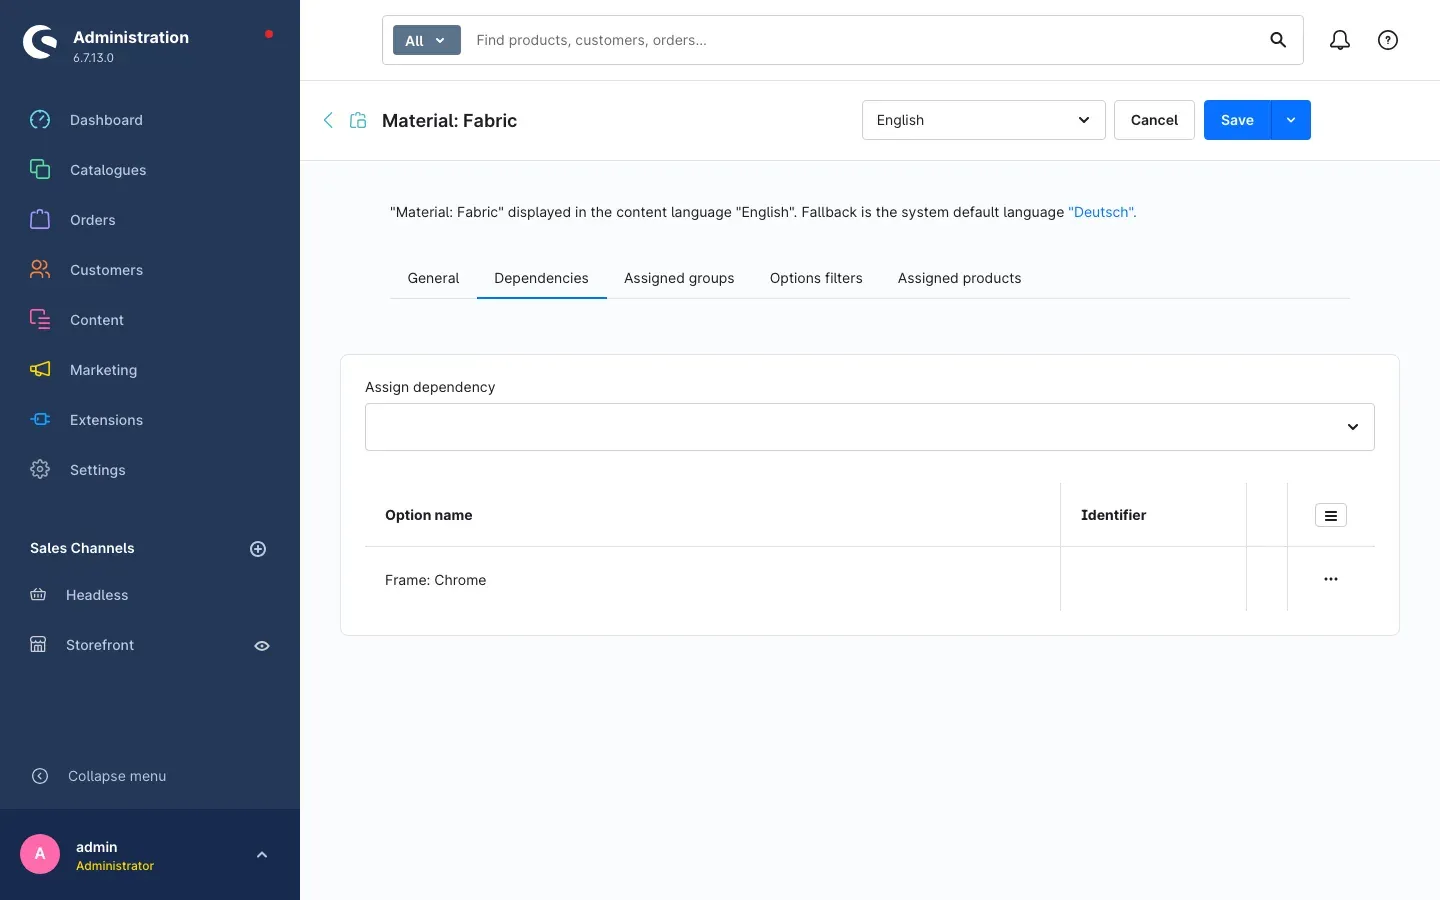 Fig. 3: the option Material: Fabric — Frame: Chrome is recorded as an incompatible option on the Dependencies tab
Step by step: creating a dependency
- In the product configurator, open the detail page of the option you want to record a dependency for (Material: Fabric in the example above).
- Click Dependencies in the tab bar. It sits between General and Assigned groups.
- Click into the selection field below Assign dependency.
- Type part of the name or the identifier and pick the option that does not go with the option you have open. The result list shows the option name and the identifier side by side — with identical names, this is how you spot the right option.
- The selected option immediately appears in the list below, with the columns Option name and Identifier.
- Repeat steps 3 to 5 for every further incompatible option.
- Click Save in the top right corner.
Important: the assignment is only really stored after you click Save. If you leave the page before that, or click Cancel, it is gone again.
The assignment always works both ways
If you block Frame: Chrome on Material: Fabric, then Material: Fabric is blocked in return as soon as a customer picks Frame: Chrome first.
So you maintain each pair only once — no matter in which order your customers configure. A second entry on the other side is not needed and is created automatically.
Removing an assignment
You have two ways:
- In the list, click … at the right end of the row, then Delete.
- Or pick the same option in the Assign dependency field once more — the selection field then switches the assignment off again.
Click Save afterwards. Removing also works both ways.
When nothing has been recorded yet
As long as an option has no dependency, you see the note No dependencies exist for this option yet. instead of the list. That is not an error, it is the normal starting point for every new option.
Good to know
- The option you have open never appears in the result list — an option cannot rule itself out.
- You can record any number of incompatible options per option.
- Maintain the assignments on the option you consider the “trigger”. Because the block works both ways anyway, the result in the shop is the same — but your list stays easier to survey.
Tip: work along your complaints. Every combination that made you call a customer or cancel an order in recent months is a candidate for a dependency.
Careful with preselected options: if an option is already preselected in the configurator and another choice blocks it, it disappears from the form — or is greyed out — as soon as the customer clicks. So check your preselections in the shop once after creating new dependencies.
The result in your shop
What this gives you: this is what your customers actually notice from the work you did in chapter 4.
Starting point
On the product page, the option selection of the product configurator lists its option groups — Material and Frame color in the example. As long as the customer has not chosen anything, every option is available.
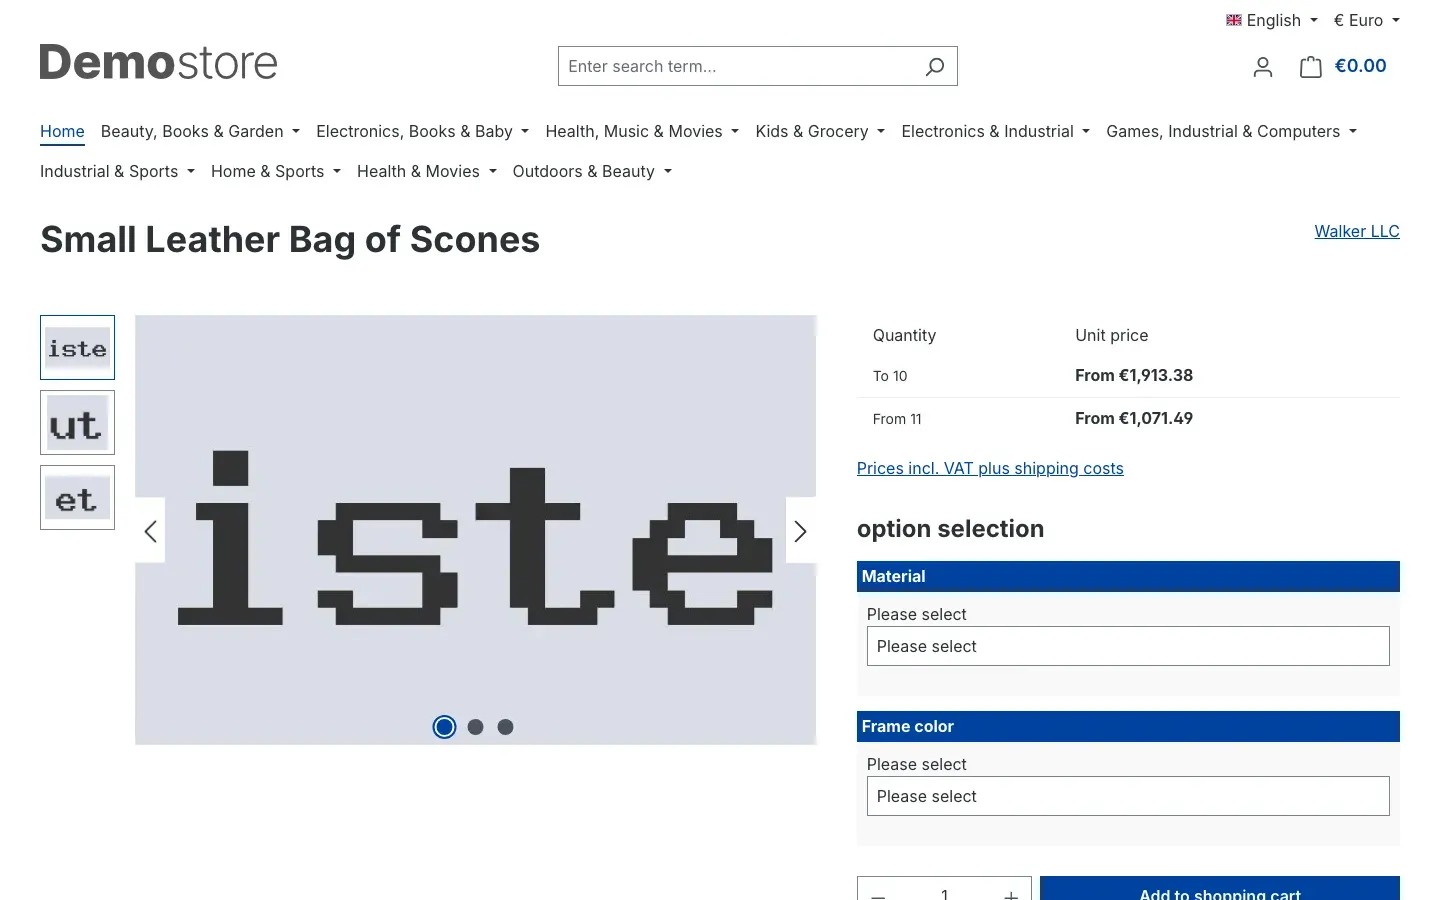 Fig. 4: the option selection before the first choice — both groups show Please select
After the choice
As soon as the customer picks an option, the shop evaluates the recorded dependencies immediately — without reloading the page.
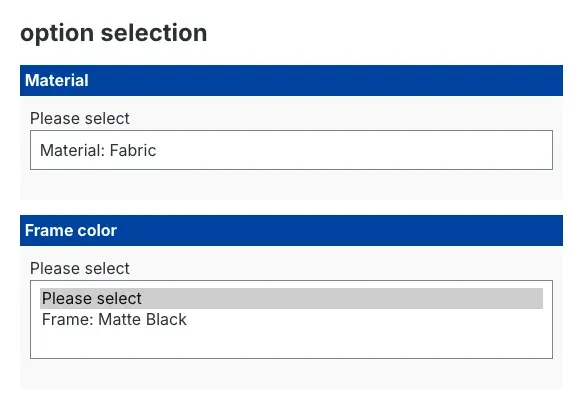 Fig. 5: after choosing Material: Fabric, the Frame color group only offers Frame: Matte Black — Frame: Chrome is gone
In the example the setting Options are hidden if they are on the blacklist is active. That is why Frame: Chrome is no longer in the list at all. Had you chosen Options are grayed out if they are on the blacklist, the entry would still be there — faded and not clickable.
If the customer undoes their choice or picks something else, the previously blocked options are back right away.
Mobile view
Everything works the same way on a smartphone — there, the option selection sits below the product images and the price details.
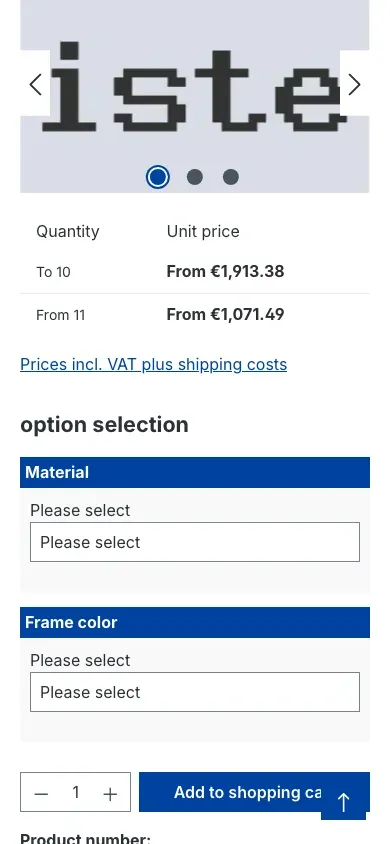 Fig. 6: the same option selection on a smartphone
How to test your rules
- In the shop, open a product the affected options are assigned to.
- Pick the option you recorded a dependency for.
- Check in the other option group whether the blocked option has disappeared or been greyed out.
- Do the reverse check: reload the page and start from the other side. The result must be the same.
Troubleshooting
The “Dependencies” tab is missing on the option detail page
What causes it: the plugin is not active, your browser is still showing an older state of the administration, or your user role is not allowed to see the dependencies.
How to fix it:
- Open Extensions → My extensions and check that the toggle next to Product configurator Dependencies is switched on.
- Reload the administration in your browser.
- If the tab still does not appear, ask an administrator to grant your role the Product configurator dependencies permissions (see For administrators / technical details).
The dependency has no effect in the shop
What causes it: in most cases the assignment was not saved, the plugin is switched off for that sales channel, or the page is still cached.
How to fix it:
- Open the option again and check on the Dependencies tab whether the incompatible option is in the list. If it is not, create it again and click Save.
- Open the plugin configuration, select the affected Sales Channel at the top and check the Enable plugin for this sales channel switch.
- Clear the cache: Settings → System → Caches & indexes → Clear cache.
- Reload the product page in the shop.
An entire option group disappears from the form
What causes it: this is intended behaviour. If the current selection blocks all options of a group, the shop hides the empty group completely instead of showing a heading without content.
How to fix it: if you would rather keep the group visible, switch the plugin configuration to Options are grayed out if they are on the blacklist. Also check whether you really meant to block every option of that group for this combination.
The option is greyed out although it should disappear (or the other way round)
What causes it: Depiction of the dependencies is set to the other choice — possibly only for this one sales channel.
How to fix it: open the configuration, select the affected Sales Channel at the top, set Depiction of the dependencies as required and click Save.
A preselected option disappears on the first click
What causes it: the configurator preselection and your dependencies contradict each other: the customer picks something that rules out the preselected option.
How to fix it: decide which takes precedence. Either remove the preselection in the product configurator, or remove the dependency between the two options.
The plugin cannot be installed
What causes it: the Product configurator base plugin is missing or too old.
How to fix it: install and activate the Product configurator in version 6.7.12 or newer first. After that this extension can be installed.
FAQ
Q: Do I really need the Product configurator?
A: Yes. This plugin adds the Dependencies tab to the product configurator and evaluates the rules in the shop. On its own it has no function.
Q: Do I have to maintain every dependency twice — once on each option?
A: No. An assignment always works both ways. You create it on either of the two options, and that is it.
Q: How many incompatible options can I record per option?
A: As many as you need — the list on the Dependencies tab is not limited.
Q: Do I lose my dependencies if I switch the plugin off for a sales channel?
A: No. Everything you recorded stays in place and takes effect again the moment you switch it back on.
Q: Can I hide options in one shop and grey them out in another?
A: Yes. Both settings — the on/off switch and the depiction — can be set separately per sales channel. Simply select the sales channel at the top of the configuration page first.
Q: Can the customer tell that something was hidden?
A: No. The blocked option is simply no longer in the list. If you want the customer to keep seeing it, choose Options are grayed out if they are on the blacklist.
Q: Does the customer have to reload the page for the block to apply?
A: No. The evaluation happens directly in the browser while the customer is choosing.
Q: What does the “Identifier” column in the list mean?
A: It is the identifier you record on the option in the product configurator. It helps you pick the right option when several option names read the same.
Q: Can I maintain dependencies differently per product?
A: No. A dependency exists between two options and therefore applies everywhere those two options are offered together.
Q: What happens to my assignments when the plugin is uninstalled?
A: If you uninstall the plugin and choose to keep the data, everything is preserved. If you choose otherwise, the assignments and the plugin settings are removed. The options of your product configurator remain untouched in both cases.
For administrators / technical details
This section is aimed at technical administrators. You do not need it for day-to-day work with the plugin.
System requirements
- Shopware: 6.7
- PHP: 8.2 or newer
- Base plugin: Product configurator (
swp/productoptions-six) from version 6.7.12 — a hard requirement, without it no installation is possible
Installation via the command line (Composer)
composer require swp/productoptions-six-dependencies
bin/console plugin:refresh
bin/console plugin:install --activate SwpProductOptionsSixDependencies
bin/console cache:clear
Permissions for restricted roles
In the administration’s permission management, the entry Product configurator dependencies appears under Catalogues, with the permissions View, Edit, Create and Delete.
- Without View, the Dependencies tab stays invisible for that role.
- Create and Delete control assigning and removing a dependency.
- To save, the role additionally needs the edit permission of the product configurator, because the assignments are stored together with the option.
This lets you grant a role access to the product configurator without allowing it to maintain the dependencies.
Behaviour after an update
After a plugin update, the administration files a notification asking you to check the plugin configuration once more. That is a reminder, not an error.
Uninstalling
When uninstalling, Shopware asks whether the plugin data should be kept.
- Keep data: assignments and settings stay in the database; a later reinstall finds everything in place.
- Remove data: the assignments and the plugin settings are deleted.
Shopware tables and product configurator data are not touched in the process.
Data handling and data protection
The plugin only stores the assignments between your configurator options and its own settings. It does not process customer data, does not set cookies and does not connect to external services. The evaluation in the shop runs in the customer’s browser, based on data the product page delivers anyway.
This manual was created for Product configurator Dependencies version 6.7.3.
More manuals
Admin Password Reminder
Admin Password Reminder: your backend users renew their passwords on time, prompted after login and by a daily email. Premium locks expired accounts until the password is changed.
Open manual Shopware 6Age Check
Tobacco, spirits, knives: visitors who do not confirm their age never see the restricted items at all. You tick a box per product, the plugin hides it everywhere.
Open manual Shopware 6AI Media Labelling
AI labelling for images and videos: flag a media item once in the media manager and the badge with your notice appears wherever it shows up in your shop. No template work needed.
Open manualNeed a team that keeps your shop running?
We have been maintaining Shopware shops for more than 20 years, including updates, hotfixes and the plugins you are configuring right now.