
Product configurator Formula calculation
Selling cut to size but quoting by email? Your customers type in width and height on the product page, your formula does the maths, the price lands in the basket.
On this page
- Introduction
- What this plugin does for you
- Who is this plugin for?
- Installation
- Getting started
- Settings
- Enable plugin for this sales channel
- Decimal accuracy of the formula
- Decimal precision of the formula result in the display
- Calculation display selection
- How to set up a formula calculation
- Creating a formula
- Connecting the formula to a product
- Creating the input fields for the measurements
- Setting up a variable
- Assigning the configuration to a product
- How the calculation appears in the shop
- On a phone
- Troubleshooting
- Known limitation: the “Formula” field type on a product
- The formula area is missing in the administration
- The shop shows “Error in formula calculation”
- The shop shows “Not enough values entered”
- The measurement entry does not appear on the product page
- The price is not shown
- The result has too many or too few decimal places
- The settings only take effect in one sales channel
- FAQ
- For administrators / technical details
- System requirements
- Installation via the command line (Composer)
- Loading the example formulas
- Permissions
- Uninstalling
- Known limitation
Introduction
Important: Add-on plugin – requires the Product Configurator (
SwpProductOptionsSix). This plugin is an extension of the base plugin Product Configurator and only works together with it. Without the installed, active and separately purchased Product Configurator from version 6.7.12, this plugin has no function.
Product configurator Formula calculation works out the price of a product from the measurements your customer enters.
Do you sell cut-to-size goods — panels, sheets, films, fabrics, tubes? Then you know the routine: the customer sends the measurements by email, someone works out the price, someone sends a quote back. With this plugin you store that calculation once as a formula. The customer enters the values directly on the product page, the plugin does the maths straight away and puts the finished price into the shopping cart.
What this plugin does for you
- You store your own calculations — area, perimeter, volume — and never work them out by hand again.
- Your customers enter their measurements right on the product page and see immediately what their cut costs.
- The calculated price goes into the shopping cart automatically — no quote by email, no recalculation.
- You decide how much of the calculation your customers get to see: only the price, only the formula, both or neither.
- You decide per sales channel whether the calculation is active — on in your B2B shop, off in your consumer shop, if that suits you.
- You set the limits for every measurement: smallest value, largest value and step size. That keeps out orders you could never produce.
Who is this plugin for?
Shop operators selling made-to-measure goods whose price depends on what the customer specifies: cutting services, workshops, manufacturers of custom parts, dealers in goods sold by the metre.
Installation
After your purchase the plugin is available directly in your administration — there is nothing to download.
- Log in to your Shopware administration (
YourShop.com/admin) - Open Extensions → My extensions
- Next to Product configurator Formula calculation, click Install
- Activate the plugin using the switch on the left of the entry — done.
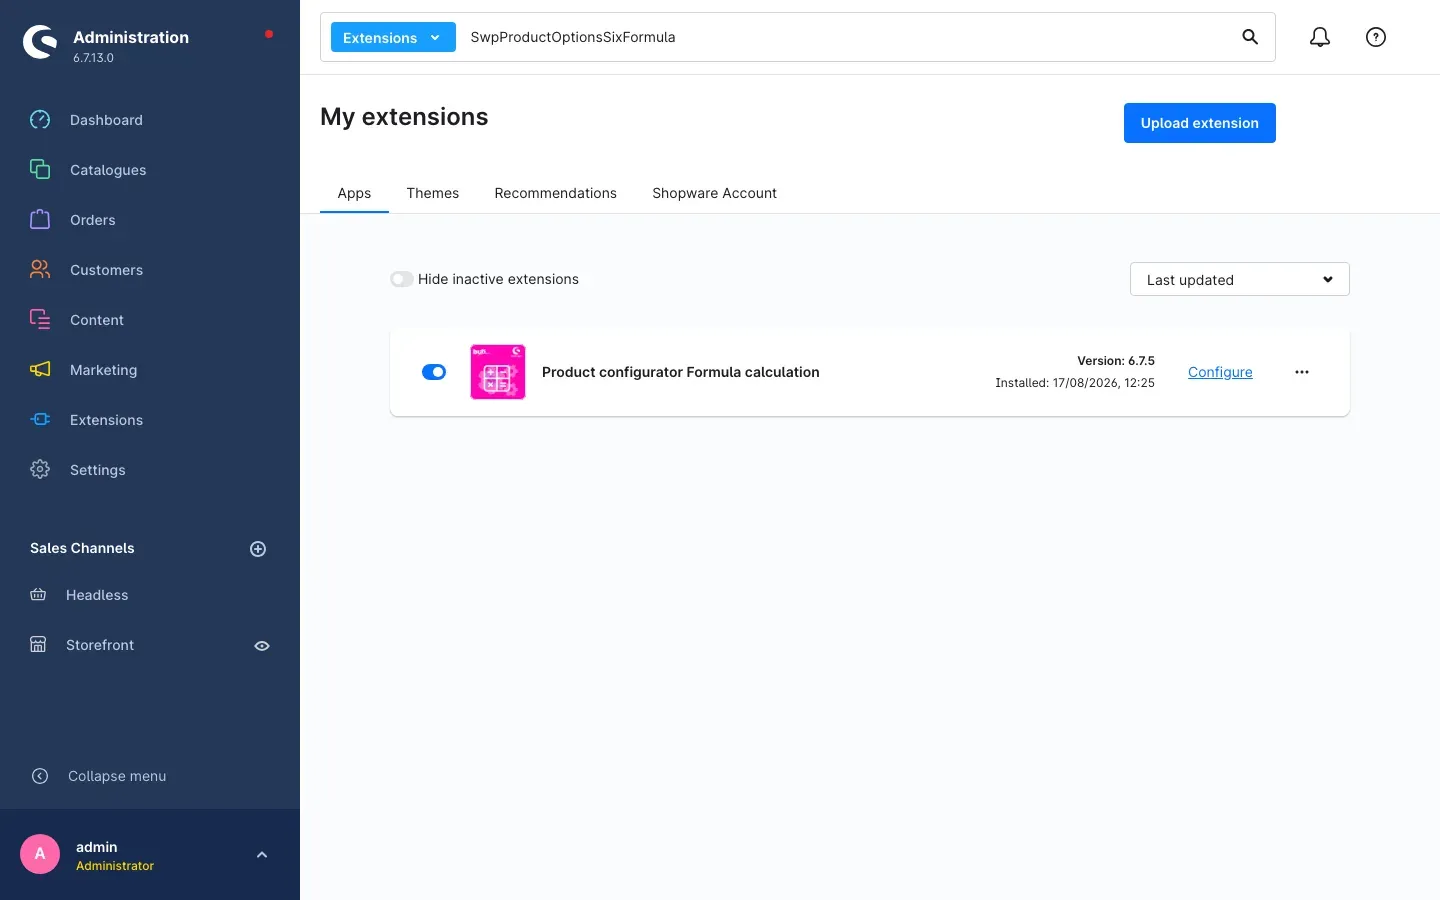 Fig. 1: The entry in My extensions — the switch on the left is on, the Configure link is on the right
The entry shows the installed version and the installation date. Configure on the right of the entry takes you straight to the settings.
Install the Product configurator and activate it before you activate the formula calculation. Without the base plugin, the areas that the formula calculation extends are missing.
If Product configurator Formula calculation does not appear in the list, your Shopware account is not yet connected to the shop. You do that under Extensions → My extensions in the Shopware Account tab.
Getting started
Three steps until the first calculation runs in your shop:
-
Open the settings: Settings → Extensions → Product configurator Formula calculation. Check that Enable plugin for this sales channel is switched on.
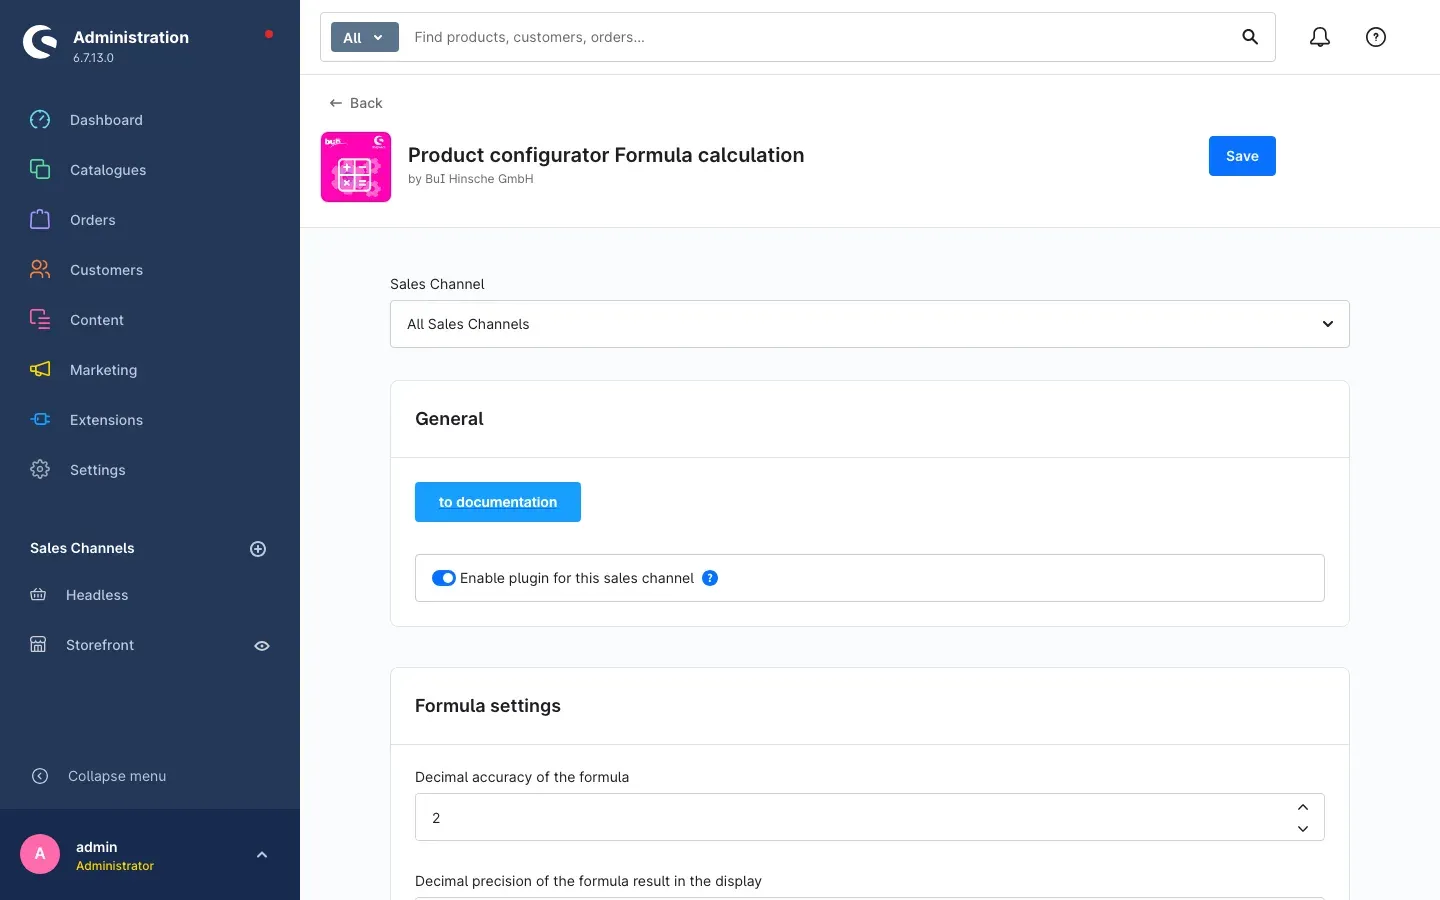 Fig. 2: The configuration page with the sales channel selector, the switch and the formula settings
 -
Create a formula: store your calculation, for example
a*bfor an area (chapter Creating a formula). -
Create the input fields and assign them to a product: build the fields your customers type their measurements into, and attach them to the product (chapters Connecting the formula to a product to Assigning the configuration to a product).
-
Check the result: open the product in your shop. The input fields for your measurements now appear under option selection.
Settings
You find the settings under Settings → Extensions → Product configurator Formula calculation.
At the very top of the page sits the Sales Channel selector. It decides which shop the settings below apply to. With All Sales Channels selected they apply everywhere. Pick a single channel and you can store different values for exactly that channel. After every change, remember the Save button in the top right.
The to documentation button at the top of the General card opens this manual online at any time — in whatever language your administration is set to.
Enable plugin for this sales channel
The Enable plugin for this sales channel switch in the General card decides whether the formula calculation works in this shop. The help text next to it puts it plainly: the formula calculation only takes effect in the sales channels in which this switch is enabled. It is switched on by default.
Why this is useful: you run a B2B shop and a consumer shop and only want to offer measurement entry to trade customers. Then you simply switch it off in the consumer channel instead of uninstalling the plugin. It is just as handy while setting things up: keep the calculation off in your live channel until your formulas are fully checked.
Decimal accuracy of the formula
Decimal accuracy of the formula in the Formula settings card sets how many decimal places are used in the calculation. The default is 2.
Why this is useful: if you charge by the square metre and sell small cuts, extra decimal places make a noticeable difference to the price — then set this to 4, for example. If you sell whole pieces, 2 places are plenty and your prices stay tidy.
Decimal precision of the formula result in the display
Decimal precision of the formula result in the display only controls how many decimal places your customer sees in the displayed result. The default is 2. The calculation itself uses the accuracy from the setting above, regardless of this value.
Why this is useful: you can calculate precisely behind the scenes and still show your customer a clean result such as 1.25 m² instead of a long string of digits.
Calculation display selection
Calculation display selection decides how much of the calculation your customers get to see. There are four options:
- Display formula and price — your customer sees the formula with its result and the resulting price. This is the default.
- Display no price — the formula and its result appear, the price share of the line item stays hidden.
- Display no formula — only the result with its unit and the price appear; how you got there stays your business.
- Formula and price do not show — neither the formula nor the price share appears; the customer only sees their own entries and the total of the line item.
Why this is useful: many businesses would rather not let every visitor read off their pricing logic. With Display no formula the price stays transparent while your calculation behind it does not.
How to set up a formula calculation
A finished measurement entry always consists of the same building blocks, and you build them in this order:
- the formula — the calculation itself,
- a group carrying the formula — it connects the calculation to the product,
- a group carrying the input fields — where your customer types the measurements,
- the assignment to the product.
Creating a formula
What this does for you: you store your calculation exactly once and use it for as many products as you like afterwards.
You reach the formula area through the product configurator: open it in the administration and switch to Formula in the tab bar above the list — Sets, Groups, Options, Formula.
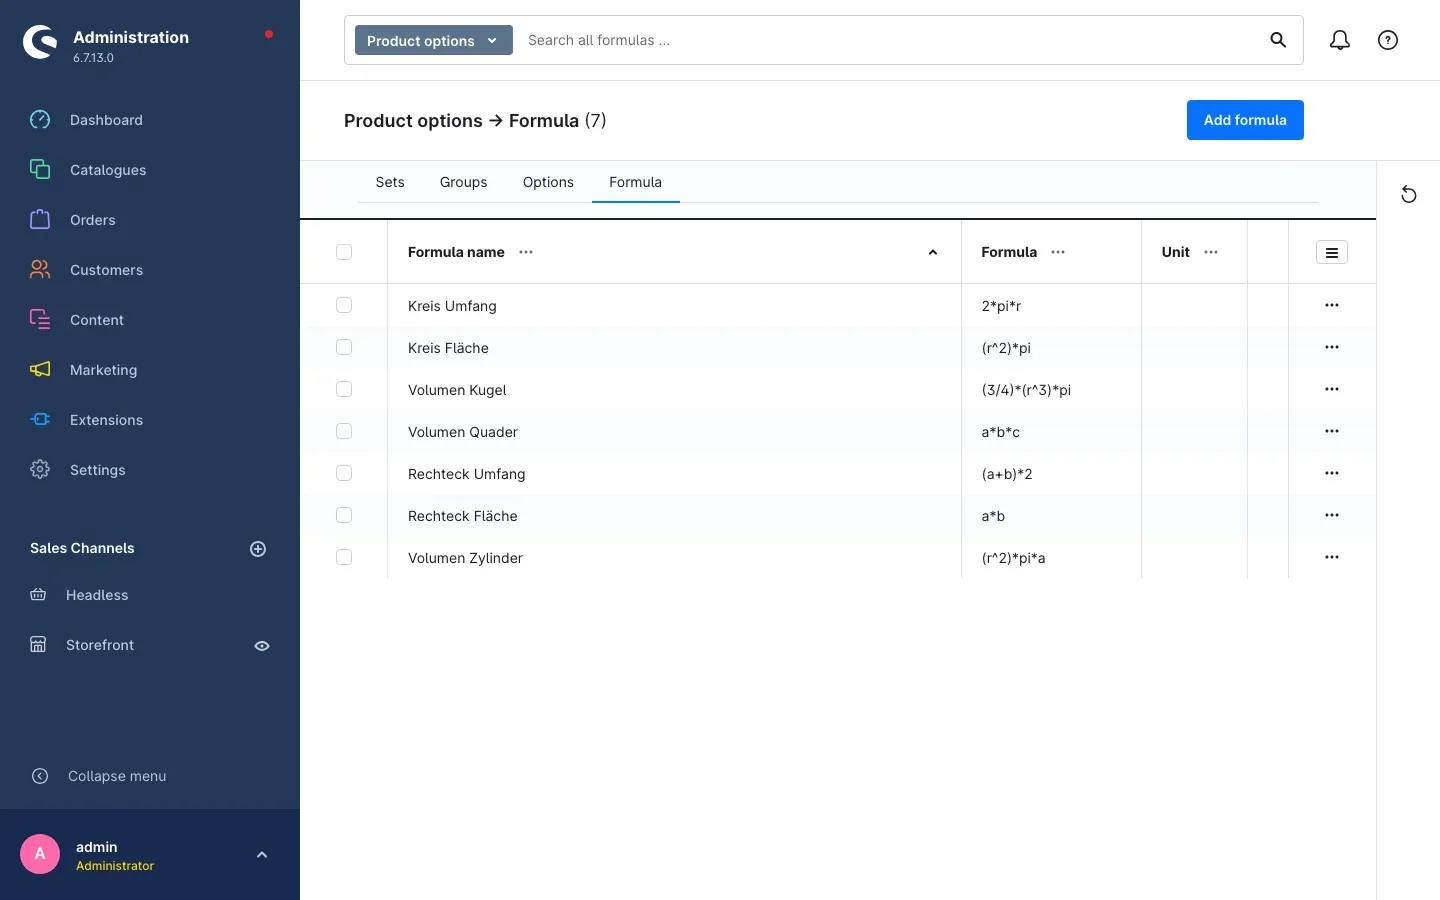 Fig. 3: The Product options → Formula overview with seven stored formulas
For each entry the list shows the Formula name, the Formula itself and the Unit. The search field at the top (Search all formulas …) finds the right one quickly even with many entries. If the list says No formulas created yet, you have not saved a formula so far.
Step by step
- Click Add formula in the top right
- Under Formula information, enter a name in Formula name that you will recognise later —
Rectangle area, for instance - Under Formula settings, enter your calculation in Formula, for example
a*b - In Unit of measure, select the unit of your result, for example square metres. The field may also stay empty
- In How to apply the result, decide what happens with the result:
- Result with article price — the result is calculated against the price of the product. This is the typical case: price per square metre times area
- Result with value — the result is calculated against a fixed amount that you specify yourself
- Plugin — another plugin takes over the calculation, if one is installed for that purpose
- In Enter the calculation step, enter how the result is applied: an operator followed by the value to calculate with. For “times the article price” you write
*AP— the abbreviationAPstands for the article price - Click Save in the top right
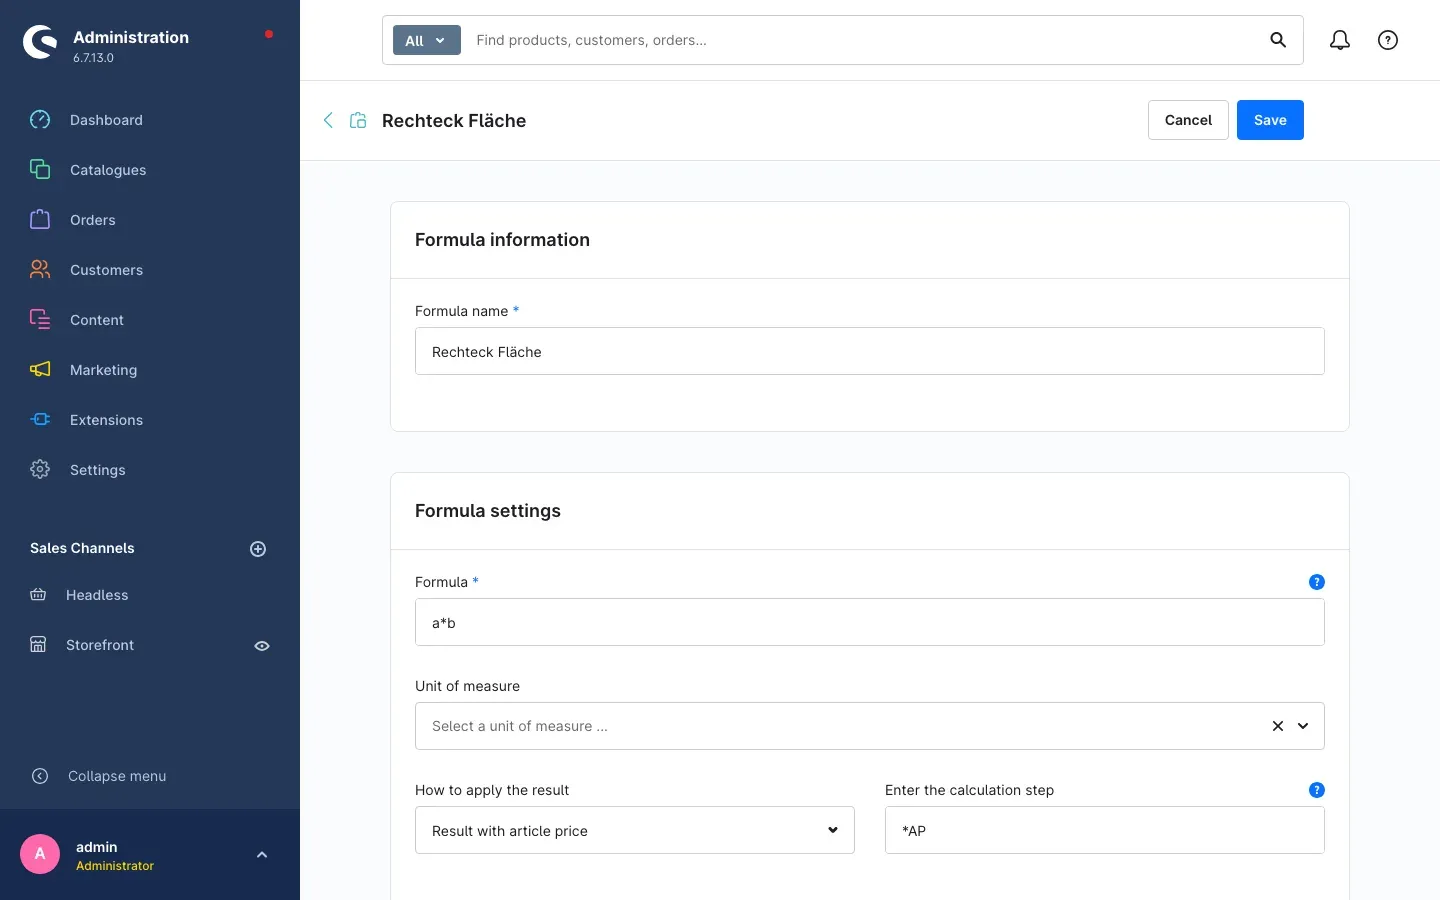 Fig. 4: The formula “Rechteck Fläche” with the calculation
 a*b and the setting Result with article price
Tip: next to the Formula and Enter the calculation step fields you see a blue question mark each. Clicking it shows the permitted operators, variables and functions right where you need them — handy when you are building a longer formula.
What a formula may contain
| Building block | Permitted |
|---|---|
| Operators | + - * / ^ (power) |
| Variables | a, b, c, d, r — no others are possible |
| Decimal numbers | with a dot, so 3.14 |
| Constants | pi, e, Inf |
| Functions | sqrt, abs, sin, cos, tan, log, exp |
| Brackets | as usual, for example (a+b)*2 |
The variables are the placeholders for the values your customer enters later. In a*b, a might stand for the width and b for the length. Which letter stands for which measurement is something you define in chapter Setting up a variable.
Four proven calculations to copy:
| Purpose | Formula |
|---|---|
| Area of a rectangle | a*b |
| Perimeter of a rectangle | (a+b)*2 |
| Volume of a cuboid | a*b*c |
| Area of a circle | (r^2)*pi |
Tip: if you are just starting out, your service provider can load seven ready-made example formulas into your shop (chapter For administrators / technical details). You then see straight away what a clean entry looks like and adapt it to your own products.
Connecting the formula to a product
What this does for you: the group is the link between your calculation and the product. Without it the shop does not know which formula to apply.
You create groups in the product configurator in the Groups tab.
Step by step
- Create a new group in the product configurator or open an existing one
- In Fieldtyp, select Formula
- The Specify your formula name selector appears directly below. Pick your formula there — the list shows the name and the calculation, for example Rechteck Fläche (a*b)
- Set Status to active
- Click Save
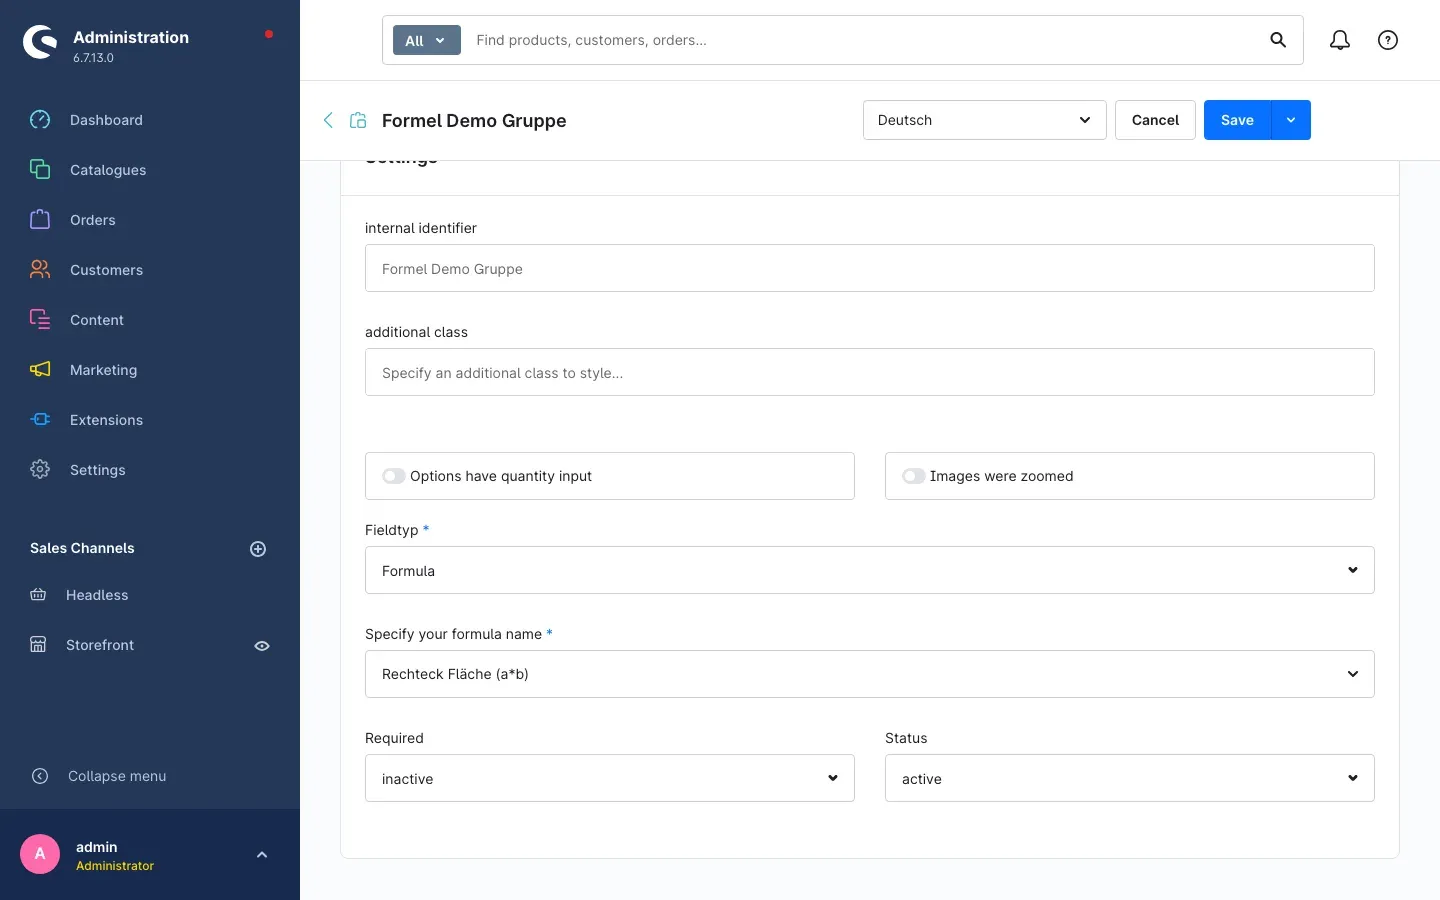 Fig. 5: The group “Formel Demo Gruppe” with the field type Formula and the assigned formula
Important: the Specify your formula name selector only appears once you have chosen Formula in Fieldtyp. If it is missing, a different field type is selected.
Important: before you go live, please read the known limitation regarding the Formula field type in chapter Troubleshooting — it also explains how to work around it.
Creating the input fields for the measurements
What this does for you: this group holds the fields your customer later types width, length or radius into. Every measurement gets its own field.
Step by step
- Create a second group in the product configurator
- In internal identifier, enter a name you will recognise — this name appears in the shop as the heading above the input fields
- In Fieldtyp, select Formula value input
- Set Status to active and save
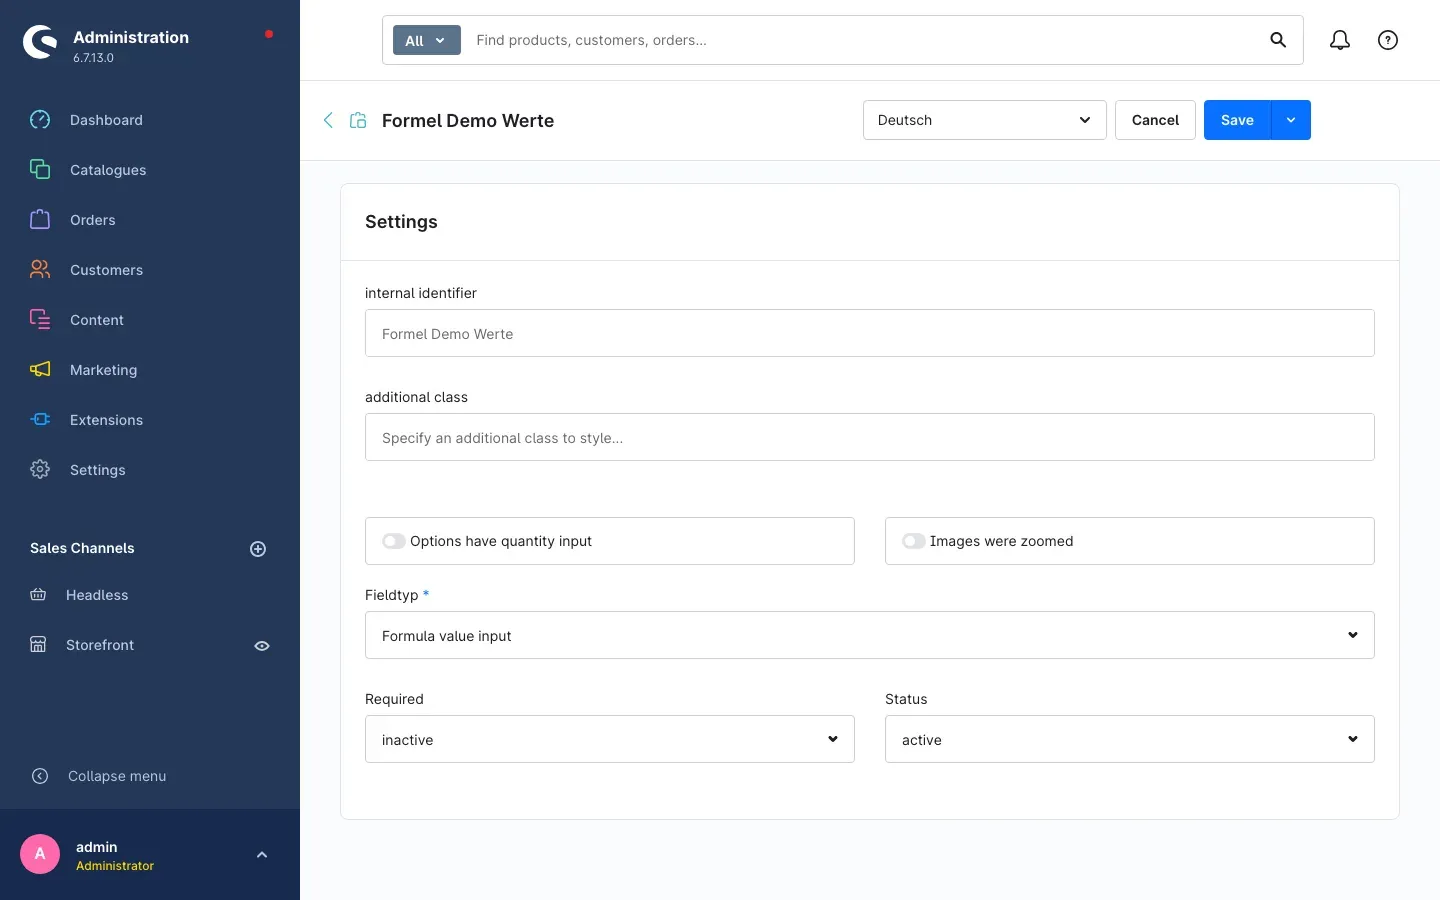 Fig. 6: The group “Formel Demo Werte” with the field type Formula value input
- Switch to the Assigned options tab at the top
- Pick an option in Option assignment and click Add option. Repeat this for every measurement your customer should enter
- The arrows in the Position column put the fields into the order in which they appear in the shop
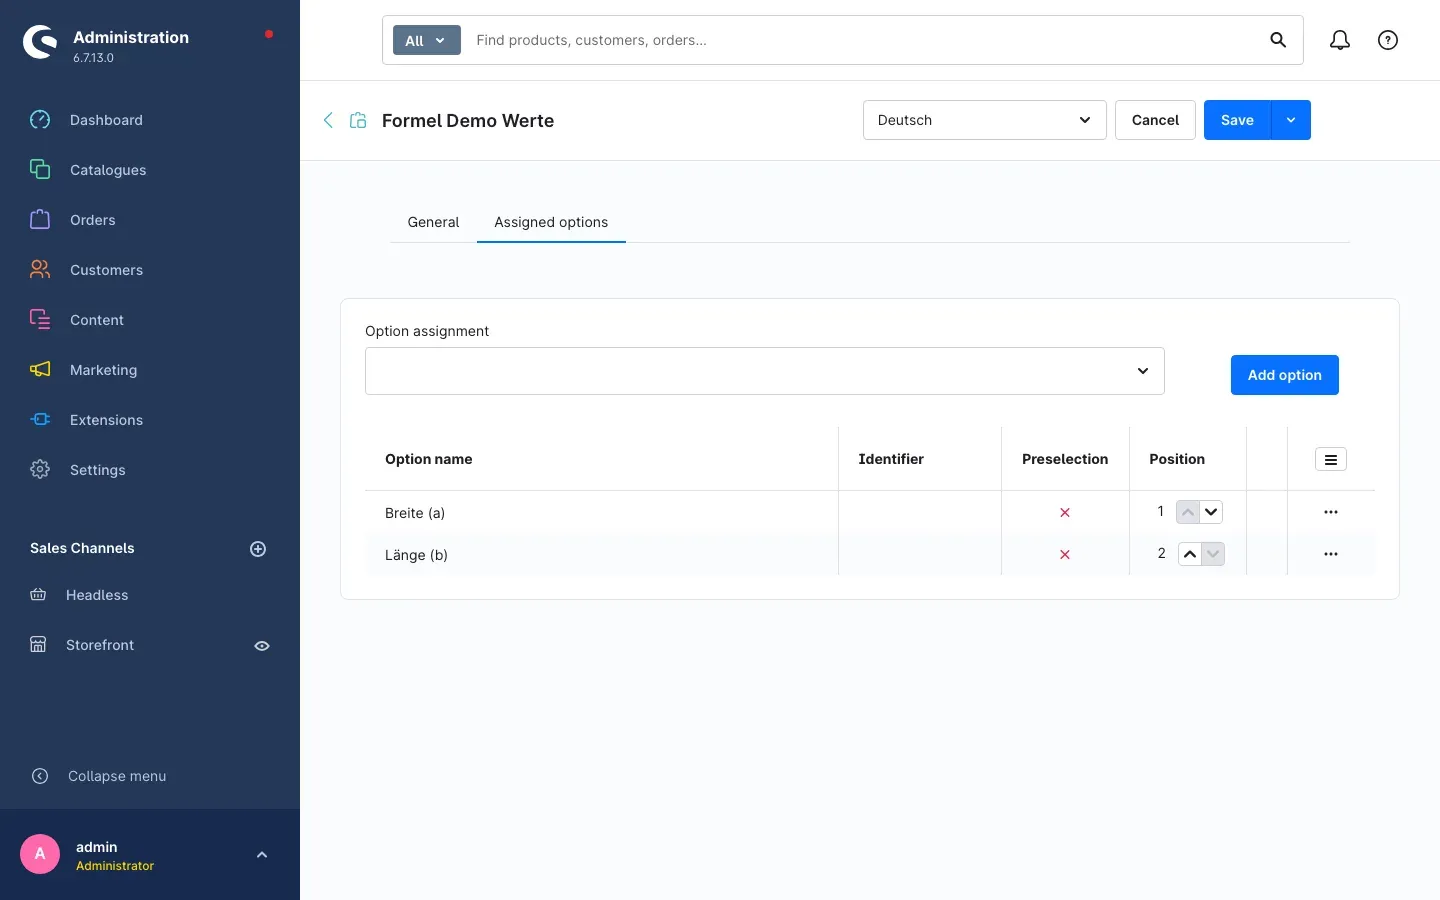 Fig. 7: Two assigned options — “Breite (a)” at position 1, “Länge (b)” at position 2
Tip: name your options so that the letter of the variable is part of the name, for example Width (a) and Length (b). Your customer still understands the label, and while maintaining the data you see at a glance which field belongs to which placeholder in the formula.
Setting up a variable
What this does for you: here you define which letter from your formula belongs to this input field — and which values your customer may enter at all. That keeps out orders you could never produce.
Step by step
- In the product configurator, open the option you created in the Options tab
- Select Formula calculation as the way the option is calculated. Only then does the plugin show the entries under Formula settings
- In Variable, enter the letter this field stands for — only
a,b,c,dandrare permitted. The help text behind the blue question mark says exactly that - In Variable value, enter a starting value if the field should be pre-filled in the shop. The field may stay empty
- In Unit, select the unit of this measurement, for example millimetres. It appears in the shop right next to the input field
- Use Minimum and Maximum to limit what your customer may enter — from 10 to 300, for instance
- Use Step size to define the increments the value may change in, for example 1
- Click Save
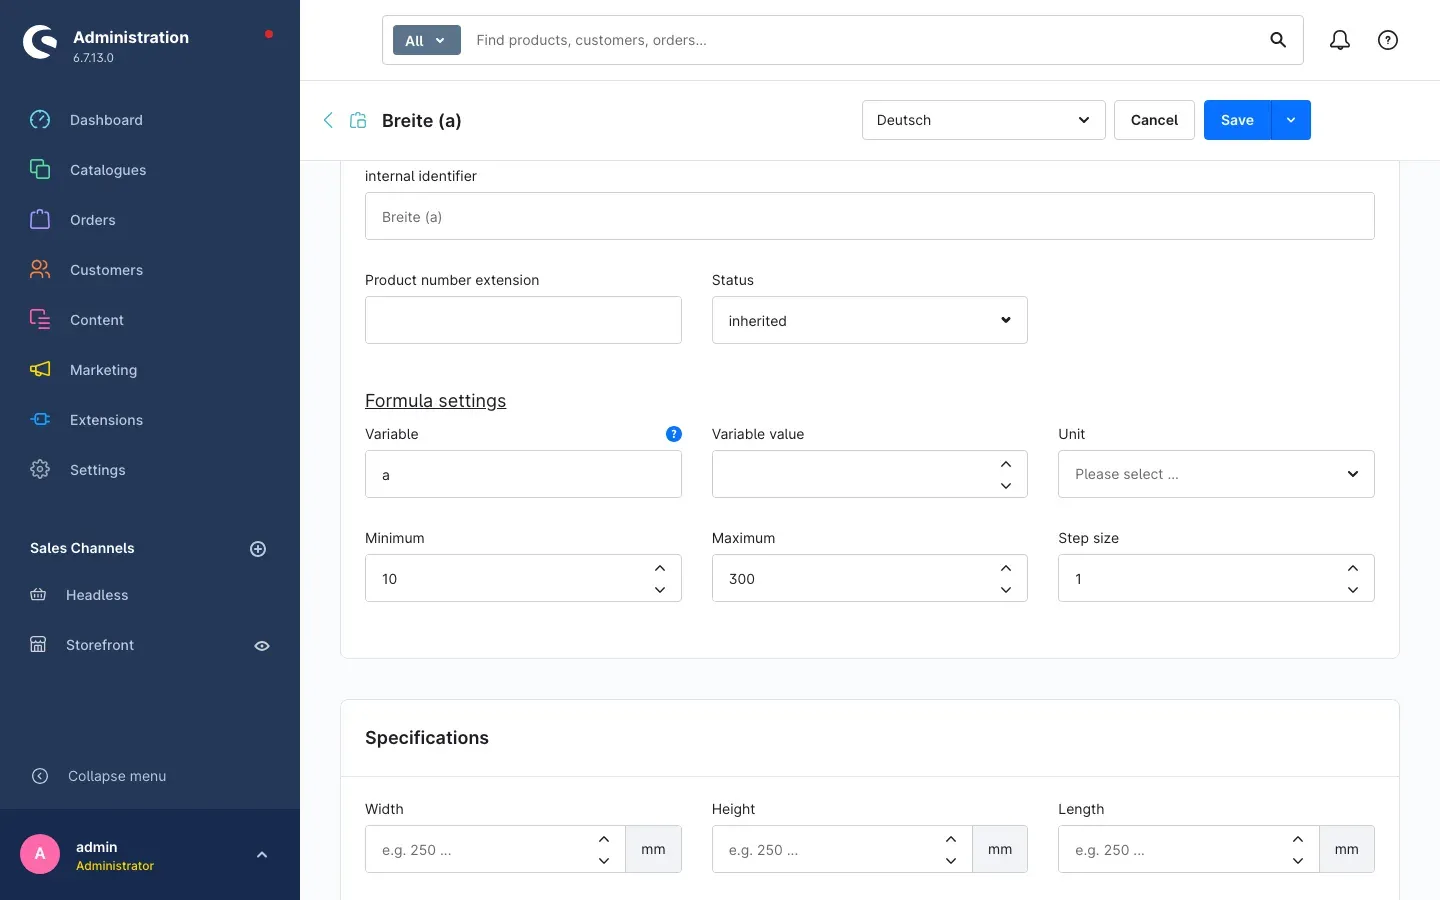 Fig. 8: The option “Breite (a)” — variable a, Minimum 10, Maximum 300, Step size 1
Tip: Minimum and Maximum are your most effective protection against unusable orders. Enter the limits your machine or your material actually allows.
Important: every letter that appears in your formula needs an input field of its own. If the formula reads
a*b, you need one option with variableaand one with variableb. If one is missing, the shop cannot calculate.
Assigning the configuration to a product
What this does for you: only this step makes the measurement entry appear on the product page.
Step by step
- Open the product under Catalogues → Products
- Switch to the Product configurator tab of the product
- Click Assign options and select your group
- Make sure the Status switch is on
- Click Save in the top right
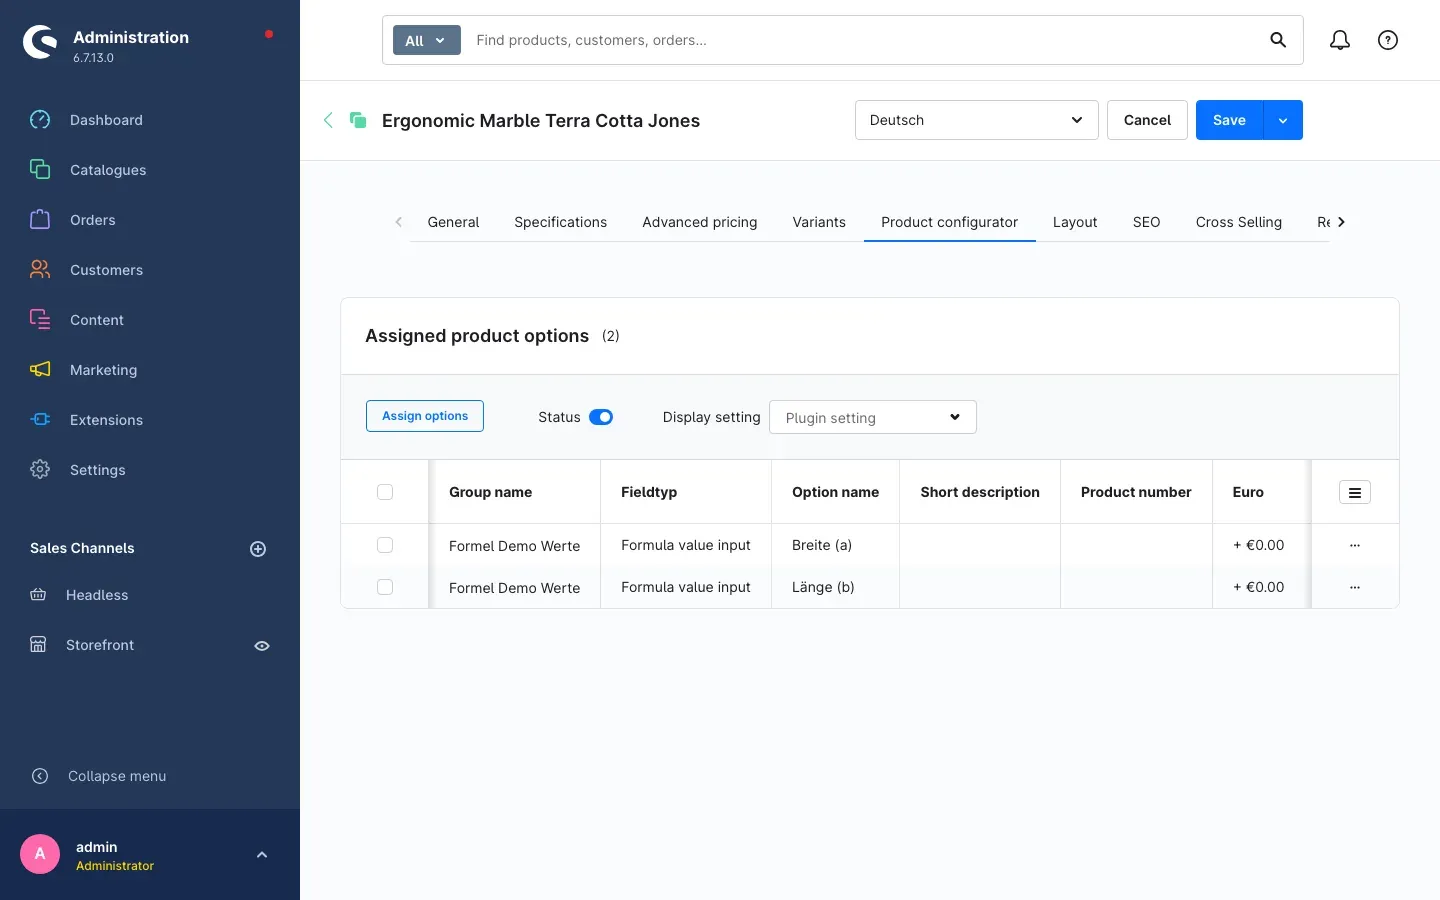 Fig. 9: Assigned product options on the product — two entries with the field type Formula value input
The table lists everything attached to this product: Group name, Fieldtyp, Option name, Short description, Product number and the price share in Euro. So you see at a glance whether all measurements really are assigned.
The Display setting selector controls how the options are presented on this product. With Plugin setting selected, whatever you configured in the product configurator generally applies.
How the calculation appears in the shop
What this does for you: this is the part your customer experiences — and the reason those quotation emails disappear.
On the product page your group appears under the option selection heading. The name of the group sits above the input fields, and below it there is one field per measurement carrying the name of your option.
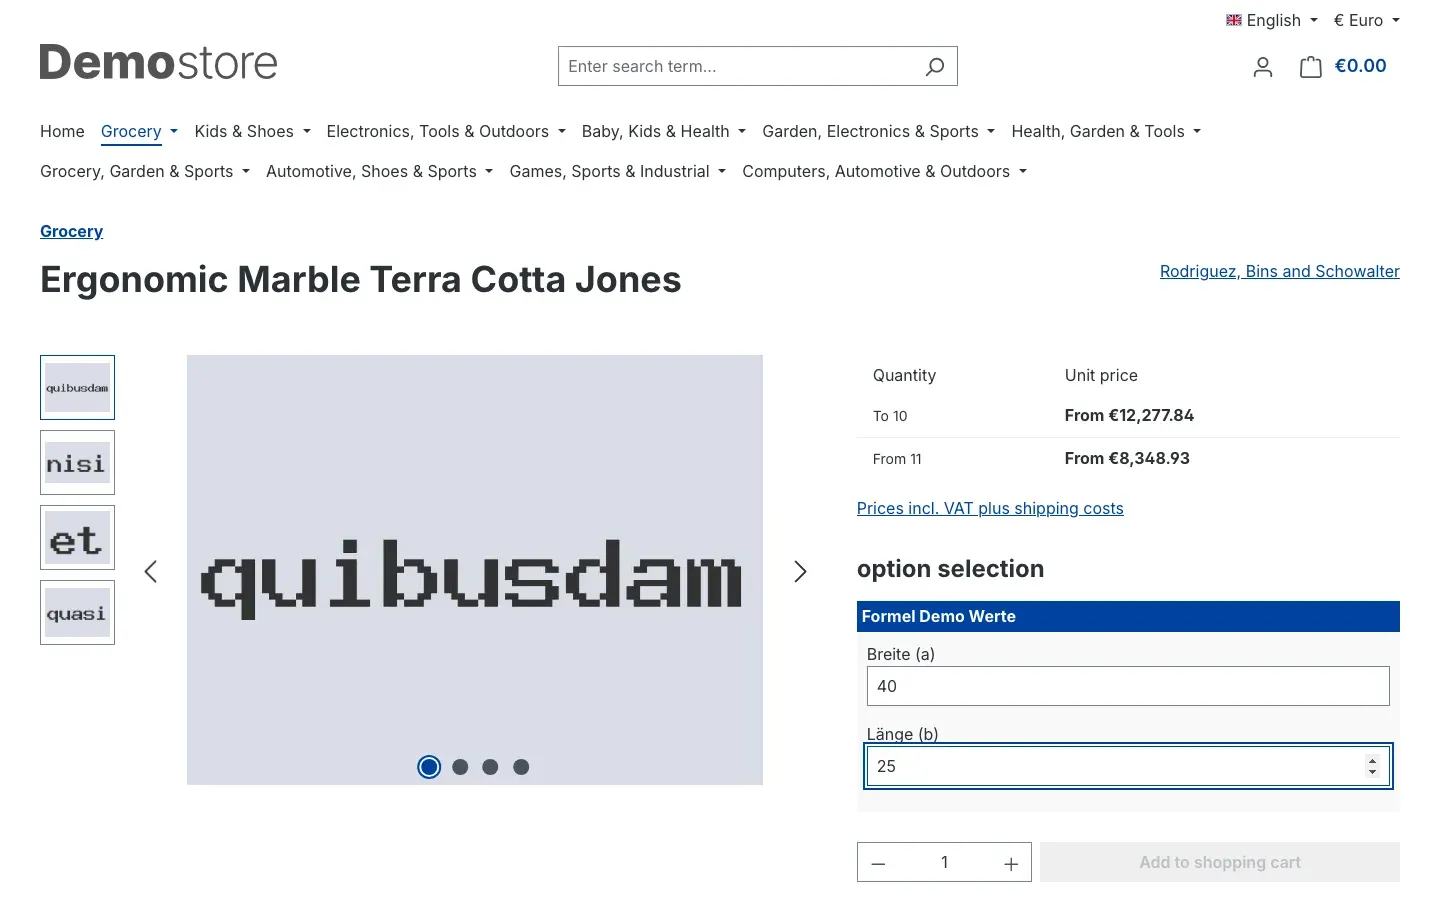 Fig. 10: The product page with the fields “Breite (a)” and “Länge (b)”, filled in with 40 and 25
This is how it plays out for the customer:
- They enter a value in each field. While a field is still empty it shows the hint Please enter a number
- If you stored a unit with the option, it appears immediately to the right of the input field — so the customer sees at once whether to enter millimetres or centimetres
- If a value falls outside your limits, the browser reports it when the form is submitted
- The plugin calculates with the entered values and shows — depending on your Calculation display selection setting — the formula, the result with its unit and the resulting price
- The customer puts the product into the shopping cart
In the shopping cart the line item is not just a price: under the heading Values used for the calculation your customer sees the measurements they entered once more, together with the result and its unit. Here, too, your Calculation display selection setting decides whether the formula and the price share are visible.
On a phone
The measurement entry adapts to narrow screens: the fields are then stacked and use the full width.
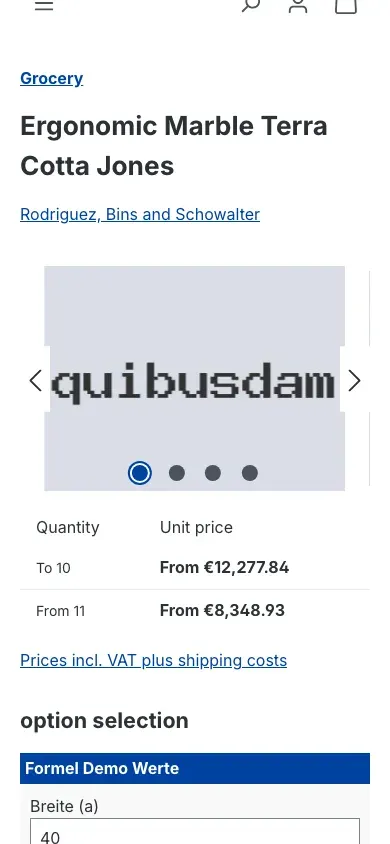 Fig. 11: The same measurement entry on a mobile device
Tip: always check your setup on a phone as well. More than half of all shop visits come from mobile devices, and long option names in particular look different on a narrow screen than they do on your desk.
Troubleshooting
Known limitation: the “Formula” field type on a product
What causes it: if you assign a group with the Formula field type to a product, an error in the script of the product page can occur in combination with the base plugin Product configurator. The Add to shopping cart button then stays greyed out and cannot be clicked, even though the customer has filled in everything. The cause lies in the preselection routine of the base plugin, not in the formula calculation itself.
How to handle it:
- Assign the group with the Formula value input field type to the product — measurement entry and calculation work fully that way
- After every change to the assignment, check the product page in your shop and click the Add to shopping cart button yourself once
- If the button stays grey, remove the group with the Formula field type from the product and contact our support (chapter 9) — we will tell you which release of the base plugin supports the combination
The formula area is missing in the administration
What causes it: either the base plugin Product configurator is not active, or your user account has no permission for the formula area, or the cache is out of date.
How to fix it:
- Open Extensions → My extensions and check that Product configurator and Product configurator Formula calculation are active
- Under Settings → System → Users & permissions, check that your role holds the View permission for Product configurator formula calculation
- Clear the cache: Settings → System → Caches & indexes → Clear cache
- Reload the administration in your browser
The shop shows “Error in formula calculation”
What causes it: the calculation cannot be worked out with the values entered — usually a typo in the formula, a character that is not permitted, or a division by zero.
How to fix it:
- Open the formula in the formula area and read the Formula field character by character
- Check that only the permitted building blocks appear (see the table in chapter Creating a formula)
- Watch out for decimal numbers: they need a dot, so
3.14and not3,14 - Check that every bracket is closed again
- Save and reload the product page
The shop shows “Not enough values entered”
What causes it: your formula contains a letter that has no input field — or the customer left a field empty.
How to fix it:
- Write down every letter used in your formula, for example
aandbina*b - Open the group with the Formula value input field type and its Assigned options tab
- For every option, check which letter is entered in Variable under Formula settings
- Add the missing options and save
The measurement entry does not appear on the product page
What causes it: usually one of the stations between formula and product is not active.
How to fix it:
- On the configuration page, check that Enable plugin for this sales channel is switched on for exactly this sales channel — select the channel at the top before you look
- On the group, check that Status is set to active
- On the product, in the Product configurator tab, check that the group is assigned and the Status switch is on
- Clear the cache and reload the product page
The price is not shown
What causes it: in most cases this is not a fault but your own setting.
How to fix it:
- Open the configuration page and look at Calculation display selection
- If it says Display no price or Formula and price do not show, the price share is hidden on purpose
- Set it to Display formula and price and save
The result has too many or too few decimal places
What causes it: two settings work together here — one for calculating, one for displaying.
How to fix it:
- Change Decimal accuracy of the formula if the price itself is calculated too coarsely or too finely
- Change Decimal precision of the formula result in the display if only the displayed number is too long or too short
- Save and reload the product page
The settings only take effect in one sales channel
What causes it: you had a single sales channel selected when you saved. Values stored that way only apply there.
How to fix it:
- Set the selector at the top to All Sales Channels and enter the values there — they then apply everywhere a channel does not carry its own value
- If you deliberately want a different value per channel, select the channel and save there
FAQ
Q: Do I need another plugin for the formula calculation to work?
A: Yes. The formula calculation is an extension of the Product configurator plugin. Both have to be installed and active.
Q: How many different measurements can a customer enter?
A: Up to five. The placeholders a, b, c, d and r are available — enough for length, width, height, depth and radius in practically every case.
Q: Can I calculate with the product price?
A: Yes, and that is the normal case. Select Result with article price in How to apply the result and enter *AP in Enter the calculation step, for instance. AP stands for the price of the product. At a square-metre price of €20 and an area of 1.25 m² that comes to €25.
Q: Can I calculate with a fixed amount instead?
A: Yes. Select Result with value and enter the operator and the amount to calculate with in Enter the calculation step.
Q: My customers should not see my calculation. Is that possible?
A: Yes. Set Calculation display selection to Display no formula. Your customer then sees the result and the price, but not how you got there.
Q: Can I stop someone ordering measurements I cannot produce?
A: Yes. For every option, enter Minimum, Maximum and Step size under Formula settings. The shop then only accepts entries within those limits.
Q: Can I use the same formula for several products?
A: Yes. You create a formula once and use it in as many groups and on as many products as you like. If you change the formula later, the change takes effect everywhere.
Q: Can I use decimal numbers in a formula?
A: Yes, but with a dot as the separator — so 3.14 and not 3,14.
Q: Do I have to set everything up again for each sales channel?
A: No. Formulas, groups and options apply across the whole shop. Only the settings on the configuration page can be stored differently per sales channel — including the switch that turns the calculation off in a channel completely.
Q: Who on my team may edit formulas?
A: You control that through the user roles under Settings → System → Users & permissions. For Product configurator formula calculation you can grant View, Edit, Create and Delete individually.
Q: Are my formulas gone if I uninstall the plugin?
A: Only if you want them to be. When uninstalling, Shopware asks whether your data should be kept. Answer yes and your formulas are still there, unchanged, after a fresh installation.
Q: Which languages does the plugin support?
A: The interface is available in German, English and Dutch. This manual is available in German and English.
For administrators / technical details
This section is aimed at technical administrators. You do not need it for normal use.
System requirements
- Shopware: 6.7
- PHP: 8.2 or newer
- Base plugin: Product configurator (
swp/productoptions-six) from version 6.7.12, installed and active
Installation via the command line (Composer)
composer require swp/productoptions-six-formula
php bin/console plugin:refresh
php bin/console plugin:install SwpProductOptionsSixFormula --activate
php bin/console cache:clear
Loading the example formulas
For a quick start, seven ready-made example formulas can be written into the shop — perimeter and area of a rectangle and a circle, volume of a cuboid, a cylinder and a sphere. Precondition: the shop already contains products.
php bin/console productoptions:formula:examples
php bin/console productoptions:formula:examples --force
The first call only lists what would be written. The formulas are created only with --force. A second call does not create them again but updates the same seven entries — so the command can safely be repeated.
Permissions
The plugin brings its own permission area, which you assign to a role under Settings → System → Users & permissions. It is called Product configurator formula calculation there and offers the levels View, Edit, Create and Delete. The levels build on each other: anyone allowed to edit, create or delete always needs View as well.
Uninstalling
When uninstalling, the plugin evaluates Shopware’s question about whether user data should be kept. Answer yes and your formulas stay in the database and are back after a fresh installation. Otherwise they are removed.
Known limitation
The limitation described in chapter Troubleshooting concerns the preselection routine in the base plugin Product configurator, not the formula calculation. It occurs when a group with the Formula field type is assigned directly to a product; the error keeps the Add to shopping cart button disabled. The tested and recommended route is the assignment through a group with the Formula value input field type.
This manual was written for Product configurator Formula calculation version 6.7.4.
More manuals
Age Check
Tobacco, spirits, knives: visitors who do not confirm their age never see the restricted items at all. You tick a box per product, the plugin hides it everywhere.
Open manual Shopware 6Blog: Posts, Categories & Comments
Stop running WordPress next to your shop. Write posts, categories, authors and moderated comments in Shopware, then build the blog pages in Shopping Experiences.
Open manual Shopware 6Cart Extras
Your customer sees in the cart how much is missing before the free gift or the discount. Below your minimum order value, the plugin adds exactly the shortfall as a surcharge.
Open manualNeed a team that keeps your shop running?
We have been maintaining Shopware shops for more than 20 years, including updates, hotfixes and the plugins you are configuring right now.