
Product configurator Matrix
Selling made to measure without variant sprawl: the plugin reads each option price from a table of two dimensions, such as width and height, and prices it in the cart.
On this page
- Introduction
- What this plugin does for you
- Who is this plugin for?
- Installation
- Getting started
- Settings
- Sales Channel
- Enable plugin for this sales channel
- to documentation
- Working with price matrices
- How to create a price matrix
- How to define the size steps
- How to enter the prices
- How to connect an option group to your price matrix
- What your customer sees in the shop
- How the dimensions appear in the cart and in the order
- Reusing the dimensions in formulas
- Troubleshooting
- No price appears on the product page although both fields are filled
- The cart shows “Error in the matrix”
- The cart shows “Not enough values entered”
- The cart shows “Value too large”
- The surcharge is €0.00
- The “Matrix” tab is missing
- A colleague cannot see the “Matrix” tab
- FAQ
- For administrators / technical details
- System requirements
- Installation via the command line (Composer)
- Creating an example price table
- Permissions
- Uninstalling
Introduction
Important: Add-on plugin – requires the Product Configurator (
SwpProductOptionsSix). This plugin is an extension of the base plugin Product Configurator and only works together with it. Without the installed, active and separately purchased Product Configurator from version 6.7.12, this plugin has no function.
Product configurator Matrix helps you sell made-to-measure goods without creating a separate variant for every size: your customer enters two dimensions — width and height, for example — and the plugin reads the matching price from a price table and adds it straight to the article price.
The plugin extends the product configurator. It adds the field type Matrix to it, plus its own management area for price tables.
What this plugin does for you
- You enter your price list once as a table — columns for the first dimension, rows for the second, prices in the cells.
- Your customers enter their dimensions on the product page and see the surcharge immediately, before they even click Add to shopping cart.
- You avoid hundreds of variants: a table with 3 × 3 cells already covers nine combinations, a 10 × 10 table covers a hundred.
- The price appears in the cart and in the order together with the entered dimensions — your team sees straight away what has to be cut.
- You decide which dimensions can be ordered at all: the input fields in the shop only accept values that exist in your table.
Who is this plugin for?
For anyone selling goods cut to size whose price depends on two dimensions: glass and panel cutting, films, tarpaulins, fabrics, carpets, sun protection, flooring, worktops, signs and prints. It also fits any price list graded by two other quantities — print run and format, or weight and distance, for instance.
You do not need any technical knowledge. The price table is maintained entirely in the Shopware administration.
Installation
After your purchase the plugin is available directly in your administration — there is nothing to download.
Important: this plugin extends the product configurator. The product configurator has to be installed and active, otherwise Product configurator Matrix cannot be installed.
- Log in to your Shopware administration (
YourShop.com/admin) - Open Extensions → My extensions
- Next to Product configurator Matrix, click Install
- Activate the plugin using the toggle to the left of the entry — done.
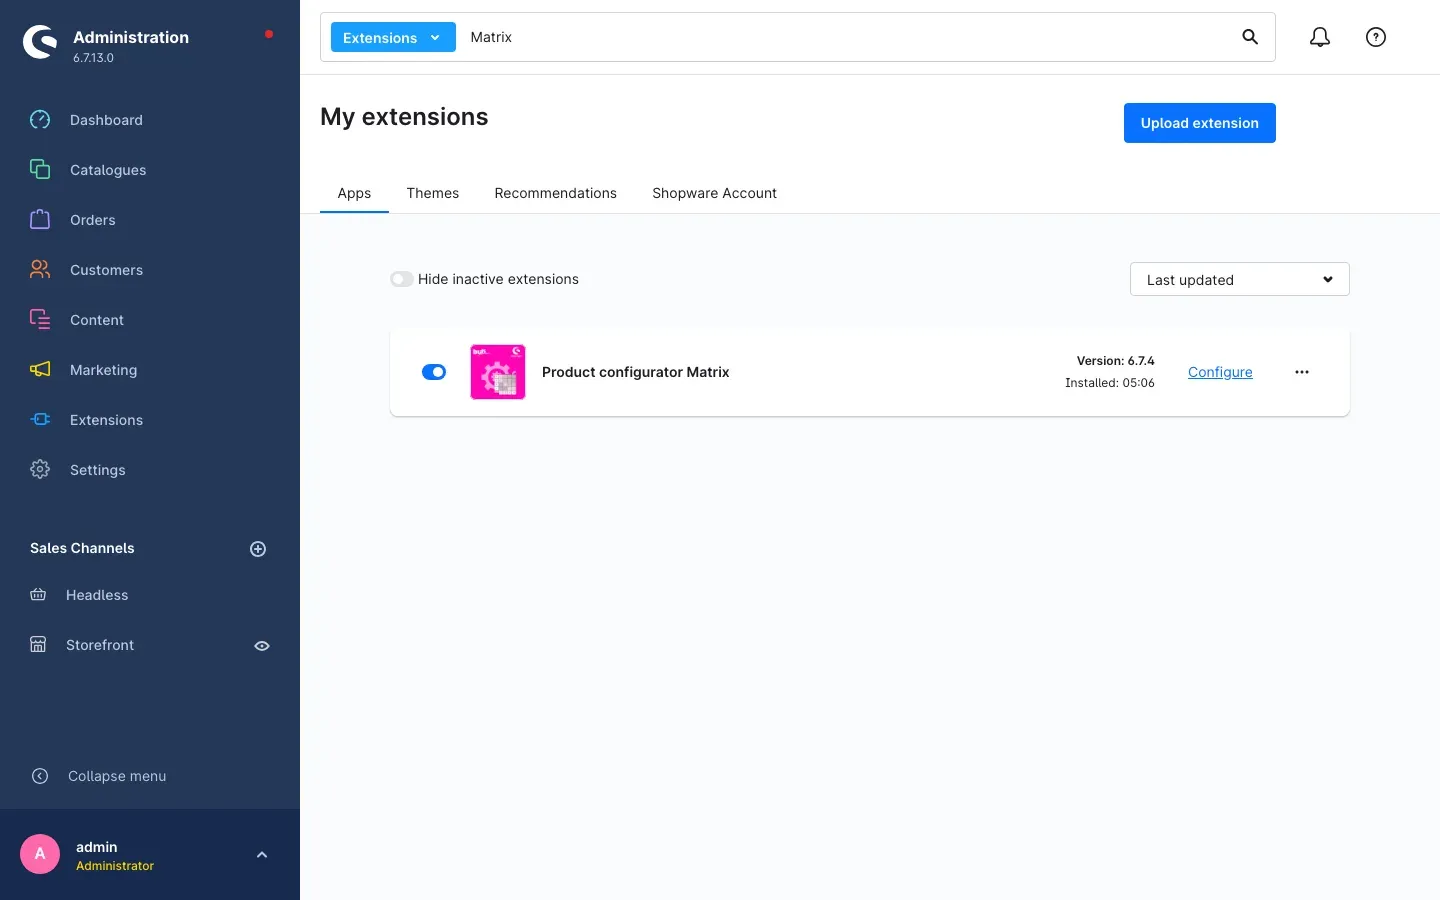 Fig. 1: the Product configurator Matrix entry under My extensions — the toggle on the left is switched on, the installed version is shown on the right.
If Product configurator Matrix does not appear in the list, your Shopware account is not yet connected to the shop. You can do that under Extensions → My extensions on the Shopware Account tab.
To find the entry faster, use the search bar at the top: in the screenshot it is set to Extensions and filtered on the term “Matrix”.
Getting started
Three steps are enough for your first made-to-measure product. Each step is described in detail in chapter 5.
-
Create a price table: open the Product options area and switch to the Matrix tab at the top. Use Add matrix to create your first price table, enter the size steps and fill in the prices.
-
Switch an option group to Matrix: in the product configurator, open the option group that is supposed to ask for the dimensions, choose Matrix as the Fieldtyp and select your price table below, under Specify your matrix name.
-
Check the result: open the product in your shop, enter two dimensions and look at the Calculation of your configuration: block. It shows the surcharge taken from your table.
The plugin’s own settings are located under Settings → Extensions → Product configurator Matrix.
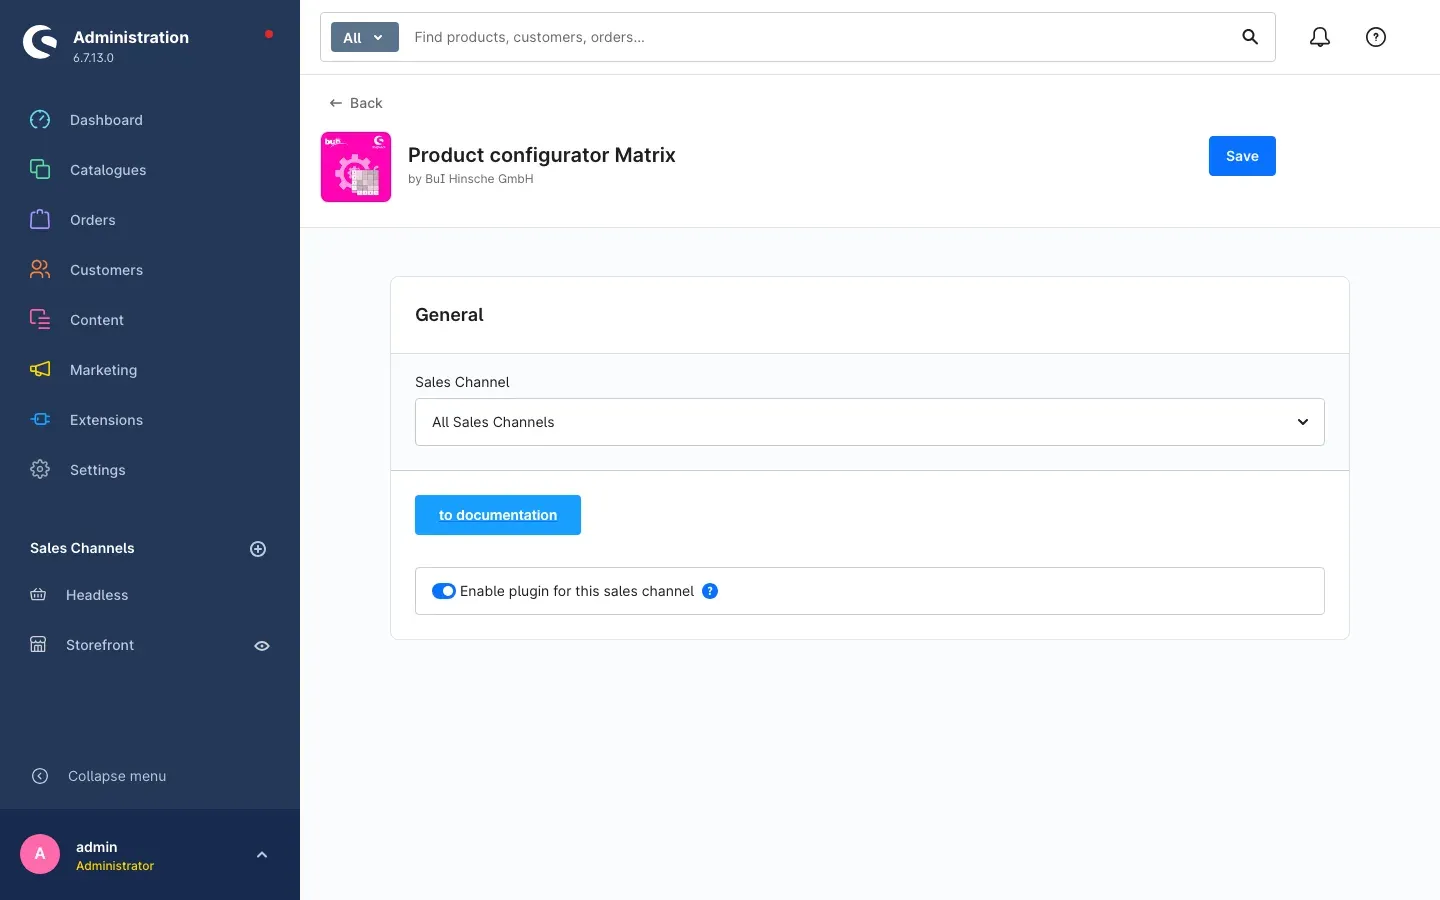 Fig. 2: the configuration page with the sales channel selector, the to documentation button and the Enable plugin for this sales channel toggle.
Settings
You will find the settings under Settings → Extensions → Product configurator Matrix. There is only one setting — everything else is maintained on the price table and on the option group.
Sales Channel
At the very top, Sales Channel determines which shop the setting below applies to. As long as All Sales Channels is selected, it applies everywhere. Pick an individual channel to decide differently for that one.
Why this is useful: if you run a retail shop alongside a trade shop, you can use the dimension-based pricing in one of them only.
Enable plugin for this sales channel
Enable plugin for this sales channel determines whether the price matrix works in this shop at all. The toggle is switched on by default. Switch it off and matrix options in this sales channel are neither priced in the cart, nor are the input fields on the product page limited to the dimensions of your table.
Why this is useful: you can put the feature on hold temporarily — while you rework a large price list, for example — without uninstalling the plugin and without losing your price tables.
After every change, remember to click Save in the top right corner.
to documentation
The to documentation button opens this manual online — always in the language your administration is set to.
Working with price matrices
How to create a price matrix
What this gives you: the price matrix is your price list. You create it once and can then use it on as many option groups and products as you like.
Step by step
- Open the Product options area in the administration
- Switch to the Matrix tab at the top — next to Sets, Groups and Options
- Click Add matrix in the top right corner
- Enter a meaningful name under Matrix name, for example “Preismatrix Fensterglas 4mm”. You will select the table by this name on the option group later, so pick something you will recognise in a long list.
- Click Save in the top right corner
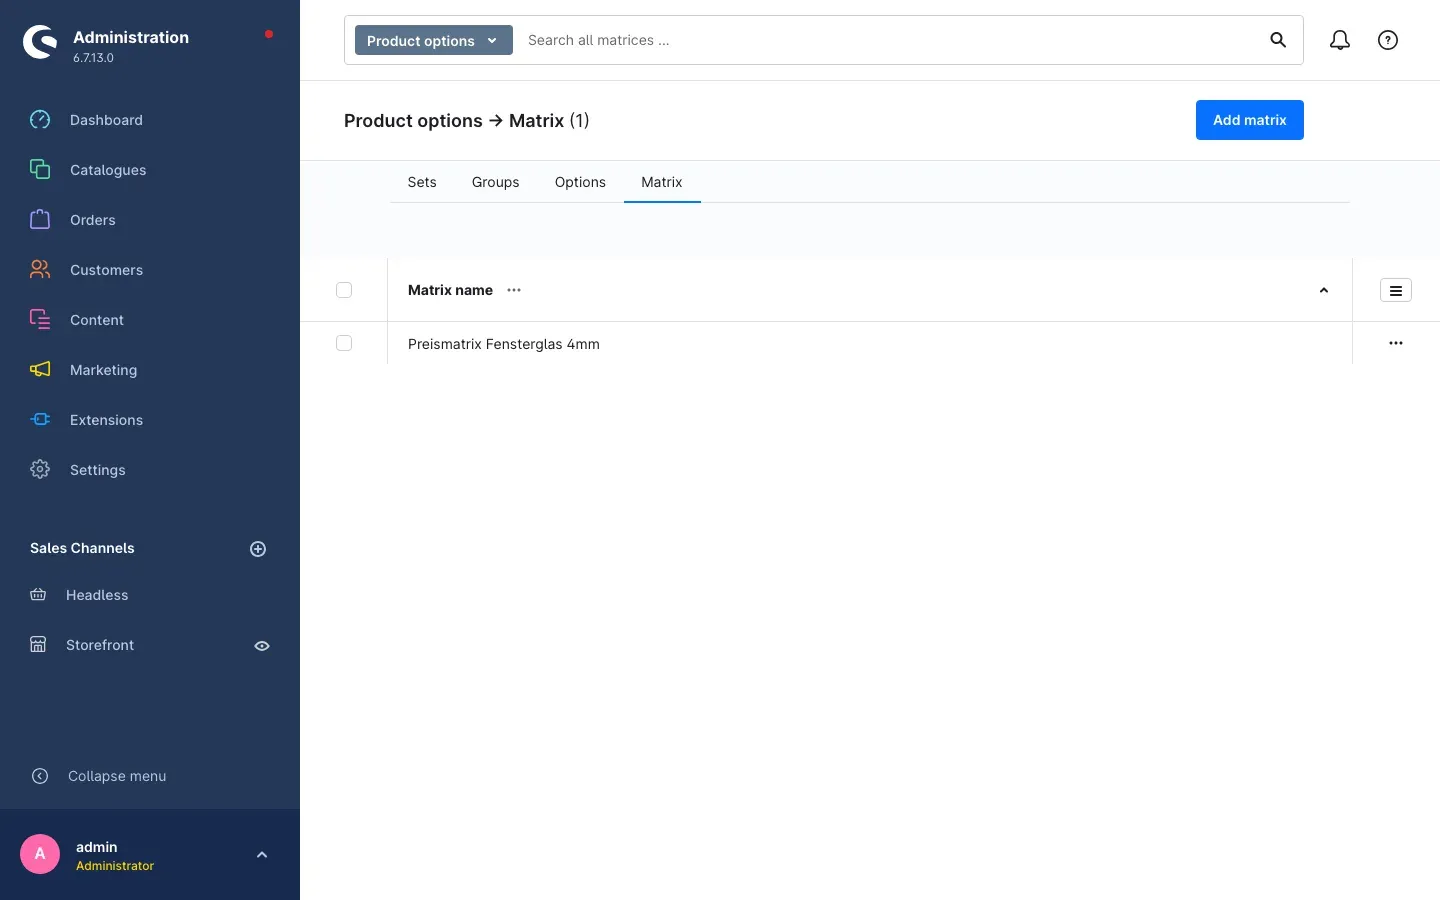 Fig. 3: the Product options → Matrix overview with one price table. The Add matrix button sits in the top right corner.
Tip: the search bar at the very top brings your tables back up — it reads Search all matrices … as soon as Product options is selected on the left.
Tip: in the overview you can also rename a table directly in its row, without opening it.
If you have not created a table yet, the overview reads No matrix created yet.
How to define the size steps
What this gives you: the size steps decide in which increments your price changes. You define them separately for the columns (the first dimension, width in our example) and the rows (the second dimension, height in our example).
Step by step
- Open your price matrix from the overview
- Click Edit columns
- In the Column names field, enter your values separated by commas, for example
30,60,90,120. The note above the field states the same format: “Please enter the column names here, separated by commas. e.g. 10,20,30” - Click Apply assignment
- Repeat this via Edit rows for the second dimension — the field there is called Row names
- Click Save in the top right corner
How your values become price steps: the first value is the lower bound, every further value closes off a step. 30,60,90,120 produces the three steps 30 - 60, >60 - 90 and >90 - 120. A customer entering 60 still lands in the 30 - 60 step; from 61 onwards >60 - 90 applies.
The smallest and the largest value are also the limits for your customers: in the shop, the input fields only accept values between the two. In the example, that means between 30 and 120.
Important: only numbers and commas belong in these two fields. Any other character is removed as you type. Your values are also sorted in ascending order automatically and duplicates are dropped — so you do not have to watch the order.
Tip: prefer a few well-chosen steps over a great many. Every additional column and every additional row is one more price to maintain — 6 columns and 6 rows already come to 36 prices.
How to enter the prices
What this gives you: the prices in the cells are what turns the grid into your price list. Exactly the value from the matching cell is later added to the article price.
Step by step
- Click into the cell you want to fill
- Enter the price — both comma and full stop are accepted,
34,90and34.90produce the same result - Confirm your entry
- Once every cell is filled, click Save in the top right corner
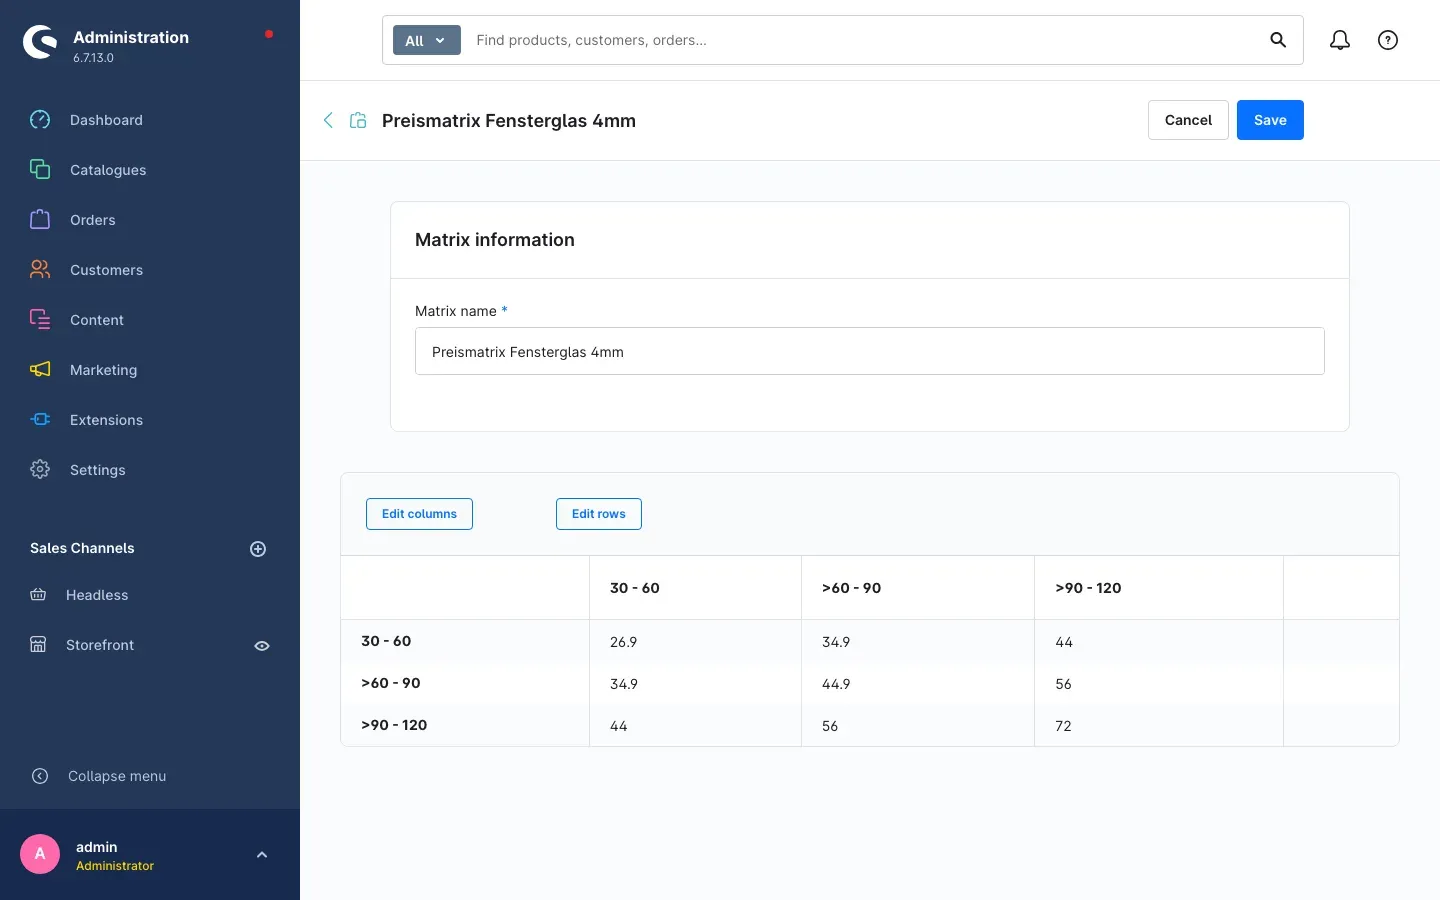 Fig. 4: the opened price matrix. At the top the Matrix information card holding the Matrix name, below it the Edit columns and Edit rows buttons and the price table with the steps 30 - 60, >60 - 90 and >90 - 120.
Net or gross? Enter your prices as net prices. If your shop displays gross prices, the tax rate of the respective product is added automatically. The cell in the example above holds 34.9 — in the shop, at a 7 % VAT rate, this becomes a surcharge of €37.34.
Important: an empty cell means “no surcharge”. If a customer’s dimensions land in an empty cell, nothing is charged for that option. So fill in every cell that should be orderable.
Tip: if you change a price later, it takes effect immediately — including in carts your customers currently have open. Orders that have already been placed are not affected.
How to connect an option group to your price matrix
What this gives you: the option group is what your customer sees on the product page. Only the link to the price matrix tells the shop which price list to use for the dimensions entered.
Step by step
- In the product configurator, open the option group that is supposed to ask for the dimensions
- Choose Matrix as the Fieldtyp
- The Specify your matrix name field appears below it. Select your price matrix there — while the field is still empty, the text Please select your matrix points this out. The entry is mandatory.
- Click Save in the top right corner
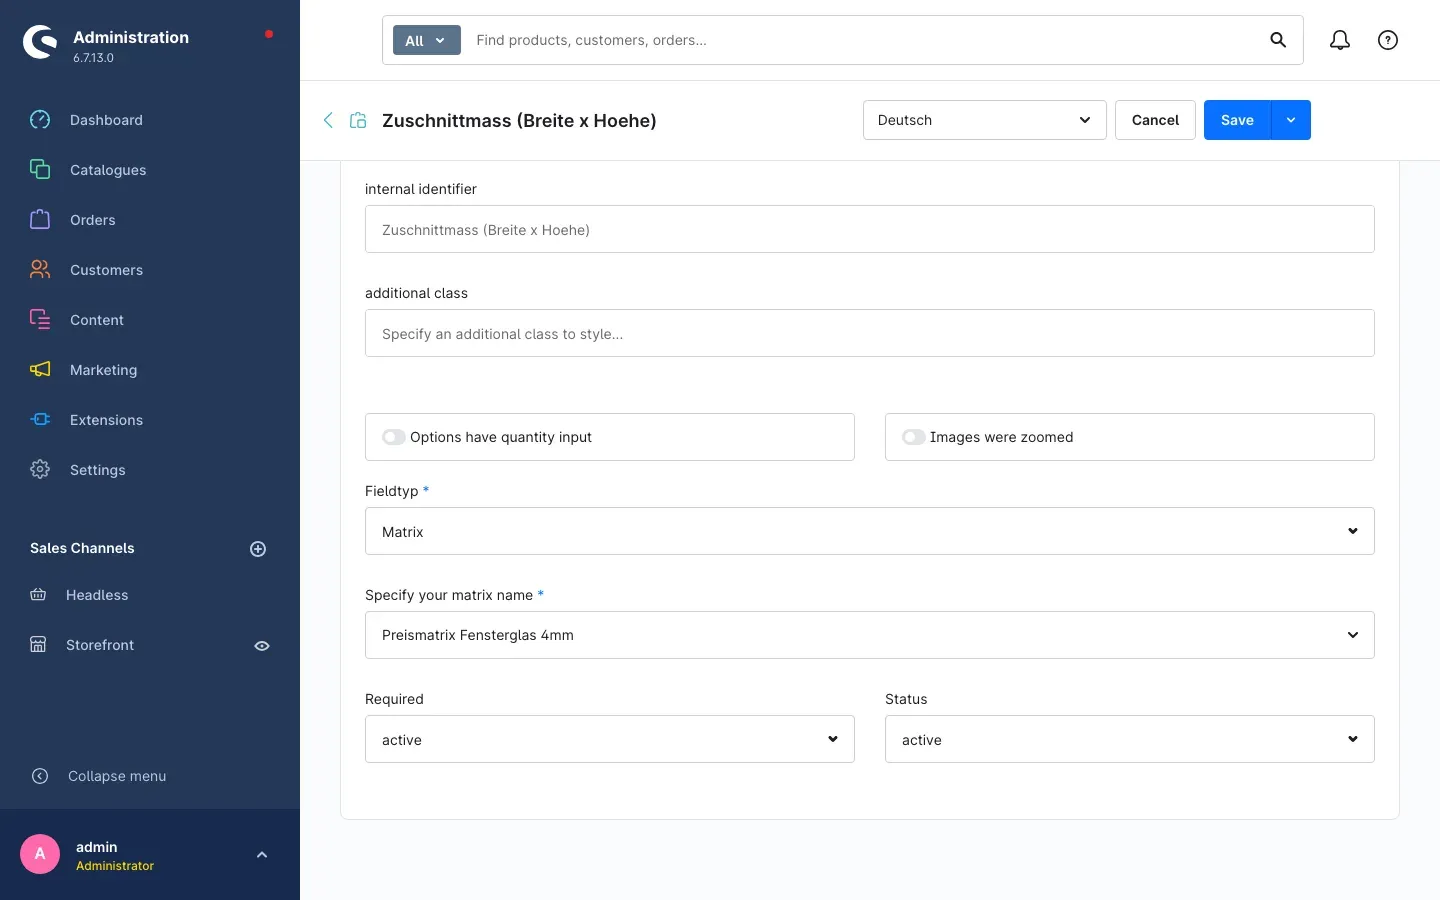 Fig. 5: an option group with Matrix selected as the Fieldtyp. Directly below sits the Specify your matrix name assignment with the selected price matrix.
Which option belongs to which direction? The group needs exactly two options, and their order decides:
- The first option asks for the dimension running across the columns (“Width (cm)” in our example).
- The second option asks for the dimension running down the rows (“Height (cm)” in our example).
Name the two options the way your customers will understand them — the names appear unchanged on the product page, in the cart and in the order.
Important: if you later switch a group from Matrix to a different field type, the link to the price matrix is removed. Switch back and you have to select the table again.
Tip: you can use the same price matrix on as many option groups as you like. If you sell the same material across several products, you still maintain the prices in a single place.
What your customer sees in the shop
What this gives you: your customer enters the dimensions and immediately sees what the cut costs — no enquiry, no quote, no waiting.
On the product page, the two input fields of your option group appear under option selection. While they are empty they show the hint Please enter a number.
As soon as both fields are filled, the Calculation of your configuration: block appears with three lines:
- original article price: — the price of the product without the cut
- the line for your option group with the name of your price matrix and the dimensions entered — the surcharge from the table next to it
- your configured article price: — the sum of the two
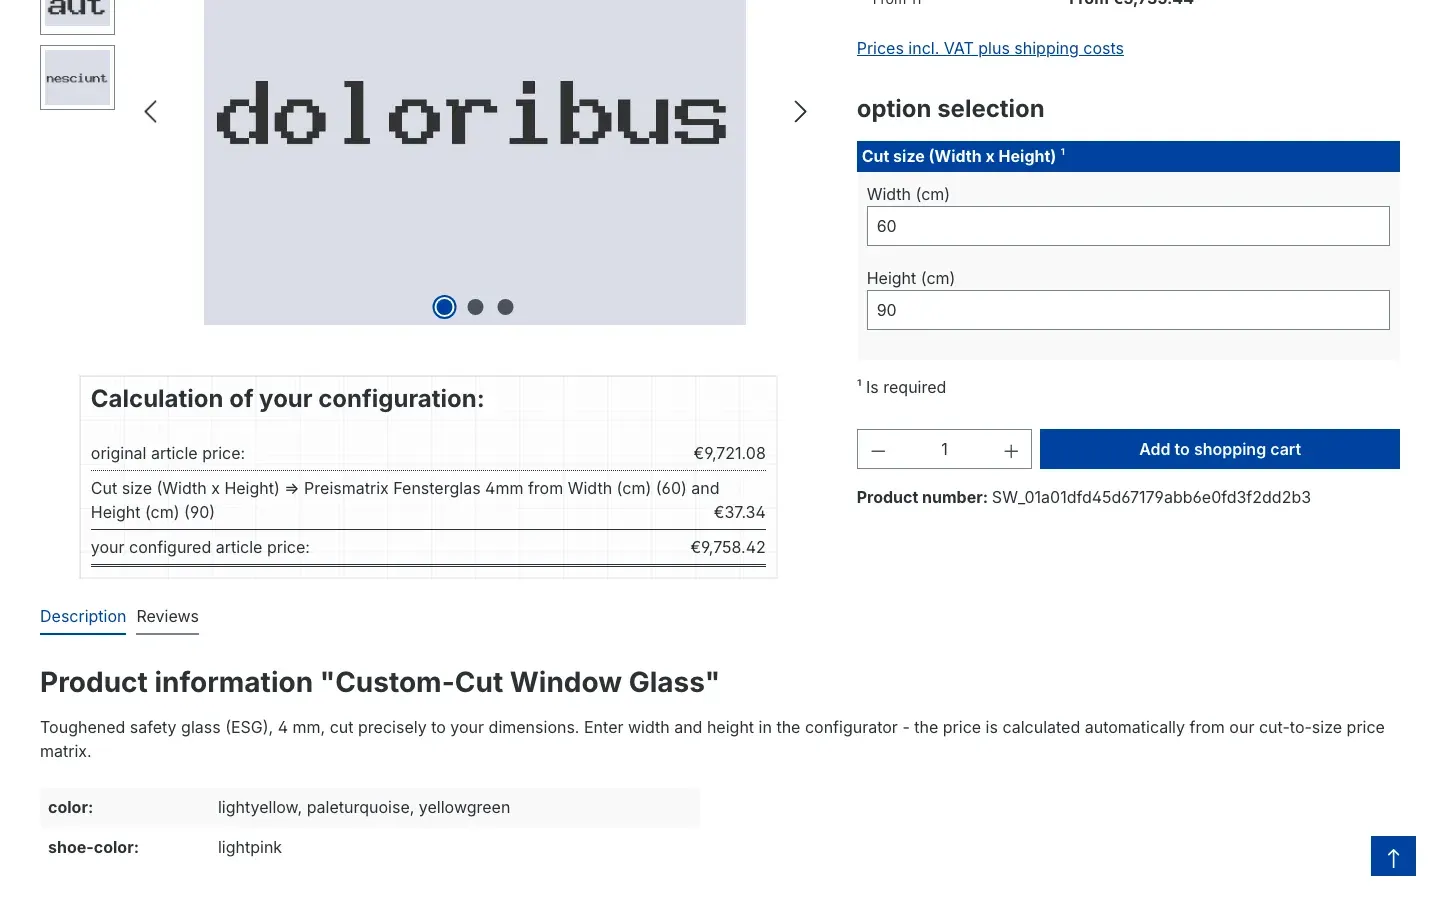 Fig. 6: the product page with the Width (cm) and Height (cm) fields and the calculation block. 60 × 90 results in a surcharge of €37.34.
Your customers cannot get it wrong: the two fields only accept values that exist in your table. If your table runs from 30 to 120, smaller or larger entries are not possible.
Tip: if you allow a quantity entry for the option group, there is nothing to take care of — the quantity of the option automatically follows the quantity your customer sets above Add to shopping cart.
Tip: state in the product text which unit the dimensions are expected in. A bare number does not say whether centimetres or millimetres are meant, so include the unit in the name of the option, as in “Width (cm)”.
How the dimensions appear in the cart and in the order
What this gives you: you and your customer can see the ordered dimensions and their price all the way through — in the cart, in the order confirmation and in the order inside the administration.
In the cart, expand the Produkt Konfiguration section. It holds one line for the product itself and one line for your dimension option. That line names the option group, the name of your price matrix, both dimensions with their values and, on the right, the surcharge.
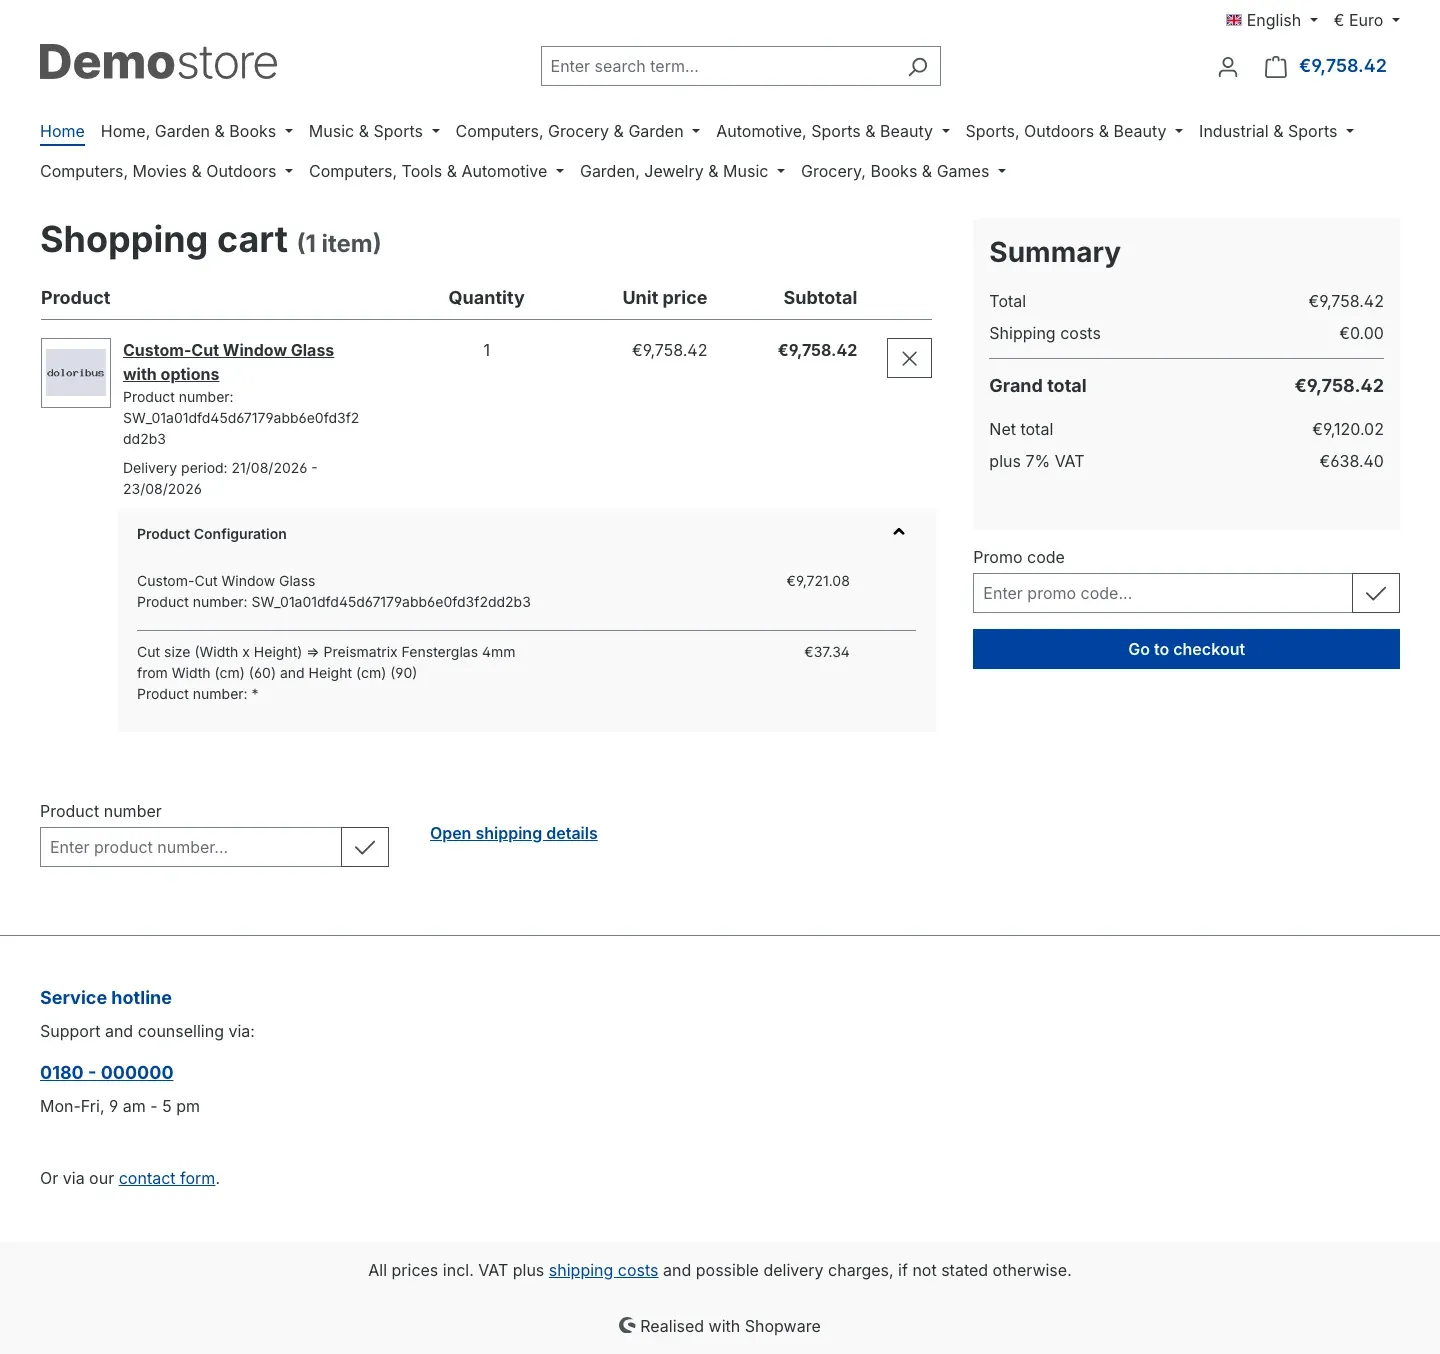 Fig. 7: the cart with the product configuration expanded. The second line shows the dimension option including the €37.34 surcharge.
You will find the same information in the order inside the administration: in the overview of configured options, both dimensions are listed with their values one below the other.
Note: the dimension line in the cart shows an asterisk as its product number. That is expected — the option itself is not a separate article and therefore carries no number of its own.
Reusing the dimensions in formulas
What this gives you: if you already work with formulas in the product configurator, you can access the two dimensions of the matrix there — to add a handling fee per metre on top of the cutting price, for instance.
The plugin adds two entries to the list of available values:
- Matrix column — the dimension running across the columns of your table
- Matrix row — the dimension running down the rows of your table
You can skip this section if you do not use formulas. Plain price calculation from the table does not need it.
Troubleshooting
No price appears on the product page although both fields are filled
What causes it: usually no price matrix is assigned to the option group, or the assigned table does not contain any columns and rows yet.
How to fix it:
- Open the option group and check that Matrix is selected as the Fieldtyp and that a table is selected below, under Specify your matrix name
- Open the price matrix and check that columns, rows and prices are filled in and saved
- Under Settings → Extensions → Product configurator Matrix, check that Enable plugin for this sales channel is switched on for the affected sales channel
The cart shows “Error in the matrix”
What causes it: the option group has no valid price matrix assigned — because the table was deleted afterwards, for example.
How to fix it: assign a price matrix to the option group again under Specify your matrix name and save. The cart then recalculates the line item.
The cart shows “Not enough values entered”
What causes it: only one of the two dimensions was submitted. The calculation always needs both.
How to fix it: check that your option group really contains two options. A matrix needs exactly two — one for the columns, one for the rows.
The cart shows “Value too large”
What causes it: one of the entered dimensions lies above the largest step of your table. There is no price for that dimension.
How to fix it: extend your table by another step via Edit columns or Edit rows and enter the corresponding prices — or state in the product text up to which size you cut.
The surcharge is €0.00
What causes it: the cell the entered dimensions fall into is empty.
How to fix it: open the price matrix and fill in the cell in question. Look for the row holding the matching step of the second dimension and the column holding the matching step of the first one.
The “Matrix” tab is missing
What causes it: the plugin is not active yet, or the administration cache is out of date.
How to fix it:
- Open Extensions → My extensions and check that the toggle next to Product configurator Matrix is switched on
- Clear the cache: Settings → System → Caches & indexes
- Reload the administration in your browser
A colleague cannot see the “Matrix” tab
What causes it: their user role lacks the permissions for the price matrix.
How to fix it: open the role in question and enable at least View under Product options: price matrix in the permission list. Add Edit for editing, Create for creating and Delete for deleting.
FAQ
Q: Do I need a separate price matrix for every product?
A: No. One price matrix can be used on as many option groups — and therefore as many products — as you like. You only need a separate table when the prices differ, for example per material thickness.
Q: Can I ask for more than two dimensions?
A: A price matrix always works with exactly two dimensions — one across the columns, one down the rows. You can collect further input through the other field types of the product configurator; it is then priced by their rules.
Q: Are the prices in the table net or gross?
A: Net. If your shop displays gross prices, the tax rate of the product is added automatically.
Q: What happens to orders when I change prices?
A: Orders that have already been placed remain unchanged. Open carts recalculate with the new prices the next time they are opened.
Q: Can I save effort by leaving cells empty?
A: An empty cell means “no surcharge” — the option is then free of charge. If a combination of dimensions should not be orderable at all, it is better to remove the step from the table entirely. The input fields in the shop will then not accept that range in the first place.
Q: Can I use the plugin in only one of my shops?
A: Yes. Under Settings → Extensions → Product configurator Matrix, pick the sales channel at the top and set Enable plugin for this sales channel accordingly.
Q: Where do I define the unit of measurement?
A: The plugin works with plain numbers and does not know any unit. Include it in the name of your options, as in “Width (cm)”.
Q: After an update a message asks me to check my settings. Is something broken?
A: No, this is a reminder shown after every update. Have a look at the plugin’s configuration page and confirm that everything is set the way you want it.
Q: What happens to my price tables if I uninstall the plugin?
A: When uninstalling, Shopware asks whether your data should be kept. If you choose to keep it, your price tables remain and are available again after a re-installation. Otherwise they are removed together with the plugin’s settings.
For administrators / technical details
This section is aimed at technical administrators. You do not need it for regular use.
System requirements
- Shopware: 6.7
- PHP: 8.2 or newer
- Prerequisite: the base plugin of the product configurator (
swp/productoptions-six, version 6.7.12 or newer)
Installation via the command line (Composer)
composer require swp/productoptions-six-matrix
php bin/console plugin:refresh
php bin/console plugin:install SwpProductOptionsSixMatrix --activate
php bin/console cache:clear
Creating an example price table
For a first test, the following command creates a price table named TestMatrix1. At least one active product has to exist in the shop, otherwise the command stops with a notice.
php bin/console productoptions:matrix:examplesPermissions
The plugin ships no storefront addresses of its own; permissions are attached entirely to the price matrix. In the permission list of a user role they appear under Product options: price matrix with the levels View, Edit, Create and Delete.
Uninstalling
While uninstalling, the plugin evaluates Shopware’s question about keeping your data. If the data is not to be kept, it removes its settings, its database table and the link it added to the option groups.
This manual was written for Product configurator Matrix version 6.7.3.
More manuals
Admin Password Reminder
Admin Password Reminder: your backend users renew their passwords on time, prompted after login and by a daily email. Premium locks expired accounts until the password is changed.
Open manual Shopware 6Age Check
Tobacco, spirits, knives: visitors who do not confirm their age never see the restricted items at all. You tick a box per product, the plugin hides it everywhere.
Open manual Shopware 6AI Media Labelling
AI labelling for images and videos: flag a media item once in the media manager and the badge with your notice appears wherever it shows up in your shop. No template work needed.
Open manualNeed a team that keeps your shop running?
We have been maintaining Shopware shops for more than 20 years, including updates, hotfixes and the plugins you are configuring right now.