
Product configurator Saleschannel
One product, two shops, different choices: assign configurator options to a specific sales channel. Add-on for the SwpProductOptionsSix product configurator.
On this page
- Introduction
- What you achieve with this plugin
- What you need for it
- Who is this plugin for?
- Installation
- Getting started
- Settings
- Sales Channel
- to documentation
- Enable plugin for this sales channel
- How to work with sales channels in the product configurator
- How to see which options a sales channel offers
- How to assign new options to a sales channel
- How to offer options in all sales channels
- How your shop decides what the customer sees
- Troubleshooting
- The “Select sales channel” field does not appear in the “Product configurator” tab
- The sales channel selection stays empty
- The shop shows all options although I only assigned a few
- Options that used to be in the shop are missing
- After assigning, the options ended up in the wrong sales channel
- FAQ
- For administrators / technical details
- System requirements
- Installation via the command line (Composer)
- Permissions
- Behaviour in case of a fault
- Uninstallation
Introduction
Important: Add-on plugin – requires the Product Configurator (
SwpProductOptionsSix). This plugin is an extension of the base plugin Product Configurator and only works together with it. Without the installed, active and separately purchased Product Configurator from version 6.7.12, this plugin has no function.
Product configurator Saleschannel lets you offer the options of your product configurator differently in each sales channel — the same product shows one set of choices in one shop and another set in the next.
What you achieve with this plugin
- You decide, per product, which configurator options are offered in which sales channel.
- You show your B2B customers different equipment, materials or colours than your retail customers — without creating the product twice.
- You try out new options in a single sales channel first, before releasing them everywhere.
- You switch the sales channel separation on or off per shop, without uninstalling the plugin.
What you need for it
This plugin is an extension of the product configurator. It requires the plugin Product configurator (SwpProductOptionsSix) from version 6.7.12 and cannot be used without it — the configurator options themselves, their groups, field types and prices are created and maintained there. This manual therefore covers only what the sales channel assignment adds. How to create configurations and assign them to a product in general is described in the manual of the product configurator.
Who is this plugin for?
For shop operators who already use the product configurator and run more than one sales channel — for example a retail shop and a B2B shop, several country shops, or an additional headless connection.
Installation
After the purchase, the plugin is available directly in your administration — there is nothing to download.
-
Log in to your Shopware administration (
YourShop.com/admin) -
Open Extensions → My extensions
-
Next to Product configurator Saleschannel, click Install
-
Activate the plugin using the switch to the left of the entry
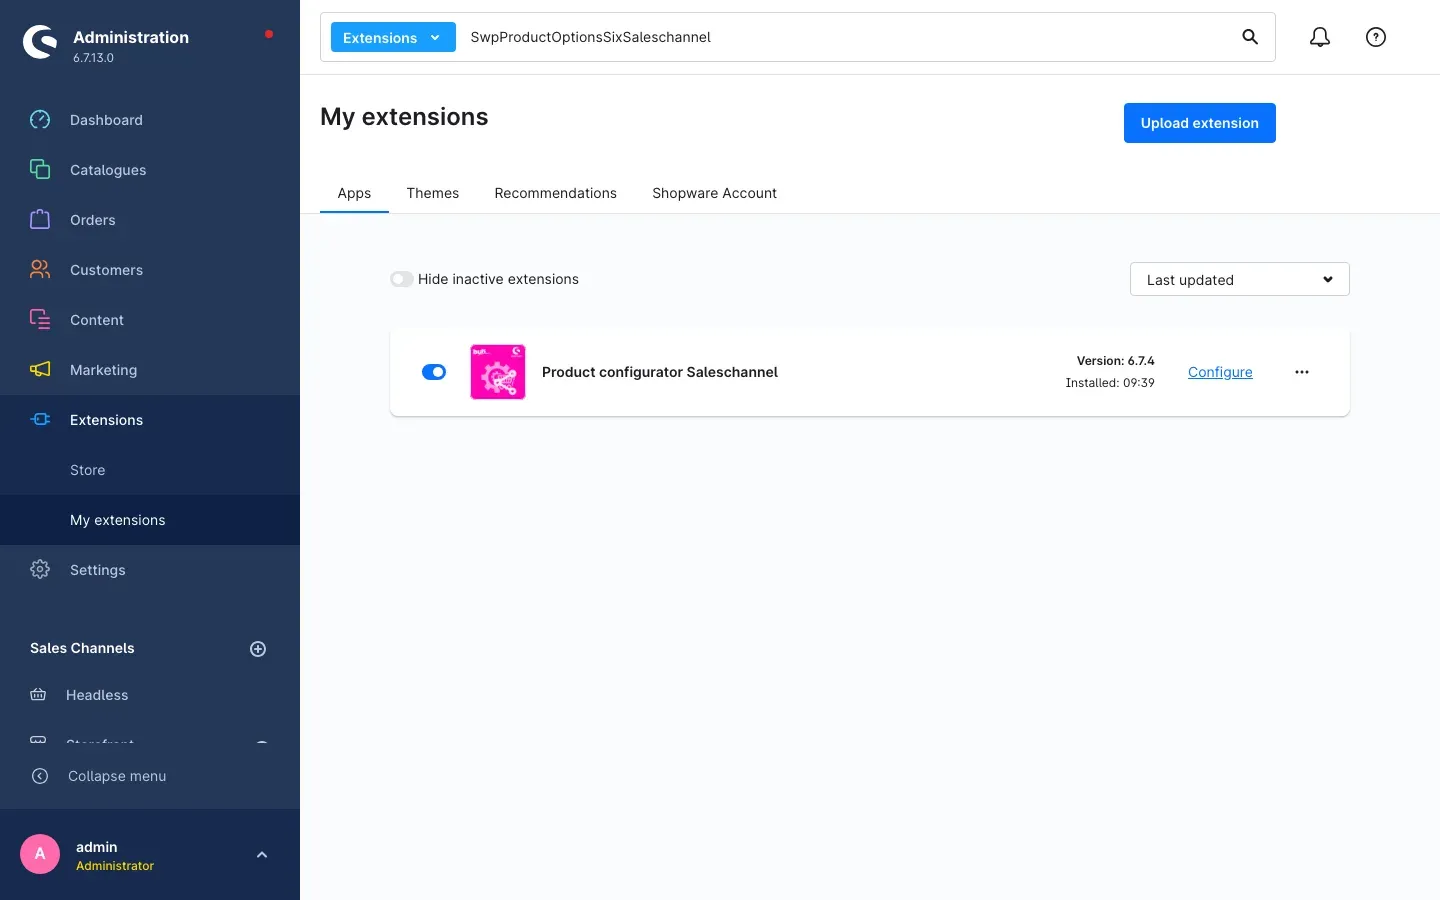
Fig. 1: The entry “Product configurator Saleschannel” under “My extensions” — installed and activated.
The sales channel selection is then available in the Product configurator tab of every product.
Important: The plugin Product configurator must be installed and active before you activate this plugin. Without it, the extension cannot be installed.
If Product configurator Saleschannel does not appear in the list, your Shopware account is not yet connected to the shop. You can do that under Extensions → My extensions in the Shopware Account tab.
Getting started
-
Open the settings: go to Extensions → My extensions and click Configure in the Product configurator Saleschannel row.
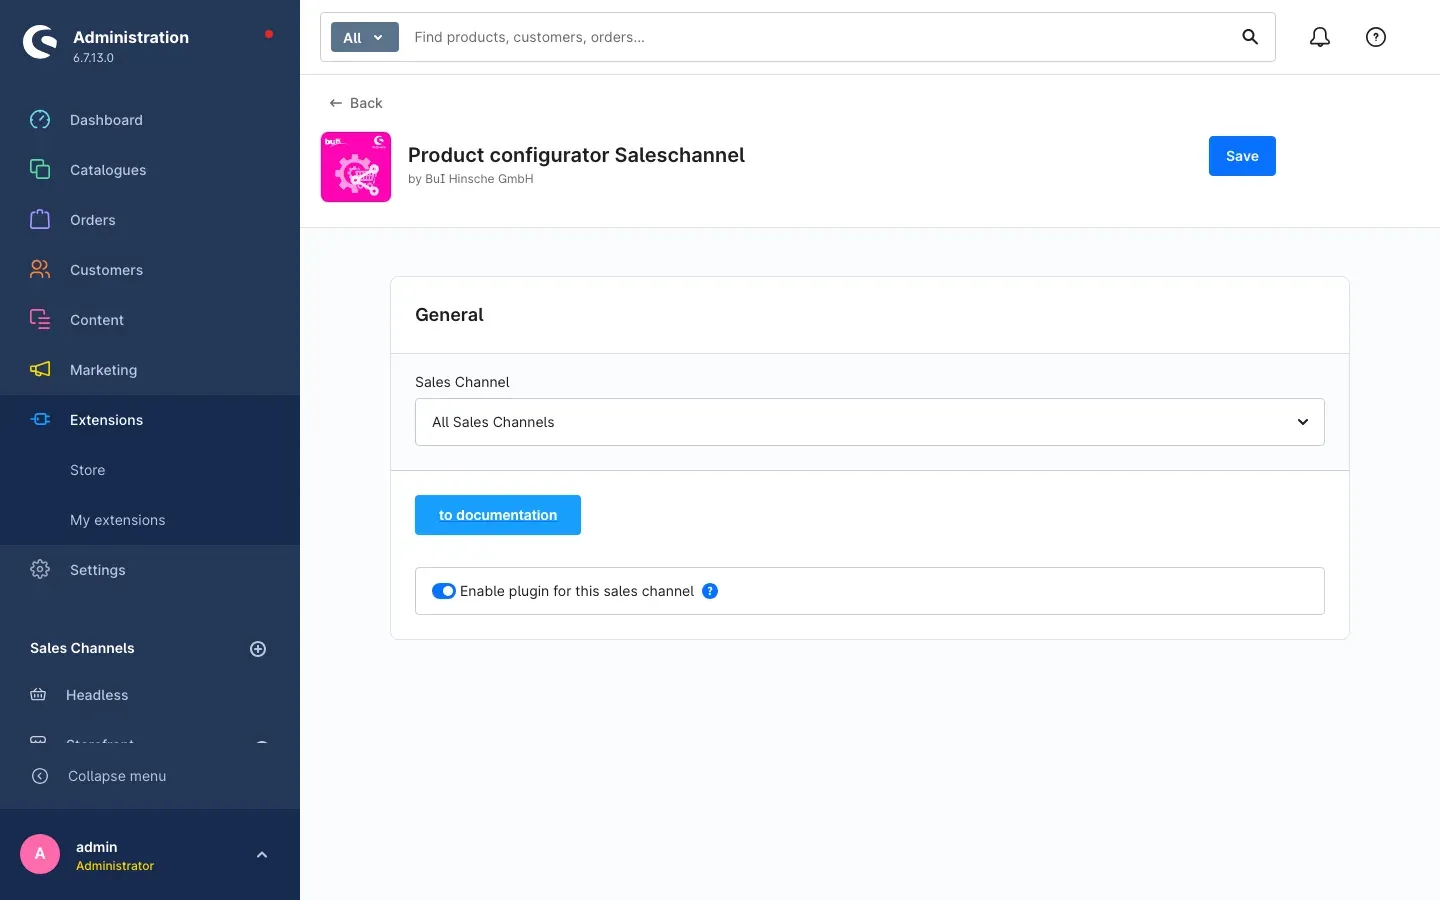
Fig. 2: The configuration page with the sales channel selection, the “to documentation” button and the “Enable plugin for this sales channel” switch.
-
Check your sales channels: the switch Enable plugin for this sales channel is on by default. To begin with, you can leave everything as it is.
-
Open a first product: go to Catalogues → Products, open a product that has configurator options and switch to the Product configurator tab.
-
Select a sales channel: above the option list you will find the new field Select sales channel. As soon as you pick a sales channel there, the list only shows the options assigned to exactly that channel.
-
Check the result: open the product in the storefront of the selected sales channel. The configurator shows exactly the options you assigned to that channel.
Settings
You find the settings under Extensions → My extensions, via the Configure link in the plugin row.
Fig. 3: The “General” card of the plugin configuration.
Sales Channel
At the top of the page there is the Sales Channel selection. It is part of every Shopware plugin configuration and determines which shop the settings below apply to. With the default All Sales Channels you define a common baseline. If you pick a single sales channel, the setting applies only there and overrides the common baseline.
Why this is useful: you can use the sales channel separation in your B2B shop and leave it switched off in your retail shop — without uninstalling the plugin and without losing your assignments.
to documentation
The blue to documentation button opens this manual in a new browser tab, in the language of your administration.
Why this is useful: the manual is always available where you are working, so you never have to search for it.
Enable plugin for this sales channel
The switch Enable plugin for this sales channel determines whether the sales channel assignment takes effect at all in the selected shop. It is on by default.
If the switch is off, the assignment is not applied in that sales channel: every product shows the full set of options there again, exactly as the product configurator would deliver it without this extension. Your assignments are kept — switch it back on and they take effect immediately.
Why this is useful: you can disable the separation in one specific sales channel, for example where all options should deliberately be offered, or pause it briefly while investigating an issue.
Tip: remember to click Save in the top right corner after every change.
How to work with sales channels in the product configurator
All the work happens in the Product configurator tab of a product: Catalogues → Products → [open product] → Product configurator.
There, the plugin adds a single extra field to the bar above the option list: Select sales channel. Everything else in this view — the Assign options button, the Status switch, the Display setting selection and the option list itself — belongs to the product configurator.
How to see which options a sales channel offers
What this gives you: you see at a glance which choices your customers get in exactly this shop — without opening the storefront.
Step by step
-
Open the product and switch to the Product configurator tab
-
In the bar above the list, click the Select sales channel field
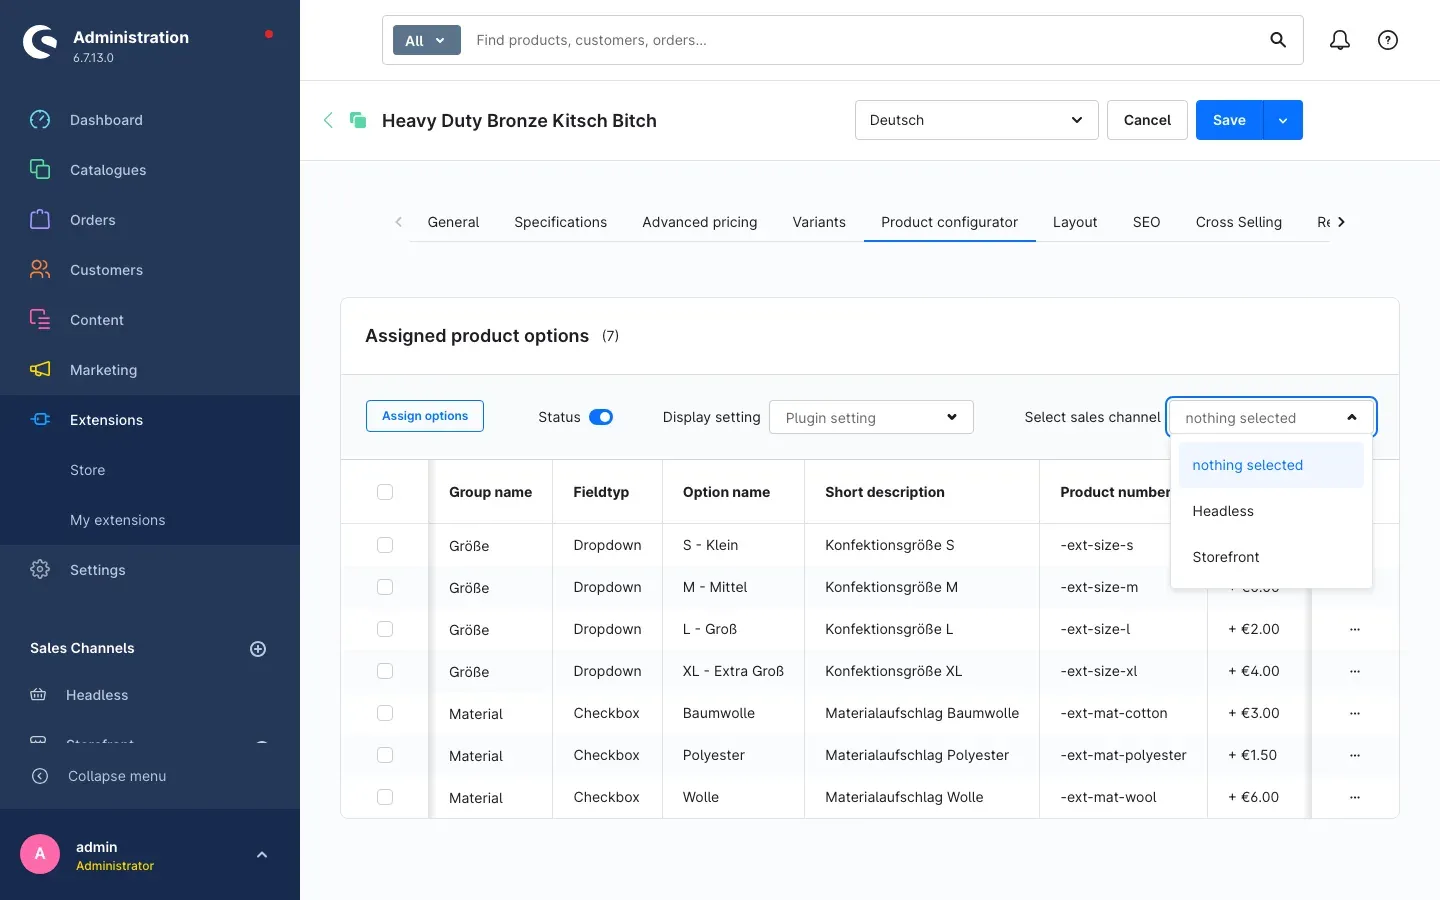
Fig. 4: The opened “Select sales channel” field with the entry “nothing selected” and the sales channels of the shop.
-
Pick the sales channel you want, for example Storefront
-
The Assigned product options list updates immediately and only shows the options of that sales channel. The number in brackets after the heading tells you how many there are.
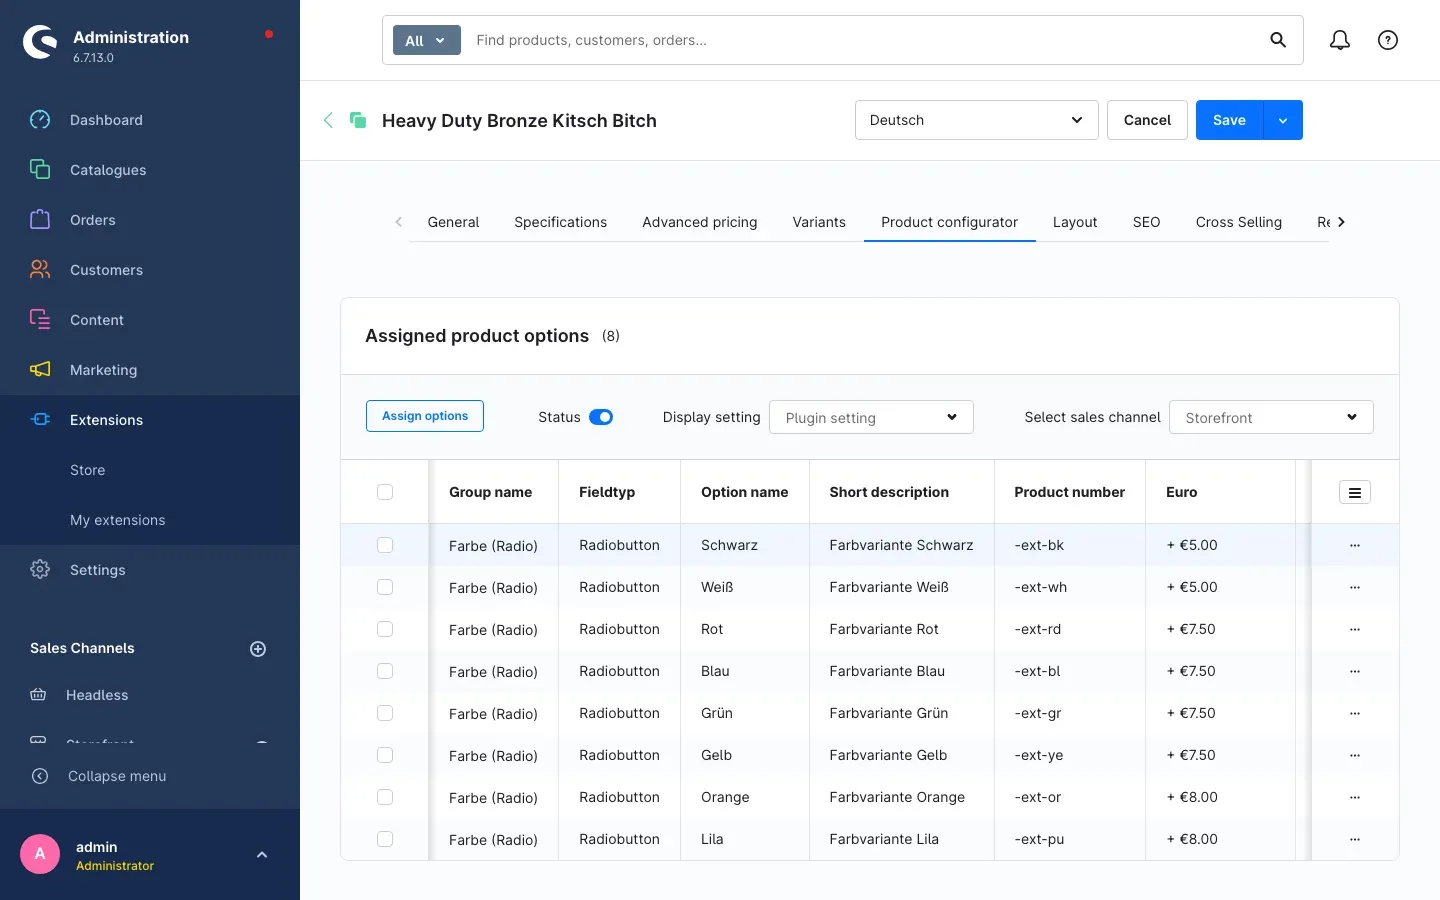
Fig. 5: After selecting “Storefront”, the list only shows the options assigned to that sales channel.
Tip: switch back and forth between sales channels to compare the selection. Nothing is saved and nothing is changed — you are simply looking at a different section each time.
How to assign new options to a sales channel
What this gives you: you release an option for one specific shop. In all other sales channels it stays invisible.
Step by step
- First pick the sales channel the options should apply to in the Select sales channel field
- Only then click Assign options
- Select the configurations you want in the window
- Click Save
The newly assigned options now belong to the sales channel that was selected while assigning.
Important: the order matters. If you select the sales channel only after assigning, the new options belong to whichever channel was set at the moment of assignment — possibly to none at all. Afterwards, use step 5.1 to check that the options appear where you expect them.
How to offer options in all sales channels
What this gives you: options that are offered everywhere in the same way do not have to be maintained per sales channel.
If you leave the entry nothing selected in the Select sales channel field, you are working with the options that are assigned to no particular sales channel. This is also the state of every assignment that was created before this plugin was installed.
That is exactly how you proceed when an option should appear in every shop: leave nothing selected in place and assign the option as usual via Assign options.
How your shop decides what the customer sees
What this gives you: you understand why a product shows the full selection in one shop and only part of it in another — and you can adjust it deliberately.
When a customer opens a product, the shop checks, in this order:
- Is the plugin switched on in this sales channel? If not, the customer sees the full set of options of the product configurator — the assignment is not applied (chapter 4).
- Does this product have at least one option assigned to exactly this sales channel? If yes, the configurator shows those options only.
- Is there not a single assigned option for this sales channel? Then the configurator shows the full set of options of the product.
Point 3 leads to the most important rule in practice: a product for which you assign nothing at all in a sales channel loses nothing there. The customer still sees everything. The restriction only starts once you assign the first option to that channel — from then on, you define the selection entirely yourself.
Tip: if you want to offer only a single option in a sales channel, that one assignment is enough. A single assignment is sufficient to activate the restriction.
Troubleshooting
The “Select sales channel” field does not appear in the “Product configurator” tab
What causes it: the plugin is not activated yet, or the cache of the administration is out of date.
How to fix it:
- Open Extensions → My extensions and check that the switch next to Product configurator Saleschannel is on
- Clear the cache: Settings → System → Caches & indexes → Clear caches
- Reload the administration in your browser
The sales channel selection stays empty
What causes it: your user account is missing the permission to read sales channels. The tab still opens, but the selection stays without entries.
How to fix it: ask an administrator to grant you read permission for sales channels, or log in with an account that has it.
The shop shows all options although I only assigned a few
What causes it: usually one of two reasons — either the switch Enable plugin for this sales channel is off for exactly that sales channel, or the product has no option at all assigned to that channel (see chapter 5.4).
How to fix it:
- Open the plugin configuration, select the affected sales channel at the top and check the switch
- Open the product, select the same sales channel in the Product configurator tab and check whether the list contains entries
- If the list is empty, assign the options you want as described in chapter 5.2
Options that used to be in the shop are missing
What causes it: the first option was assigned to that sales channel. From that moment on, the configurator only shows the assigned options in that channel.
How to fix it: assign the missing options to that sales channel as well (chapter 5.2) — or remove the assignment so that the full set of options appears there again.
After assigning, the options ended up in the wrong sales channel
What causes it: a different sales channel than intended was selected when you clicked Assign options.
How to fix it: remove the wrongly assigned entries from the list, select the correct sales channel and assign them again.
FAQ
Q: Do I have to maintain every product for every sales channel?
A: No. Only where the selection is meant to differ. Products without any assignment show the full set of options in every sales channel.
Q: What happens to my existing configurations after installation?
A: They stay unchanged and initially belong to no particular sales channel — you find them via the entry nothing selected. Nothing changes in the shop because of this.
Q: Is a single assigned option enough for the restriction to take effect?
A: Yes. As soon as a product has at least one option assigned to a sales channel, the configurator shows only the assigned options there.
Q: Can I assign the same option to several sales channels?
A: Yes. Select the sales channels one after another and assign the option again each time.
Q: What happens if I switch the plugin off for a sales channel?
A: In that sales channel, every product shows the full set of options again. Your assignments stay stored and take effect again as soon as you switch it back on.
Q: Do I really need the “Product configurator” plugin?
A: Yes. This extension adds the sales channel assignment to the product configurator; the options themselves come from the product configurator. Without it, the extension cannot be used.
Q: Does the assignment also work in a headless setup?
A: Yes. The selection is evaluated for the respective sales channel, no matter whether it is run as a classic storefront or headless.
Q: What happens to my assignments when I uninstall?
A: If you choose to remove the plugin data during uninstallation, the sales channel assignments and the plugin settings are deleted. Your configurations in the product configurator are not affected. If you choose to keep the data, the assignments are kept as well.
For administrators / technical details
This section is aimed at technical administrators. You do not need it for normal use.
System requirements
- Shopware: 6.7 (current patch release of that line)
- PHP: 8.2 or newer
- Prerequisite: plugin Product configurator (
swp/productoptions-six) from version 6.7.12, installed and active
Installation via the command line (Composer)
composer require swp/productoptions-six-saleschannel
php bin/console plugin:refresh
php bin/console plugin:install SwpProductOptionsSixSaleschannel --activate
php bin/console cache:clear
Permissions
To use the sales channel selection in the product tab, the administrator account needs read permission for sales channels in addition to product editing. Without it, the tab still opens but the selection stays empty.
Behaviour in case of a fault
If the sales channel restriction cannot be applied in the shop, the configurator deliberately delivers the full set of options instead of breaking the product page with an error. The incident is written to the plugin log.
Uninstallation
When uninstalling, Shopware asks whether the plugin data should be removed. If you choose to remove it, the plugin settings and the sales channel assignments are deleted; the configurations of the product configurator remain.
This manual was created for Product configurator Saleschannel version 6.7.3.
More manuals
Admin Password Reminder
Admin Password Reminder: your backend users renew their passwords on time, prompted after login and by a daily email. Premium locks expired accounts until the password is changed.
Open manual Shopware 6Age Check
Tobacco, spirits, knives: visitors who do not confirm their age never see the restricted items at all. You tick a box per product, the plugin hides it everywhere.
Open manual Shopware 6AI Media Labelling
AI labelling for images and videos: flag a media item once in the media manager and the badge with your notice appears wherever it shows up in your shop. No template work needed.
Open manualNeed a team that keeps your shop running?
We have been maintaining Shopware shops for more than 20 years, including updates, hotfixes and the plugins you are configuring right now.