Product Deposit
Crates, returnable bottles, transport containers: the plugin works out the deposit per product automatically and shows it separately in cart, order and email.
On this page
- Introduction
- What this plugin does for you
- Who is this plugin for?
- Installation
- Getting started
- Plugin settings
- Configuration Channel
- Configuration Others
- Managing refund types
- The overview
- Creating or editing a refund type
- Linked product: “Real refund product”
- Tax: “Tax-free reusable deposit”
- Assigning a deposit to a product
- Setting up a single product
- Setting up a whole category at once
- How the deposit appears in your shop
- Troubleshooting
- No deposit appears in the cart
- The indented deposit line below the product is missing
- The “Refund” area is missing on the product
- The “Refund System” menu entry is missing under “Catalogues”
- A voucher also discounts the deposit
- The deposit amount does not match my expectation
- FAQ
- For administrators / technical details
- System requirements
- Installation via the command line
- Data storage
- Permissions
- Uninstalling
Introduction
Product Deposit calculates deposit amounts for your products automatically and shows them in your shop separately from the product price — exactly the way customers know it from crates, reusable bottles or transport containers.
You define once which refund types exist in your shop (for example “Reusable Bottle 0.5l” or “Beverage crate”) and store on each product which refund type applies and how much it costs. The plugin does the rest: it shows the deposit on the product page, adds it to the shopping cart as a separate item and includes it in the order total.
What this plugin does for you
- You show deposits transparently — customers immediately see which part of the price is the deposit and which part is the goods.
- You maintain deposit amounts centrally through a handful of refund types instead of writing them into product descriptions.
- You copy deposit settings from a category to every product it contains with a single click.
- You can treat reusable deposits as tax-free without touching the rest of your pricing.
- You decide per sales channel whether deposits are charged — useful if you serve B2B and B2C from the same shop.
- You control whether vouchers and promotions may also reduce deposit amounts.
Who is this plugin for?
For shop operators selling goods with a deposit: beverage retailers, breweries, dairies, farm shops, catering suppliers or any business shipping in reusable containers. No technical knowledge is required — everything is set up inside the Shopware administration.
Installation
After your purchase the plugin is available directly in your administration — there is nothing to download.
- Log in to your Shopware administration.
- Open Extensions → My extensions.
- Find the entry Product Deposit in the list and click Install next to it.
- Then switch on the toggle to the left of the entry. The plugin is now active.
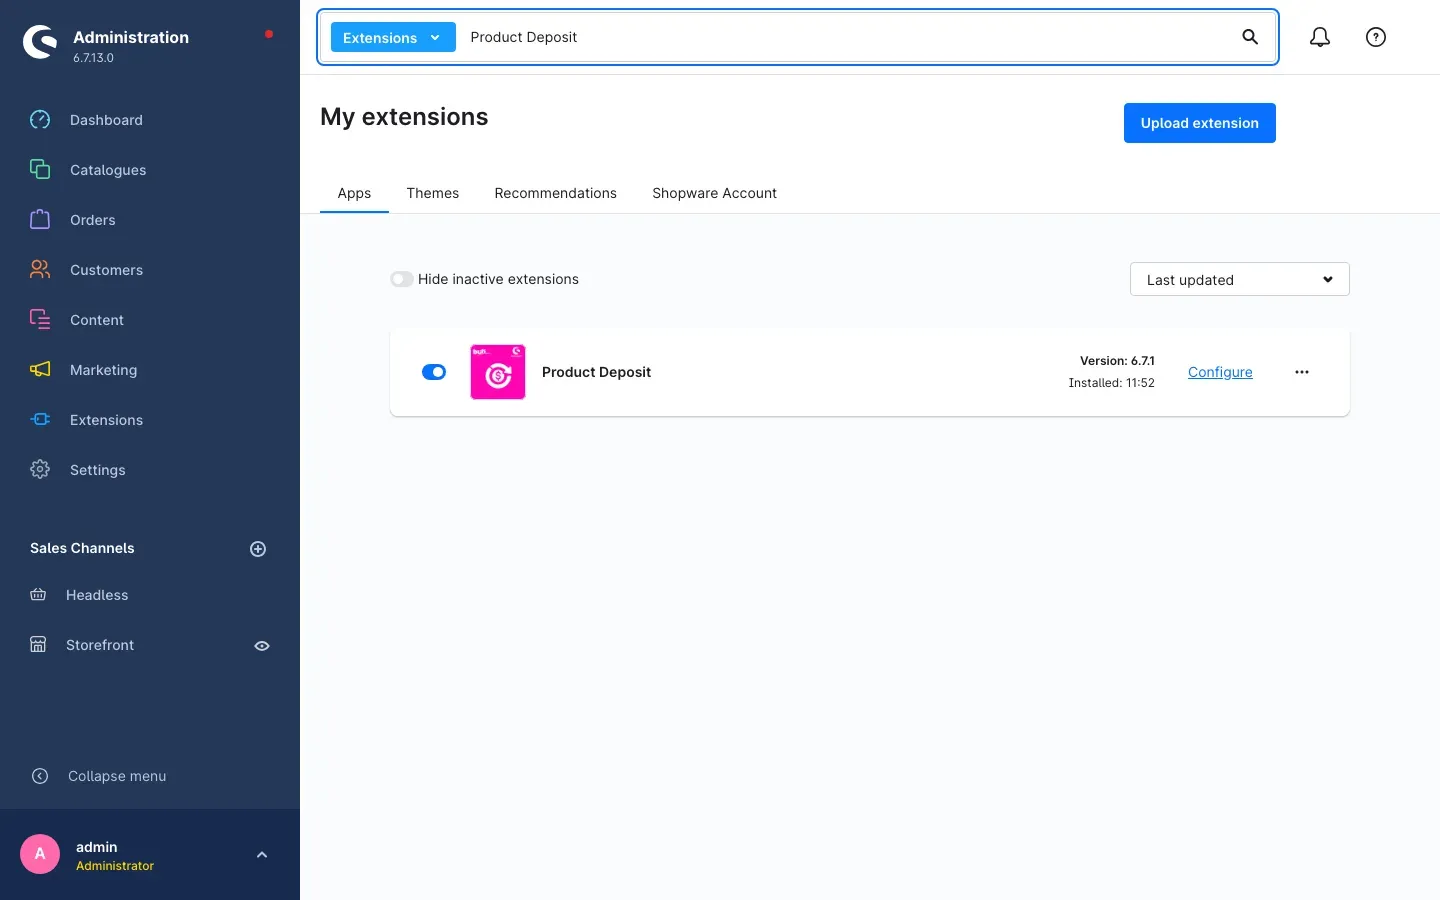 Fig. 1: Under “My extensions” you see the status of the plugin and reach the settings via “Configure”.
As soon as the plugin is active, the Configure link appears on the right-hand side of the row — this opens the settings (see Plugin settings).
Product Deposit is not in the list? Then your shop is not yet connected to your Shopware account. You will find the login under Extensions → My extensions in the Shopware Account tab.
Important: While the plugin is deactivated, the deposit fields are not available on your products. The values you entered are kept and reappear once you activate the plugin again.
Getting started
Four steps take you from installation to your first product with a deposit:
- Review the settings: Open Extensions → My extensions and click Configure on Product Deposit. The defaults suit most shops — still, take a quick look (Plugin settings).
- Create a refund type: Go to Catalogues → Refund System and create your first refund type, for example “Reusable Bottle 0.5l” (Managing refund types).
- Link a product: Open a product under Catalogues → Products, select the refund type in the custom fields area and enter the deposit amount (Assigning a deposit to a product).
- Check the result: Add the product to the cart in your shop. The deposit appears there as a separate item (How the deposit appears in your shop).
Plugin settings
You reach the settings via Extensions → My extensions and the Configure link in the Product Deposit row.
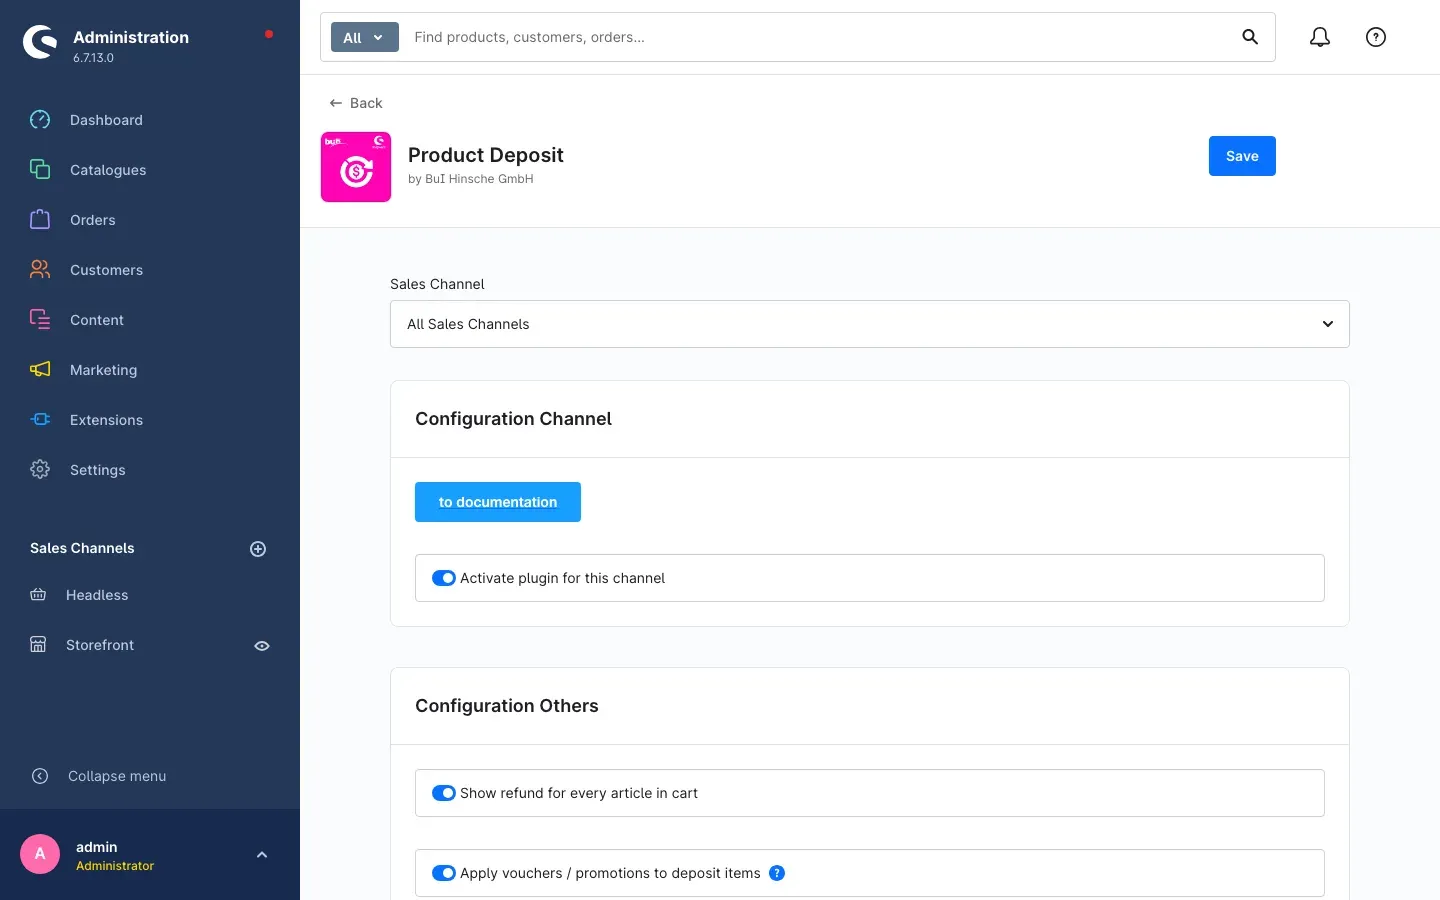 Fig. 2: The configuration page of the plugin. The “Sales Channel” selection at the top defines which shop the settings below apply to.
At the very top you find the Sales Channel selection. If All Sales Channels stays selected, your changes apply to the whole shop. If you pick an individual sales channel instead, you can set different values for it — all other channels keep the general setting. Changes take effect once you click Save in the top right corner.
Configuration Channel
The first element in this area is the to documentation button. Clicking it opens this manual in your browser — handy while you set things up.
Activate plugin for this channel
This switch is the master switch for the selected sales channel. When it is on, deposits are calculated and displayed in that shop; when it is off, everything behaves as if the plugin were not there — deposit amounts disappear from product pages and the cart. It is switched on by default.
Why this is useful: If you run several sales channels, you can show deposits exactly where they belong. Your refund types and the values on your products are untouched — you only switch the effect off and, whenever you like, back on.
Configuration Others
Show refund for every article in cart
When this switch is on, the cart shows an indented line directly below every product with a deposit, containing the name of the refund type and the amount. Your customers see at a glance which product causes which deposit. When it is off, these individual lines are omitted; the combined deposit item in the cart remains in both cases. It is switched on by default.
Why this is useful: With large carts the item list becomes calmer if you hide the individual lines. If you prefer maximum transparency, leave them switched on.
Apply vouchers / promotions to deposit items
This switch decides whether discounts from vouchers and promotions may also reduce deposit amounts. When it is off, voucher discounts are capped to the cart total excluding deposit items, so the deposit stays undiscounted. In any case the cart total can never become negative. It is switched on by default.
Why this is useful: If you hand out 100-percent or high fixed-amount vouchers, switching this off prevents a voucher from consuming the deposit as well — which would mean giving the deposit away.
Managing refund types
A refund type is the kind of deposit you assign to your products — for example “Reusable Bottle 0.5l”, “Beverage crate” or “Transport container”. It defines the name shown in your shop and whether the deposit is treated as tax-free.
You find the management area in the administration under Catalogues → Refund System.
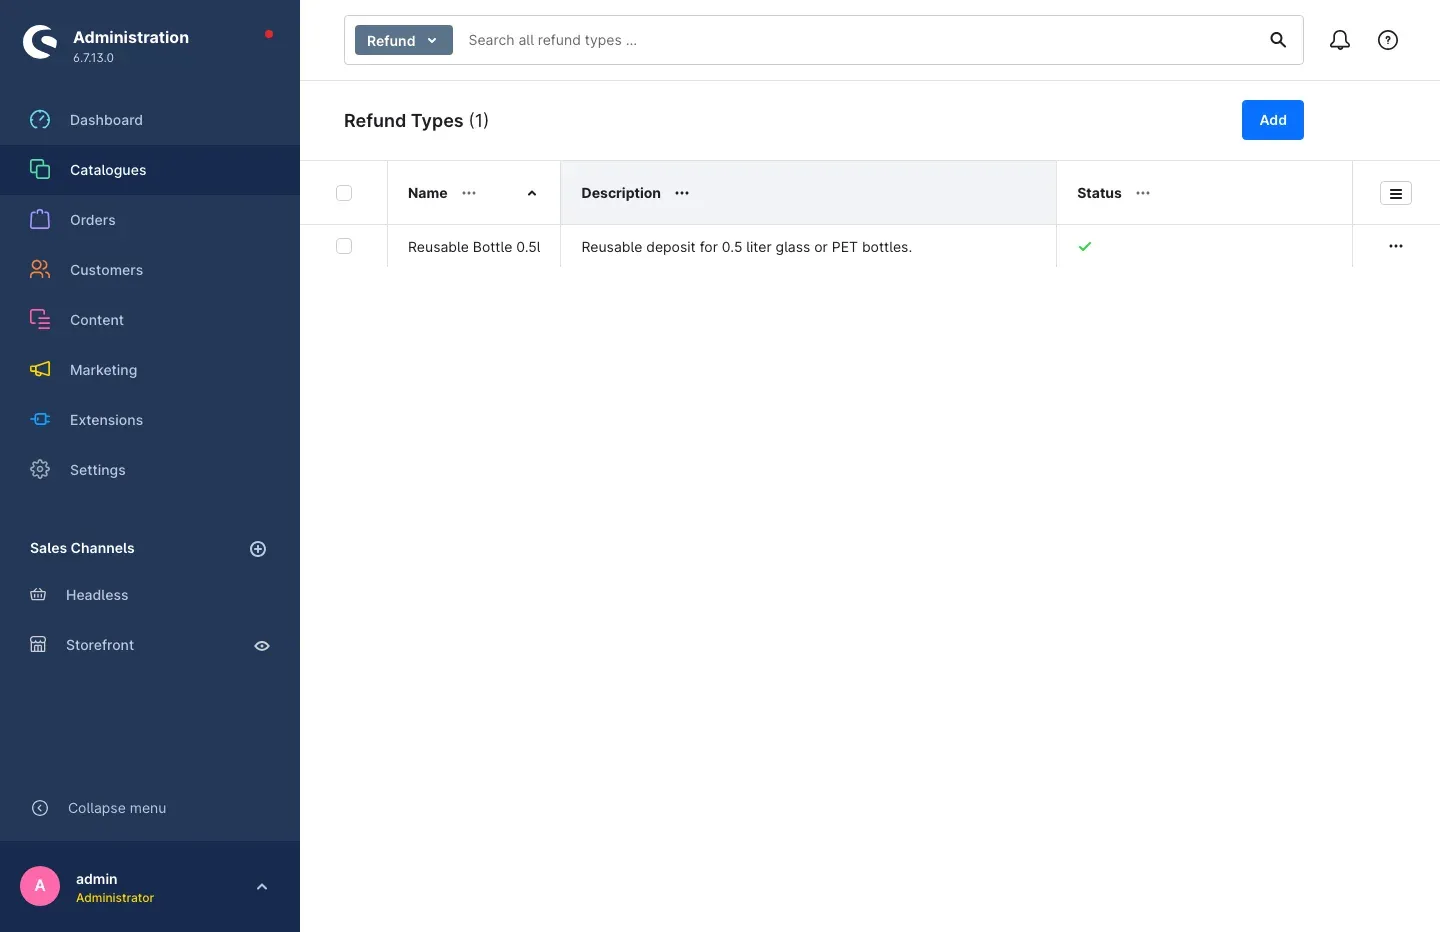 Fig. 3: The “Refund Types” overview with the Name, Description and Status columns.
The overview
The Refund Types overview lists all refund types with Name, Description and Status. The number in brackets after the heading tells you how many entries exist in total. A green tick in the Status column means the refund type is active and is calculated in your shop.
- The search field at the top (Search all refund types …) helps you find single entries even in long lists.
- Clicking the name opens the entry for editing.
- The three dots at the end of a row let you edit or delete an entry.
- The Add button in the top right corner creates a new refund type.
Tip: Do not delete a refund type while it is still assigned to products. If you want to pause it, set it to inactive in the detail form instead — the deposit is then no longer calculated while the assignment on your products stays in place.
Creating or editing a refund type
What this does for you: You define once what a deposit is called, how it looks in the shop and how it is treated for tax — and then use it for as many products as you like.
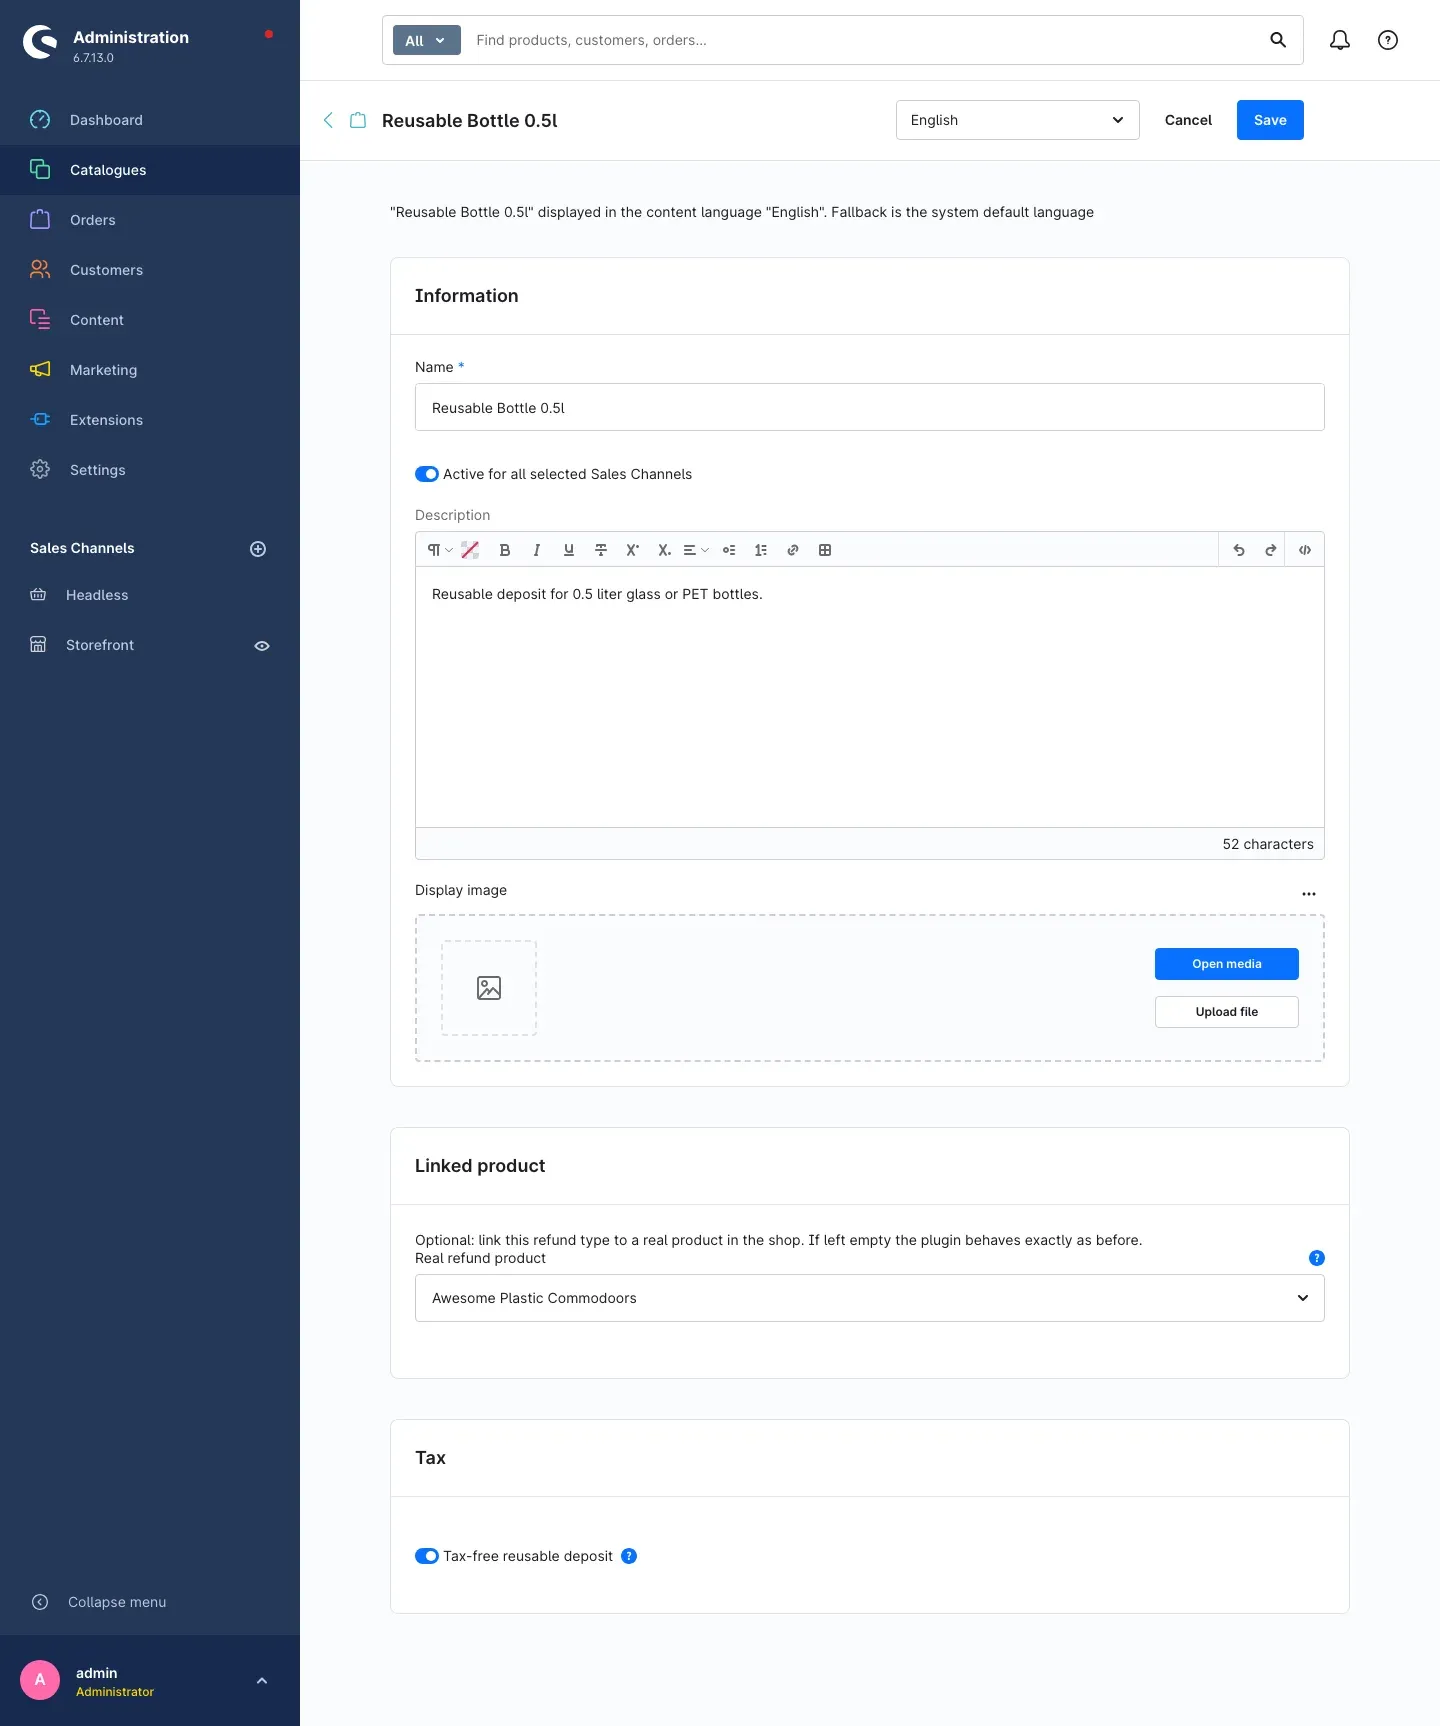 Fig. 4: The form of a refund type. The language selection at the top lets you maintain name and description per language.
Step by step
- Go to Catalogues → Refund System.
- Click Add in the top right corner.
- Fill in the Information area:
- Name: the text your customers see in the shop — for example “Reusable Bottle 0.5l”. The field is mandatory and appears in the cart after the plus sign.
- Active for all selected Sales Channels: defines whether this refund type is calculated in your shop. Leave it switched on as soon as you want to use it.
- Description: an internal note that helps you tell entries apart in the overview.
- Display image: an image shown next to the deposit item in the cart. Use Open media to pick an existing file or Upload file to add a new one. The field is optional.
- Review the Linked product area and the Tax area (both are explained in the next sections).
- Click Save in the top right corner. A short message confirms that your entry was saved.
Running a multilingual shop? Use the language selection in the header to switch languages and enter name and description in each one. Save before switching — otherwise Shopware will ask you to.
Linked product: “Real refund product”
What this does for you: The deposit is handled in cart and order not just as an amount, but as a real product of your shop. Vouchers, discounts and statistics then process the deposit cleanly, and your figures show how much deposit you moved.
In the Linked product area you select a product from your shop in the Real refund product field. The note above the field says it briefly: linking is optional — if you leave the field empty, the plugin behaves like a plain deposit surcharge. The presentation in the cart is identical either way.
How to go about it: Create a dedicated product for the refund type (for example “Deposit reusable bottle 0.5l”) that you do not assign to any category in the shop, and select it here. The small clear icon in the field removes the link again.
Tax: “Tax-free reusable deposit”
What this does for you: You show reusable deposits without VAT while the product itself is taxed as usual.
In the Tax area you switch on Tax-free reusable deposit. When it is active, no VAT is shown on the deposit items in cart and order, and the amount is added to the total tax-free. The combined deposit line is then called Refund Amount (tax-free).
When the switch is off — which is the default — the deposit is calculated with the tax rate of the related product and the deposit line shows that rate, for example Refund Amount with 7 % VAT.
Important: Whether reusable deposits may be treated as tax-free in your case is a tax question. Confirm the setting with your tax advisor before switching it on in a live shop.
Assigning a deposit to a product
What this does for you: Only this assignment makes your shop actually charge a deposit. You define per product which refund type applies and how high the amount is.
For this purpose the plugin adds a Refund area to the custom fields of your products and categories.
Setting up a single product
Step by step
- Go to Catalogues → Products and open the product you want.
- Switch to the Specifications tab.
- Scroll to the Custom fields area and open the Refund tab there.
- Enter the details:
- Refund-Type: the refund type you created earlier, for example “Reusable Bottle 0.5l”.
- Refund-Price: the deposit amount for one piece of this product, for example
0.15. For several pieces the amount is multiplied by the quantity automatically. - CashBack: normally left switched off. If you switch it on, no deposit is charged for this product even though a refund type is assigned.
- Click Save in the top right corner.
Four things must come together for a deposit to appear in your shop: a Refund-Type is selected, the Refund-Price is greater than zero, the refund type is active, and the CashBack switch is off.
Tip: Enter the deposit price the way your customers should pay it. If the tax-free reusable deposit is switched off on the refund type, the amount is handled with the tax rate of the product.
Setting up a whole category at once
What this does for you: Instead of touching hundreds of beverage products one by one, you enter the deposit details once on the category and copy them to all its products with a single click.
Step by step
- Go to Catalogues → Categories and select the category you want.
- In the General tab, scroll to the Custom fields area and open the Refund tab.
- Enter Refund-Type and Refund-Price as they should apply to the products in this category.
- Click Save in the top right corner.
- Then click Mirror settings to articles in the same area. The note above the button states that the changes made in these fields are mirrored to the articles under this category.
- Confirm the question Are you sure? with Save. Cancel aborts without any change.
Important: Mirroring overwrites the deposit details of the affected products. Products that need a different refund type or a different amount have to be adjusted individually afterwards.
Tip: The button is only available once the category has been saved. So save first, then mirror.
How the deposit appears in your shop
Once everything is set up, the deposit shows up in three places in your shop — without any change to your theme.
On the product page and in product listings the name of the refund type appears below the price, followed by the deposit amount, for example “excl. €0.15 Refund”. Your customers know before buying what is added to the price of the goods.
In the cart and during checkout the deposit is handled as a separate item:
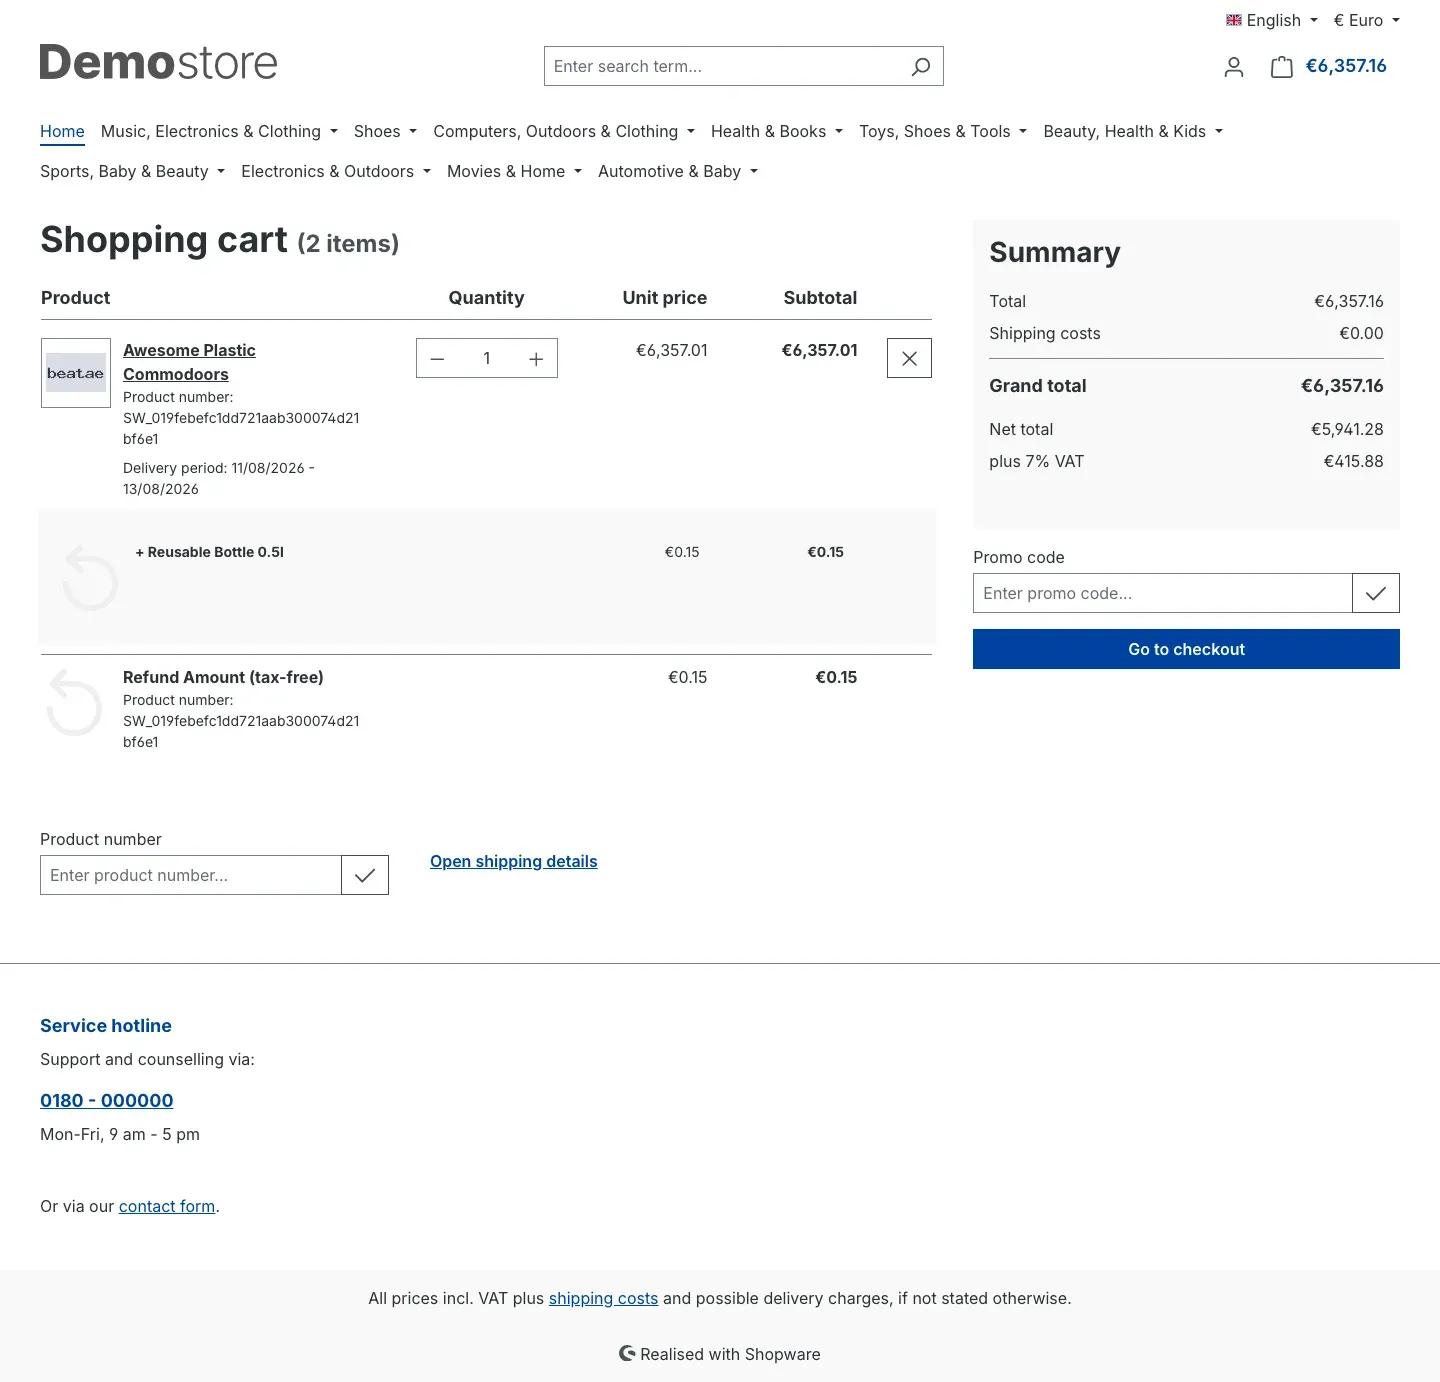 Fig. 5: The deposit appears indented below the product and additionally as a separate item “Refund Amount (tax-free)”.
- Directly below the product with a deposit there is an indented line with a plus sign and the name of the refund type, for example + Reusable Bottle 0.5l, including unit price and subtotal. You show or hide this line with the Show refund for every article in cart setting (Plugin settings).
- Below it the combined deposit amount follows as a separate item. It is called Refund Amount (tax-free) when the tax-free reusable deposit is switched on for the refund type — otherwise Refund Amount with 7 % VAT, showing the tax rate of your product.
- The deposit is already included in the grand total on the right. Shopware does not charge shipping costs on the deposit.
In the order these items are preserved: they appear in your customer’s order overview, in the order confirmation email and in the order inside your administration.
Troubleshooting
No deposit appears in the cart
What causes it: Usually one of the four conditions from Assigning a deposit to a product is missing.
How to fix it:
- Open the product under Catalogues → Products, tab Specifications, area Custom fields, tab Refund. Check that a Refund-Type is selected and that the Refund-Price is greater than zero.
- Check that the CashBack switch is off for this product.
- Open the refund type under Catalogues → Refund System and check that it is active (green tick in the Status column).
- Open the plugin settings and check Activate plugin for this channel for the affected sales channel.
- Add the product to the cart again afterwards — existing carts are recalculated the next time they are opened.
The indented deposit line below the product is missing
What causes it: The display of individual lines is switched off.
How to fix it: Open Extensions → My extensions → Configure on Product Deposit, select the affected sales channel at the top and switch on Show refund for every article in cart. Do not forget to save. The combined deposit item appears regardless of this setting.
The “Refund” area is missing on the product
What causes it: The plugin is deactivated, or the cache of the administration is out of date.
How to fix it:
- Check under Extensions → My extensions whether Product Deposit is active.
- Reload the administration in your browser.
- If that does not help, clear the cache under Settings → System → Caches & indexes.
The “Refund System” menu entry is missing under “Catalogues”
What causes it: Your user account lacks the permission, or the plugin is not active.
How to fix it: First check that the plugin is active. Otherwise ask an administrator to grant your role the permissions for the Refund System area under Settings → System → Users & permissions.
A voucher also discounts the deposit
What causes it: The setting Apply vouchers / promotions to deposit items is switched on.
How to fix it: Switch it off in the plugin settings. Voucher discounts are then capped to the cart total excluding deposit items.
The deposit amount does not match my expectation
What causes it: In almost all cases the tax treatment of the refund type is behind it.
How to fix it: Open the refund type under Catalogues → Refund System and check the Tax-free reusable deposit switch. If it is off, the deposit is handled with the tax rate of the product; if it is on, the amount is added to the total tax-free. Also check the Refund-Price on the product and the ordered quantity — the amount is calculated per piece.
FAQ
Q: Do I need a separate refund type for every product?
A: No. You create a few refund types (typically one per container type) and assign the same refund type to as many products as you like. The amount is entered on the product and can therefore differ from product to product.
Q: What happens if a customer orders two pieces of the same product?
A: The deposit is multiplied by the quantity. With a deposit of €0.15 and two pieces the cart shows €0.30.
Q: Can I show deposits in only one of my shops?
A: Yes. Select the sales channel you want at the top of the settings and set Activate plugin for this channel there. All other channels remain untouched.
Q: Do I have to create a real product in the shop for every refund type?
A: No, the Real refund product field is optional. Without a link the deposit is handled as a plain surcharge. With a link it appears as a real product in cart and order, which lets vouchers, discounts and statistics process it cleanly.
Q: Does editing a refund type later change my existing orders?
A: No. Completed orders keep the amounts and labels that applied at the time of purchase. Your change affects new carts and orders.
Q: Is the deposit shown on the invoice?
A: Yes. The deposit items are part of the order and therefore appear in the order documents Shopware generates from it.
Q: Can I switch deposits off temporarily without losing my settings?
A: Yes, in three different ways: switch the plugin off for a sales channel, set an individual refund type to inactive, or switch on CashBack on an individual product. In all cases your entries are preserved.
Q: Does Shopware charge shipping costs on the deposit?
A: No. Deposit items are excluded from the shipping cost calculation and do not receive a delivery time of their own.
For administrators / technical details
This section is aimed at technical administrators. You do not need it for day-to-day work with the plugin.
System requirements
- Shopware: 6.7
- PHP: 8.2 or newer
- Database: MySQL 8.0 / MariaDB 10.11 or newer
Installation via the command line
php bin/console plugin:refresh
php bin/console plugin:install SwpRefundSystemSix --activate
php bin/console cache:clear
Data storage
The plugin creates its own database tables for refund types and their translations. Existing Shopware tables are not modified.
Refund type and deposit price are assigned through a dedicated custom field set named Refund, which is provided on products and categories when the plugin is activated. Deactivating the plugin disables the set so the fields no longer appear in the administration; the values you entered are preserved and become available again once the plugin is reactivated.
Mirroring the deposit details from a category to its products runs through a dedicated endpoint of the administration interface and includes the subcategories as well.
Permissions
User roles can be granted the Refund System permission area with the usual levels for viewing, editing, creating and deleting. Without read permission the menu entry under Catalogues does not appear.
Uninstalling
When uninstalling, Shopware asks whether the data of the plugin should be kept. If you choose to keep it, refund types and custom fields remain in the database and are available again after a reinstallation. Otherwise the tables of the plugin, its custom fields and its configuration are removed.
This manual was created for Product Deposit version 6.7.1.
More manuals
Age Check
Tobacco, spirits, knives: visitors who do not confirm their age never see the restricted items at all. You tick a box per product, the plugin hides it everywhere.
Open manual Shopware 6Blog: Posts, Categories & Comments
Stop running WordPress next to your shop. Write posts, categories, authors and moderated comments in Shopware, then build the blog pages in Shopping Experiences.
Open manual Shopware 6Cart Extras
Your customer sees in the cart how much is missing before the free gift or the discount. Below your minimum order value, the plugin adds exactly the shortfall as a surcharge.
Open manualNeed a team that keeps your shop running?
We have been maintaining Shopware shops for more than 20 years, including updates, hotfixes and the plugins you are configuring right now.