
Rule-based property filters
Maintaining filterable properties across thousands of products by hand? Write the rule once and the plugin assigns the property itself, then keeps it current in the background.
On this page
- Introduction
- What you get out of this plugin
- Who is this plugin for?
- Installation and activation
- A tour of the plugin area
- Your first rule, step by step
- Step by step
- What happens next?
- The three rule modes in detail
- Two values (true/false)
- Presence/absence
- Value (calculated)
- Writing conditions
- The basic form
- The information available to you
- The variable list as your reference
- Proven examples
- Testing a condition
- Step by step
- Creating and managing property groups
- Creating a new group straight from the rule
- Using an existing group
- Editing groups later
- Priority and order
- Automatic sync and full resync
- Automatically on every change
- Why the filters are not updated instantly
- The daily safety-net run
- Starting a full resync manually
- Checking the result on a product
- The result in the storefront
- Plugin configuration
- Enable plugin for this sales channel
- Enable automatic sync on product save
- Log rule evaluations
- The “Background processing” card
- Permissions
- Troubleshooting
- The “Rule-based property filters” menu item is missing
- The rule has no effect — nothing changes on the product
- A condition matches every product
- An error message appears when testing
- A product carries two contradictory values
- The filter does not appear in the shop
- The resync does not seem to do anything
- FAQ
- For administrators / technical details
- System requirements
- The plugin’s scheduled tasks
- The queue from the command line
- Full resync from the command line
- Installation from the command line
- How conditions are evaluated
- Logging
- Uninstall behaviour
Introduction
Rule-based property filters takes the manual work out of maintaining filterable product properties: you write a rule once, and the plugin assigns the matching property itself every time a product is saved.
A typical example: you would like to offer a Delivery status filter with the values Ready to ship and Currently unavailable. That information already exists on every product — it just is not a filterable property. Maintaining it by hand would mean touching thousands of products and updating them again after every stock movement. With this plugin you describe the rule once, and the filter stays correct from then on.
What you get out of this plugin
- You offer your customers filters Shopware does not provide out of the box — delivery status, warranty period, a price tier or an organic certification, for example.
- You no longer maintain these properties by hand: whenever a product is saved, the assignment is re-evaluated straight away.
- You reuse information that already sits on the product: stock, price, weight, manufacturer, tax rate or your own custom fields.
- You turn numbers into tidy filter buckets: a price of €687.40 becomes the price tier 600, 5.4 years of warranty becomes 5.
- You test every rule against a real product before saving it and see immediately what it will do.
Who is this plugin for?
Merchants and content editors with large catalogues who want to offer better filters without editing every product individually.
One honest note up front: you write the condition of a rule as a short expression in Twig notation — the same notation Shopware uses in email templates and documents. For simple cases a single line is enough, and you can copy it straight from this manual. For your own more elaborate conditions you will need a little practice. The built-in help, the variable list and the test function exist precisely for that.
Installation and activation
After the purchase the plugin is available directly in your Administration — there is nothing to download.
- Log in to your Shopware Administration.
- Open Extensions → My extensions and stay on the Apps tab.
- Find the entry Rule-based property filters and click Install next to it.
- Then activate the plugin using the toggle on the left of the entry. Once it is blue, the plugin is running.
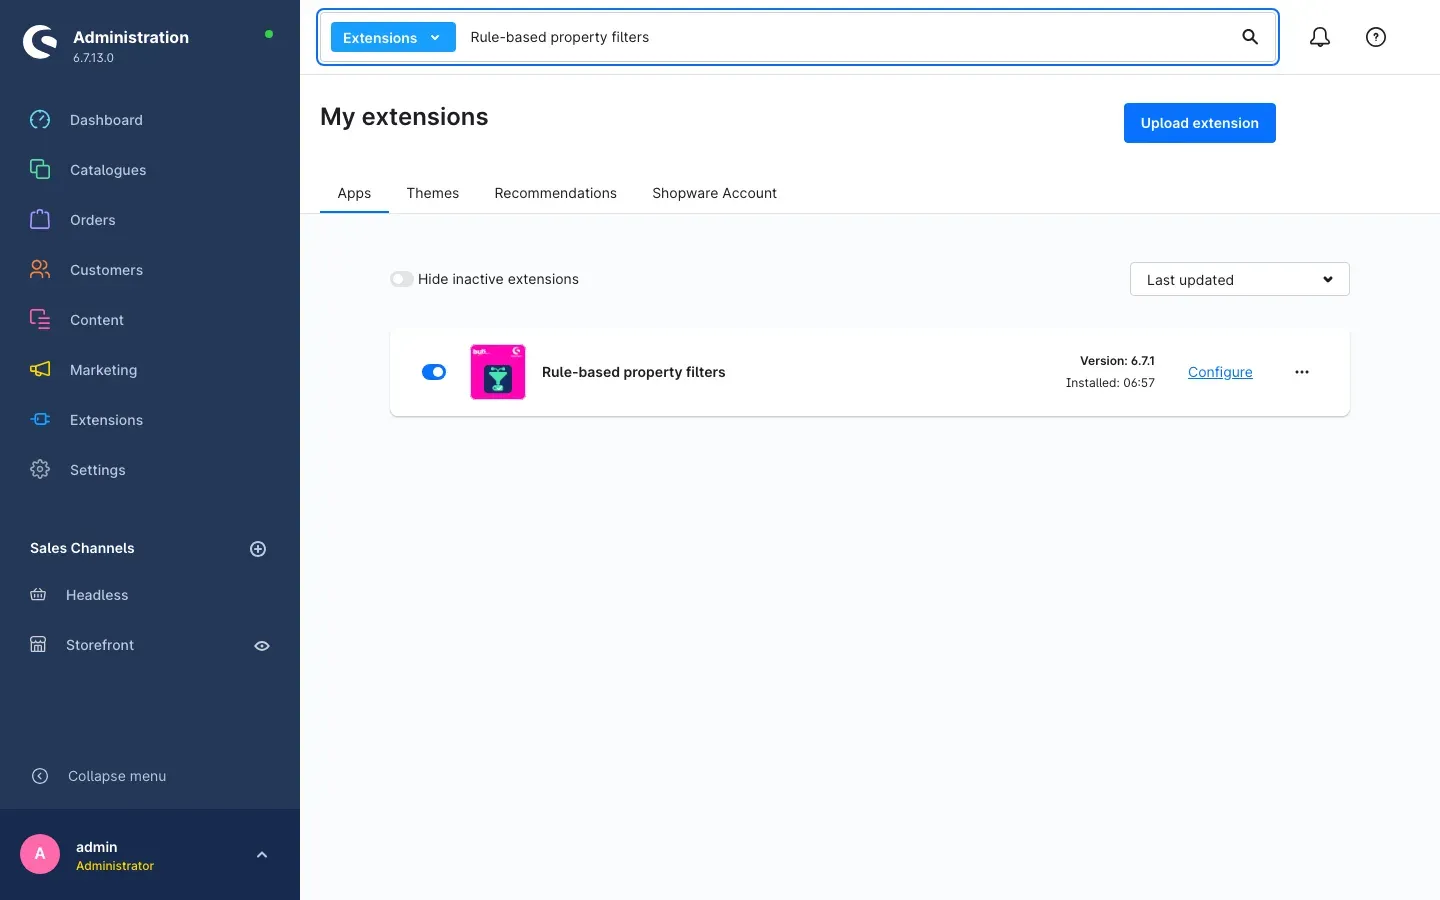 Fig. 1: The plugin is installed and activated — you can tell by the switched-on toggle on the left. The version and the Configure link are on the right.
After activation you will find the new menu item Rule-based property filters in the left-hand navigation under Catalogues.
If the menu item does not appear, reload the Administration in your browser. If it still does not show up, clear the cache under Settings → System → Caches & indexes.
A tour of the plugin area
Open Catalogues → Rule-based property filters. You land on the Conditional property rules overview, where you manage all rules of your shop; the number in brackets after the headline tells you how many there are.
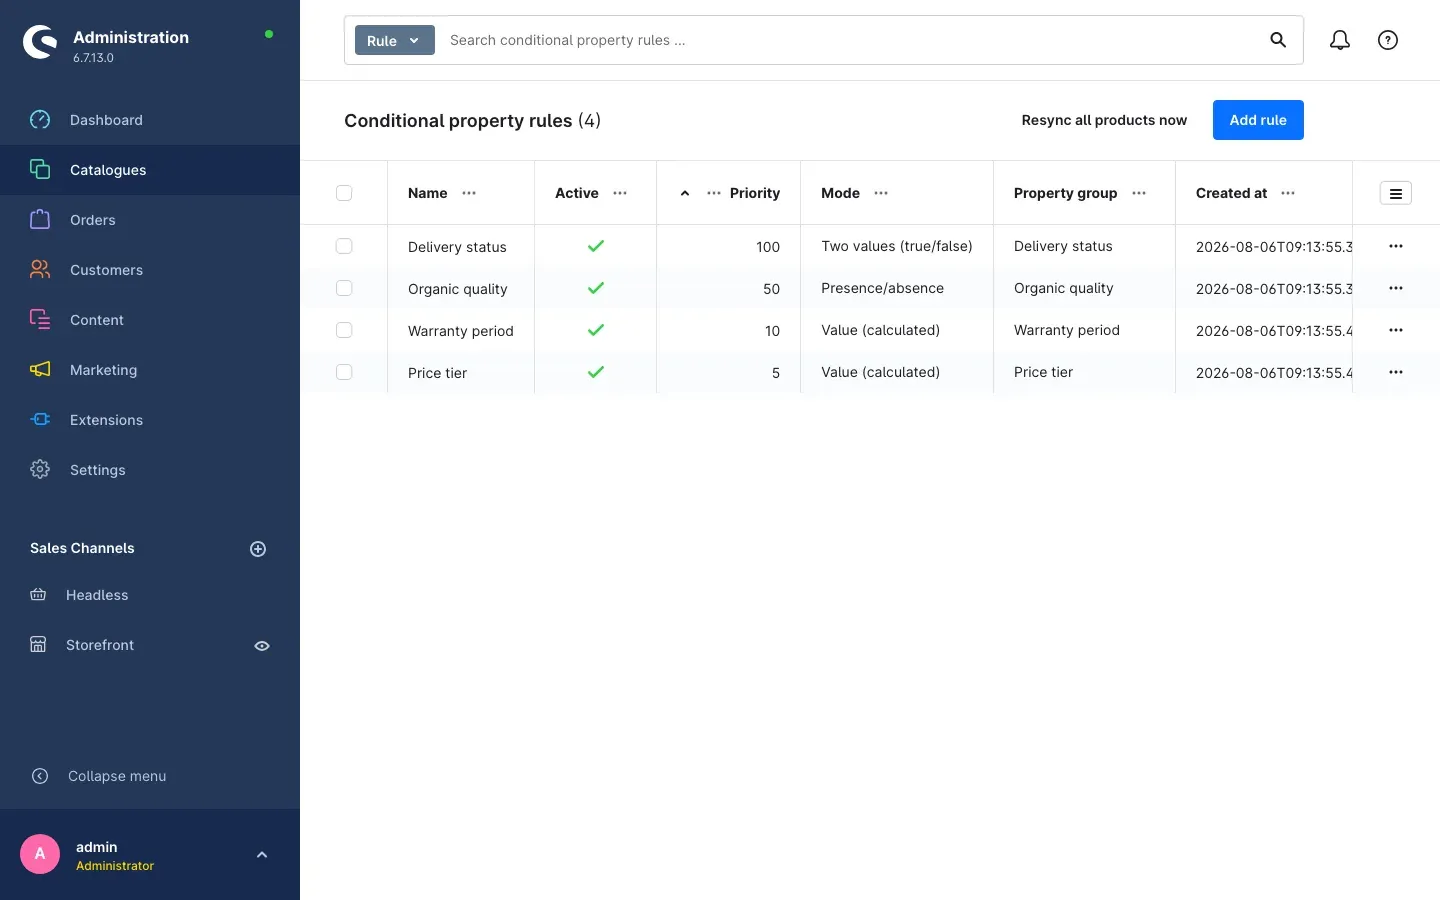 Fig. 2: The “Conditional property rules” overview with four example rules.
For every rule the list shows you at a glance:
- Name — the label you gave the rule. It is only visible to you in the back office and never appears in the shop.
- Active — a green tick means the rule is being evaluated. Rules without a tick simply sit idle.
- Priority — the order in which the rules are processed (see Priority and order).
- Mode — how the rule works: Two values (true/false), Presence/absence or Value (calculated).
- Property group — the group in which the rule assigns values. It later becomes the filter in your shop.
- Created at — when the rule was created.
Two buttons sit at the top:
- Add rule creates a new, empty rule.
- Resync all products now re-evaluates every rule across the whole catalogue (see Automatic sync and full resync).
The menu at the end of each row gives you the actions for that single rule — that is where you edit or delete it. The search field at the very top finds a rule by its name; it carries the hint Search conditional property rules ….
As long as no rule exists yet, you are greeted by the message No rules yet and the prompt Create your first conditional property rule. instead.
If products are currently waiting to be re-evaluated, an additional notice appears above the list. What it means is explained in Automatic sync and full resync.
Your first rule, step by step
What you get out of this: by the end of this chapter you will have a working Delivery status filter in your shop that follows the stock level entirely on its own — without you touching a single product by hand.
Step by step
-
Go to Catalogues → Rule-based property filters and click Add rule at the top right.
-
Fill in the General card:
- Name: enter something descriptive, for example
Delivery status. It only helps you find the rule in the list. - Active: the toggle is already switched on for a new rule. Leave it on so the rule takes effect.
- Priority: a higher number means the rule is evaluated earlier. For your first rule you can keep the preset value.
- Mode: choose Two values (true/false). Every product then receives either one value or the other — never none and never both.
- Description: optional. Use it to record for yourself and your colleagues what the rule is for.
- Name: enter something descriptive, for example
-
In the Property group card, select the group the values should go into. If you do not have a suitable group yet, click Create new property group and create it right here — see Creating and managing property groups.
-
In the Condition card, enter into the Condition (Twig) field when a product counts as available:
{{ available_stock > 0 }}In plain words: “there is available stock left.” This is exactly the example the plugin itself displays below the field, together with all available variables.
-
Underneath, define which value is assigned in which case:
- Option when “true”: the value for matching products, here Ready to ship.
- Option when “false”: the value for all others, here Currently unavailable.
You can choose from exactly the values stored in the property group you selected above.
-
Check the rule in the Test condition card before you put it to work — see Testing a condition.
-
Click Save at the top right.
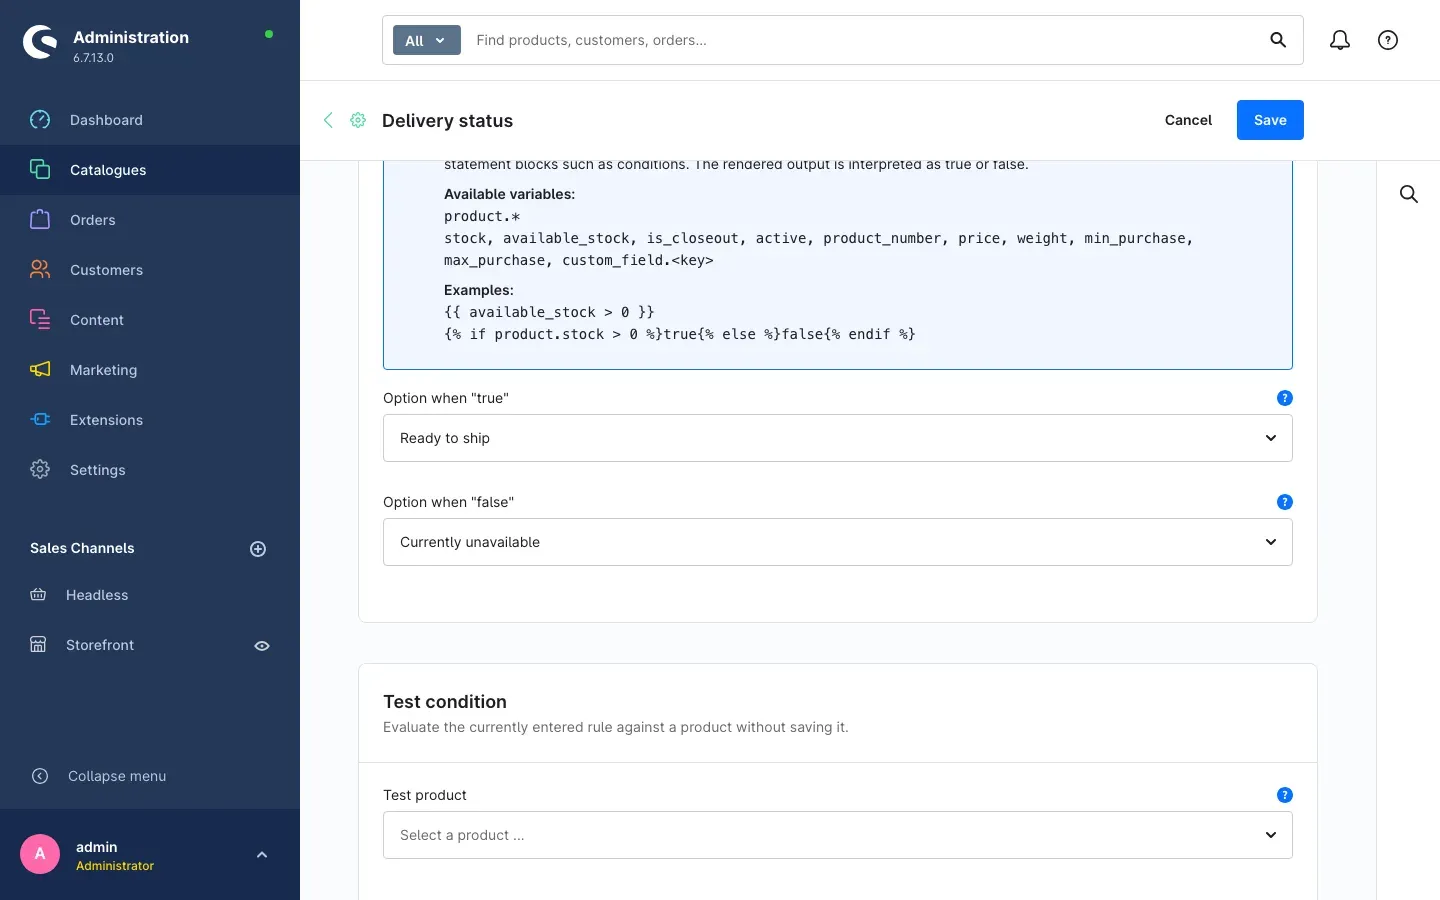 Fig. 3: The finished “Delivery status” rule with the options “Ready to ship” and “Currently unavailable”.
What happens next?
Once saved, the rule is live — but at first it only applies to products that are saved from now on. To bring your existing catalogue in line immediately, run the full resync described in Automatic sync and full resync once.
Important: if you forget a required entry when saving, the plugin tells you with the message Input incomplete and names exactly what is missing — for example Please select a property group. or Please enter a condition.
The three rule modes in detail
The Mode decides how a rule assigns a property. You choose it in the General card; depending on your choice, the form then shows exactly the fields that mode needs.
Two values (true/false)
What you get out of this: a filter with exactly two options where every product is guaranteed to carry one of them. Ideal for yes/no statements your customers should be able to filter in both directions.
You provide a condition plus an Option when “true” and an Option when “false”. If the condition is met, the product receives the first value, otherwise the second. The other value is removed automatically — so a product can never be Ready to ship and Currently unavailable at the same time.
Typical uses: delivery status, free shipping yes/no, new arrival yes/no.
Presence/absence
What you get out of this: a badge that only appears where it applies — without the shop displaying an unattractive “no” on every other product.
You provide a condition and one option. If the condition is met, the option is assigned; if it no longer applies, the option is removed again. Products that do not match simply receive nothing at all from this rule.
Typical uses: seals and badges such as Organic, Sale or Handmade — things you highlight but never negate.
A real-world example is the Organic quality rule: it checks a custom field on the product and assigns the value Organic in the property group of the same name — but only to products where that field is set.
Value (calculated)
What you get out of this: a number on the product turns into a neatly bucketed filter value. Instead of hundreds of individual prices you get price tiers such as 100, 200, 600 — values customers can actually filter by.
In this mode the rule calculates a value and stores it as an option in the selected property group. If that value does not exist there yet, it is created automatically. You fill in the Value calculation card:
- Value expression (Twig) — what should be calculated, for example
{{ price }}for the product’s gross price. - Rounding — how the result is smoothed: None, Round (commercial), Round down or Round up.
- Step size — optional. Instead of rounding to whole numbers, the value is rounded to the nearest multiple of this figure. With a step size of
100and Round down, €687.40 becomes the tier 600. - Optional condition (Twig) — also optional. If you fill this in, the value is only assigned when this condition is met. Leave it empty and the rule applies to all products.
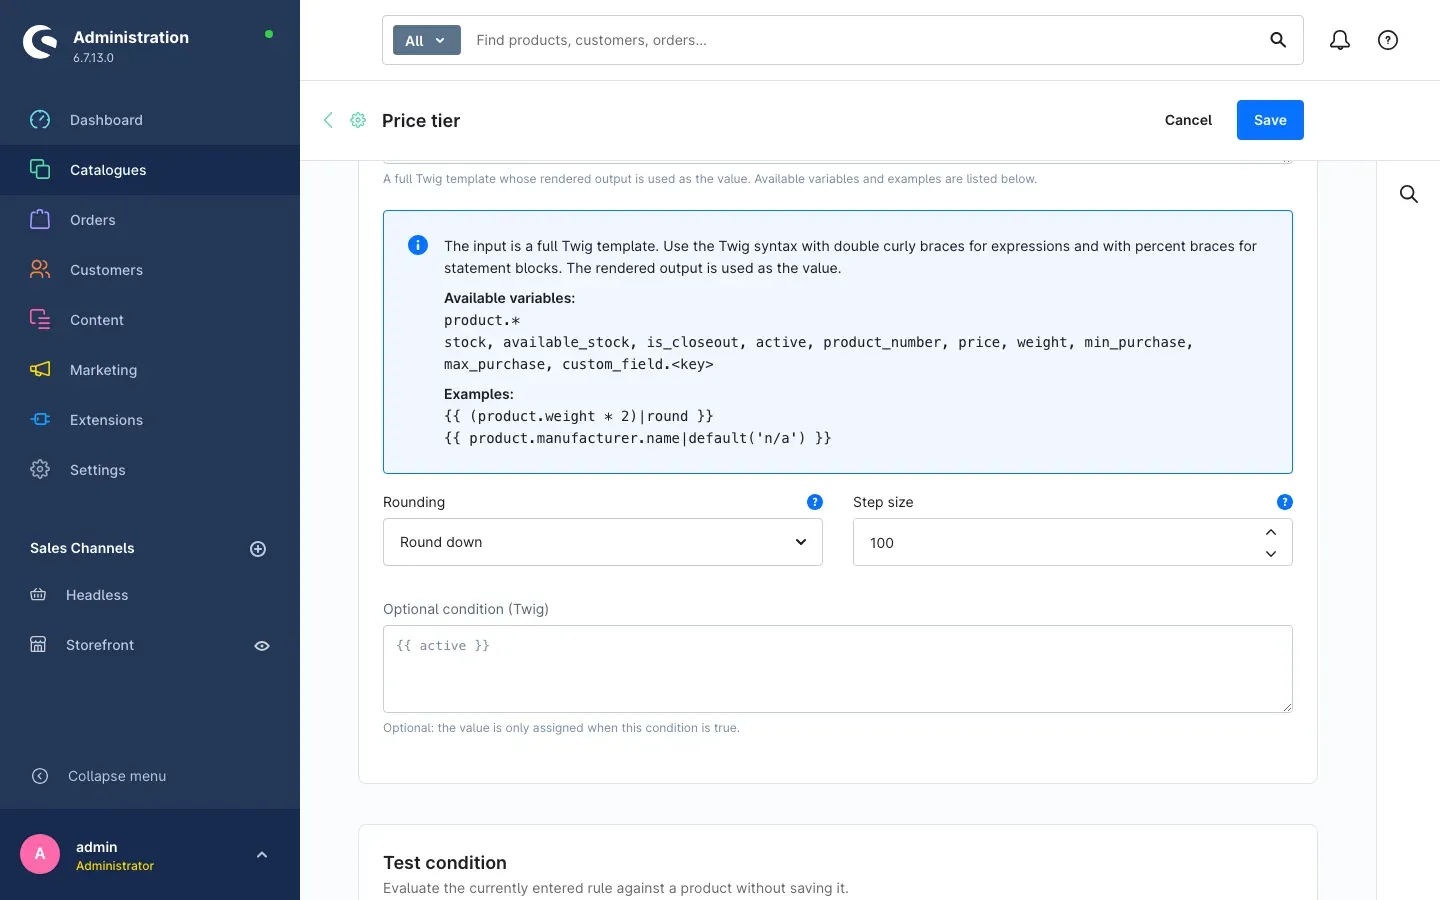 Fig. 4: The “Price tier” rule rounds the price down using a step size of 100.
Typical uses: price tiers, warranty in years, weight classes, manufacturer name as a filter.
Important: a value rule treats all values of the selected property group as its own and cleans up outdated assignments within it. Always use a dedicated property group for value rules, one you do not additionally maintain by hand. Every other property on your products stays untouched.
Writing conditions
What you get out of this: the condition is the heart of every rule. It decides which products receive the value — and because you phrase it freely, you can cover cases no standard filter ever anticipates.
The basic form
A condition is a short piece of Twig — the same notation Shopware uses in email templates. Two forms occur, and the hint above the field names both:
- Expressions are written in double curly braces:
{{ available_stock > 0 }} - Statements are written in percent braces:
{% if product.stock > 0 %}true{% else %}false{% endif %}
The result is interpreted as true or false.
Important: the braces are mandatory. Text without braces is output unchanged and then counts as true — a condition such as
stock > 0without braces therefore matches every product. Write{{ stock > 0 }}instead.
The information available to you
Right below the input field the plugin lists what you can use under Available variables:. The most important ones in plain language:
| Variable | Meaning |
|---|---|
stock | The product’s stock level |
available_stock | The available stock (stock minus reserved goods) |
is_closeout | Whether the product can only be ordered while stock lasts |
active | Whether the product is visible in the shop |
product_number | The product number |
price | The gross price in the default currency |
weight | The weight |
min_purchase / max_purchase | Minimum and maximum order quantity |
custom_field.<fieldname> | The content of one of your own custom fields |
On top of that, product. gives you access to every other detail of the product, for example:
product.manufacturer.name— the manufacturerproduct.tax.taxRate— the tax rateproduct.customFields.<fieldname>— your custom fields as well
The variable list as your reference
There is nothing to memorise. Use the magnifier icon at the right-hand edge of the rule to open the Variables panel.
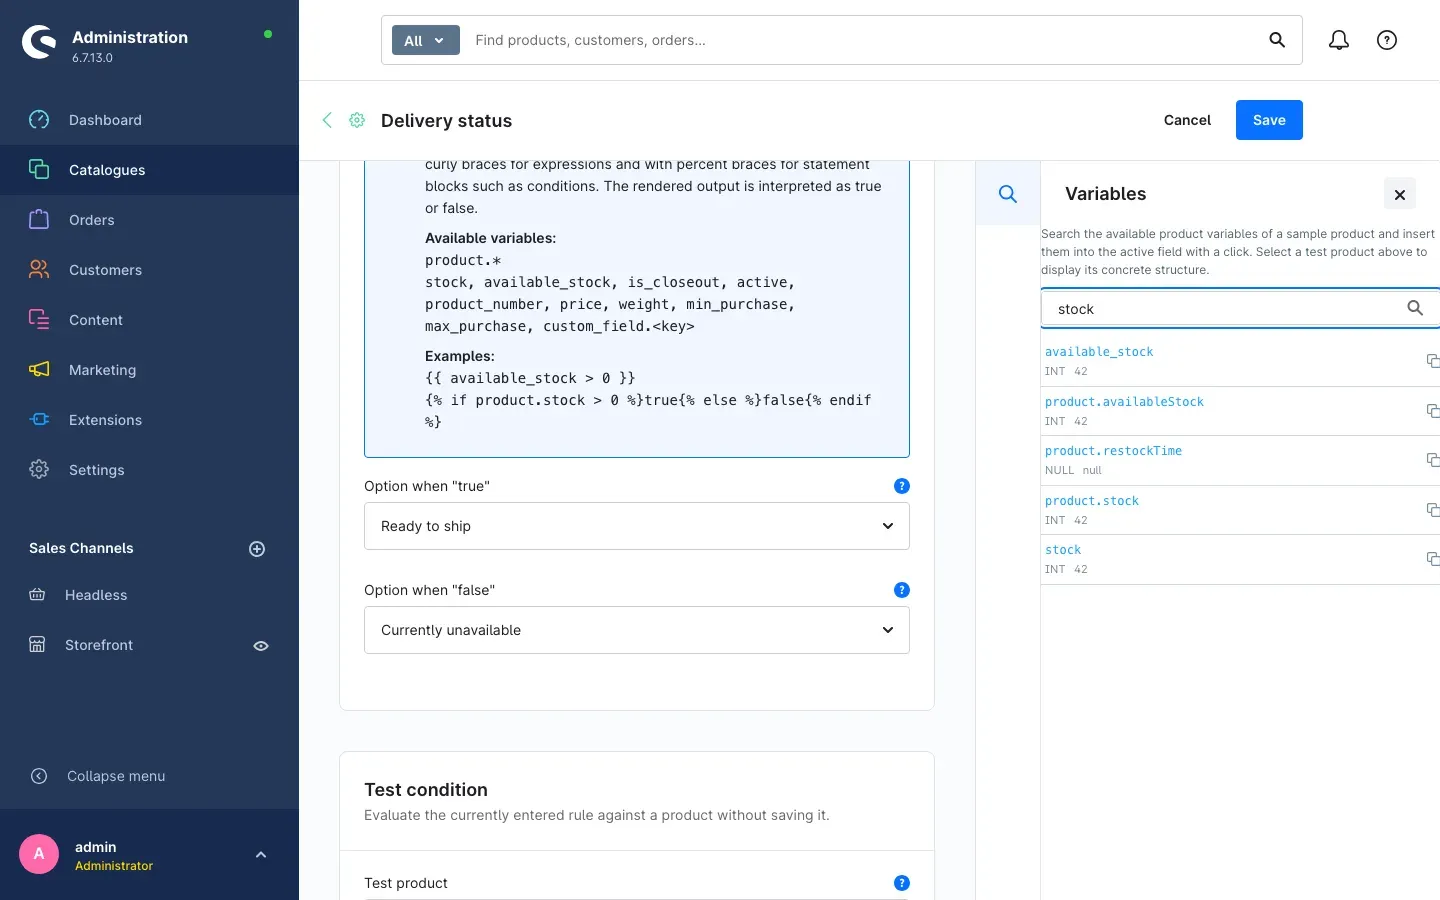 Fig. 5: For every entry, the variables panel also shows the real value of the selected test product.
Here is how to work with it:
- Select a Test product in the Test condition card further down. The panel then shows not only the variable names but also the concrete value for that product — so you can see immediately whether you picked the right one. The text at the top of the panel points this out as well.
- Type a search term into the Search variables … field, for example
stockor the name of your custom field. - First click into the condition field the variable should go into, then click the match in the panel. The variable is inserted at the cursor position and the plugin confirms with Variable inserted.
- Alternatively, copy a variable to the clipboard using the icon on the right.
Tip: with a large number of matches the panel hides some of them and reports Further matches are hidden. Narrow down the search …. Just type a few more characters.
Proven examples
| Goal | Condition |
|---|---|
| Available stock exists | {{ available_stock > 0 }} |
| Stock left, or selling beyond stock allowed | {{ stock > 0 or not is_closeout }} |
| A custom field is set (badge) | {{ custom_field.swp_demo_bio }} |
| Only visible products | {{ active }} |
| Explicit if/then notation | {% if product.stock > 0 %}true{% else %}false{% endif %} |
For the Value (calculated) mode you enter a calculation instead of a condition:
-
The price as the basis for the price tier:
{{ price }} -
Twice the weight, rounded to a whole number:
{{ (product.weight * 2)|round }} -
The manufacturer as a filter value, with a fallback for products without one:
{{ product.manufacturer.name|default('n/a') }}
The last two examples are the ones the plugin itself displays below the field in Value (calculated) mode.
Tip: the names of your custom fields are listed in the Administration under Settings → System → Custom fields. That exact name is what goes after
custom_field..
Testing a condition
What you get out of this: you see in black and white what your rule does to a real product — before you save it and let it loose on your catalogue. That saves you nasty surprises in the shop.
Every rule has a Test condition card at the very bottom, with the note “Evaluate the currently entered rule against a product without saving it.”
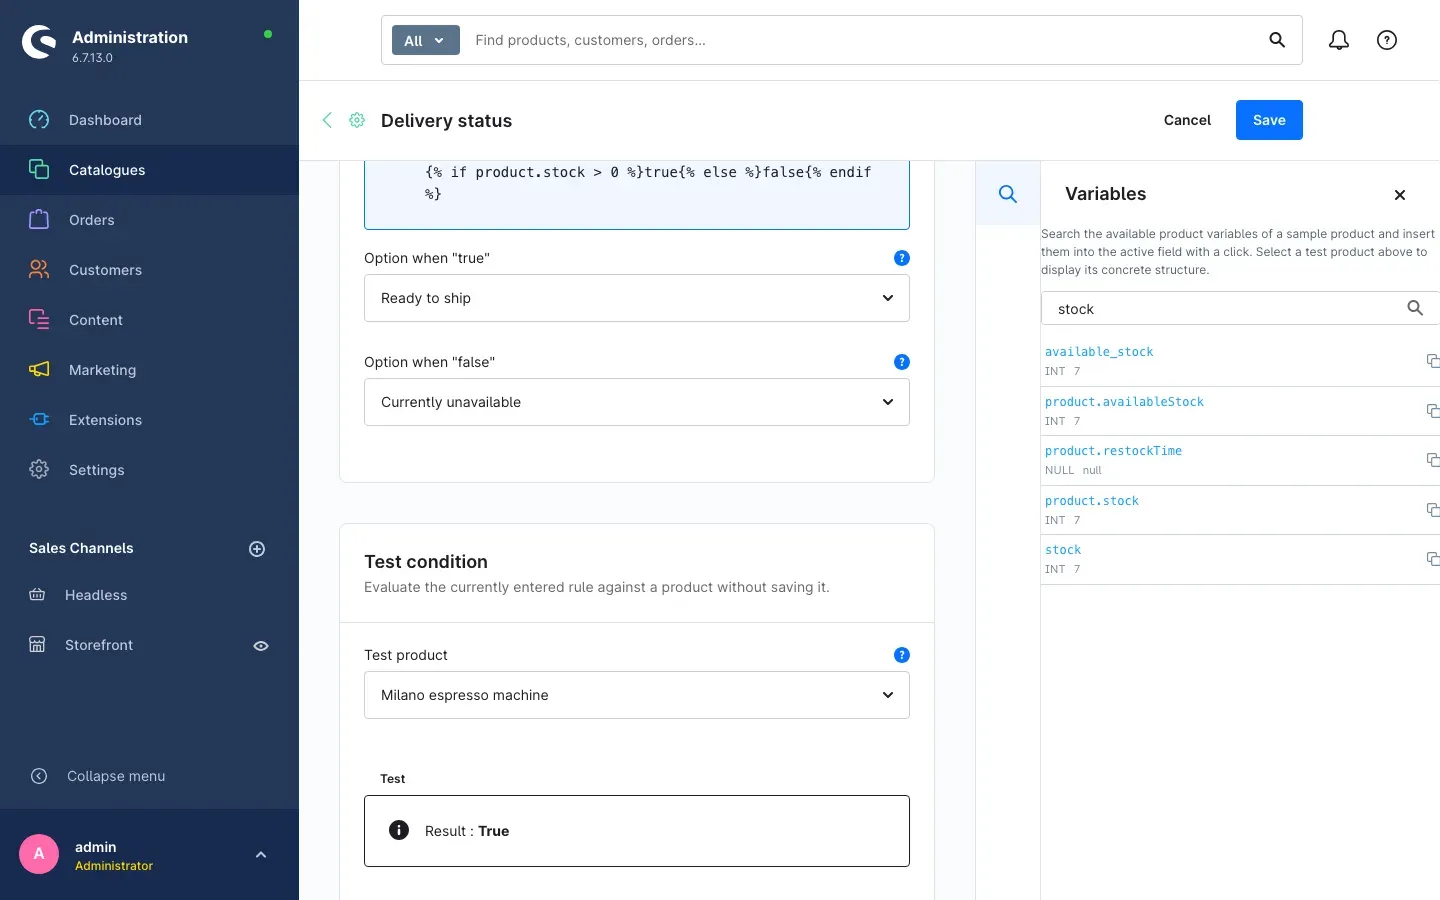 Fig. 6: The test evaluates the condition against a real product — here with the result “True”.
Step by step
- Pick a product from your catalogue under Test product. As long as nothing is selected it reads Select a product …. Ideally choose a product where you already know the expected outcome.
- Click Test.
- Read the result below the button:
- In Two values and Presence/absence mode it reads Result: True or Result: False.
- In Value (calculated) mode the plugin shows you under Calculated value exactly the option the product would receive — rounding and step size included.
- If something is wrong with your condition, an Error with a hint about the cause appears instead.
The test changes nothing: it saves neither the rule nor the product.
Good to know: product names in the Test product list are shown in the default language of your shop, not in the language you are currently using the Administration in.
Tip: test every rule with two products — one that should match and one that should not. Only when both results are correct is the condition really right.
Creating and managing property groups
What you get out of this: the property group is what your customers later see as the filter heading in your shop — Delivery status with the values Ready to ship and Currently unavailable, for example. So that you do not have to switch to another part of the Administration, you create it directly from the rule.
Creating a new group straight from the rule
- Click Create new property group in the Property group card.
- Fill in the Create new property group dialogue:
- Group name — the heading of the later filter, for example
Seasonal goods. This entry is required. - Name of the “true” option — the value for matching products. Preset to Yes.
- Name of the “false” option — the value for all others. Preset to No. This field only appears if your mode needs an opposite value.
- Group name — the heading of the later filter, for example
- Click Create.
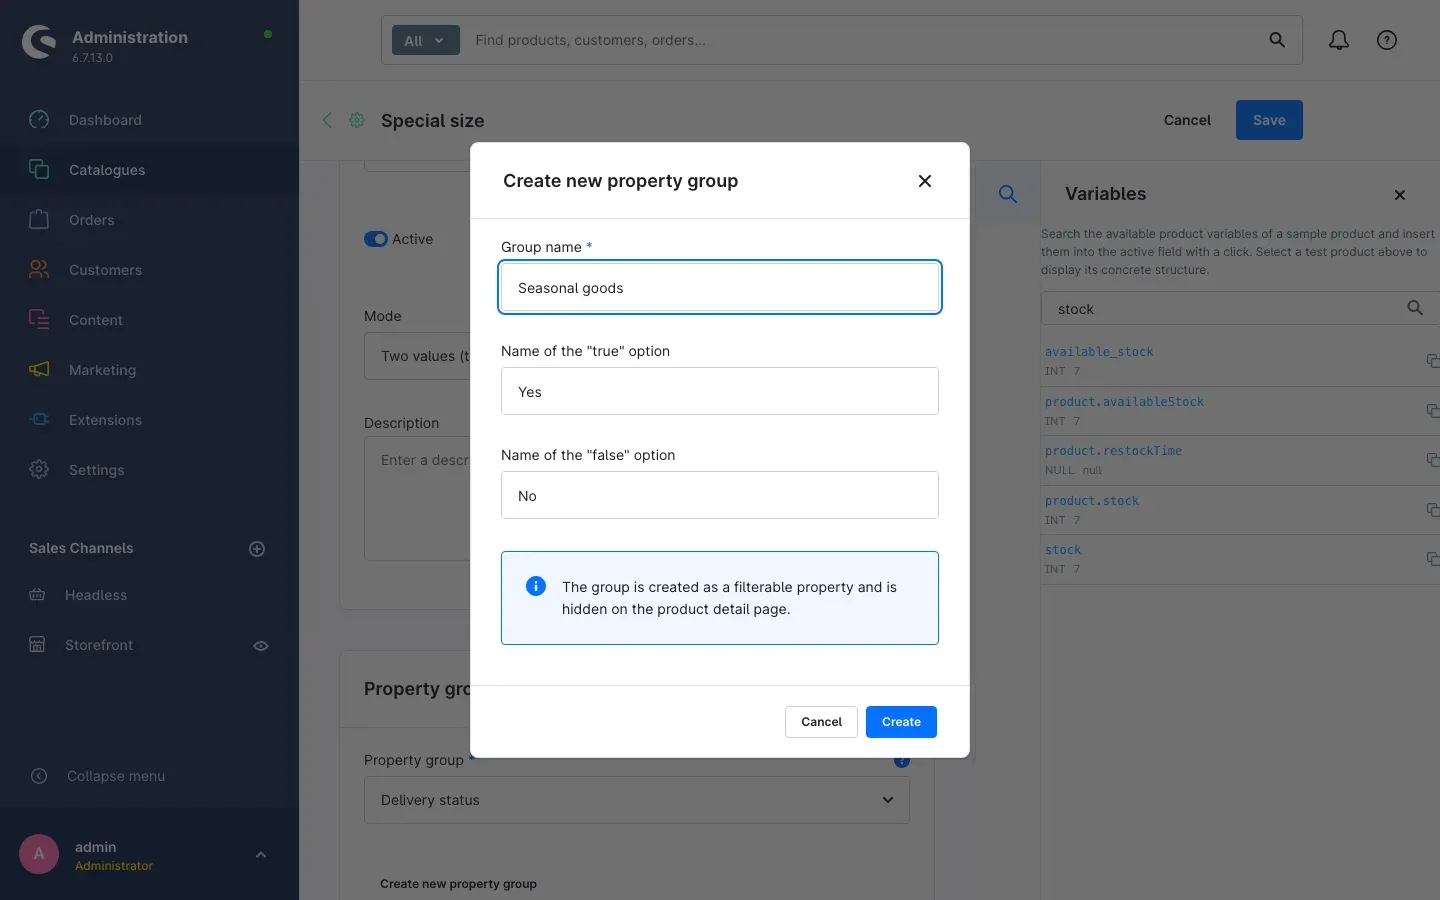 Fig. 7: A new property group is created right inside the rule — including both values.
The plugin confirms with Group created and immediately enters the new group into your rule. The note in the dialogue tells you exactly how the group is created: The group is created as a filterable property and is hidden on the product detail page. The value therefore appears in your category filters without cluttering the product page.
If you forget the name, the plugin points it out with Please enter a name for the group.
Using an existing group
You can just as well use a property group that already exists in your shop: simply select it in the Property group field. In Two values and Presence/absence mode you can then choose from exactly the values of that group.
Editing groups later
Renaming, sorting, changing the display: you do that as usual in the Shopware property management under Catalogues → Properties. The plugin does not interfere there — it only fills the groups.
Good to know: inside the plugin area, the names of property groups and their values are always shown in the default language of your shop — even when you are using the Administration in another language. Rule names, buttons and all other texts do follow the selected interface language. In your shop itself, customers see the names in their own language as usual.
Priority and order
What you get out of this: as soon as several rules are in play, the priority determines which one goes first.
In the Priority field of the General card you enter a number. The hint on the field says: Rules with a higher priority are evaluated first. A rule with 100 therefore comes before one with 5. The overview is sorted by that number by default, so you can see the order at a glance.
A proven approach is to assign priorities in steps of ten or a hundred (100, 50, 10, 5). That way you can always slot a new rule in between later without touching any of the others.
Tip: let exactly one rule fill each property group. Assignments are then unambiguous and priority is merely a matter of overview. If two rules write into the same group, both values can end up on a product at the same time — which is confusing in the filter.
Rules whose Active toggle is off are not evaluated at all, regardless of their priority. That is the quickest way to pause a rule without deleting it.
Automatic sync and full resync
What you get out of this: you do not have to think about keeping the filters current — the plugin does it for you.
Automatically on every change
When something about a product changes, the plugin re-evaluates that product’s active rules and adjusts the assigned properties. It is not only saving in the Administration that counts:
| What changes | Example |
|---|---|
| The product itself | Manual editing, import, API, ERP system |
| Stock, through an order | An item sells and drops below your threshold |
| Related data | Price, category assignment, manufacturer, tax rate, unit, delivery time, tags, images |
| Variants | You change the main product and the variants follow |
Only what genuinely has to change is written — and only within the properties your rules manage. Every property you assigned by hand stays untouched.
Why the filters are not updated instantly
The evaluation does not happen in the moment you save. The plugin only notes which product needs re-evaluating, and a background process works through that list — normally within a minute.
What you get out of this: saving stays fast. That matters most when an ERP system or an import writes hundreds or thousands of products at once: the transfer is not noticeably slowed down by the plugin, because the actual work happens afterwards in the background.
While something is still outstanding, the notice Changes are being processed in the background appears above the rule list, together with the number of products waiting. It disappears on its own once everything has been processed.
If the notice does not disappear: if it changes to The queue is not being processed, nothing is working through the list. The notice itself names the cause. Either the background worker is switched off in the plugin configuration (Plugin configuration) — switch it back on. Or your shop’s background processing is not running, which is one for your administrator (For administrators / technical details).
If you would rather have the filters set immediately on save and your shop receives no bulk transfers, you can switch to immediate evaluation — see Plugin configuration. The automation as a whole can be switched off there as well.
The daily safety-net run
On top of that, the plugin re-evaluates the entire catalogue once a day. This catches the rare cases where product data was changed bypassing Shopware — another plugin writing straight to the database, for instance. Interval and switch-off are covered in Plugin configuration.
Starting a full resync manually
After every change to your rules you should have the catalogue re-evaluated once. The automatic detection reacts to product changes, not to rule changes — otherwise a new or edited rule only applies to products that are touched afterwards anyway (at the latest during the daily safety-net run).
- Go to Catalogues → Rule-based property filters.
- Click Resync all products now at the top.
- The plugin confirms with the message Sync started and the note A full resync of all products has been started in the background.
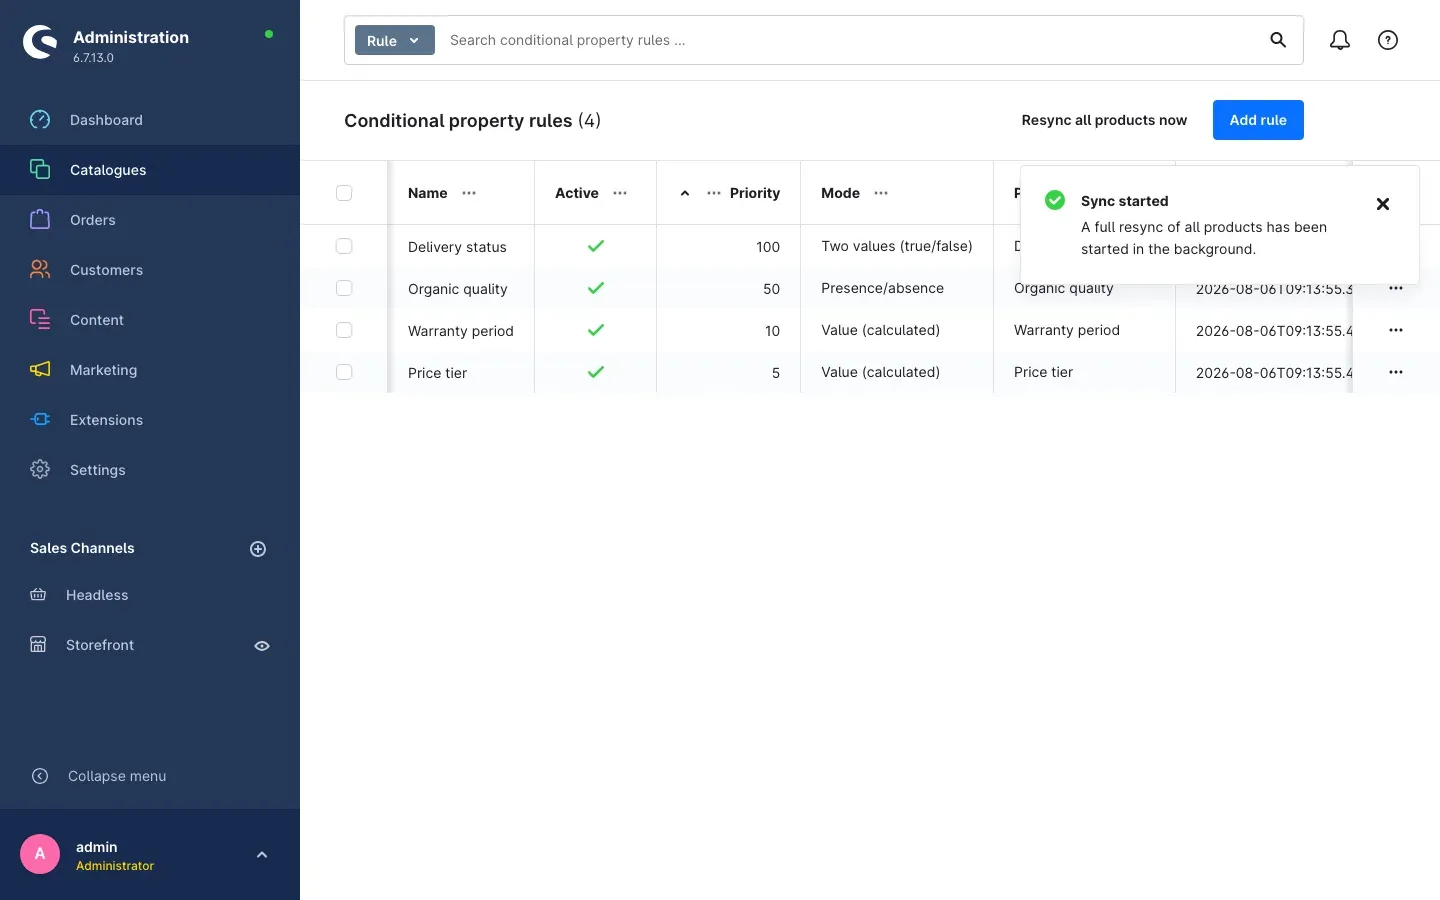 Fig. 8: After the click, the plugin confirms that the resync has started.
When you need this:
- right after you created your first rule,
- after every change to a condition, a rounding setting or the assigned values,
- after activating, deactivating or deleting a rule,
- after products entered the database bypassing the Administration.
Important: the resync runs in the background rather than all at once. With a large catalogue it can take a while, and the filters in your shop will catch up gradually. It requires your shop’s background processing to be running — which is the case in most hosted shops. If nothing changes at all long after the message, contact your administrator; the relevant check is described in For administrators / technical details.
If the plugin is switched off in the configuration, the resync does not start. Instead you are told to enable it first.
Checking the result on a product
The fastest way to see whether an assignment has arrived is the product itself: open it under Catalogues → Products, switch to the Specifications tab and look at the Properties card.
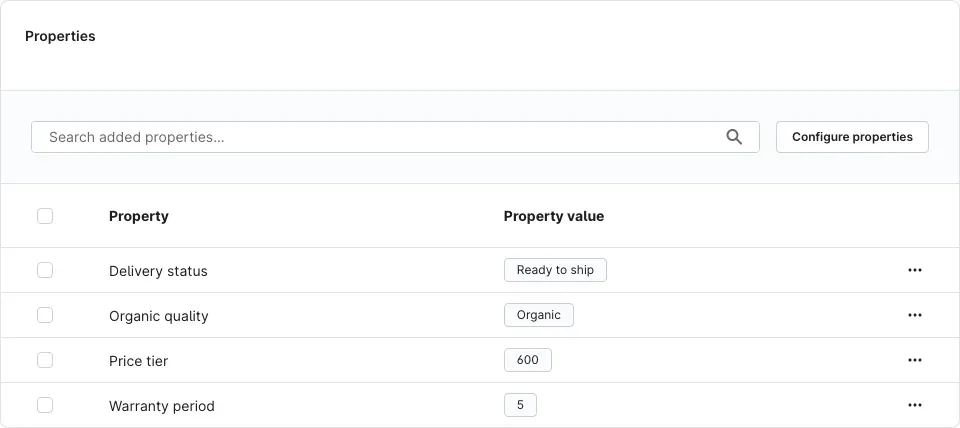 Fig. 9: The values “Ready to ship”, “Organic”, “600” and “5” assigned by the plugin sit right next to the other properties.
The values assigned by the plugin appear there in the Property value column, among your other properties as normal. You recognise them by the property group you selected in the rule.
Important: do not edit these values by hand. The next time the product is saved, the rule resets them to the result it calculated anyway.
The result in the storefront
What you get out of this: this is where all the work pays off — your customers get additional filters that take them to the right product faster.
As soon as values have been assigned in a property group, that group appears in the filter row above the product listing of your categories — exactly like Shopware’s standard filters, in the same place and styled by your theme. Clicking a filter expands its values.
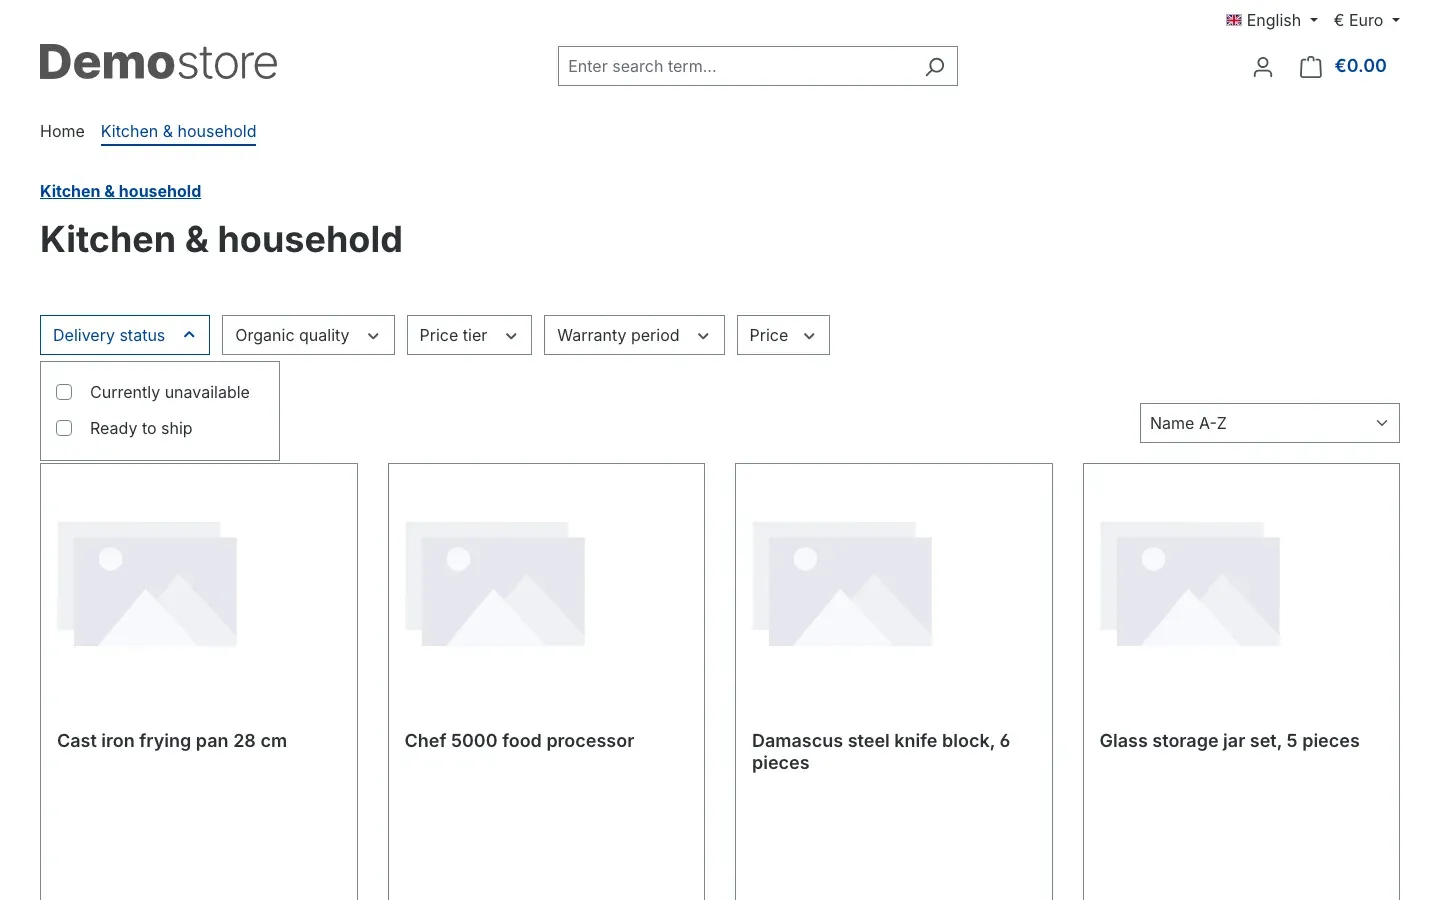 Fig. 10: The “Delivery status”, “Organic quality”, “Price tier” and “Warranty period” filters sit next to the standard “Price” filter. “Delivery status” is expanded, showing the two values from the rule.
When a customer selects a value, the result list is narrowed down immediately. The filter shows in brackets how many of its values are currently active.
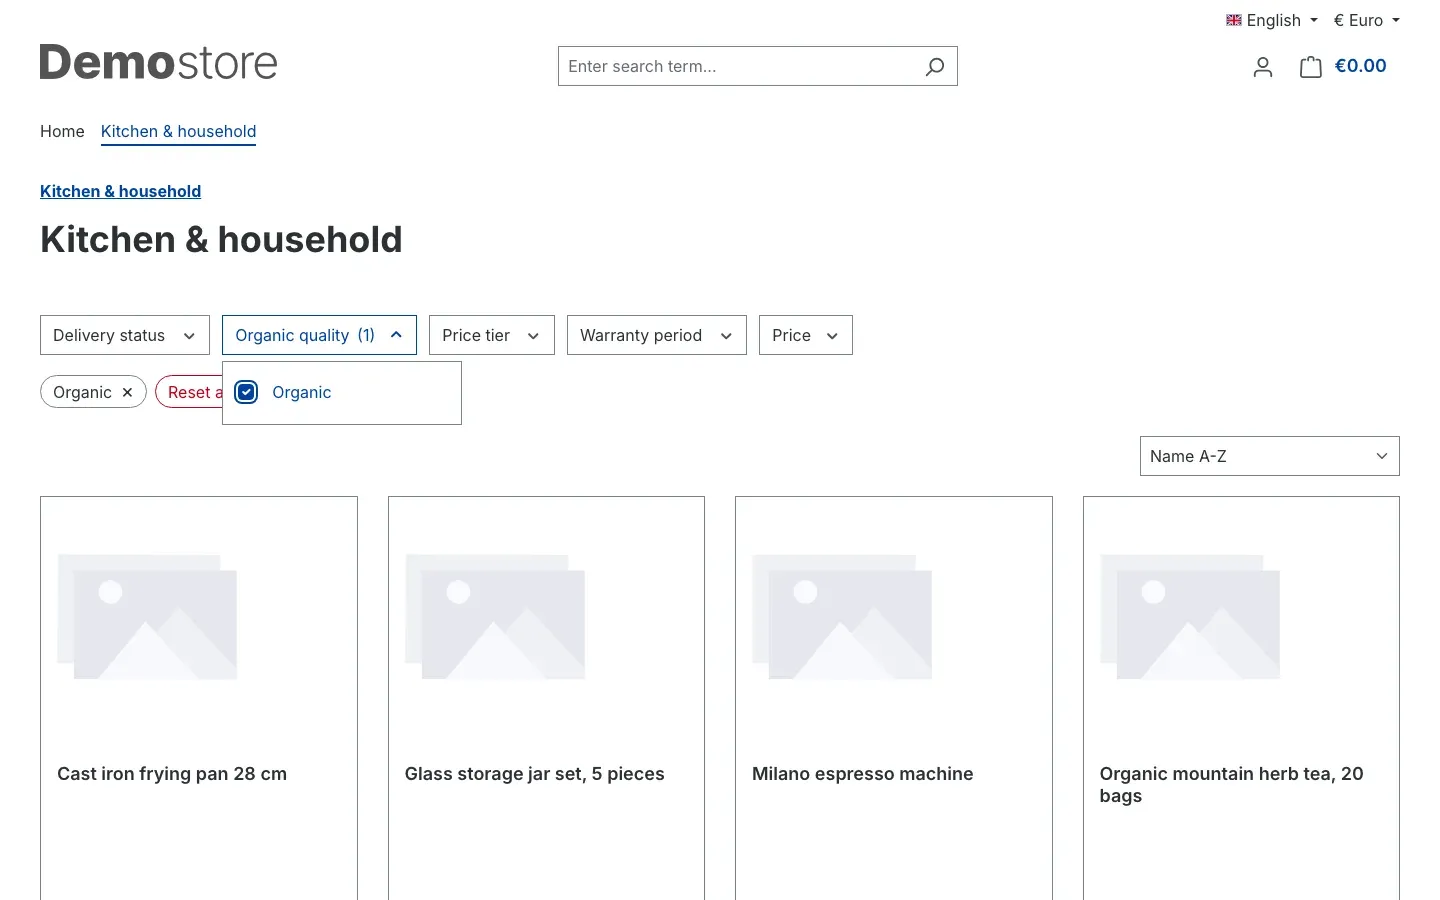 Fig. 11: After filtering for “Organic”, exactly the products carrying that badge remain.
On smartphones and tablets the same filters are available in the Filter products overlay.
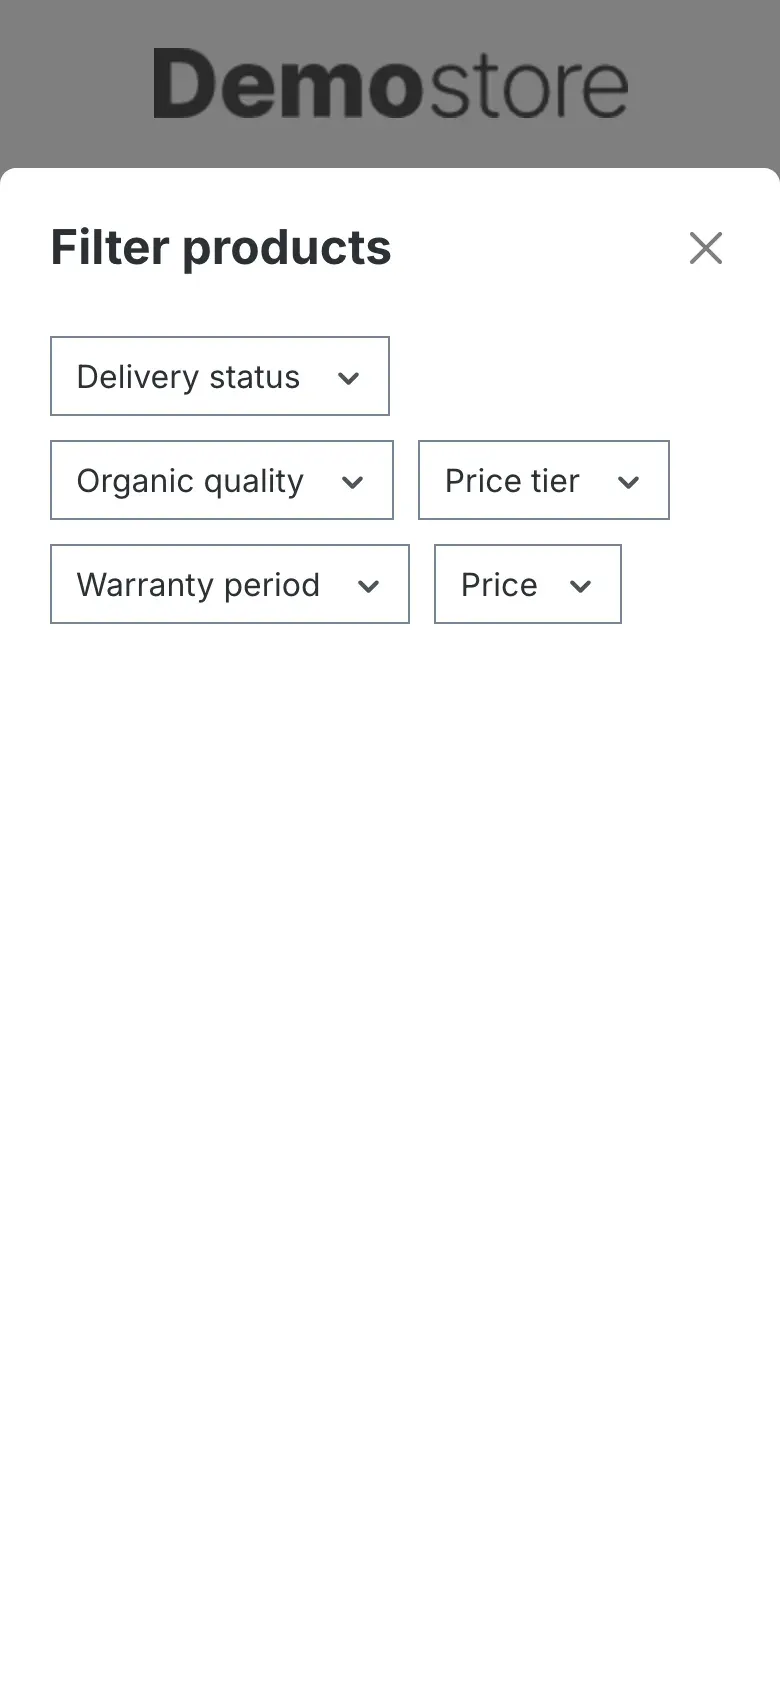 Fig. 12: All additional filters are available on mobile devices too.
Tip: you control the order and appearance of the filters just like for any Shopware property — through the sorting of the property groups under Catalogues → Properties and through the filter settings of your category.
Important: if the shop does not show a filter yet although the values are on the product, the product index usually just needs refreshing. Check that under Settings → System → Caches & indexes.
Plugin configuration
You reach the settings via Extensions → My extensions: click Configure on the Rule-based property filters entry. They are spread over two cards: General with three switches and Background processing with four settings that can normally stay as they ship.
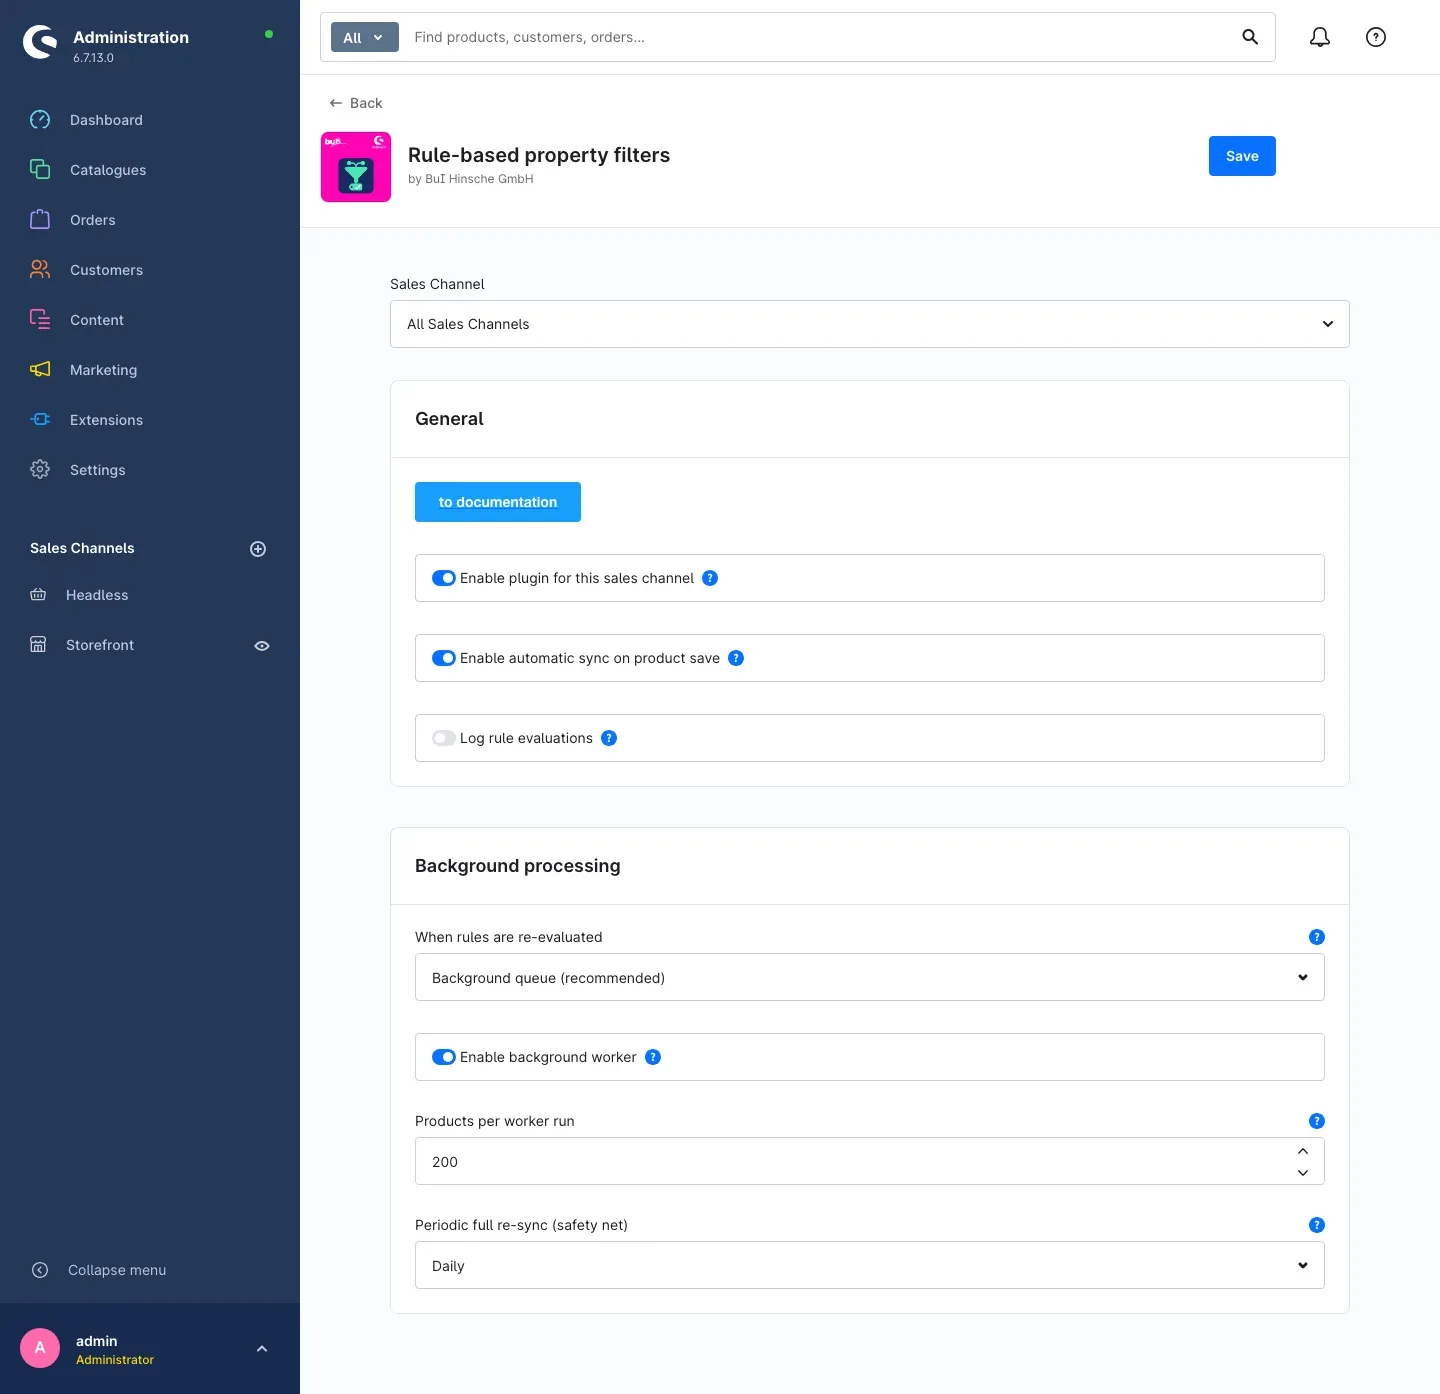 Fig. 13: The configuration page with both cards, “General” and “Background processing”.
At the very top of the General card sits the to documentation button. It opens this manual in a new browser tab — in the language you are currently using the Administration in.
Good to know: above the cards you will see Shopware’s familiar Sales Channel selector. The settings of this plugin apply to your entire shop, because the assigned properties belong to the product itself and therefore count in every sales channel. Leave the selector on All Sales Channels.
Enable plugin for this sales channel
The master switch. With it off, the plugin evaluates no rule at all and writes no assignment — neither on product save, nor via the full resync, nor from the command line. It is switched on by default.
Assignments that already exist are kept untouched when you switch it off — the plugin does not clean anything up, it simply stops working.
What it is good for: you want to put the plugin on hold temporarily without uninstalling it and without losing your rules.
Enable automatic sync on product save
This switch decides whether the rules are re-evaluated automatically every time a product is saved. It is switched on by default — and as a rule it should stay that way, because this is exactly where the plugin’s value lies.
What it is good for: you want to pause the automatic updating completely, during a larger data clean-up for example. Switch it back on afterwards and run a full resync once — otherwise the filters of the products changed in the meantime stay on their old state.
Log rule evaluations
With this switch on, the plugin records every change to an assignment in detail in its log. It is switched off by default.
What it is good for: troubleshooting only. If a rule behaves differently than expected, switch logging on together with your administrator, reproduce the case and switch it off again afterwards. Left on permanently it produces a great many entries.
The “Background processing” card
These four settings control when and how the evaluation happens. The defaults suit the vast majority of shops.
When rules are re-evaluated
- Background queue (recommended) — the default. A change only records the product id; the evaluation follows shortly afterwards in the background. Saving, and every transfer from an ERP system, stays fast.
- Immediately, inside the request — the rules are evaluated inside the write itself. The filters are set right away, but every product save and every API call takes correspondingly longer.
What this is good for: only switch to Immediately, inside the request if your shop receives no bulk transfers and you cannot or do not want to use the background process. As soon as an ERP system is connected, this setting belongs on Background queue (recommended).
Enable background worker
Master switch for the plugin’s background processing — both for working through the queue and for the daily safety-net run. Switched on by default.
With it off, pending changes stay untouched in the queue; the rule list points this out with a notice. Nothing is lost — as soon as you switch it back on, the list is processed.
Products per worker run
How many queued products one run processes (1–1000, default 200). Higher values clear a large backlog faster but need more memory, because every product is loaded with all of its related data. Only change this value in consultation with your administrator.
Periodic full re-sync (safety net)
How often the entire catalogue is additionally re-evaluated: Off, Hourly, Daily (default) or Weekly.
What this is good for: the run catches changes that raise no event at all — another plugin writing product data straight to the database, for example. With very large catalogues you can set it to Weekly or switch it off; the normal updating is unaffected.
Remember to confirm changes with Save at the top right.
Permissions
What you get out of this: you decide who on your team may only look at rules and who may change them.
The plugin adds its own entry to the role management for that. You will find it under Settings → System → Users & permissions, in the role you want to edit, under the name Conditional properties.
There you grant the rights to view, edit, create and delete rules separately. They build on each other: anyone allowed to edit or create also needs the right to view — Shopware ticks the necessary boxes for you.
In practice this means:
- View only — the user sees the menu item and all rules but cannot change anything. Good for colleagues who only want to understand why a product carries a certain filter value.
- Edit — rules may be changed, and this right also allows creating property groups and their values. It is required by anyone who should be able to use the Create new property group button.
- Create and delete — for everyone who may add new rules or remove existing ones.
Without the view right, the Rule-based property filters menu item does not appear for that user at all.
Troubleshooting
The “Rule-based property filters” menu item is missing
What causes it: the plugin is not activated yet, the cache is stale, or the user lacks the permission.
How to fix it:
- Open Extensions → My extensions and check on the Apps tab that the toggle next to the plugin is switched on.
- Reload the Administration in your browser.
- Clear the cache under Settings → System → Caches & indexes.
- Check under Settings → System → Users & permissions whether the user’s role has the view right for Conditional properties.
The rule has no effect — nothing changes on the product
What causes it: in the vast majority of cases no resync has been run after creating the rule. On their own, rules only take effect when a product is saved.
How to fix it:
- Check in the rule overview that the rule has the tick in the Active column.
- Test the condition in the Test condition card against exactly the product that bothers you. If the result is wrong there, the condition is at fault, not the sync.
- Click Resync all products now in the overview and give the processing some time.
- Check under Extensions → My extensions → Configure whether Enable plugin for this sales channel and Enable automatic sync on product save are switched on.
A condition matches every product
What causes it: almost always the braces are missing. A condition without {{ }} or {% %} is output as plain text — and text counts as true.
How to fix it:
- Put the expression in double curly braces:
stock > 0becomes{{ stock > 0 }}. - Check the result in the Test condition card against a product that should not match. It has to read Result: False there.
- Then run the full resync.
An error message appears when testing
What causes it: the condition contains a typo — most often a missing closing brace, a mistyped variable name or a {% if %} without {% endif %}.
How to fix it:
- Compare your input with the examples displayed right below the field.
- Open the Variables panel, search for the entry you need and insert it with a click instead of typing it out.
- Start with a very simple condition (just
{{ stock > 0 }}, for example), test it, and build it up step by step.
A product carries two contradictory values
What causes it: two rules fill the same property group, or someone additionally assigned the value on the product by hand.
How to fix it:
- Check the Property group column in the overview: every group should appear only once.
- Remove the manually assigned value on the product under Specifications → Properties.
- Then run the full resync.
The filter does not appear in the shop
What causes it: the values are on the product, but the shop’s product index has not been refreshed yet — or the property group is not released as a filter.
How to fix it:
- Check on a sample product under Specifications → Properties that the value really is assigned.
- Refresh the product index under Settings → System → Caches & indexes.
- Check under Catalogues → Properties whether the property group may be used as a filter.
- Check in the category whether the filter is allowed in the settings of the product listing.
The resync does not seem to do anything
What causes it: the resync is handed over to your shop’s background processing. If that is not running, the job simply waits.
How to fix it: as a cross-check, save a single product and see whether its properties are correct. If they are, your rules work and it is purely a matter of background processing — talk to your administrator or hosting provider (For administrators / technical details).
FAQ
Q: Do I need to be able to write code to use the plugin?
A: No. For the common cases — delivery status, a badge from a custom field, price tiers — you can copy the conditions from this manual and only adjust the names. Only for unusual conditions of your own is it worth looking into the Twig notation, and there the built-in help, the variables panel and the test function support you.
Q: Does the plugin overwrite properties I assigned by hand?
A: No. The plugin only touches values it manages itself. All other properties stay untouched. One exception is worth knowing: in Value (calculated) mode the rule treats the entire selected property group as its own responsibility. Use a dedicated group for that.
Q: How quickly does a change to a rule take effect?
A: For a single product immediately on the next save. For the whole catalogue only after clicking Resync all products now — and even then the processing works through the catalogue in the background, piece by piece.
Q: Can I pause a rule temporarily?
A: Yes. Switch the Active toggle off in the rule and save. The rule is then no longer evaluated. To make already assigned values disappear as well, run the full resync afterwards.
Q: Are variants covered too?
A: Yes. The rules are applied to every product that is saved, variants included, each with its own stock, price and custom field values.
Q: Can I use my own custom fields?
A: Yes, that is one of the most common use cases. Create your field as usual under Settings → System → Custom fields, fill it on the product and address it in the condition with custom_field. followed by the field name.
Q: How many rules can I create?
A: There is no technical limit. Bear in mind, though, that every active rule is evaluated on every product save — so keep the number to what you genuinely need.
Q: What happens if I uninstall the plugin?
A: Your rules are removed unless you explicitly choose to keep the data during uninstallation. The property groups and their values remain in any case — they belong to Shopware and may be attached to products, orders or filters. You can clean them up manually under Catalogues → Properties if you wish.
Q: Why do I see group and product names in another language in the plugin area although my Administration is set to English?
A: Names of property groups, their values and products are always shown in the default language of your shop inside the plugin area. This only affects the selection lists in the back office — in your shop, customers see the names in the language of the respective sales channel.
Q: Does the plugin slow down my shop?
A: The evaluation happens when a product is saved, not when a customer opens a page. Your storefront does not get slower. In addition, data is only written when an assignment actually changes.
For administrators / technical details
This section is aimed at technical administrators. You do not need it for day-to-day work with the plugin.
System requirements
- Shopware: 6.7 (all patch levels)
- PHP: 8.2 or newer
- A running message queue consumer and scheduled task runner. This is set up in standard installations and with most hosting providers. Without them the plugin’s queue stalls — in “Background queue” mode no properties are updated any more. The rule list points this out with a notice.
The plugin’s scheduled tasks
| Task | Interval | Purpose |
|---|---|---|
swp_conditional_properties.process_queue | every minute | works through the queue of changed products |
swp_conditional_properties.full_resync | configurable, daily by default | triggers the full catalogue re-evaluation |
Both are visible under Settings → System → Tasks and additionally follow the Enable background worker switch in the plugin configuration. The cadence of the full re-sync follows the Periodic full re-sync (safety net) setting; the task reschedules itself accordingly after every run.
The queue from the command line
The queue can be inspected and worked off independently of the worker — useful during deployment, with a large backlog, or when the worker is deliberately off:
# Show the state: count, age of the oldest entry, mode
bin/console swp:conditional-properties:queue:status

# Empty the queue without processing it
bin/console swp:conditional-properties:queue:status --clear

# Process one batch
bin/console swp:conditional-properties:queue:process

# Keep processing until the queue is empty
bin/console swp:conditional-properties:queue:process --all

# Use a different batch size (default: the configured value, maximum 1000)
bin/console swp:conditional-properties:queue:process --limit=500

# Only show what would happen — the queue is left untouched
bin/console swp:conditional-properties:queue:process --dry-run
Unlike the scheduled task, the command runs even when the background worker is switched off in the configuration; the plugin’s master switch still applies. That makes the command line a full substitute for the worker — via a system cron instead of Shopware’s scheduler, for instance.
Full resync from the command line
For large catalogues, deployments and troubleshooting the resync can also be triggered directly — it then runs in the foreground, independently of the queue:
bin/console swp:conditional-properties:syncTwo options are available:
# Only show what would happen — nothing is written
bin/console swp:conditional-properties:sync --dry-run

# Adjust the size of the processed batches (default 100, maximum 500)
bin/console swp:conditional-properties:sync --batch=250
The command can be repeated as often as you like and produces the same result every time. Only the assignments managed by the plugin are ever changed.
Installation from the command line
php bin/console plugin:refresh
php bin/console plugin:install SwpConditionalPropertiesSix --activate
php bin/console cache:clear
How conditions are evaluated
Rule expressions are evaluated in a sandboxed Twig environment: only a fixed list of tags, filters and functions is permitted, processing time and memory are capped, and the result is truncated to a sensible length. A faulty expression is logged and treated as false; a product save never fails because of it.
Logging
With Log rule evaluations switched on, the plugin writes a detailed entry to its own log channel for every changed assignment. Errors during rule evaluation are always logged regardless of that setting.
Uninstall behaviour
If the plugin is uninstalled without the option to keep the data, it removes its own rules, its queue and its settings. Property groups and their values are deliberately preserved, as they belong to Shopware and may be attached to products, orders or filters.
This manual was written for Rule-based property filters version 6.7.1.
More manuals
Admin Password Reminder
Admin Password Reminder: your backend users renew their passwords on time, prompted after login and by a daily email. Premium locks expired accounts until the password is changed.
Open manual Shopware 6Age Check
Tobacco, spirits, knives: visitors who do not confirm their age never see the restricted items at all. You tick a box per product, the plugin hides it everywhere.
Open manual Shopware 6AI Media Labelling
AI labelling for images and videos: flag a media item once in the media manager and the badge with your notice appears wherever it shows up in your shop. No template work needed.
Open manualNeed a team that keeps your shop running?
We have been maintaining Shopware shops for more than 20 years, including updates, hotfixes and the plugins you are configuring right now.