Product configurator File upload
No more chasing artwork by email: your customers upload logos, PDFs and templates right in the product configurator. You set formats, size and file count.
On this page
- Introduction
- What you achieve with this plugin
- Who is this plugin for?
- What you need
- Installation
- Getting started
- Settings
- Basic Configuration
- Allowed file types
- How to use the file upload
- How to offer a file upload on a product
- How the upload works on the product page
- How to let customers upload only after the order
- How to get to the uploaded files
- How to remind customers of missing files automatically
- How the shop cleans up unneeded files on its own
- Troubleshooting
- No upload area appears on the product page
- Every file is rejected with “file type that is not allowed”
- A customer reports that the upload breaks off
- An item has disappeared from the basket
- No reminder emails are being sent
- The trash area is missing on a smartphone
- The order stays on “Wait for files” although the files are there
- FAQ
- For administrators / technical details
- System requirements
- Installation via the command line (Composer)
- Upload limits of the server
- Where the files are stored
- Automatic tasks
- Behaviour on update and uninstall
Introduction
Important: Add-on plugin – requires the Product Configurator (
SwpProductOptionsSix). This plugin is an extension of the base plugin Product Configurator and only works together with it. Without the installed, active and separately purchased Product Configurator from version 6.7.12, this plugin has no function.
Product configurator File upload adds the one feature that makes personalised products truly sellable: your customers upload their own files directly with the item — print data, logos, engraving artwork or photos for a photo product.
From that moment on the files belong to the order line they were uploaded for. You no longer have to collect them from email attachments and match them to the right order by hand.
What you achieve with this plugin
- Your customers upload their files themselves — either while configuring the item or only after the order, whichever fits your workflow better.
- You decide which file formats are allowed, how large a single file may be and how many files may be collected per option. Anything else is rejected during the upload, with a message right at the upload area.
- You see the uploaded files in the order and download them from there.
- Orders that are still missing files are marked with their own order status Wait for files.
- Customers who forgot their files are reminded by email automatically — you do not have to chase anyone.
- Files that never turned into an order are removed from the server on their own after a retention period you define.
- All settings apply per sales channel. If you run several shops, you decide for each of them whether and how the upload is offered.
Who is this plugin for?
For everyone selling personalised products: print shops, sign making, engraving and textile finishing, label producers, photo products and made-to-measure furniture.
What you need
This plugin is an extension of the Product configurator plugin. The Product configurator must be installed and active, because the file upload is offered there as an additional field type of a configurator group. Without the Product configurator there is no option a file upload could be attached to.
Installation
After your purchase the plugin is available directly in your administration — there is nothing to download.
- Log in to your Shopware administration (
YourShop.com/admin) - Open Extensions → My extensions
- Make sure Product configurator is in the list, installed and switched on. It is the basis for this plugin.
- Click Install next to Product configurator File upload
- Switch the plugin on using the toggle on the left of the entry
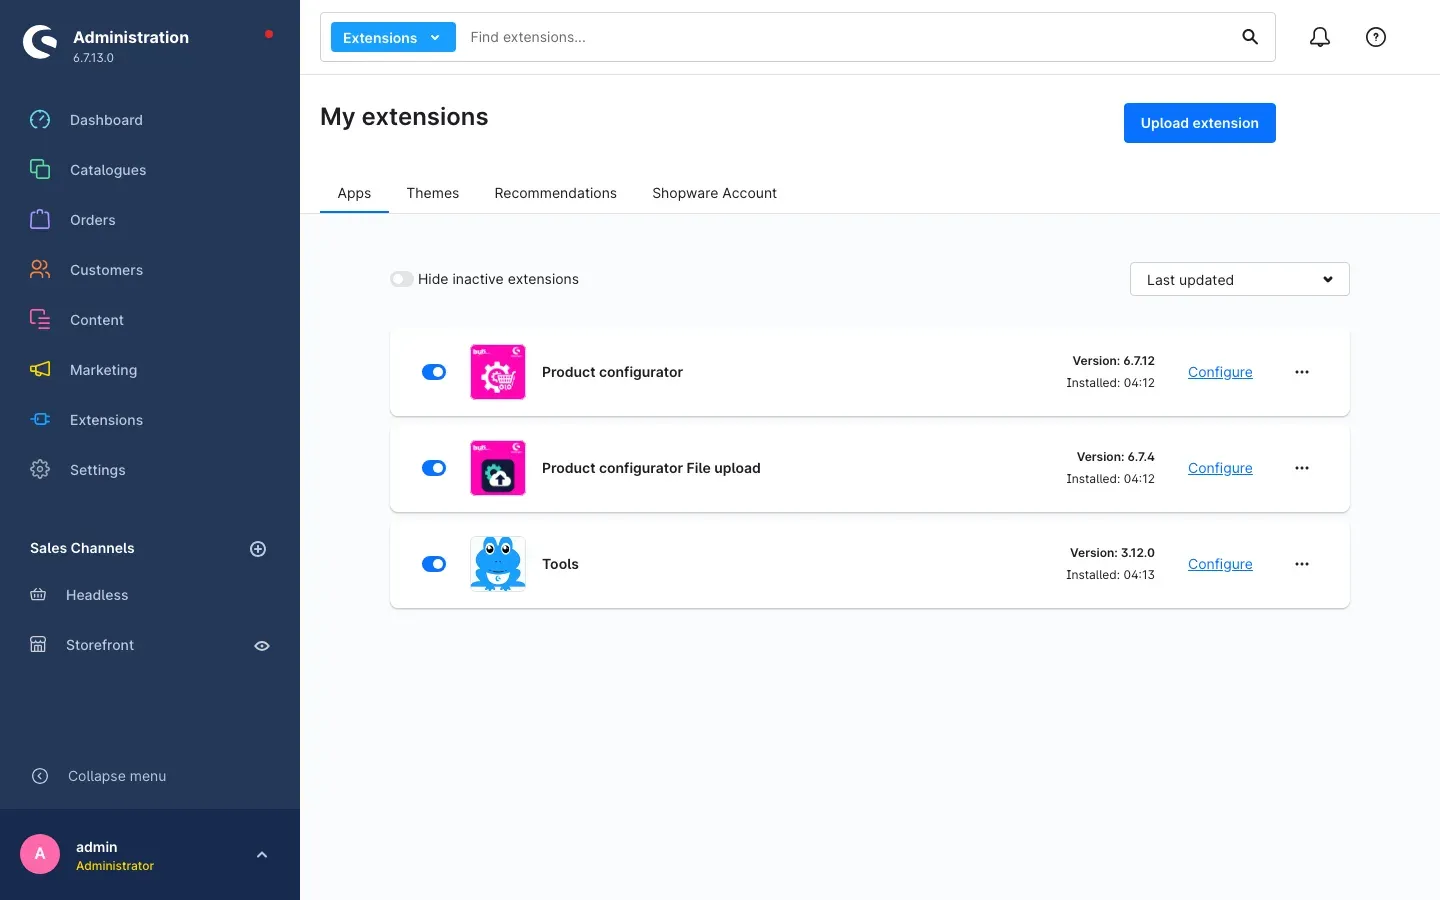 Fig. 1: In “My extensions”, Product configurator and Product configurator File upload are installed and switched on.
The blue toggle on the left shows that the plugin is active. Configure on the right of the entry takes you straight to the settings.
If Product configurator File upload does not appear in the list, your Shopware account is not yet connected to the shop. You can do that under Extensions → My extensions on the Shopware Account tab.
Important: After the installation no file types are selected yet. As long as that is the case, the shop rejects every uploaded file. The next section shows what to set up first.
Getting started
Four steps are enough to get the file upload ready for use.
-
Open the settings: Settings → Extensions → Product configurator File upload. Alternatively, click Configure in the plugin entry under Extensions → My extensions.
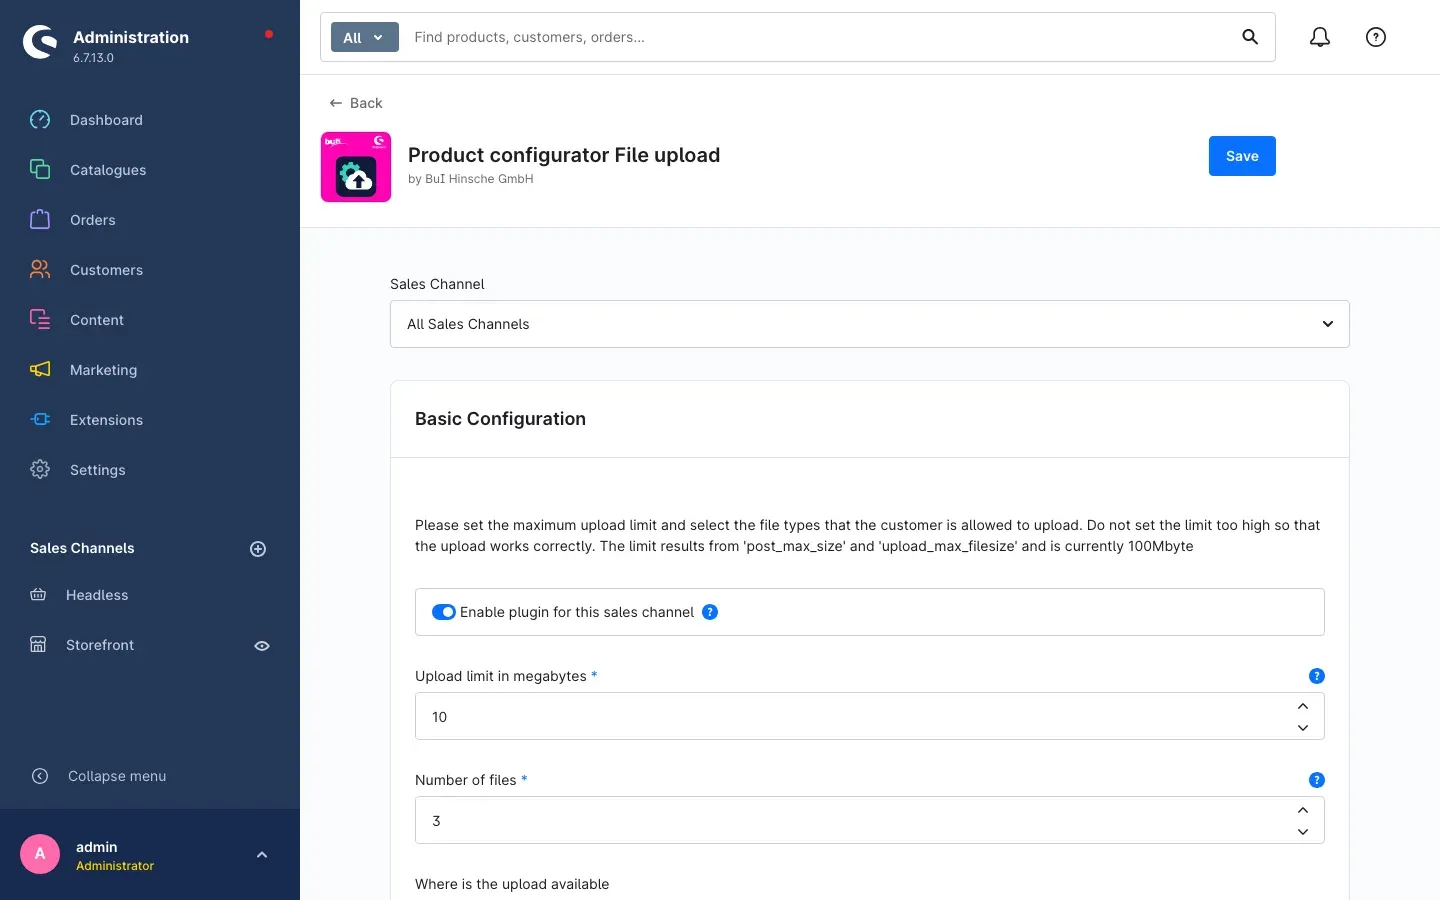 Fig. 2: The configuration page with the sales channel selection, the note about the upload limit and the basic settings.
 -
Choose the sales channel: At the very top you find Sales Channel. With All Sales Channels your entries apply everywhere; if you pick a single channel, they apply only there.
-
Select the allowed file types: Scroll to the Allowed file types card and select the formats your customers may send under MimeTypes for images and MimeTypes for applications — for example
*.pdfand*.jpeg *.jpg *.jpe. Without a selection every file is rejected. -
Set the upload limit: Under Upload limit in megabytes enter how large a single file may be, and under Number of files how many files may be collected per option. Then click Save in the top right.
That is the groundwork. To make the upload visible to your customers you still need a configurator group with the field type Upload — see How to offer a file upload on a product.
Tip: Above the first setting there is a note telling you the maximum your server currently accepts. Keep Upload limit in megabytes below that value, otherwise large uploads break off before the shop can even check them.
Settings
You find the settings under Settings → Extensions → Product configurator File upload. They are split into two cards: Basic Configuration and Allowed file types.
At the very top there is the Sales Channel selection. Every setting on this page applies to exactly the channel selected there. That way you can allow more generous file sizes in your B2B shop than in your consumer shop — or switch the upload off there completely.
Above the settings there is the to documentation button. It opens the current version of this manual in your browser.
Basic Configuration
Enable plugin for this sales channel
Enable plugin for this sales channel decides whether the file upload is offered in this shop at all. If the toggle is off, there is no upload area on the product page, no upload link after the order and no reminder emails. After the installation the toggle is switched on.
What this is good for: You can offer the upload in one channel and keep it dormant in another without uninstalling the plugin — for instance if your marketplace channel is not supposed to accept print data.
Upload limit in megabytes
Upload limit in megabytes defines the maximum size of a single file. If a customer tries to upload a larger file, the shop stops and shows a message right at the upload area, naming the actual file size and the permitted maximum. This entry is mandatory, there is no preset value.
What this is good for: Print data grows large quickly. A realistic limit keeps your storage under control and prevents uploads that would break off on poor connections anyway. Use the note above the settings as your guide — your server cannot accept more than the maximum stated there.
Number of files
Number of files determines how many files a customer may upload for one option. Once the limit is reached, the upload area reports “You have reached the maximum number of files.” The preset value is one file.
What this is good for: One piece of artwork is usually enough for an engraving. For a photo book or a multi-page print you allow more accordingly — without anyone dropping a hundred images by accident.
Where is the upload available
Where is the upload available decides when the upload happens. You have two choices:
- Upload in the option selection — the customer uploads the files directly on the product page while configuring the item. The files travel into the basket and into the order together with the item. This is the preset.
- Upload after the order — instead of the upload area, the product page shows the normal option selection of the Product configurator. Only after the order does the customer get a dedicated page to supply the files for the ordered line. The order is set to the status Wait for files.
What this is good for: If you want to keep checkout as short as possible, let customers upload after the order — they order in a minute and take care of the print data later. If you absolutely need the data before the purchase, stay with the option selection.
Which option is offered for deletion
Which option is offered for deletion determines how a customer removes an uploaded file again:
- A trash area is offered — an area with a bin icon appears next to the upload area. The customer drags an already uploaded file onto it with the mouse to remove it. This is the preset.
- Delete is offered in the row — the trash area is omitted and the upload area becomes wider instead. Every uploaded file then carries a clickable bin icon of its own.
What this is good for: The trash area is easy to explain on a desktop and hard to miss. On smartphones and tablets there is no dragging with a mouse — the shop hides the area there automatically and always shows the icon on the individual file instead. If your customers order mostly on mobile devices, “Delete is offered in the row” is the more consistent choice.
Reminder email after x days if no files have been uploaded yet
Reminder email after x days if no files have been uploaded yet defines after how many days a customer is automatically reminded of the missing files. Counting starts at the order date. Reminders are only sent while the order is still in the Wait for files status. The preset is 14 days; with a 0 the shop sends no reminders at all.
What this is good for: Missing print data is the most common reason for an order to stall. The reminder does the chasing for you. More on this in How to remind customers of missing files automatically.
After how many days x should the uploads that did not become an order be deleted?
After how many days x should the uploads that did not become an order be deleted? defines the retention period for files that were uploaded but never ended up in an order — typically from an abandoned basket. Once the period has passed, the shop deletes them on its own, once a day. The preset is 14 days; with a 0 nothing is deleted automatically.
What this is good for: Customer files nobody needs any more should not sit on your server indefinitely — neither for storage nor for data protection reasons. Files from completed orders are not affected, they are kept.
Important: If you set the period very short, it can hit a customer who leaves the basket alone for a few days. If the file for a basket line is missing, the shop removes that line the next time the basket is opened and tells the customer about it. Fourteen days has proven to be a good middle ground.
Allowed file types
On the second card you define which file formats your customers may upload. Both lists are multiple selections — click as many entries as you want to permit.
MimeTypes for images
Under MimeTypes for images you select the image formats. Available are *.png, *.jpeg *.jpg *.jpe, *.tiff *.tif, *.gif, *.svg, *.psd and *.eps.
MimeTypes for applications
Under MimeTypes for applications you select the remaining document formats: *.pdf, *.ai, *.eps, *.doc, *.rtf, *.xls and *.ppt.
What this is good for: You only receive the formats you can actually process. Everything else is rejected during the upload with the message “The file ’…’ has a file type that is not allowed.” — which saves you from asking the customer for a different file after the order has already arrived.
Important: If nothing is selected in either list, every file is rejected. That is the situation right after the installation. Select at least one format before you offer the upload on a product.
How to use the file upload
How to offer a file upload on a product
What this gives you: Only this step makes an upload area visible to your customer. You decide exactly where in your product configuration the files are requested — for the option “Engraving from artwork”, for instance, but not for “Engraving with standard motif”.
The configurator groups are managed by the Product configurator plugin. This plugin only adds one more entry to the Fieldtyp selection there.
Step by step
- In the Product configurator, open the group that is to offer the file upload — or create a new one.
- Open the Settings area of the group.
- Under Fieldtyp, choose the entry Upload.
- Make sure Status is set to active.
- Click Save in the top right.
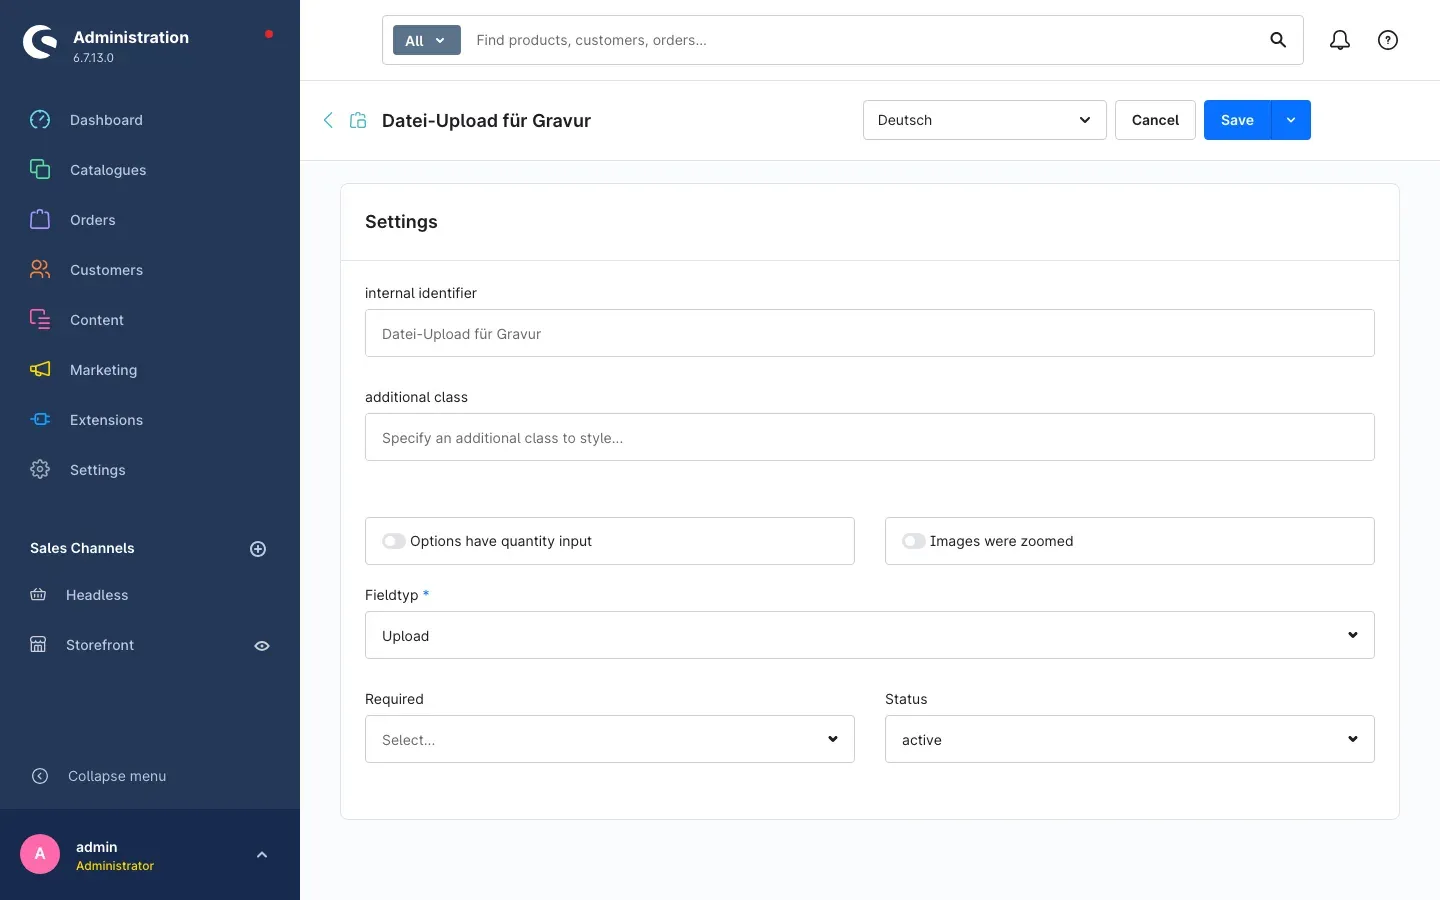 Fig. 3: The group “Datei-Upload für Gravur” with the field type “Upload” — this entry comes from the plugin.
Tip: Required controls whether the customer has to fill in the group before the item can be added to the basket. That setting belongs to the Product configurator and works the same way for all field types.
Important: The name of the group appears to your customers as the heading above the upload area. Choose it so that it is clear what should be uploaded — “File upload for engraving” says a lot more than “Group 3”.
How the upload works on the product page
What this gives you: Your customers put the item into the basket together with their print data. You receive orders that are complete from the start.
This variant is active as long as Where is the upload available is set to Upload in the option selection.
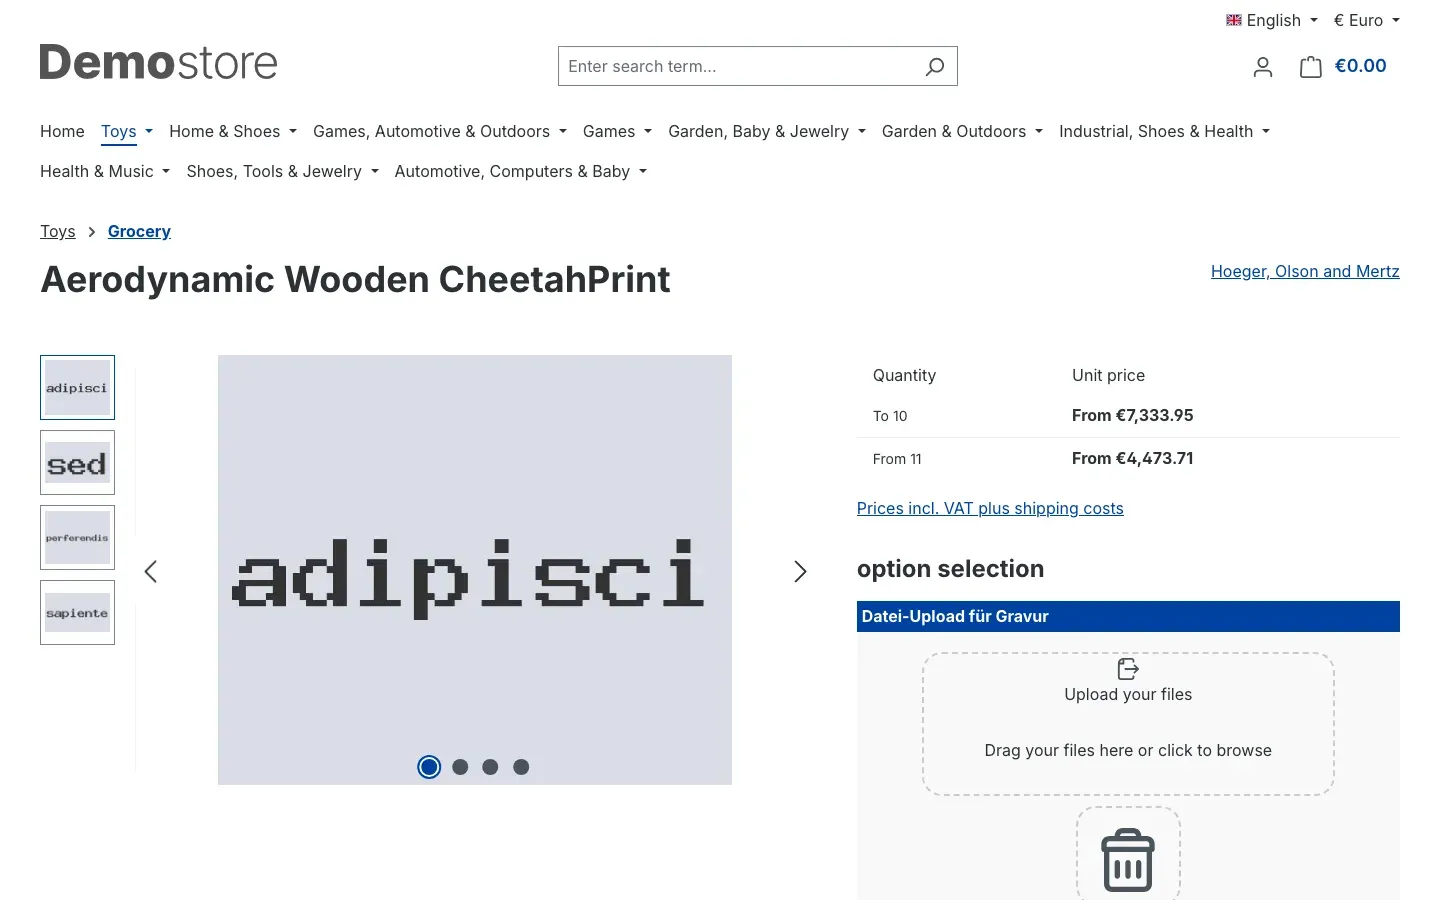 Fig. 4: In the “option selection” area, the upload area with its dashed zone appears below the group heading, with the trash area underneath.
This is what your customer experiences:
- They open the product page and see the group with the upload area under option selection.
- The upload area says Upload your files and, below that, “Drag your files here or click to browse”. So they can either drag the file onto the area with the mouse or click the area and pick the file in the file dialog.
- While the file is transferred, a slim progress bar runs below the area.
- Afterwards the file appears below it in a list — with a small preview image and the file name. That way the customer sees immediately that the right file has arrived.
- To remove a file again, they drag it onto the trash area or click the bin icon on the file — depending on what you set under Which option is offered for deletion.
- Then they add the item to the basket as usual. The file names are shown with the basket line and in the order.
If a file does not match your specifications, a red message appears right below the upload area and the file is not accepted:
- “The file ’…’ has a file type that is not allowed.” — the format is not part of your selection under Allowed file types.
- “The file ’…’ is too large (… MiB). Maximum file size: … MiB.” — the file exceeds your Upload limit in megabytes.
- “You have reached the maximum number of files.” — the count permitted under Number of files is exhausted.
On a smartphone
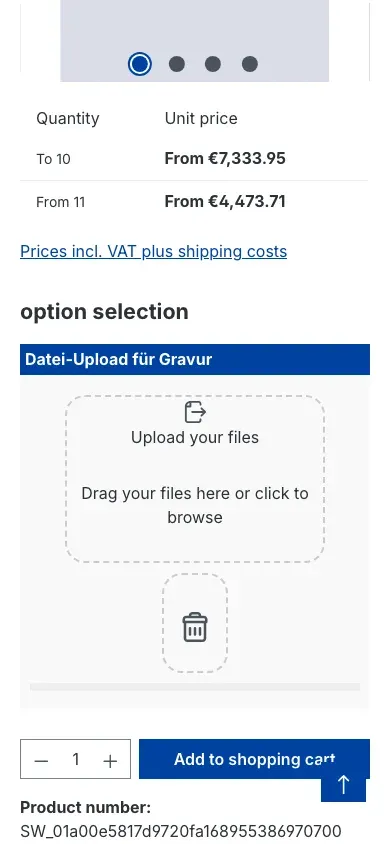 Fig. 5: The same upload area on a narrow screen — the zone takes up the full width.
On smartphones and tablets the upload zone takes up the full width, and the trash area is omitted automatically: on a touch device nothing can be dragged there with a mouse. For deleting, the bin icon on the individual file is always available there. Tapping the zone opens the device’s file picker, so customers can also send a photo from their gallery.
How to let customers upload only after the order
What this gives you: Checkout stays short — nobody abandons the purchase because the print file is not at hand right now. Still, you never lose sight of the missing files, because the order visibly waits for them.
To do this, set Where is the upload available to Upload after the order and save.
What happens next
- No upload area appears on the product page. The customer selects the options as usual and orders.
- As soon as the order has been placed, it receives the status Wait for files. You see this status in the order list and in the order itself.
- For every line that is missing files, the shop creates a personal upload link. This link is contained in the reminder email (see How to remind customers of missing files automatically) — one for each affected line.
- The customer opens the link and lands on a lean upload page without navigation. At the top it shows Order number:, Order position, Article number: and Article name:, below that Group:, Option: and Price: for each option together with its upload area. They have to be logged in to open the page; customers who ordered as a guest get in through the guest login.
- They upload their files exactly as on the product page and then click Upload for article completed.
- Once the files are present for all affected lines of the order, the order automatically returns to the status Open and can be processed by you as usual.
Tip: Wait for files is a full order status. You can filter for it in the order list and see at a glance which jobs are still waiting for customer data.
Important: The upload link belongs to exactly one order line and serves as proof that the order belongs to the customer calling it up. Do not pass it on in public forums or group emails.
How to get to the uploaded files
What this gives you: You take the print data straight from the order — no detour via mailboxes, file shares or follow-up questions to the customer.
Step by step
- Open Orders and select the order.
- Open the line with the configured options. For an upload option, the overview of the chosen options lists the uploaded files.
- Every file is a link. One click downloads it in a new browser tab. A small preview image in front of the file name lets you tell image files apart right in the list.
The file names also appear directly below the line — in the basket, in the order confirmation and in the order. So your customer can see at any time which file they sent for which item.
Tip: Downloading requires the read permission for orders. Staff who are allowed to process orders anyway will therefore reach the files automatically; anyone without access to orders does not get to the customer data either.
How to remind customers of missing files automatically
What this gives you: You do not have to chase anyone. The shop writes on its own, and only to those who are actually still missing something.
How to set it up
- Open Settings → Extensions → Product configurator File upload.
- Under Reminder email after x days if no files have been uploaded yet, enter how many days after the order the reminder should be sent — the preset is 14.
- Save. That is it — the rest runs automatically, once a day.
Reminders are sent only for orders in the Wait for files status whose order date is further back than the number of days you entered. The email goes to the address from the order and contains the personal upload link for every open line.
How to adjust the text of the email
The plugin brings its own email template. You find it in the administration under Settings → Shop → Email templates with the name After order - upload reminder for customers. The subject line reads “Data upload for order … incomplete”.
You can adapt subject and text there like with any other Shopware template. Please keep the list of lines with the upload links — without it your customer cannot reach the upload page.
Important: If you enter a
0for the days, the shop stops sending reminders. The orders still remain in the Wait for files status until the files arrive.
How the shop cleans up unneeded files on its own
What this gives you: Your server does not accumulate leftovers. Files from baskets that never turned into an order disappear automatically.
Once a day the shop checks which of those files are older than the number of days entered under After how many days x should the uploads that did not become an order be deleted? and deletes them. The preset is 14 days.
Only files that are not yet assigned to an order are affected. As soon as an order is placed, the files move to the order area and are kept there.
If a customer puts an item into the basket and only returns after the period has passed, the corresponding file is gone. The shop then removes the affected line the next time the basket is opened and shows the note: “Due to time restrictions, your uploads and the associated items have been removed from your basket.” The customer can then configure the item again and upload the file once more.
Tip: If your customers typically take a long time over an order, set a more generous period — 30 days, for example. With a
0you switch automatic deletion off entirely; then you have to take care of old files yourself.
Troubleshooting
No upload area appears on the product page
What causes it: Usually the upload is switched off for this sales channel, it is supposed to happen only after the order, or the configurator group does not use the right field type.
How to fix it:
- Open Settings → Extensions → Product configurator File upload and pick the affected Sales Channel at the top.
- Check that Enable plugin for this sales channel is switched on.
- Check that Where is the upload available is set to Upload in the option selection. With Upload after the order, a missing upload area on the product page is the expected behaviour.
- Check in the configurator group that Fieldtyp is set to Upload and Status to active.
- Then clear the cache: Settings → System → Caches & indexes → Clear cache.
Every file is rejected with “file type that is not allowed”
What causes it: No format is selected under Allowed file types. As long as both lists are empty, the shop deliberately lets nothing through.
How to fix it: Open the settings, select the formats you want to accept under MimeTypes for images and MimeTypes for applications, and save.
Note: some programs save a file with an extension that does not match its actual content. The shop checks the content, not just the extension — a renamed file is therefore still rejected.
A customer reports that the upload breaks off
What causes it: Either the file exceeds your Upload limit in megabytes, or that limit is higher than what your server accepts.
How to fix it:
- Open the settings and read the note above the first setting — it names the maximum your server currently accepts.
- Set Upload limit in megabytes to a value below that.
- If you need larger files, your hosting provider has to raise the limit on the server (see For administrators / technical details).
An item has disappeared from the basket
What causes it: The uploaded file was removed by the automatic cleanup because the basket sat there longer than the period you set. Without the file the line cannot be produced, so the shop removes it and informs the customer.
How to fix it: Increase After how many days x should the uploads that did not become an order be deleted? to a value that suits your customers. Files that have already been deleted cannot be restored — the customer has to configure the item again.
No reminder emails are being sent
What causes it: Either the reminder is switched off, there are no matching orders, or the shop is not running its automatic tasks.
How to fix it:
- Check that Reminder email after x days … contains a number greater than
0. - Check whether there are any orders in the Wait for files status at all and whether their order date is far enough back. Only those are reminded.
- Check that Enable plugin for this sales channel is switched on for the channel of the order.
- Check that the template After order - upload reminder for customers still exists under Settings → Shop → Email templates.
- If the problem persists, have the automatic tasks of your shop checked (see For administrators / technical details).
The trash area is missing on a smartphone
What causes it: This is intended. On touch devices nothing can be dragged onto an area with a mouse, so the shop hides it there.
How to fix it: Nothing to do — for deleting, the bin icon is shown directly on the uploaded file on those devices.
The order stays on “Wait for files” although the files are there
What causes it: The status only changes back once the files are present for all lines of the order that require an upload and the customer has clicked Upload for article completed for each of them.
How to fix it: Check in the order whether files are really stored for every upload line. If one is missing, ask the customer to open the upload link for that line once more. You can also set the status in the order to Open manually.
FAQ
Q: Do I really need the Product configurator?
A: Yes. The file upload is an extension of the Product configurator plugin and is offered there as an additional field type. Without it there is no option a file upload could be attached to.
Q: Can a customer upload several files for one item?
A: Yes, as long as you allow it. Under Number of files you define how many files may be collected per option. The preset is one file.
Q: Can I use different rules for different shops?
A: Yes. All settings apply per sales channel. Select the channel at the top of the configuration page and set it up separately — your B2B shop may send larger files than your consumer shop, for example.
Q: What happens to the files if an order is cancelled?
A: They are kept. The automatic cleanup only removes files that never turned into an order.
Q: Can my customers see other customers’ files?
A: No. The files are stored outside the publicly accessible area of your shop. Access runs through the customer’s own order or their personal upload link; in the administration the read permission for orders is required.
Q: Can I change the text of the reminder email?
A: Yes. The template is called After order - upload reminder for customers and can be found under Settings → Shop → Email templates. Subject and text can be adapted freely — the list with the upload links should be kept.
Q: What is the maximum size of a file?
A: As large as you permit under Upload limit in megabytes — but never larger than what your server accepts. The maximum currently possible is shown in the note above the settings.
Q: What happens to the settings and the email template when I uninstall?
A: If you state during uninstallation that data should be removed, the plugin deletes its settings, its email template and the Wait for files order status again. If you keep the data, everything remains available for a later reinstallation.
Q: Can I switch the upload from the product page to “after the order” later on?
A: Yes, at any time via Where is the upload available. The change applies to new orders; lines that have already been ordered keep their original process.
For administrators / technical details
This section is aimed at technical administrators. You do not need it for normal use.
System requirements
- Shopware: 6.7
- PHP: 8.2 or newer
- Required plugin: Product configurator (
swp/productoptions-six) from version 6.7.12
Installation via the command line (Composer)
composer require swp/productoptions-six-fileupload
php bin/console plugin:refresh
php bin/console plugin:install SwpProductOptionsSixFileUpload --activate
php bin/console cache:clear
Upload limits of the server
The shop can never accept more than the PHP settings post_max_size and upload_max_filesize permit. The smaller of the two values is the effective ceiling; it is displayed as a note at the top of the configuration page. If larger files are required, these values have to be raised on the server — depending on the hosting, either in the PHP configuration or in the provider’s customer area. Only then is it worth increasing Upload limit in megabytes.
Where the files are stored
Uploaded files are stored below the shop directory in files/plugins/productoptionsuploads/, separated into basket uploads and order uploads. The directory sits outside the publicly served area; files are only delivered through the checked routes of the plugin. Include this directory in your backup — the files live there, not in the database.
Automatic tasks
The plugin ships two tasks that run once a day: the reminder about missing uploads and the cleanup of files that never became an order. They appear in the administration under Settings → System → Tasks. This requires the task processing of your shop to be running — without it, neither reminders are sent nor files cleaned up.
Both can also be triggered directly on the command line for testing:
php bin/console productoptions:upload:reminder
php bin/console productoptions:upload:garbage
Behaviour on update and uninstall
After an update the plugin posts a note in the administration asking you to check the configuration once more. When uninstalling without keeping the data, the plugin settings of all sales channels, the supplied email template including its template type and the Wait for files order status are removed. Files already uploaded to the upload directory are not affected and have to be deleted manually if required.
This manual was created for Product configurator File upload version 6.7.3.
More manuals
Admin Password Reminder
Admin Password Reminder: your backend users renew their passwords on time, prompted after login and by a daily email. Premium locks expired accounts until the password is changed.
Open manual Shopware 6Age Check
Tobacco, spirits, knives: visitors who do not confirm their age never see the restricted items at all. You tick a box per product, the plugin hides it everywhere.
Open manual Shopware 6AI Media Labelling
AI labelling for images and videos: flag a media item once in the media manager and the badge with your notice appears wherever it shows up in your shop. No template work needed.
Open manualNeed a team that keeps your shop running?
We have been maintaining Shopware shops for more than 20 years, including updates, hotfixes and the plugins you are configuring right now.