Real products as variants
Your stand-alone products keep number, price and their own page. On the product page they become a single variant choice: a native-looking configurator or a product grid.
On this page
- Introduction
- Installation and activation
- Configuration
- Everything applies per sales channel
- The two switches in the “Configuration Channel” area
- The settings in the “Other Settings” area
- Linking your products
- Preparing the main article
- Assigning the linked products
- Defining which properties build the selection
- Presenting individual main articles differently
- Running a product as its own main article
- How it looks in your shop
- The configurator
- The grid
- Variants Widget in Shopping Experiences
- Troubleshooting
- No selection appears in the shop
- The main article cannot be purchased
- The linked products still appear individually in the category
- The configurator shows too many or the wrong option rows
- A change to the custom fields does not show up in the shop
- The plugin does not appear in the extensions list
- Frequently asked questions
- For administrators / technical details
- System requirements
- Data storage
- Sales channels
- Caching
- Data protection
- Installation via the command line
Introduction
Many shops keep every size, every colour and every pack size as a separate product with its own number, its own price and its own stock — usually because the ERP system requires it. In the shop these products then sit next to each other as a row of almost identical results. With Real products as variants your products stay exactly as they are, but on the product page they appear as one choice: either as a configurator that looks and behaves like Shopware’s own variant selection, or as a grid of product cards. You do not create parent products and you do not change any product numbers. The connection is made simply by entering the product number of the main article on each product.
The terms used in this manual
- Main article — the product whose page carries the selection. It cannot be ordered itself.
- Linked products — the real products offered as the selection. They keep their number, price, images and their own address in the shop.
- Pseudo-variants — the wording you will meet in the settings for those linked products. It means the same thing: products that behave like variants without being variants.
Installation and activation
After your purchase the plugin is available directly in your administration — there is nothing to download.
- Log in to your Shopware administration.
- Open Extensions → My extensions.
- Find the entry Real products as variants in the list and click Install next to it.
- Then switch the plugin on using the toggle on the left-hand side of the row.
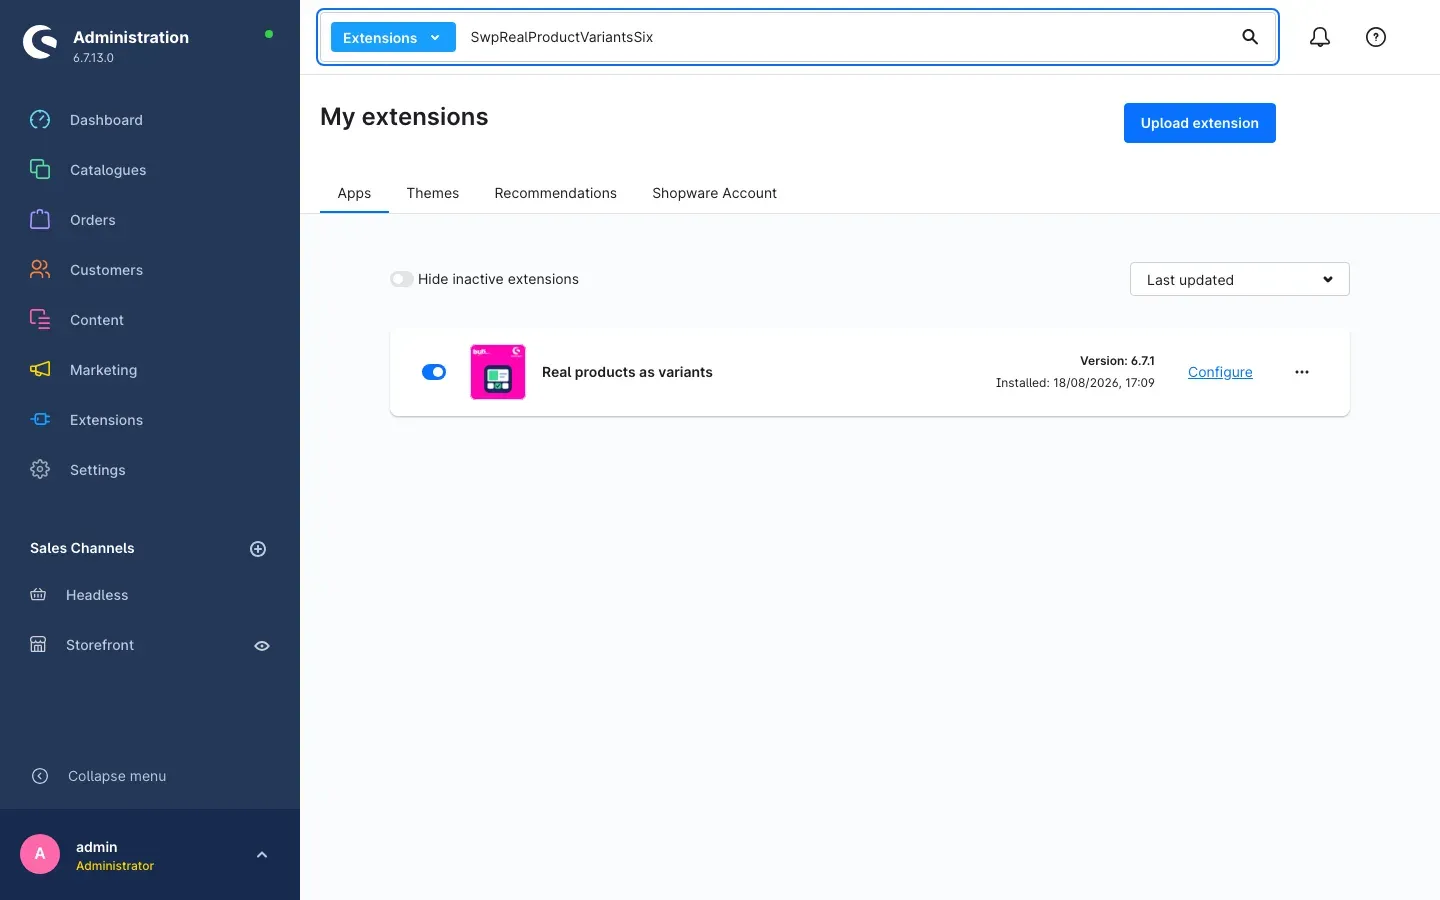 Fig. 1: The entry “Real products as variants” under “My extensions” — the toggle on the left, the “Configure” link on the right
When the toggle is blue, the plugin is active. From now on the row also offers the link Configure, which takes you straight to the settings.
If Real products as variants does not appear in the list, your Shopware account is not yet connected to this shop. You can sign in under Extensions → My extensions on the Shopware Account tab.
Right after activation nothing changes in your shop yet: no product is linked to a main article so far. That is what Linking your products is about.
Configuration
You reach the settings via Extensions → My extensions and the Configure link in the plugin’s row.
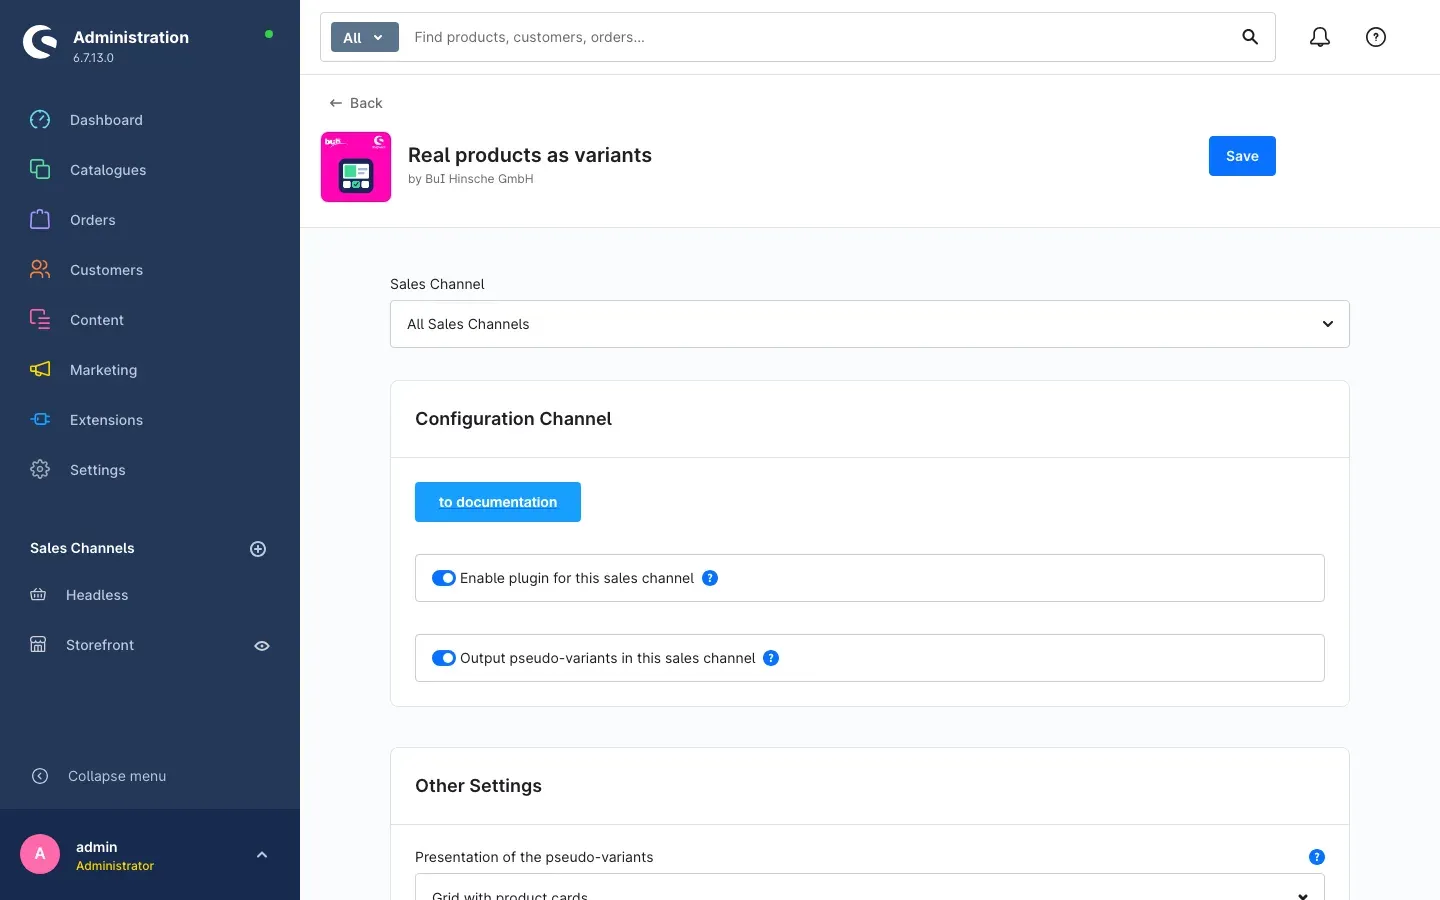 Fig. 2: The upper part of the configuration page with the Sales Channel selection and the Configuration Channel area
Everything applies per sales channel
At the very top of the page you see the Sales Channel selection, preset to All Sales Channels. Everything you set below applies to the channel selected here. This lets you use the feature in your B2B shop, for example, while leaving it dormant in your outlet channel — without uninstalling anything. After every change, remember the Save button in the top right corner.
The two switches in the “Configuration Channel” area
The to documentation button at the top opens this manual in your browser.
Enable plugin for this sales channel is the master switch. When it is off, the plugin has no effect at all in this sales channel: no selection on the product page, no products hidden from the listing, no block in the shopping cart. The switch is enabled by default.
Output pseudo-variants in this sales channel is a switch from earlier versions that was kept so that an update never overwrites an existing setting. It is enabled by default as well. Both switches have to be on for anything to happen in the channel — so if nothing shows up in your shop, this is the first place to look.
The settings in the “Other Settings” area
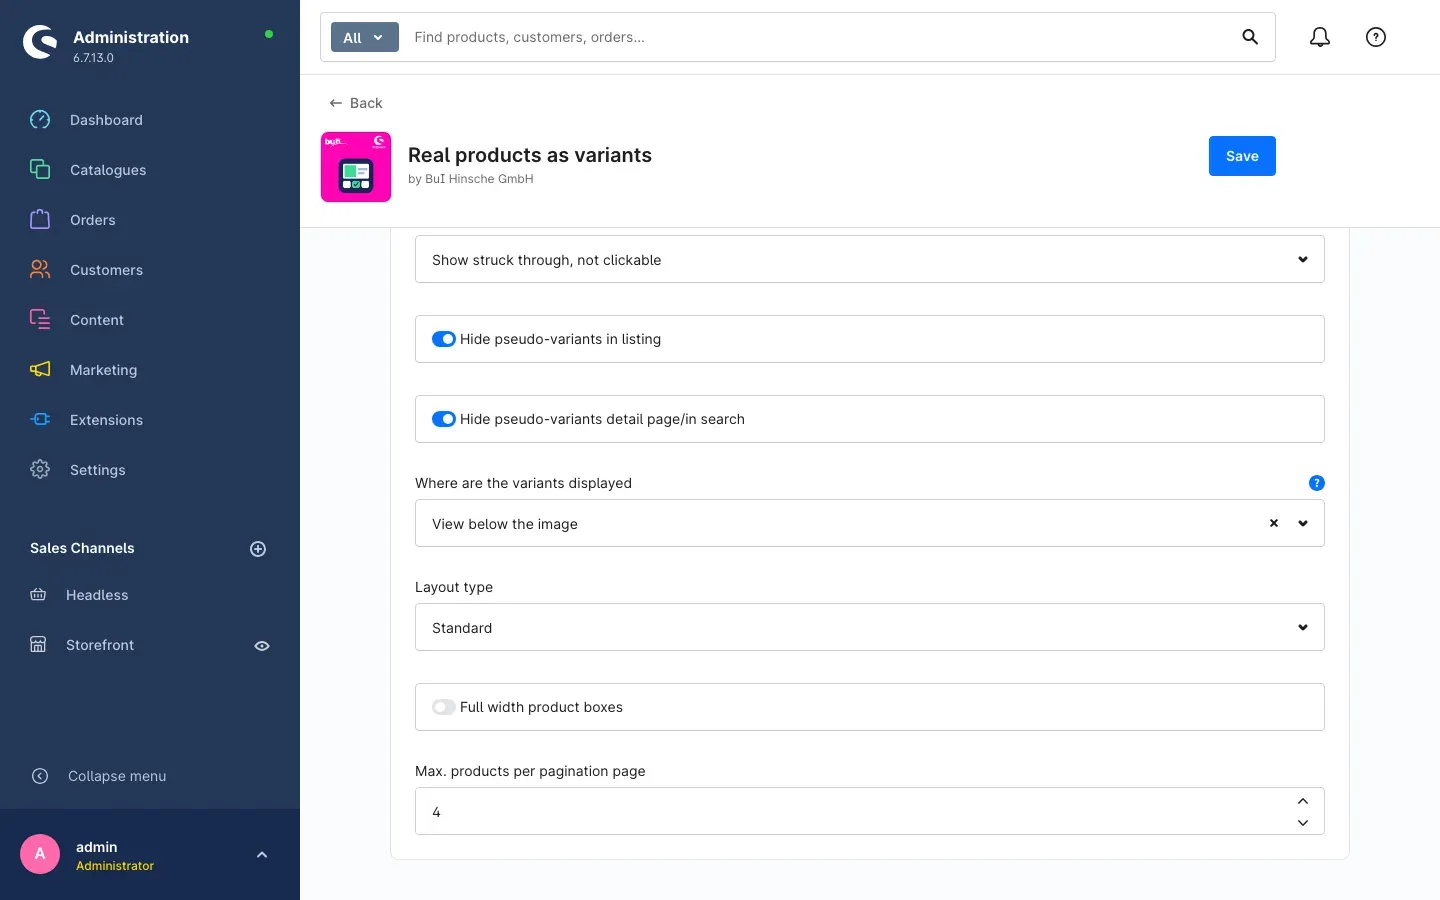 Fig. 3: The lower part of the configuration page
Presentation of the pseudo-variants
This is where you decide how the linked products appear on the main article’s page.
- Grid with product cards (default) shows them as product cards with image, properties and price, just like on a category page. A good choice when the differences need explaining or simply look different.
- Configurator like native variants shows one row of buttons per property in the buy box — visually and functionally like Shopware’s own variant selection. A good choice for classic size and colour selections.
You can decide differently for individual main articles, see Presenting individual main articles differently.
Unavailable combinations in the configurator
When a customer picks a colour that does not exist in the size already chosen, the shop has to react. This setting only applies to the configurator presentation:
- Show struck through, not clickable (default) — the customer can see that the combination exists but cannot select it. The most honest option, because the full range stays visible.
- Hide completely — combinations that do not work disappear. The selection looks tidier, but the customer no longer sees what else might exist.
- Show struck through and clickable (Shopware standard) — behaves the way Shopware does with real variants: the click is accepted and another property jumps to a combination that actually exists.
Hide pseudo-variants in listing
With this switch on (default), the linked products no longer appear individually on category pages. Customers only see the main article there — the category page shows a range again instead of twelve repetitions of the same product.
Hide pseudo-variants detail page/in search
With this switch on (default), the linked products no longer appear as separate results in the search. It also affects opening a linked product directly: in the grid presentation, visitors then land on the main article’s page, where the full selection is shown. In the configurator presentation, visitors stay on the linked product’s page — their combination is already preselected in the configurator and switching between options keeps working from there.
Where are the variants displayed
This setting only applies to the grid presentation; the configurator always appears in the buy box next to the product image.
- View below the image (default) — the grid sits directly underneath the product image, visible without any click.
- View as additional tab — the grid gets its own tab labelled Variants, next to description and reviews.
- View in a shopping world — the grid only appears where you have placed the Variants Widget element in a layout. Variants Widget in Shopping Experiences explains how.
Layout type
Determines how much information a product card in the grid carries: Standard, Big image (image dominates, little text), Minimal content (heavily reduced) or Contents as a list (below each other instead of side by side). Try them out on one product — which one works best depends on your product images.
Show filter above the grid
Shows a filter row above the grid so customers can narrow the linked products down by their variant-forming properties. The switch is on by default. It applies to every main product; a single product overrides it through its custom field of the same name (Presenting individual main articles differently). It has no meaning for the configurator — there is no filter row there.
Full width product boxes
With this switch on, the product cards use the full available width. It is off by default. It is most useful together with Contents as a list, or when only a few linked products exist.
Max. products per pagination page
Defines how many product cards the grid shows at once; the default is four. If there are more linked products, customers page through them. For very large groups a small number is kinder to loading times; with three or four products simply set it high enough to show everything at once.
Linking your products
The plugin does not guess which products belong together. You define it in two places: on the main article and on every linked product. Both entries live on the product page in the Custom fields area, on the Real articles as variants tab.
Preparing the main article
- In the administration, open the product under Catalogues whose page is to carry the selection later on.
- Scroll down the product page to the Custom fields area and open the Real articles as variants tab.
- Switch on Disable buy-box on container-products.
- Click Save in the top right corner.
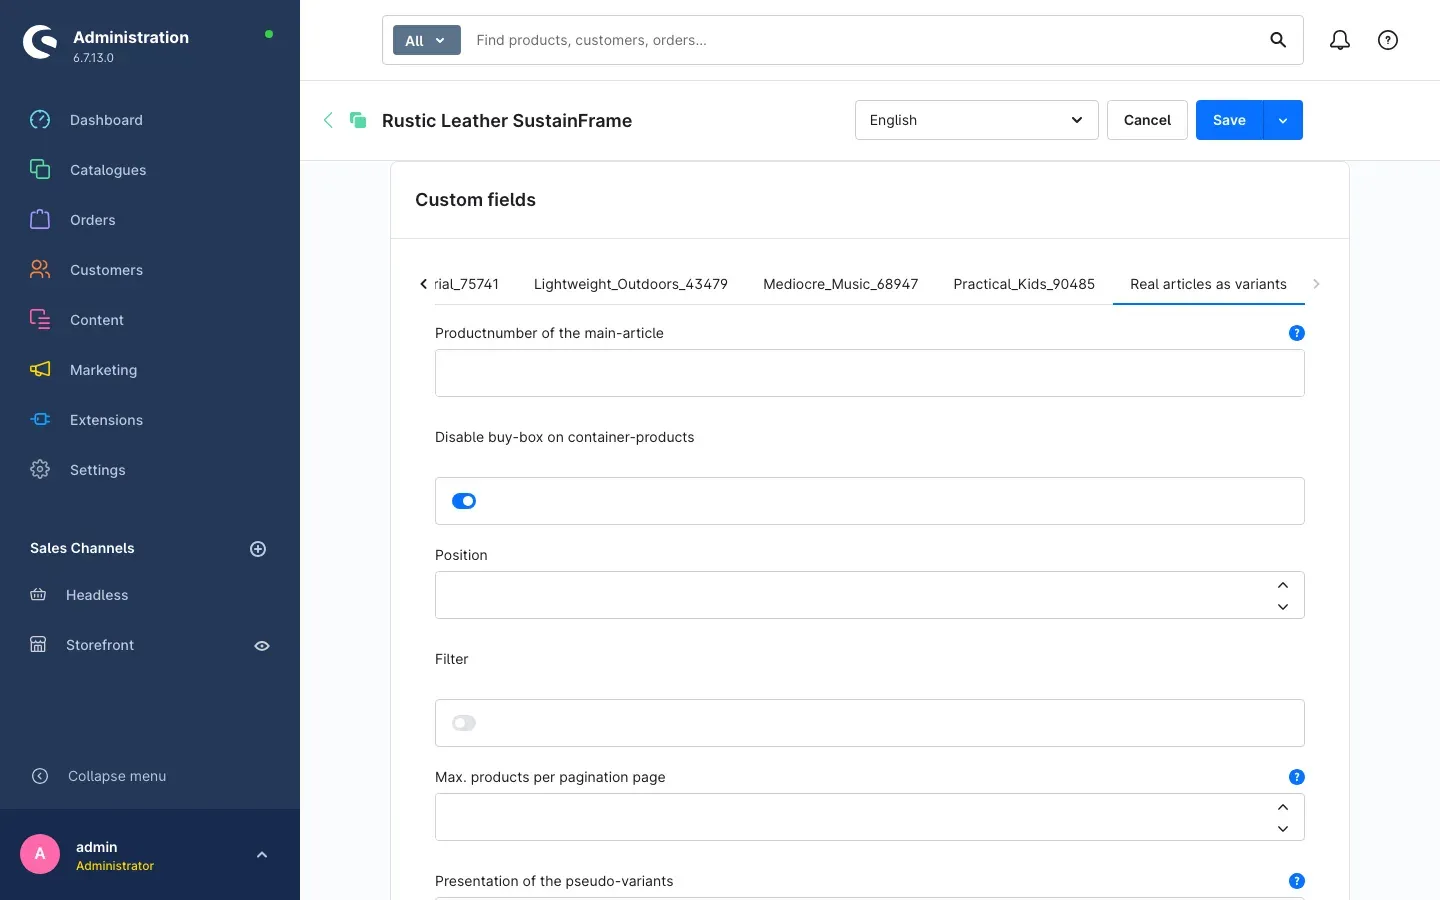 Fig. 4: The “Real articles as variants” tab on the main article — the switch “Disable buy-box on container-products” is enabled
This single switch turns the product into a main article. It does two things: the buy box disappears from its page in the shop, and the product can no longer be ordered. If somebody still adds it to the cart — via an old link or a wish list, for instance — the plugin blocks the order and shows the message: “The product ’…’ is a main product. Please select a variant.” That way you never receive an order for a product you cannot ship.
The Productnumber of the main-article field stays empty on the main article itself — unless this product is meant to be one of the variants at the same time. Running a product as its own main article explains how.
Assigning the linked products
- Open a product that belongs to the selection.
- Go to Custom fields → Real articles as variants again.
- Enter the product number of your main article in Productnumber of the main-article. If the product belongs to several main articles, separate the numbers with a comma.
- Optional: enter a number in Position. Positions control the order in which the products appear in the selection.
- Click Save and repeat this for every other product in the group.
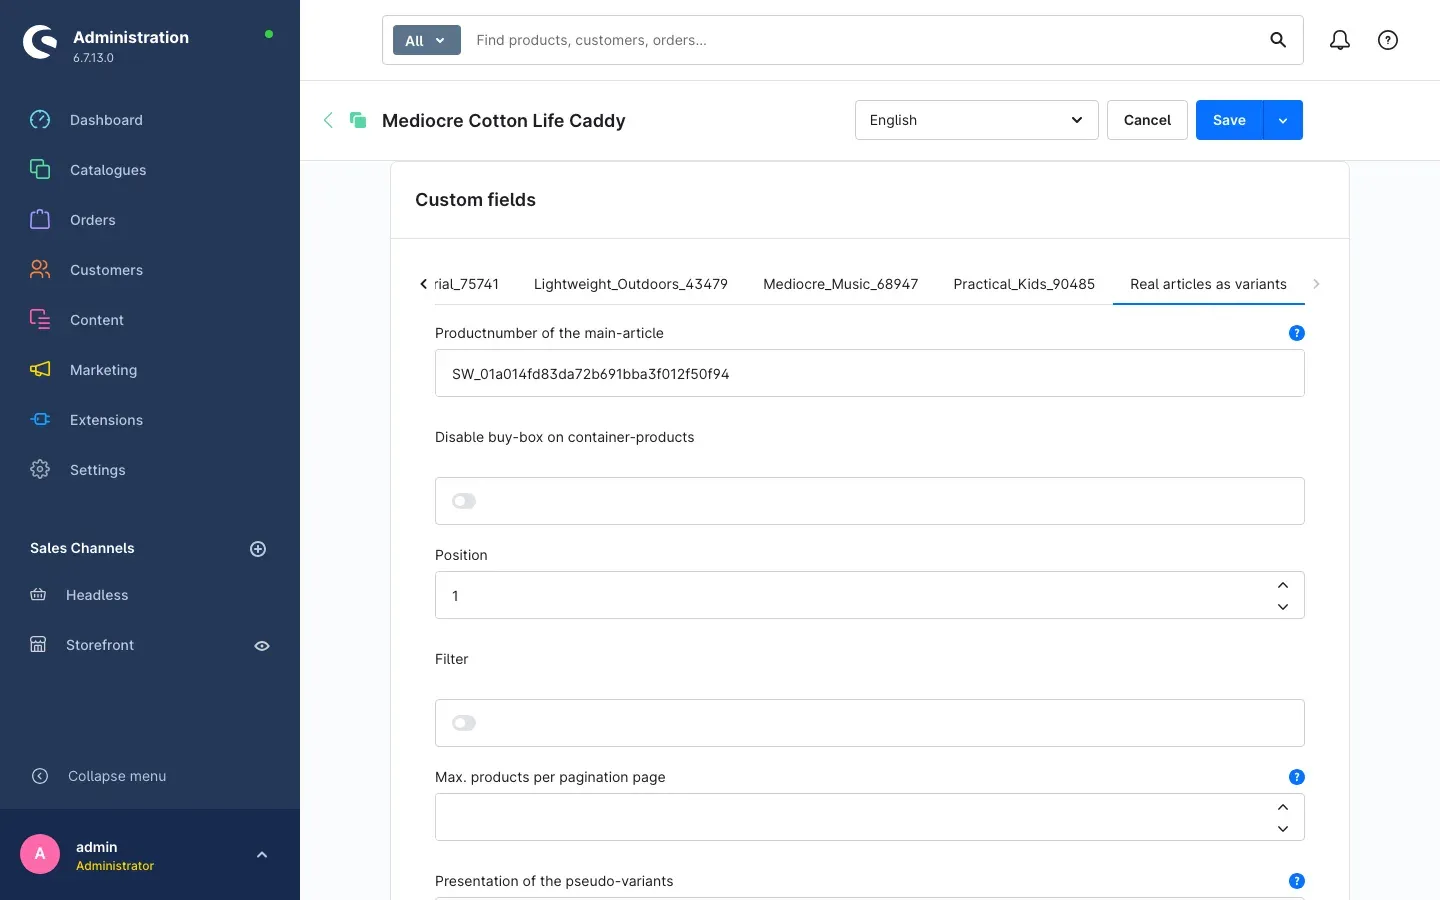 Fig. 5: On the linked product, the “Productnumber of the main-article” field holds the main article’s number, with the position underneath
Important: what you enter is the product number, not the product name. A typo silently leaves the product out of the selection.
Tip: for large ranges, this field can also be filled by your product import. That way hundreds of products can be assigned in one go instead of opening each one.
Defining which properties build the selection
The configurator builds its rows of buttons from your properties, and the grid builds its filter from them. To keep unrelated properties out, mark the ones that matter:
- In the administration, open the property that should build the selection under Catalogues — for example size or colour.
- On the Real articles as variants tab, switch on Variant-forming.
- Save, and repeat for every other property that should get a row of its own.
If you mark no property at all, the plugin falls back to using every filterable property, as before. That works, but it gets crowded quickly once your products carry many properties.
Presenting individual main articles differently
On the main article, the same tab offers three fields that override the general configuration for this one product:
- Presentation of the pseudo-variants — choose Grid with product cards or Configurator like native variants if this one product should differ from your general setting. As long as the field is empty it shows Global setting and the configuration from Configuration applies.
- Show filter above the grid — switches the filter bar on or off for this one product. As long as the field stays untouched, the general setting from Configuration applies.
- Max. products per pagination page — overrides the number of cards for this product.
Important: after changing any of these three fields, clear the cache under Settings → System → Caches & indexes. Otherwise your shop keeps showing the previous state until the next automatic clear.
Running a product as its own main article
Some ranges have no separate main article: there is no “model” that merely carries the selection — one of the real products is at the same time the page the selection lives on. For that, this product carries its own product number in the Productnumber of the main-article field.
- Open the product that is to be both: a variant and the entry point of the group.
- Under Custom fields → Real articles as variants, enter its own product number in Productnumber of the main-article.
- Enter the same number on every other product of the group, exactly as in Assigning the linked products.
The product then behaves correctly in both roles:
- It stays visible in category and search while the other products of the group remain hidden. The group still has exactly one entry in the listing — except that this entry is now a product customers can actually buy.
- On its page its own option is preselected, and it appears in the selection as an option of its own — customers can come back to it from every other variant.
- It stays orderable, with its own number and its own price. The Disable buy-box on container-products switch does not apply to it: a product assigned to itself is a real variant, not an empty container. You can therefore leave the switch on if it was already set.
Important: for the preselection to be exact, the product needs exactly one value per variant-forming property — one colour and one size, not three colours side by side. Otherwise the configurator picks the first value of the row arbitrarily.
Tip: upper and lower case of its own number do not matter. A typo does: the product is then neither a variant nor a main article, but an ordinary single product again.
How it looks in your shop
The configurator
With the presentation set to Configurator like native variants, the main article’s buy box shows one row of buttons per variant-forming property. Customers will not notice any difference to a real Shopware variant selection.
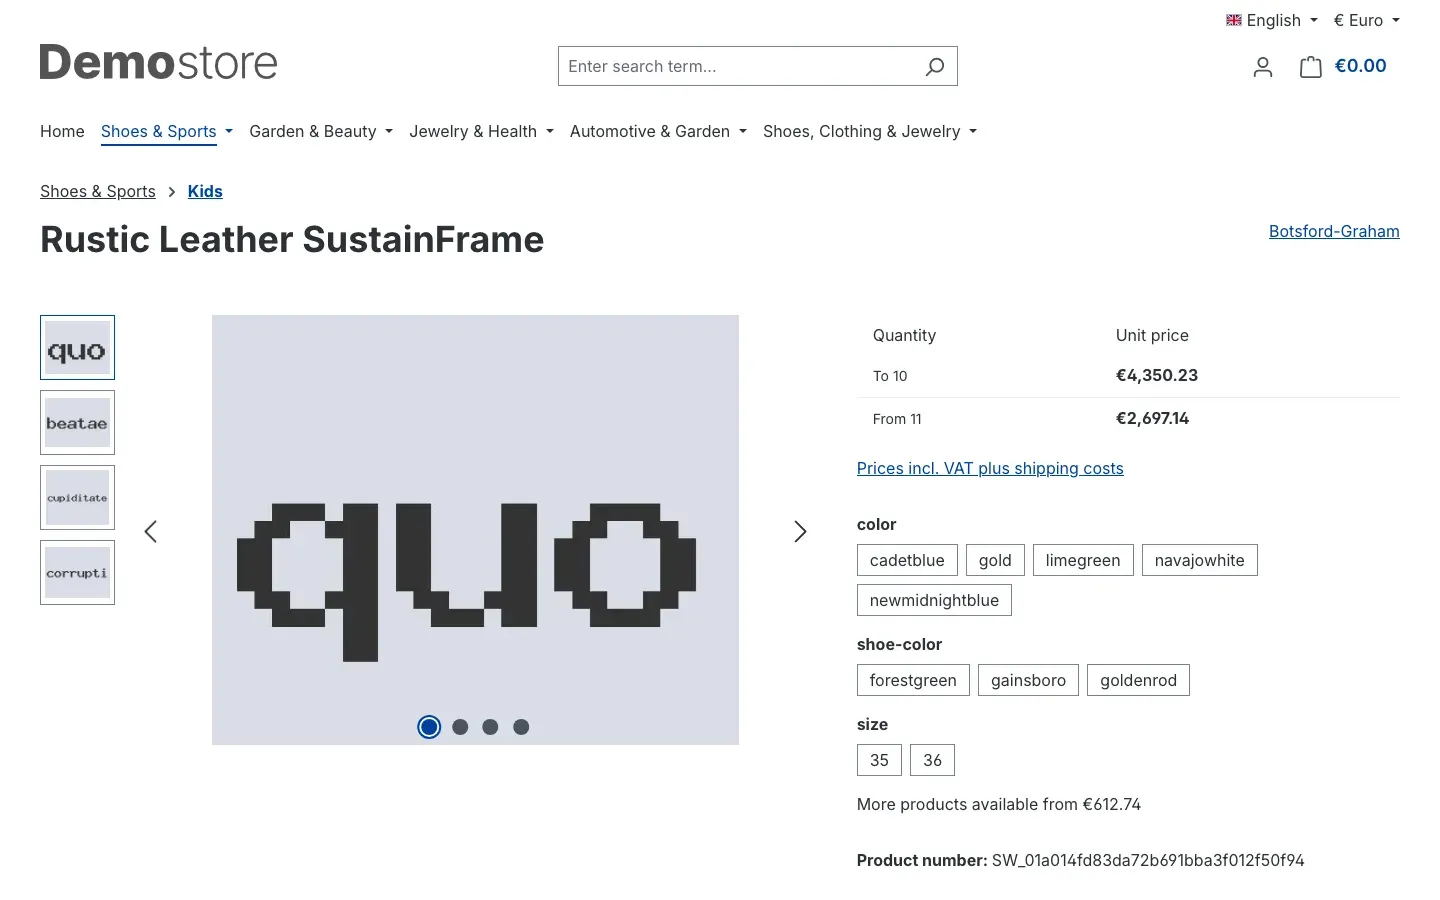 Fig. 6: The main article’s page shows the option rows and the price hint — this page has no buy box
Two things stand out here:
- Below the option rows you see More products available from … with the lowest price in the group, so customers know the price range before they choose.
- There is no buy box. That is intentional: the main article cannot be ordered, customers always buy a real product.
As soon as a customer selects an option, the shop opens the real product behind it — with its images, its product number, its price and its tiered prices. Only there does the Add to shopping cart button appear.
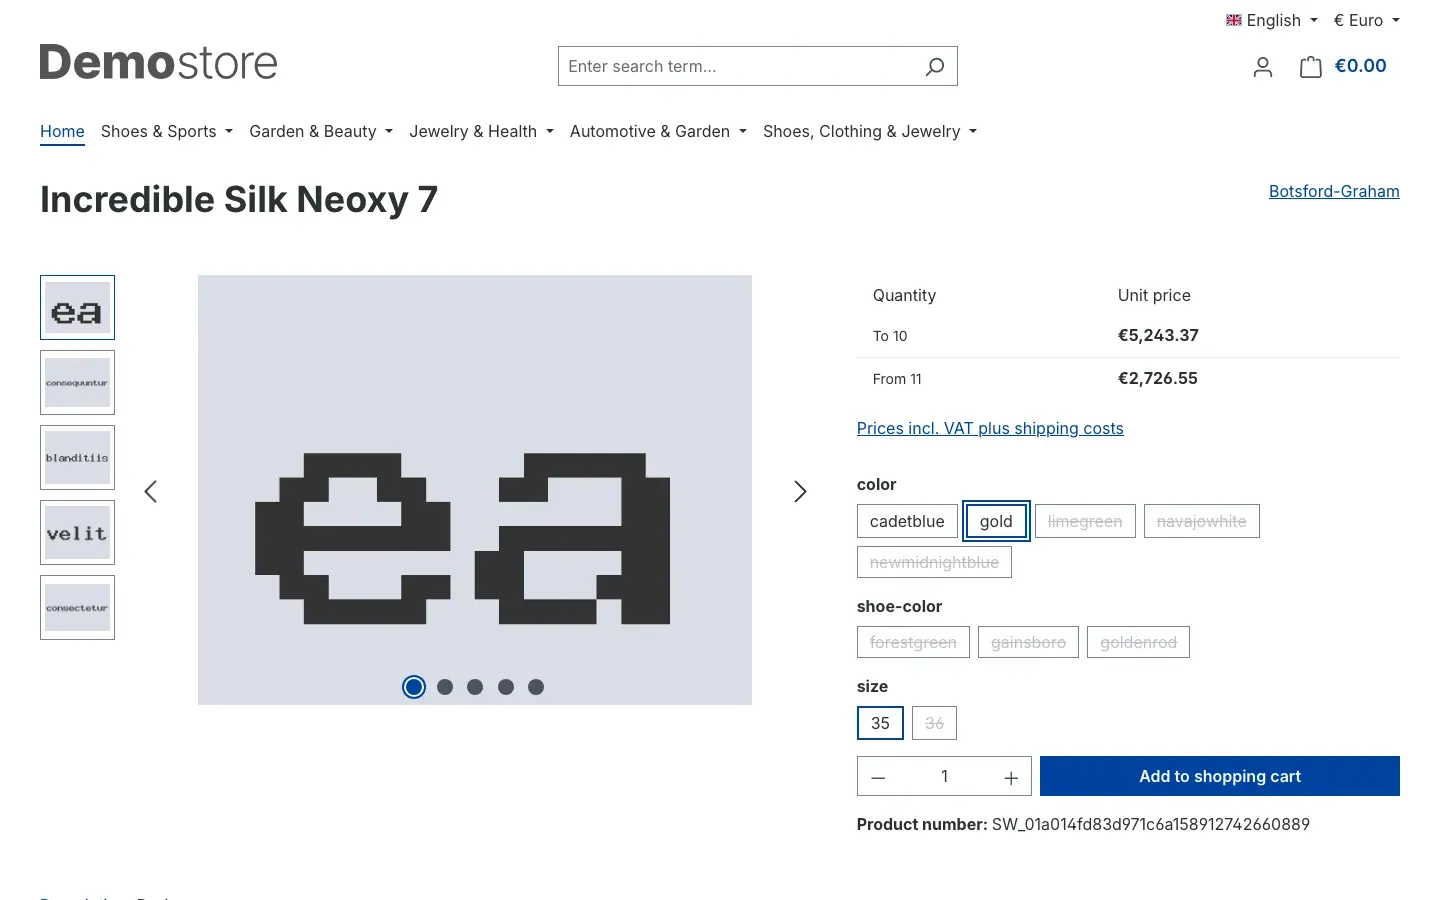 Fig. 7: After clicking an option a different product is loaded — own name, own product number, own price, now with an add-to-cart button
Combinations that do not exist are struck through and not clickable here — exactly as defined by the Unavailable combinations in the configurator setting.
The grid
With the presentation set to Grid with product cards, the linked products appear as cards: with image, the values of the variant-forming properties, an excerpt of the description, the price and a Details button.
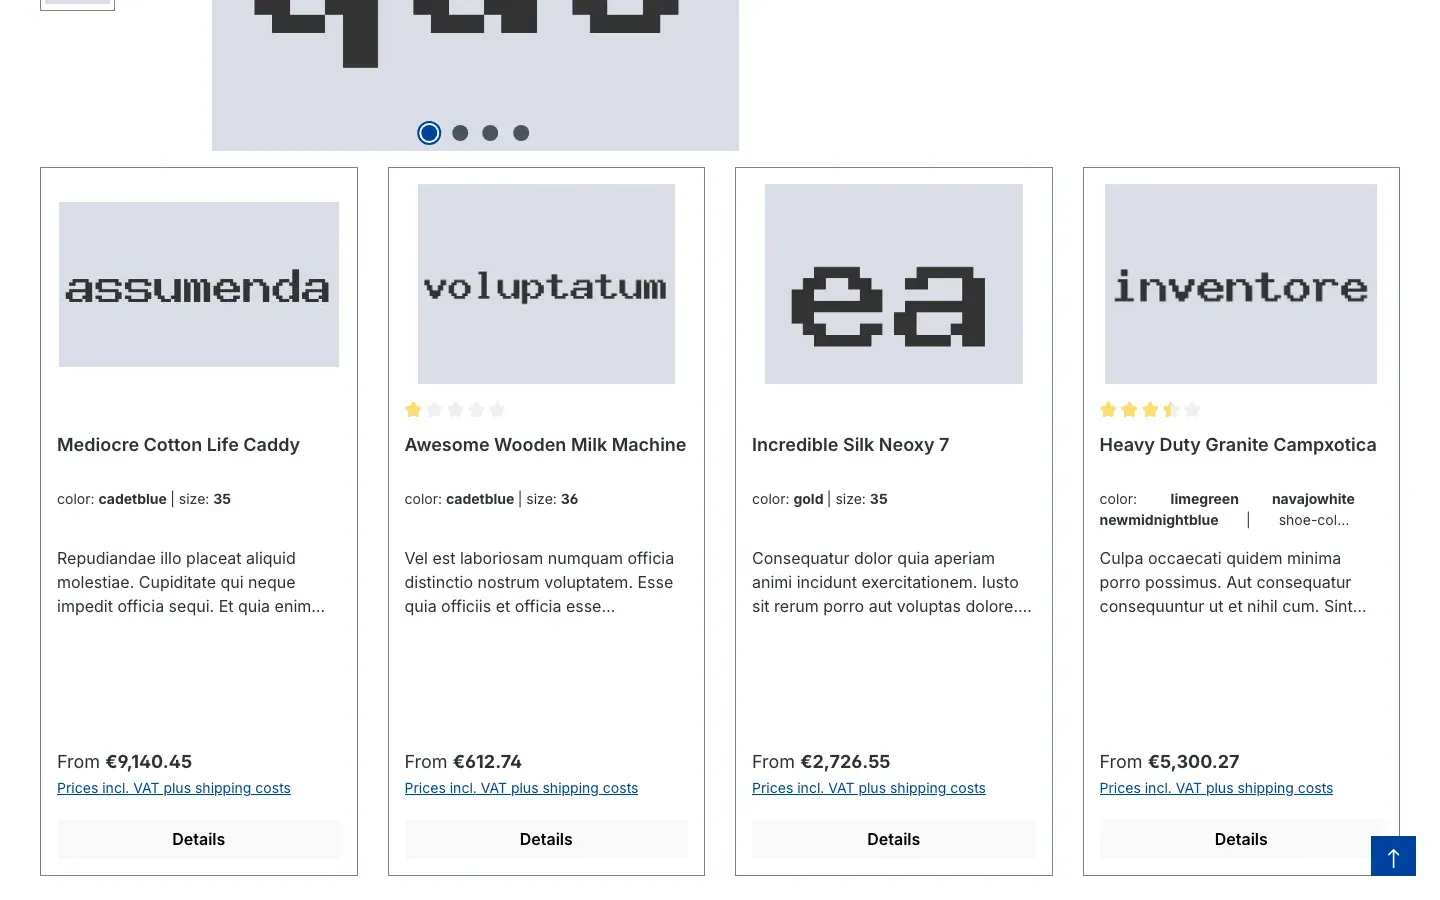 Fig. 8: The grid below the product image shows the linked products with their own prices and images
- Where the grid appears is defined by the Where are the variants displayed setting: below the image, in a separate Variants tab, or in a shopping world.
- If Filter is enabled on the main article, a filter bar sits above the grid. Customers narrow the selection themselves, for example down to one colour, and restore the full list with Reset.
- If there are more products than Max. products per pagination page allows, customers page through them.
- Details leads to the real product, where they buy it as usual.
Variants Widget in Shopping Experiences
What this gives you: if you design your product pages with Shopping Experiences, you can place the variant selection exactly where you want it — instead of fixed below the image or inside a tab.
Prerequisite: in the configuration, Where are the variants displayed is set to View in a shopping world and the presentation to Grid with product cards.
Step by step
- In the administration, open your shopping experience for product pages under Content — or create a new one.
- Click the plus sign in the layout to add a block.
- On the right, choose Commerce under Block category.
- Drag the Variants Widget block to the position you want in the layout.
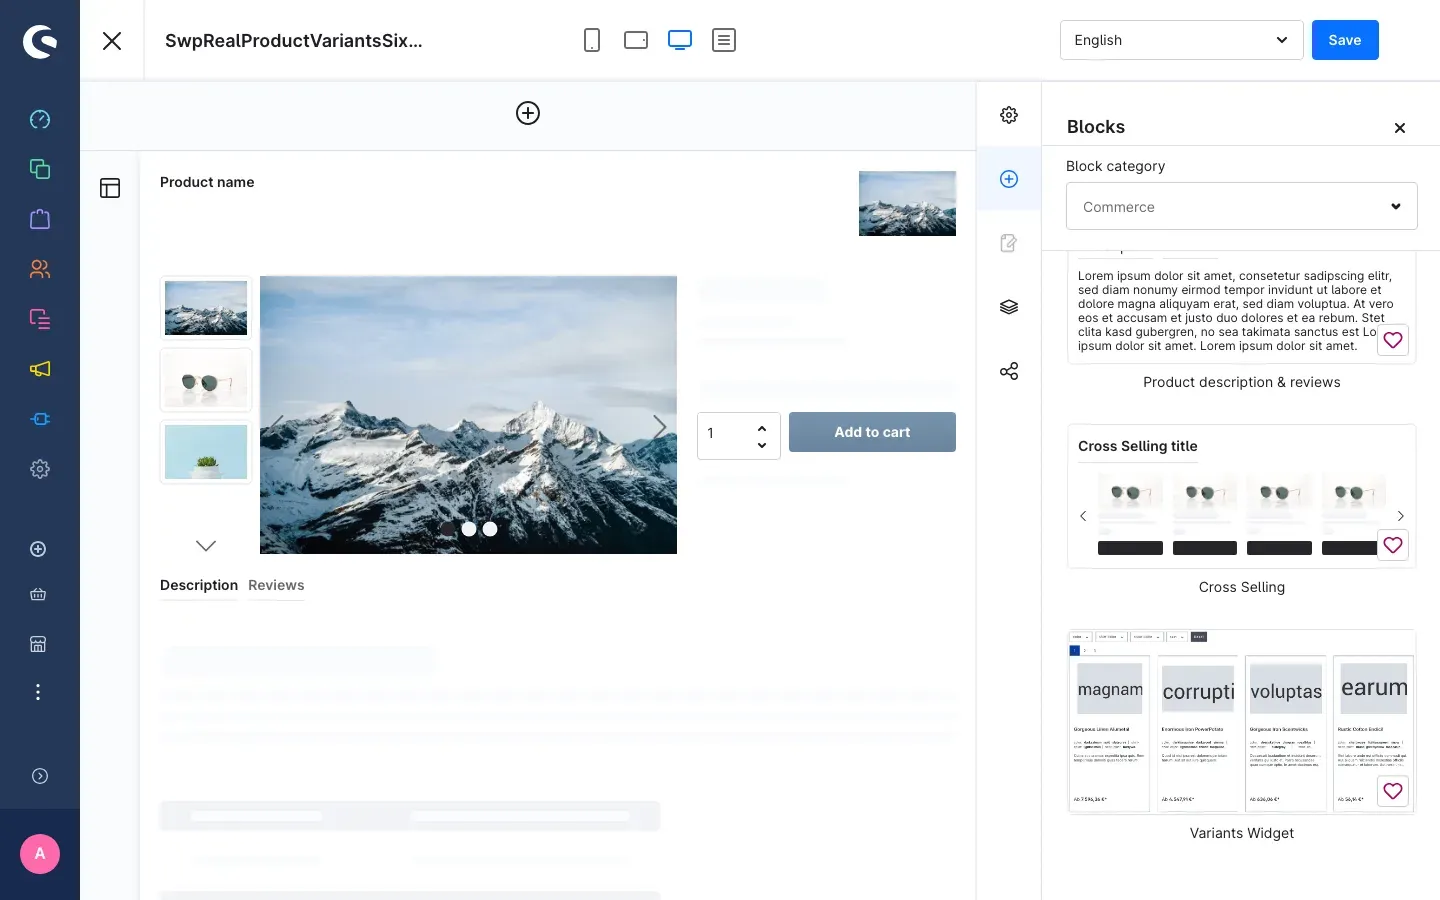 Fig. 9: The “Variants Widget” block is available in the “Commerce” block category
- Click the inserted block to open its settings:
- Headline — a line above the selection, for example “More sizes”.
- Layout type — Standard, Big image, Minimal content or Contents as a list, as described in Configuration.
- Filter display — switches the product filter above the selection on or off.
- Click Save and assign the layout to your products or categories.
Troubleshooting
No selection appears in the shop
What causes it: usually one of the two channel switches is off, or the link is not correct.
How to fix it:
- Open the configuration and select the affected Sales Channel at the top — not All Sales Channels, because a channel can carry a different setting.
- Check that Enable plugin for this sales channel and Output pseudo-variants in this sales channel are both on. Both are required.
- On the linked product, check that Productnumber of the main-article really holds the main article’s product number — character by character, without extra spaces.
- Check that the linked products are visible and active in the affected sales channel at all.
- Clear the cache under Settings → System → Caches & indexes.
The main article cannot be purchased
That is intended. The main article is the selection page, customers always buy a linked product. If it should be purchasable itself, you have two options: either switch off Disable buy-box on container-products on it — the selection stays, but in the listing it remains a product without a variant role of its own. Or turn it into a real variant of its own group by entering its own product number, as described in Running a product as its own main article.
The linked products still appear individually in the category
Check Hide pseudo-variants in listing in the configuration of the affected sales channel. If the change does not take effect immediately, clear the cache under Settings → System → Caches & indexes.
The configurator shows too many or the wrong option rows
Then no property has been marked as Variant-forming yet; in that case the plugin uses every filterable property. Under Catalogues, mark exactly the properties that should get a row, then clear the cache.
A change to the custom fields does not show up in the shop
The entries on products and properties are cached. After such changes, clear the cache under Settings → System → Caches & indexes.
The plugin does not appear in the extensions list
Open Extensions → My extensions and switch off Hide inactive extensions so that entries which are not activated become visible too. If the entry is still missing, connect your shop on the Shopware Account tab using the account you bought the plugin with.
Frequently asked questions
Q: Do I have to convert my products into Shopware variants for this?
A: No. Every product stays an independent product with its own number, its own price and its own stock. The only link is the product number you enter.
Q: Do my products keep their existing address in the shop?
A: Yes. Every linked product keeps its own page and therefore its URL. Existing search engine rankings, price portal entries, ads and old customer links still lead to the intended product.
Q: Can one product belong to several main articles?
A: Yes. Enter the product numbers of the main articles in the same field, separated by commas.
Q: Does the plugin detect related products automatically?
A: No. It only reads the product number you enter. For large ranges, your product import is the convenient way to do this.
Q: Can I use the grid and the configurator at the same time?
A: Yes, but not on the same page. You set one presentation in general and let individual main articles deviate through their Presentation of the pseudo-variants field.
Q: Can I use the plugin in only one of my shops?
A: Yes. Select the affected sales channel at the top of the configuration and switch off Enable plugin for this sales channel there. All other channels keep working as configured.
Q: What happens to the prices and stock of the individual products?
A: Nothing. Every linked product keeps its own price including tiered prices, and its own stock. The main article merely displays the lowest price in the group as a hint.
Q: How many products can I assign to one main article?
A: Up to 1,000. For the display in your shop, much smaller groups make sense — use the pagination and the filter for that.
Q: What happens to my products when I uninstall the plugin?
A: Your products stay untouched. On uninstall the plugin removes its custom fields and settings, unless you choose the option in the plugin manager to keep the data.
For administrators / technical details
This section is aimed at technical administrators. You do not need it for day-to-day work with the plugin.
System requirements
- Shopware: 6.7
- PHP: 8.2 or newer
- Storefront: required
Data storage
The plugin creates no database tables of its own and modifies no Shopware tables. The link lives exclusively in custom fields on products and properties; they are grouped under the name Real articles as variants and can therefore be filled through import and API just as well as through the administration. All custom fields of the plugin are exposed to cart and order and readable through the Store API.
Sales channels
All settings are read per sales channel. If nothing specific is stored for a channel, the value from All Sales Channels applies.
Caching
The product page stays in the Shopware cache, and switching between options is HTTP-cacheable just like the native variant switch. After changes to the custom fields of products or properties, the cache should be cleared: Settings → System → Caches & indexes or on the command line.
php bin/console cache:clearData protection
The plugin sends no data to external servers and processes no personal data. It therefore creates no additional GDPR obligations.
Installation via the command line
composer require swp/realproductvariants-six
php bin/console plugin:refresh
php bin/console plugin:install SwpRealProductVariantsSix --activate
php bin/console cache:clear
This manual was written for Real products as variants version 6.7.1.
More manuals
Admin Password Reminder
Admin Password Reminder: your backend users renew their passwords on time, prompted after login and by a daily email. Premium locks expired accounts until the password is changed.
Open manual Shopware 6Age Check
Tobacco, spirits, knives: visitors who do not confirm their age never see the restricted items at all. You tick a box per product, the plugin hides it everywhere.
Open manual Shopware 6AI Media Labelling
AI labelling for images and videos: flag a media item once in the media manager and the badge with your notice appears wherever it shows up in your shop. No template work needed.
Open manualNeed a team that keeps your shop running?
We have been maintaining Shopware shops for more than 20 years, including updates, hotfixes and the plugins you are configuring right now.