Preferred delivery date
Preferred delivery date at checkout: your customers pick the day, you set the lead time, delivery days and blocked dates. Fewer enquiries, rounds you can plan.
On this page
- Introduction
- What you get from this plugin
- Who is this plugin for?
- Installation
- Getting started
- Settings
- Activate plugin for this channel
- Customer groups
- not allowed shipping methods
- not allowed payment methods
- Offset in days
- Mandatory information
- How to use the features
- How to block days when you do not deliver
- How to set delivery days and blocked periods per shipping method
- How to give individual products more lead time
- How your customers choose their delivery date
- How to find the chosen date on the order
- How to print the date in emails and documents
- How to control who may edit the blocked periods
- Troubleshooting
- No date selection appears in the shop
- A blocked period can still be selected
- No day at all can be clicked in the calendar
- The plugin does not appear in the administration
- A change to the configuration has no effect
- FAQ
- For administrators / technical details
- System requirements
- Installation via the command line (Composer)
- Showing the preferred date in the order confirmation
- What happens on uninstall
Introduction
Desired delivery date lets your customers say when their order should arrive — and you decide which dates are available in the first place.
What you get from this plugin
- Your customers pick a delivery date from a calendar during checkout.
- You define the lead time you need before you can deliver — shop-wide or for individual products.
- You block periods when you do not deliver: company holidays, public holidays, stocktaking.
- You define for each shipping method which weekdays it actually delivers on.
- You exclude individual shipping and payment methods from the date selection.
- The chosen date is stored with the order and can be printed in confirmations and documents.
- Every sales channel is switched on and configured separately.
Who is this plugin for?
Shops where the delivery date matters: food and fresh produce, furniture and large appliances, flowers and gifts, event supplies, trades — anything that is delivered or installed on an agreed day.
Installation
After your purchase the plugin is available directly in your administration — there is nothing to download.
-
Log in to your Shopware administration (
YourShop.com/admin). -
Open Extensions → My extensions.
-
Find Desired delivery date in the list and click Install.
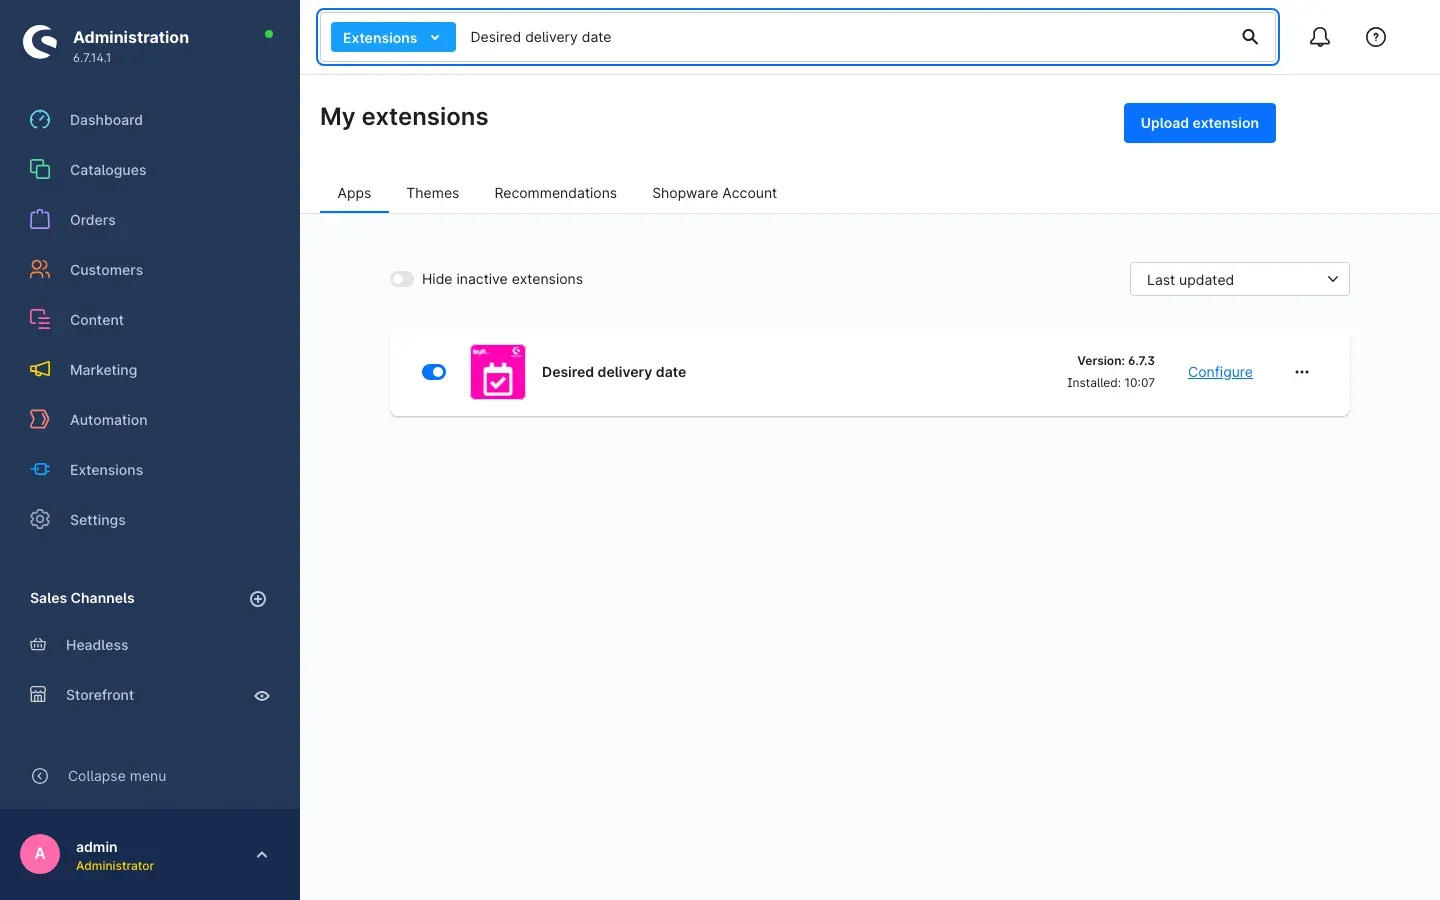 Fig. 1: The extension in “My extensions”, installed and activated
 -
Activate the plugin with the toggle next to the entry — that is all.
If Desired delivery date does not appear in the list, your Shopware account is not yet connected to the shop. You can connect it under Extensions → My extensions by logging in with your Shopware account.
After an update: in the plugin configuration, check the switch Enable plugin for this sales channel for every sales channel (select the sales channel at the top). The switch is on after the update; turn it off in channels where you do not want to offer a delivery date.
Getting started
Three steps are needed after activation before your customers see the date selection.
-
Open the settings: go to Extensions → My extensions, then click Configure on the right of the Desired delivery date row.
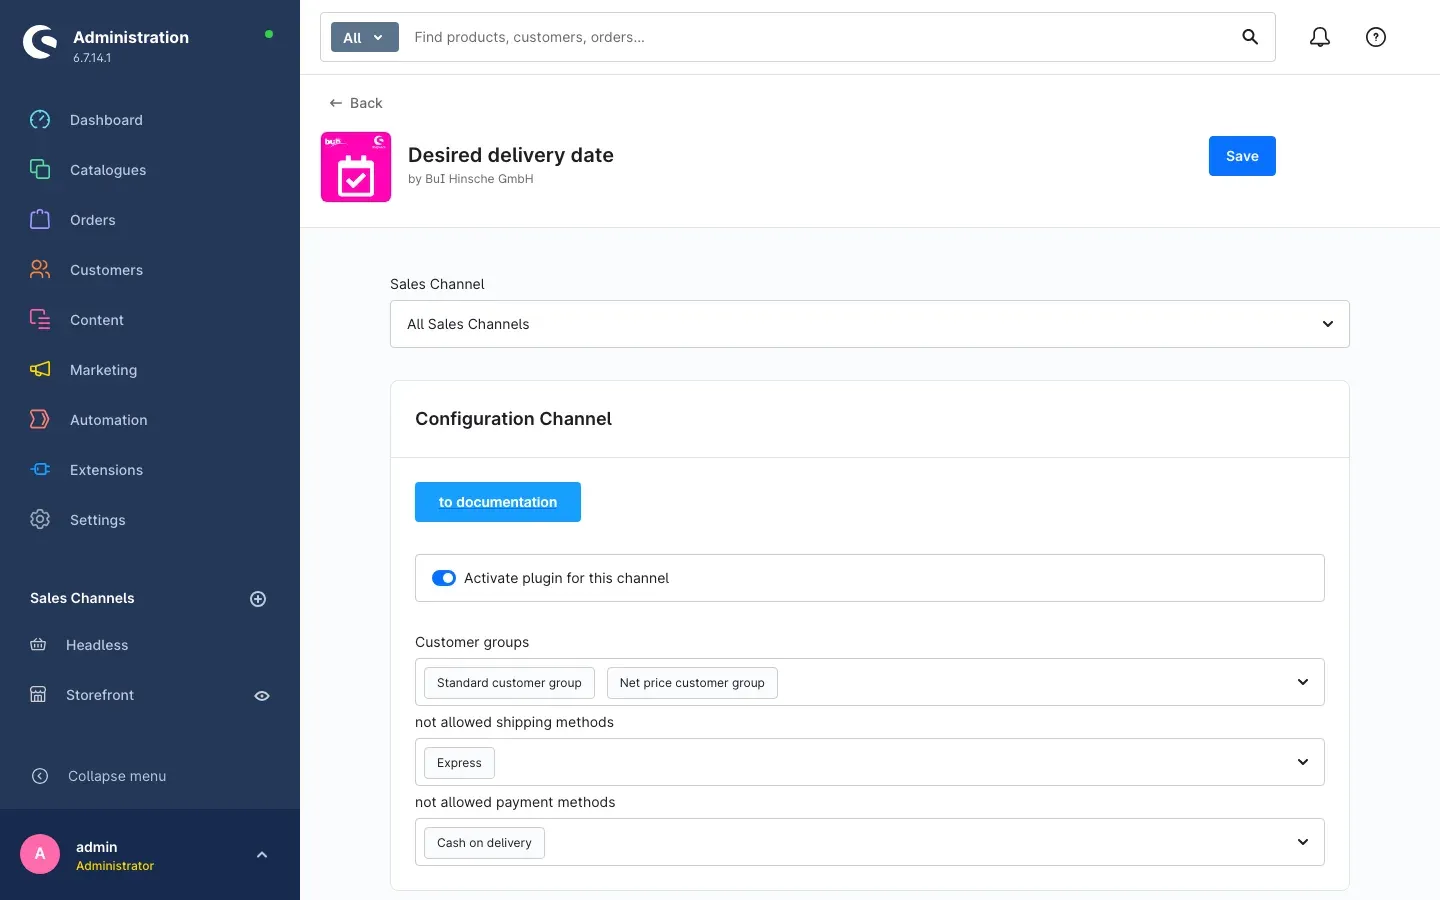 Fig. 2: The configuration, with the sales channel selector at the top
 -
Choose the sales channel: at the top of the page, select the sales channel the settings should apply to. Every channel is configured separately.
-
Select customer groups: enter at least one group under Customer groups. This step is essential — as long as the field is empty, the date selection is never offered in the shop. If every customer should be able to choose a date, simply enter all groups.
-
Set the lead time: under Offset in days, enter the number of days you need before you can deliver.
-
Save and check the result: add a product to the cart in your shop and go to the order confirmation page. The field for the delivery date appears in the summary column.
Settings
You can find the settings under Extensions → My extensions, then click Configure on the right of the Desired delivery date row. All settings apply per sales channel; you choose the channel at the top of the page.
Fig. 3: The “Configuration Channel” section
The to documentation button at the top of the configuration opens this manual at any time, in the language of your administration.
Activate plugin for this channel
Activate plugin for this channel controls whether the date selection is offered in the sales channel selected above. The toggle is switched on after installation.
Why this helps: if you run several sales channels, you can offer the service only where you can actually meet the date — for example in your regional shop, but not in the international one.
Customer groups
Under Customer groups you define which customer groups are allowed to choose a delivery date. The date selection only appears for customers in the groups listed here.
Important: an empty field does not mean “everyone”. If you leave it empty, nobody sees the date selection. Enter at least one group — and all groups if the feature should apply to your whole shop. Visitors who are not logged in belong to the default customer group of the sales channel.
Why this helps: you can offer the service to regular or business customers first and open it up to everyone later.
not allowed shipping methods
Under not allowed shipping methods you list the shipping methods that offer no date selection. If a customer picks one of them during checkout, the date field disappears; if they switch back to an allowed method, their previously chosen date is restored.
Why this helps: for express shipping or click and collect a delivery date is pointless or even misleading — this hides it cleanly.
not allowed payment methods
Under not allowed payment methods you list the payment methods that offer no date selection. The effect is the same as for shipping methods.
Why this helps: with payment in advance the delivery date depends on when the money arrives, so it cannot be promised. Instead of committing to a date you cannot keep, you take the payment method out of the date selection.
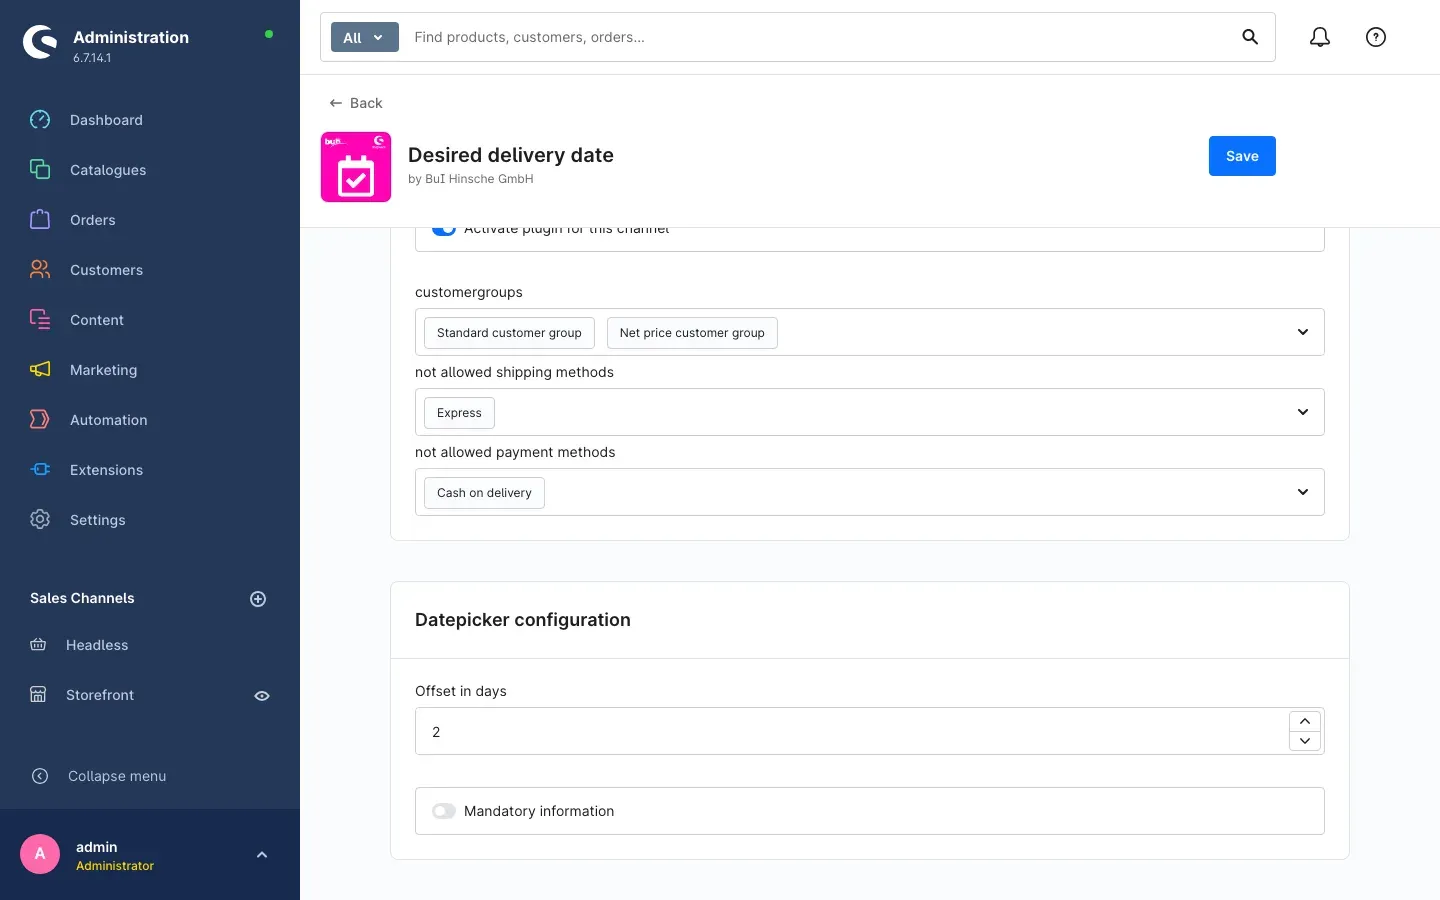 Fig. 4: The “Datepicker configuration” section
Offset in days
Offset in days defines the gap between today and the earliest selectable date. With 2, the day after tomorrow is the first date that can be chosen. Everything before that cannot be clicked in the calendar.
The smallest effective value is one day: if you enter 0, the plugin works with one day of lead time, so the earliest date is tomorrow.
Why this helps: this is your picking and dispatch time. Enter how long an order realistically takes before it leaves your warehouse — then nobody can book a date you cannot meet.
Mandatory information
Mandatory information makes the delivery date binding: without a valid date the order cannot be placed. After installation the entry is optional.
The shop checks this again itself when the order is submitted. If no date is selected, or the selected date is no longer available — for example because you have just blocked that day —, the order is not accepted. Your customer sees a notice in the checkout and picks a new date. This only applies where the date selection is offered: in an activated sales channel, for enabled customer groups and not for excluded shipping or payment methods. With Mandatory information switched off, orders without a date remain possible as before.
Why this helps: if you schedule every delivery — for fresh produce or installation appointments, for instance — you avoid having to chase customers who ordered without a date.
How to use the features
How to block days when you do not deliver
What you get from this: company holidays, public holidays and stocktaking days never appear as an option in your customers’ calendar. No order has to be rescheduled afterwards.
You manage these blocked periods under Catalogues → Delivery date blacklist.
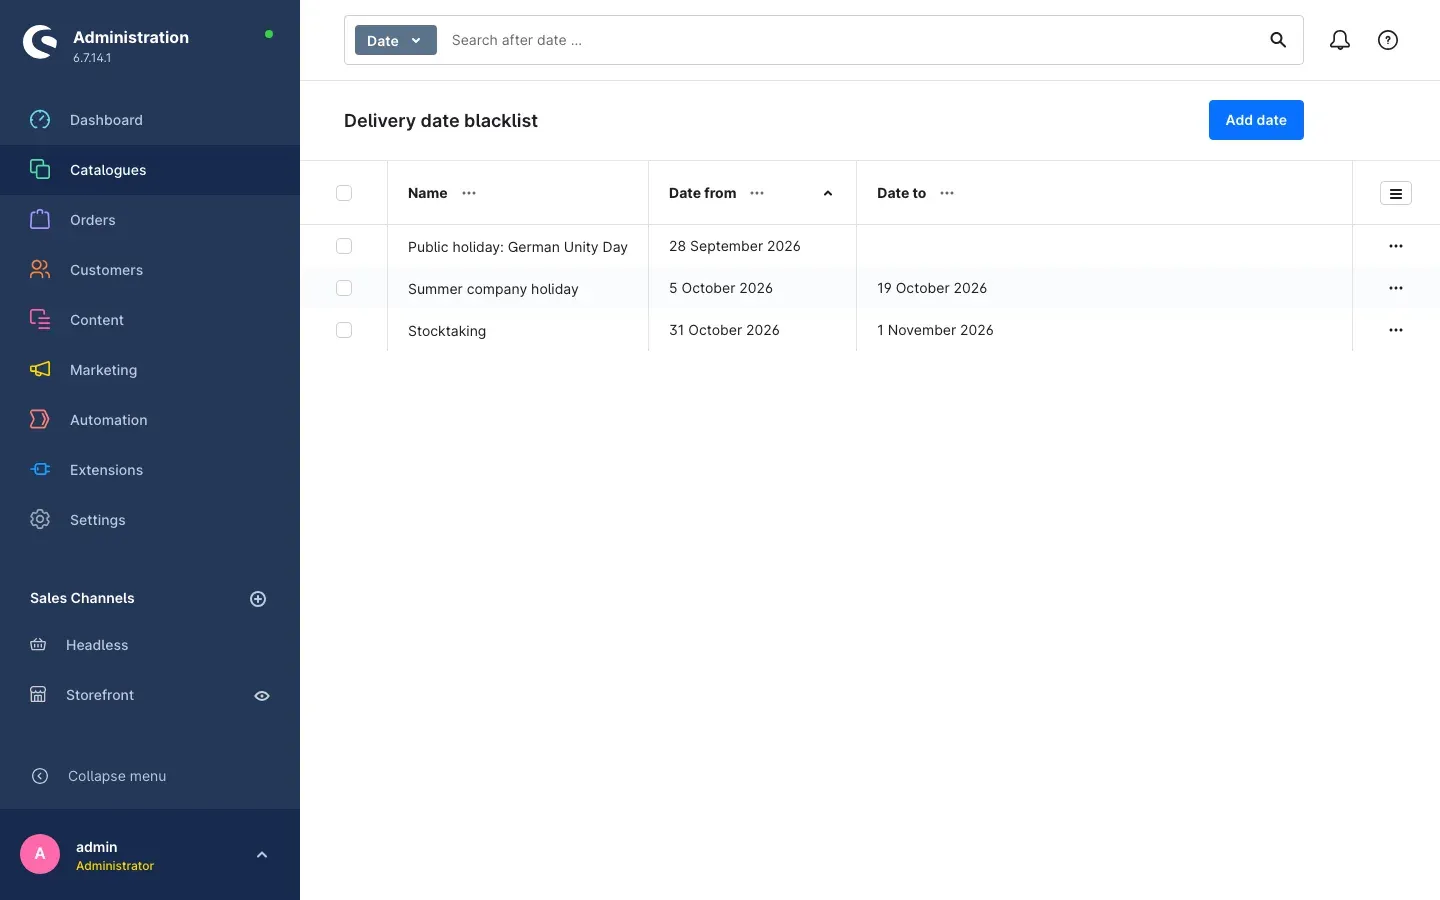 Fig. 5: The overview with the periods you created
For each entry the list shows Name, Date from and Date to. The search bar at the top helps you find an entry by date.
Step by step: block a period
- Go to Catalogues → Delivery date blacklist.
- Click Add date at the top right.
- Fill in the details:
- Name: the label you will recognise the entry by later, for example “Summer company holiday”. This field is required.
- Date from: the first blocked day. This field is required as well.
- Date to: the last blocked day. Leave it empty to block a single day only.
- Click Save at the top right.
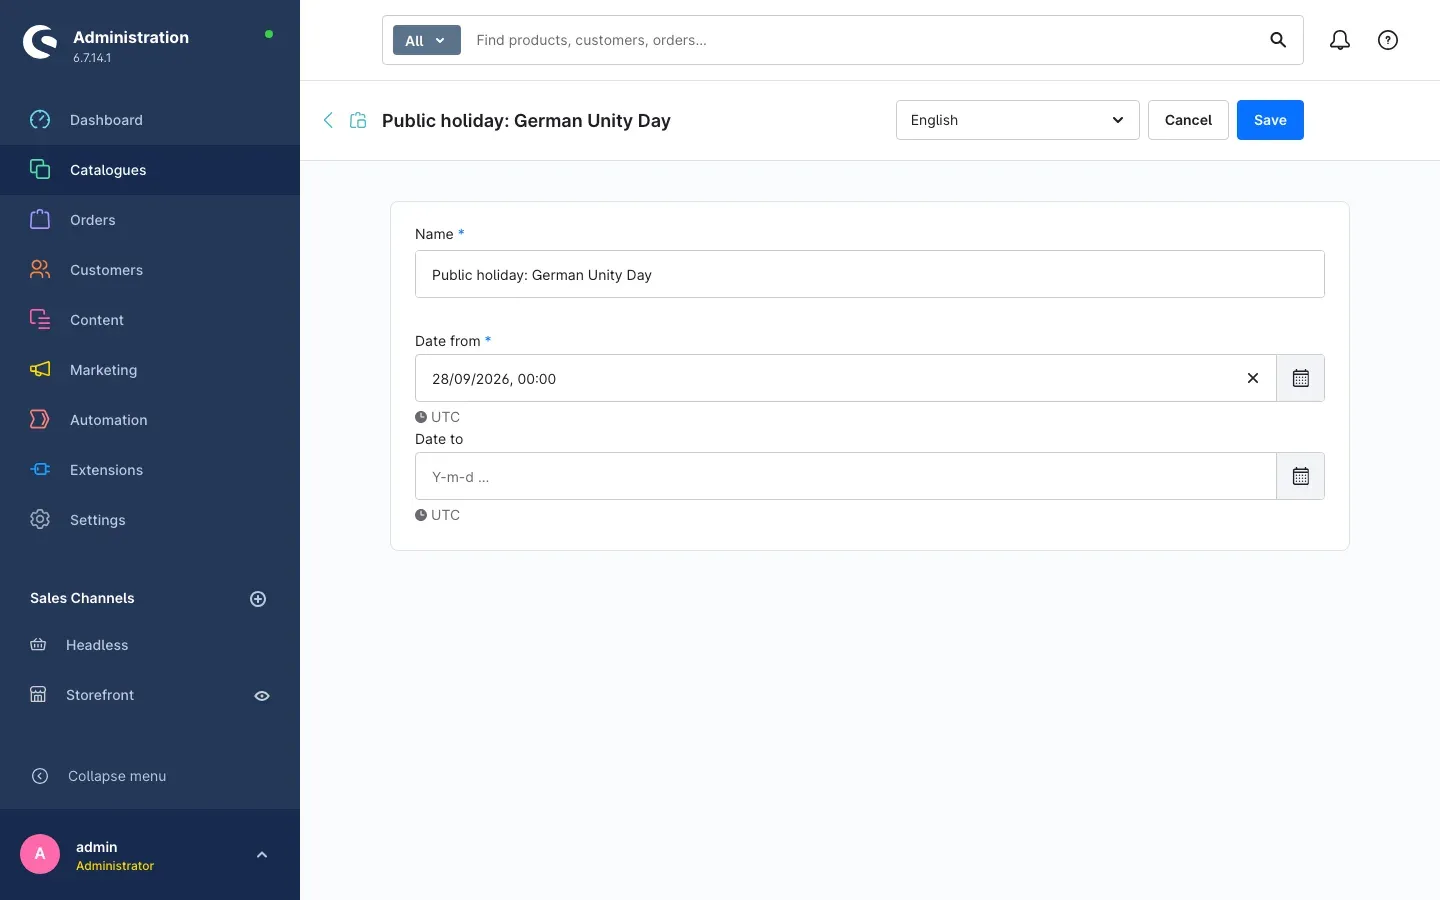 Fig. 6: A single entry with Name, Date from and Date to
Tip: use the language selector at the top of the page to store the name in every language of your shop. The name is purely a working aid for you — your customers never see it, for them the day is simply not clickable.
Important: a newly created period has no effect on its own. You have to assign it to the shipping methods it should apply to — see the next section. Periods in the past no longer have any effect; you can keep or delete them.
How to set delivery days and blocked periods per shipping method
What you get from this: your freight forwarder only drives on weekdays, your own delivery service also on Saturdays — this setting gives every shipping method exactly the days it really delivers on. And here you decide which blocked periods apply to that method.
You find these fields under Settings → Shipping. Open the shipping method and scroll down to the Custom fields card — the Preferred delivery date tab is there.
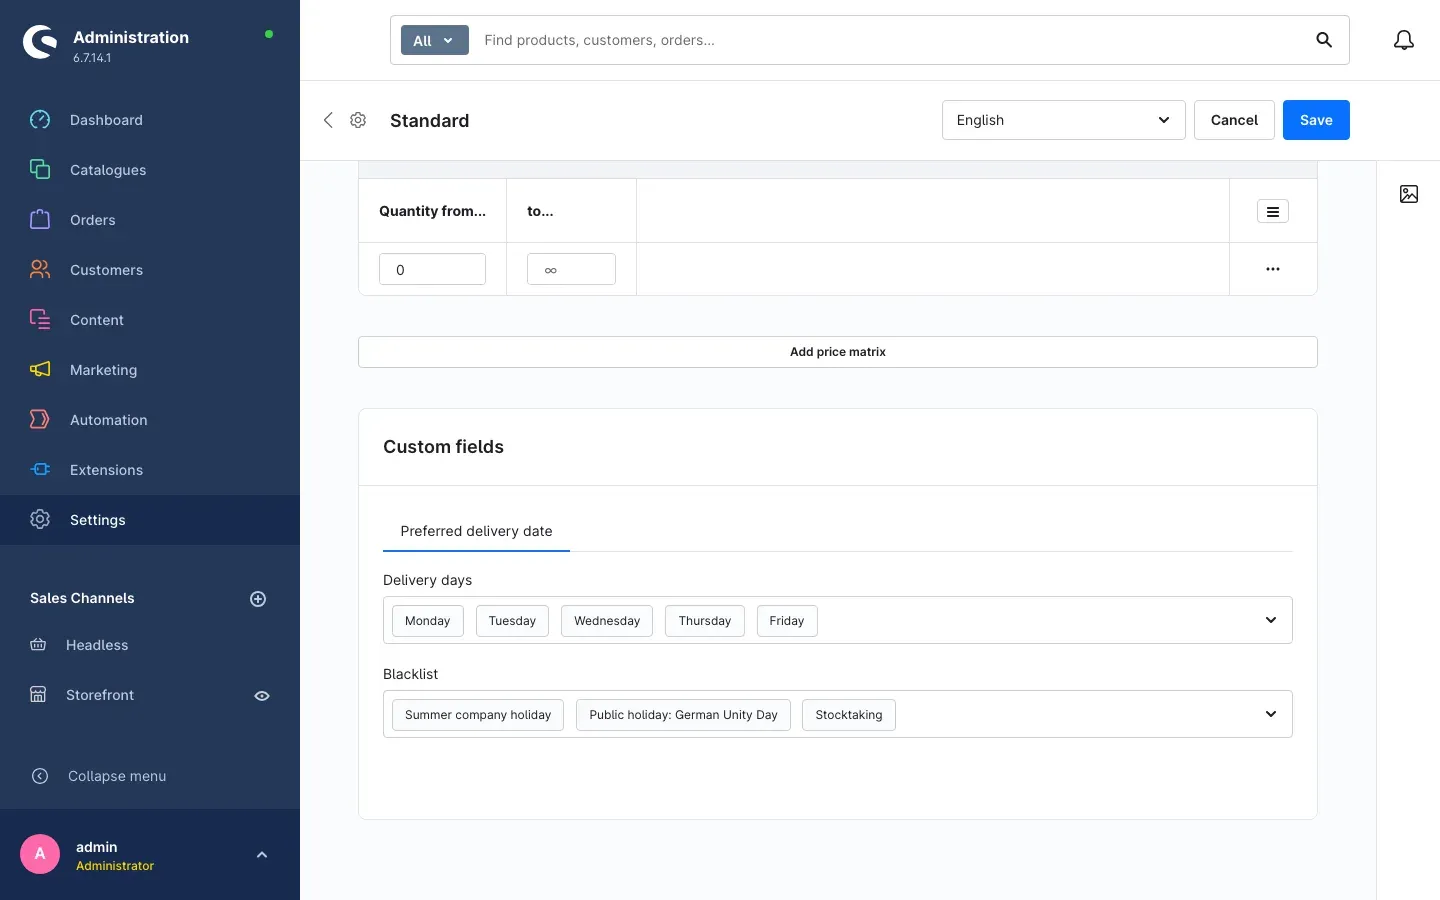 Fig. 7: Delivery days and assigned blocked periods on a shipping method
Step by step
- Go to Settings → Shipping.
- Open the shipping method you want to configure.
- Scroll down to the Custom fields card and open the Preferred delivery date tab.
- Fill in the details:
- Delivery days: the weekdays this shipping method delivers on. All other days are blocked in the calendar. If you leave the field empty, all seven weekdays are available.
- Blacklist: the periods created under Delivery date blacklist that should apply to this shipping method.
- Click Save.
Important: only periods selected here are blocked in the calendar. Whenever you create a new period, remember to add it to every shipping method it should apply to — otherwise it has no effect.
Tip: this is exactly how you map different closing times. Your own delivery service pauses during company holidays while the parcel service keeps going? Then assign the period to your own shipping method only.
How to give individual products more lead time
What you get from this: a made-to-order item or a product you have to order in takes longer than stock. You store the longer lead time on the product itself instead of raising the lead time for the whole shop.
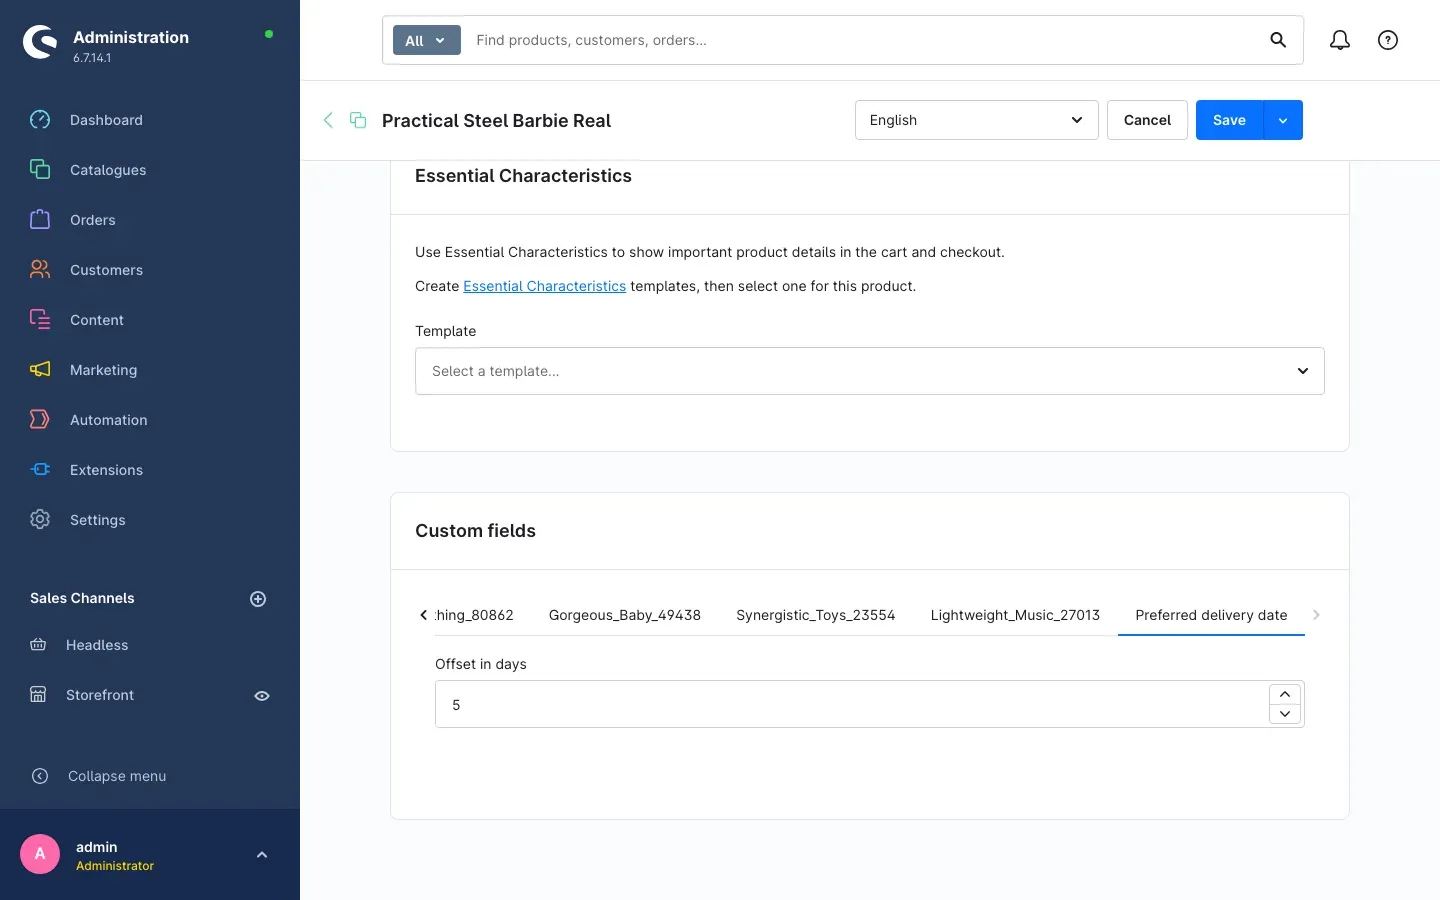 Fig. 8: The product’s own lead time
Step by step
- Go to Catalogues → Products and open the product.
- Scroll down to the Custom fields card and open the Preferred delivery date tab.
- Under Offset in days, enter the number of days this product needs.
- Click Save.
Tip: if several products are in the cart, the longest lead time always wins. A cart containing a stock item and a made-to-order item follows the made-to-order item — exactly the way you can actually deliver.
If you leave the field empty, the lead time from the sales channel configuration applies.
How your customers choose their delivery date
What you get from this: your customers see the earliest possible delivery date before they place the order and set their preferred date themselves. Email enquiries about delivery dates stop.
The date selection sits on the order confirmation page — the last step of checkout, in the summary column.
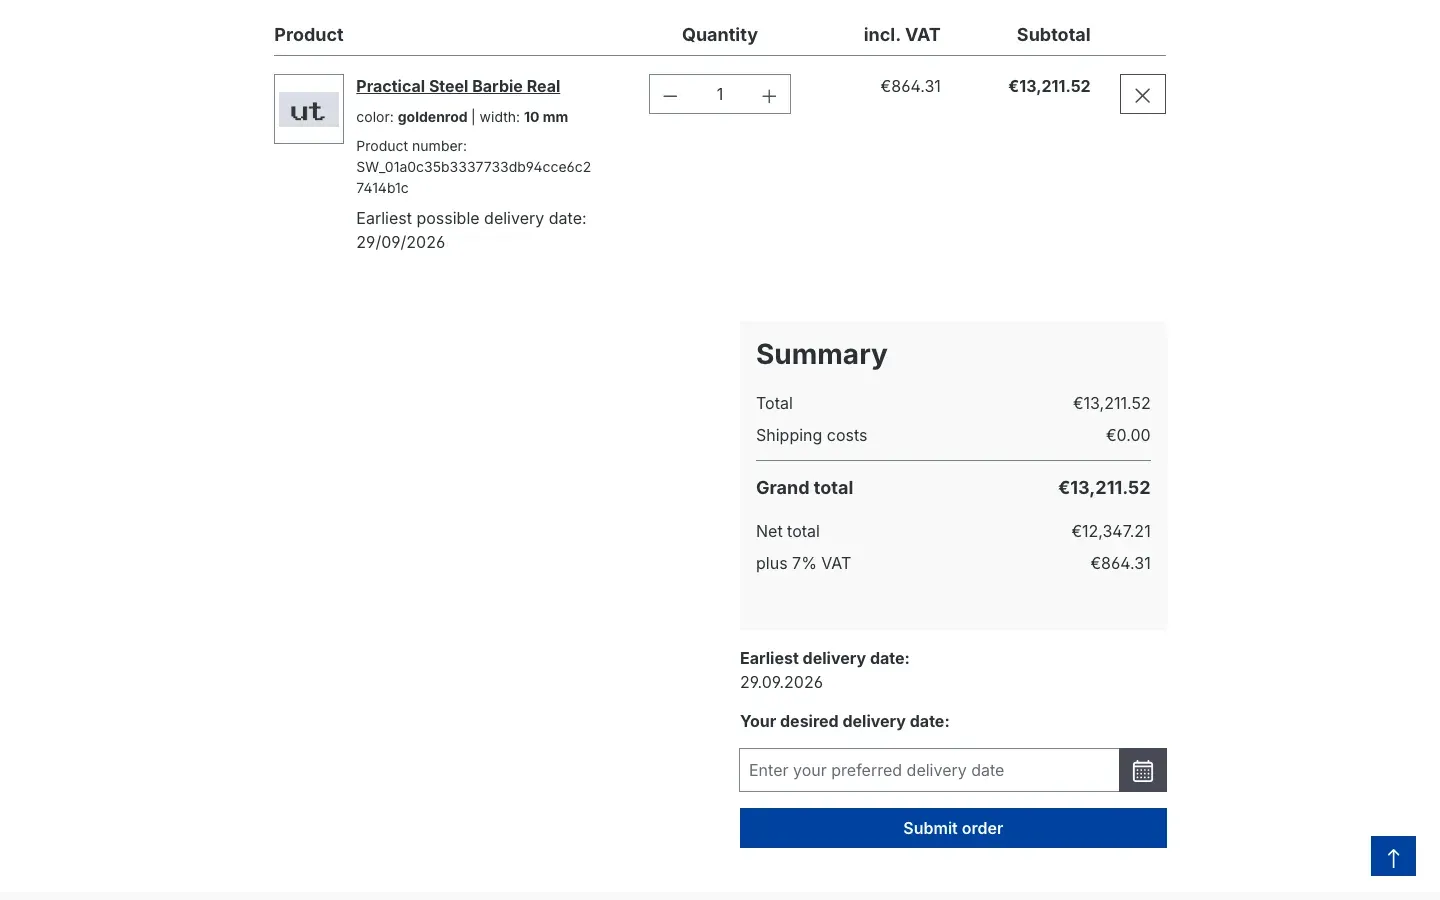 Fig. 9: Earliest delivery date and the input field for the preferred date
This is how it works from your customers’ point of view:
-
Above the input field, Earliest delivery date: shows the first date that is possible with your settings.
-
Clicking the field with the placeholder Enter your preferred delivery date, or the calendar button next to it, opens the calendar.
-
Blocked days cannot be clicked: everything before the earliest date, every weekday outside the delivery days of the chosen shipping method, and every assigned blocked period.
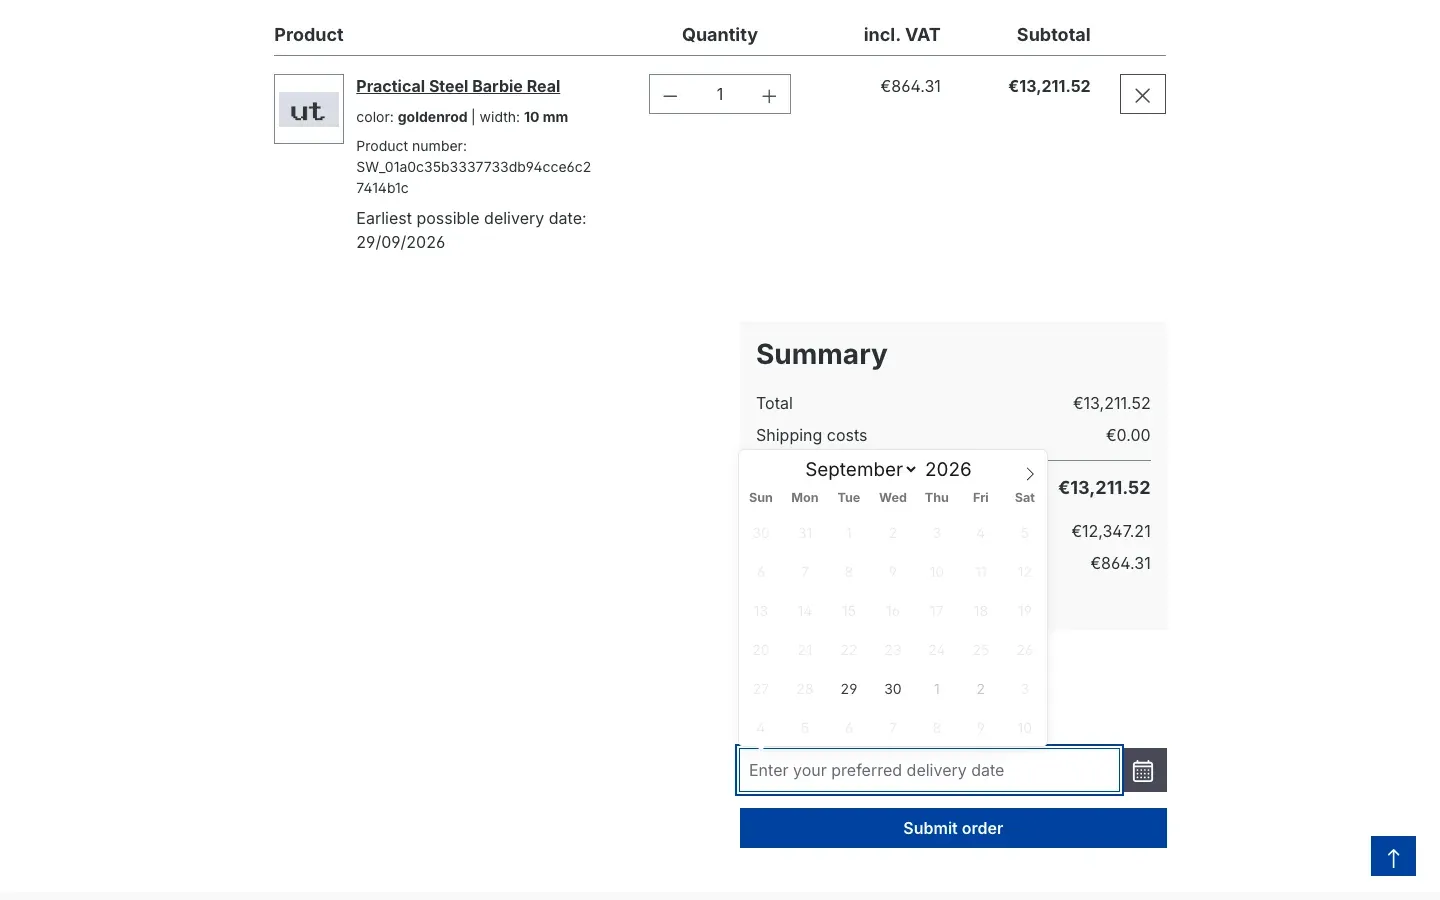 Fig. 10: Days that cannot be delivered are greyed out in the calendar
 -
After the selection the page reloads briefly and applies the date.
In addition, every product in the cart shows the earliest date it can be delivered:
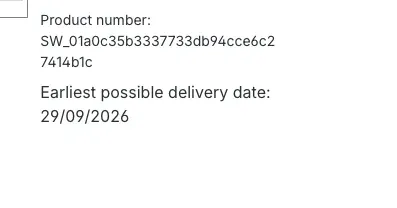 Fig. 11: The “Earliest possible delivery date” line on a cart item
The applied date then appears in the shipping block of the order confirmation page:
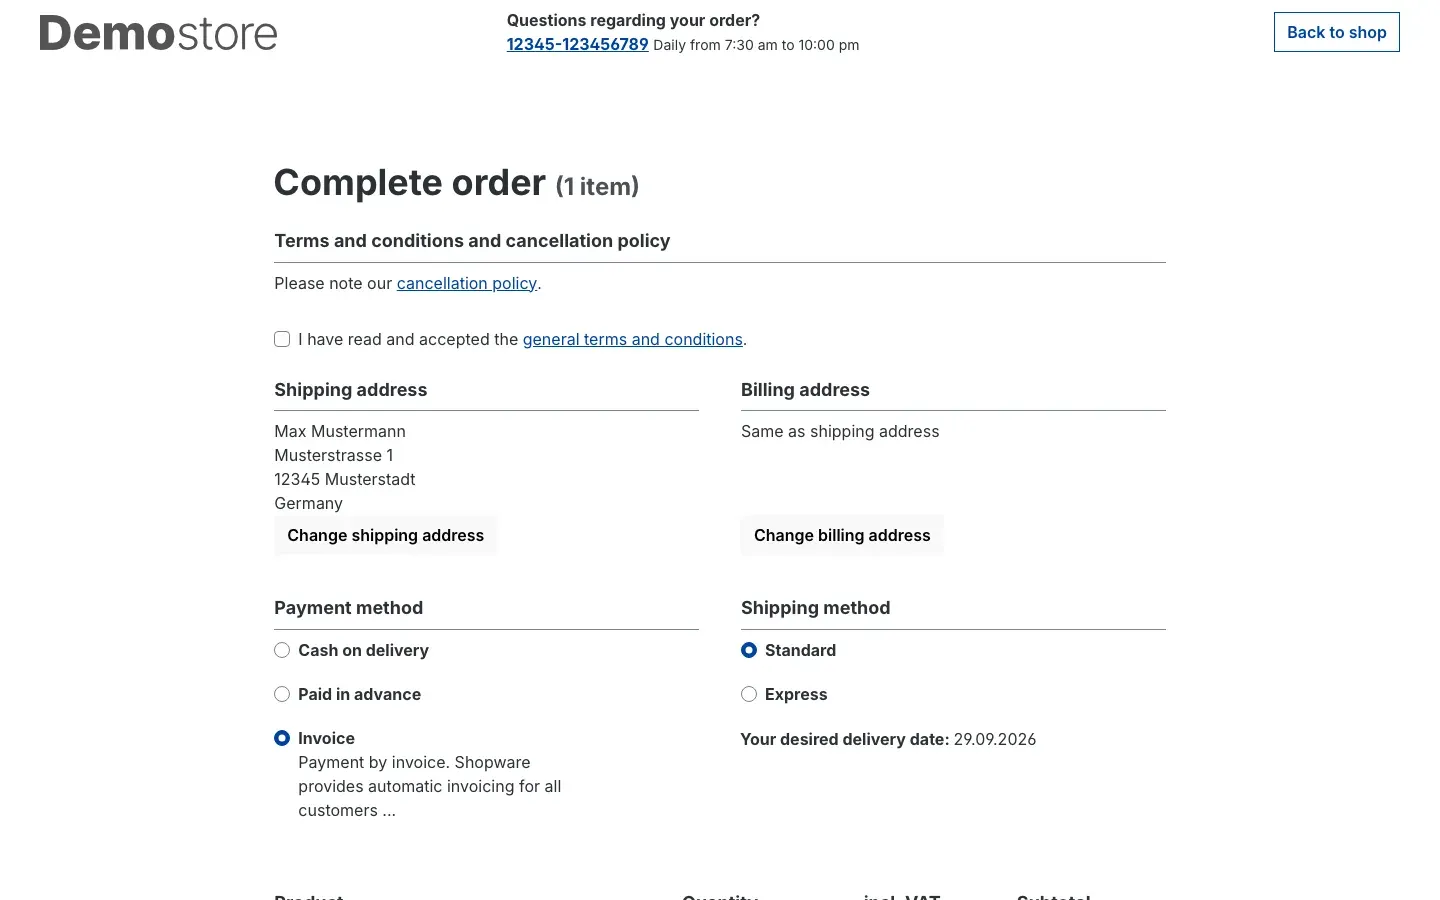 Fig. 12: The chosen date on the order confirmation page
After the order is placed, the finish page shows the date once more:
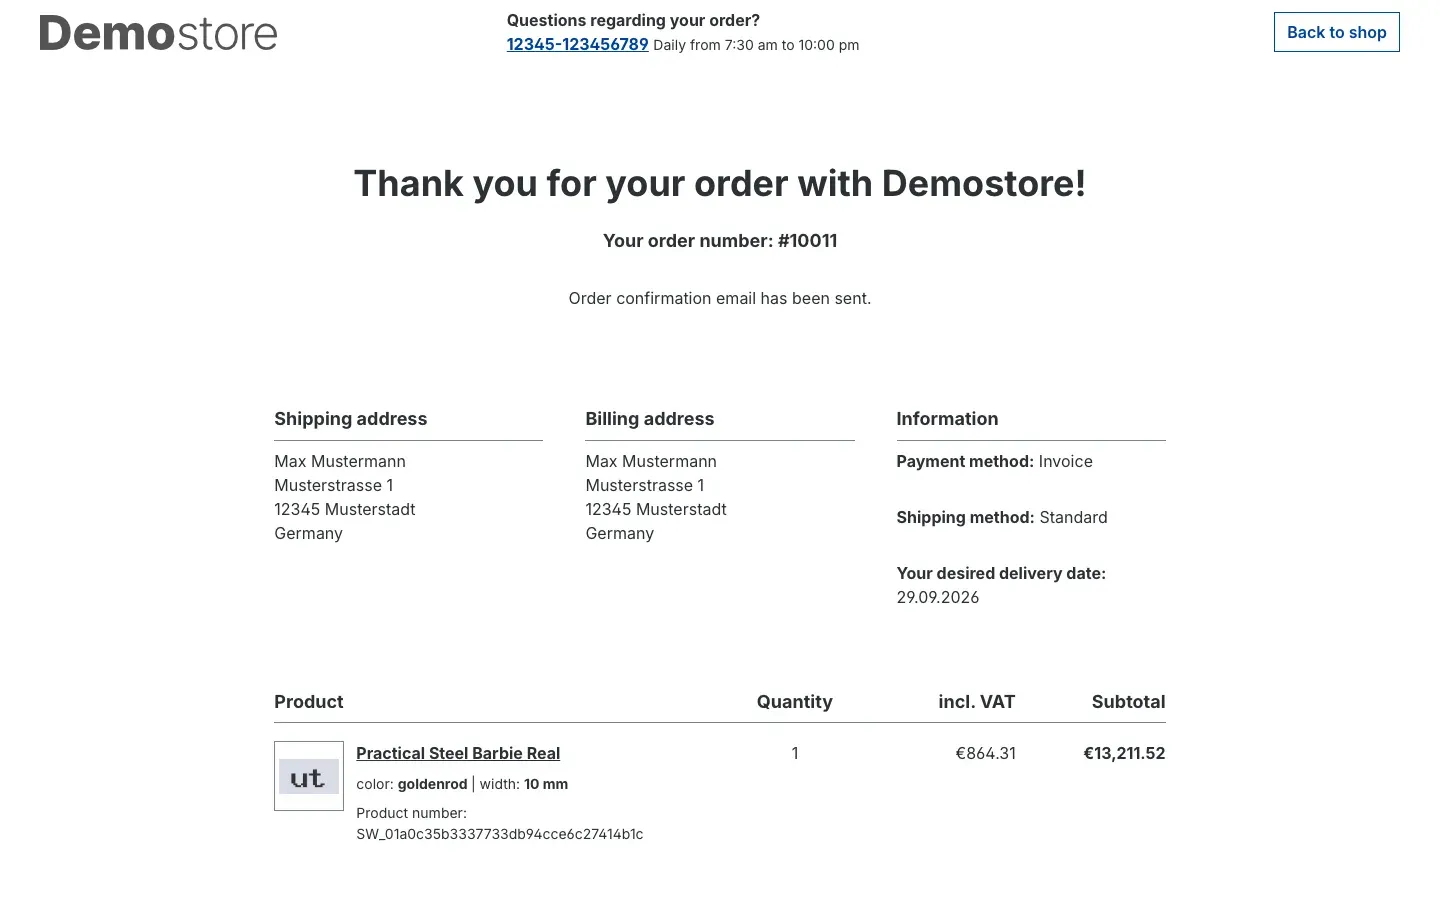 Fig. 13: The date on the order finish page
Important: if a customer switches to a shipping or payment method you excluded from the date selection, the field disappears and the date is discarded. If they switch back, their date is restored.
Tip: if an already chosen date no longer fits after a change in the cart — because a product with a longer lead time was added, for example — the plugin moves it to the next possible day automatically.
How to find the chosen date on the order
What you get from this: the chosen date stays stored with the order permanently, so you can pick and plan against it.
When the order is placed, the plugin stores the date in two places:
- as the earliest shipping date of that order’s delivery,
- as additional information on the order itself.
Important: Shopware does not show a dedicated area for additional information on the order detail page (tabs General, Details, Documents) — unlike shipping methods and products. The date is therefore not visible there as its own field, even though it is stored.
Here is how to get to the date anyway:
- Print it on the invoice and delivery note — the most reliable route for warehouse and dispatch, see For administrators / technical details.
- Print it in the order confirmation email, see For administrators / technical details as well.
- Plan by delivery date: because the date is stored as the delivery’s earliest shipping date, it is available for dispatch planning.
How to print the date in emails and documents
What you get from this: your customers get their date confirmed in writing, and your warehouse sees it on the delivery note.
The plugin deliberately leaves your email templates untouched — so your own customisations survive every update. The date is, however, already available to the order confirmation email (in the format DD.MM.YYYY) and appears as soon as you print it in the template once. The same applies to invoices and delivery notes. The small template addition required for this is in For administrators / technical details; if you do not normally edit templates yourself, simply pass that section on to your agency or service provider.
The templates are located under Settings → Email templates and Settings → Documents.
How to control who may edit the blocked periods
What you get from this: your staff only see what they need. Whoever maintains the blocked periods gets exactly that permission — and nothing else.
You assign permissions under Settings → System → Users & permissions → Roles. Open a role and look for the Delivery date blacklist entry in the permissions section. Four levels are available:
- View — see the list and the entries without changing anything.
- Edit — change existing entries.
- Create — add new periods.
- Delete — remove entries.
Without the View level, the Delivery date blacklist entry does not appear in the Catalogues menu for that role at all.
Troubleshooting
No date selection appears in the shop
What causes it: usually one of four conditions is not met.
How to fix it:
- Check in the configuration whether Activate plugin for this channel is switched on for the correct sales channel.
- Check whether at least one group is listed under Customer groups — and whether the customer’s group is among them. An empty field means: for nobody.
- Check whether the shipping or payment method chosen during checkout is listed under not allowed shipping methods or not allowed payment methods.
- Look in the right place: the date selection is on the order confirmation page, not on the cart page.
A blocked period can still be selected
What causes it: the period exists but is not assigned to any shipping method.
How to fix it: open Settings → Shipping, then the shipping method in question, and add the period under Blacklist in the Custom fields card, Preferred delivery date tab. See How to use the features.
No day at all can be clicked in the calendar
What causes it: the settings rule each other out — for example only a few Delivery days are set on the shipping method and those days also fall into a blocked period.
How to fix it: widen the Delivery days of the shipping method, shorten the blocked period, or lower Offset in days.
The plugin does not appear in the administration
What causes it: the plugin is probably not activated yet, or the cache is out of date.
How to fix it:
- Open Extensions → My extensions.
- Check whether the plugin has the status Active.
- Clear the cache: Settings → System → Caches & indexes.
- Reload the administration in your browser afterwards.
A change to the configuration has no effect
What causes it: the shop pages are still being served from the cache.
How to fix it: clear the cache under Settings → System → Caches & indexes and reload the page in the shop.
FAQ
Q: Do I have to configure everything again for every sales channel?
A: Yes, all settings apply per sales channel. This is intentional: it lets you offer the service in one channel and leave it out in another.
Q: What happens if I select no customer groups?
A: Then nobody sees the date selection. The field does not mean “everyone”. Enter all groups if the feature should apply to your whole shop.
Q: Do my customers see the names of the blocked periods?
A: No. The name is only visible to you in the administration. In the calendar the day is simply not clickable.
Q: Can my customers choose a date in the past or today?
A: No. The earliest selectable day follows from the lead time; the smallest effective lead time is one day.
Q: What applies when products with different lead times are in the cart?
A: The longest lead time always wins, so the date matches the whole delivery.
Q: Can I make the delivery date mandatory?
A: Yes, with the Mandatory information setting. The order can then not be placed without a date.
Q: Is the date automatically included in the order confirmation email?
A: It is available to the template but only printed once the template contains it. The plugin does not change your email templates itself so that your own customisations are kept. The addition is one snippet per template part and is described in For administrators / technical details under “Showing the preferred date in the order confirmation”.
Q: Why can an order not be placed even though a date was selected?
A: With Mandatory information enabled, the shop checks the date again on submit. If the day has been blocked in the meantime or lies before the earliest possible delivery date, your customer sees a notice and picks a new day.
Q: What happens to my data if I uninstall the plugin?
A: Uninstalling removes the settings and the blocked periods you created. If you only want to switch the plugin off temporarily, deactivate it instead of uninstalling it.
Q: Which languages does the plugin support?
A: German, English and Dutch — both in the administration and in the shop.
For administrators / technical details
This section is aimed at technical administrators. You do not need it for normal use.
System requirements
- Shopware: 6.7.0 or newer
- PHP: 8.2 or newer
- Storefront: Shopware’s storefront bundle is required
Installation via the command line (Composer)
composer require swp/deliverydate-six
bin/console plugin:refresh
bin/console plugin:install --activate SwpDeliveryDateSix
bin/console cache:clear
Showing the preferred date in the order confirmation
The plugin provides the preferred delivery date to the order emails (order confirmation, payment received, order cancelled) as order.customFields.delivery_date_six_order in the format DD.MM.YYYY — in sales channels where the plugin is active. It does not change the templates themselves.
- Open Settings → Email templates and edit the template of type Order confirmation.
- Select the language at the top — the snippet belongs into every language you send order confirmations in.
- Insert the snippet directly after the “Selected shipping method” section, i.e. behind the
{% endif %}line that closes that section. - Save and check with a test order.
For the plain text part:
{% set swpDeliveryDate = order.customFields.delivery_date_six_order|default %}
{% if swpDeliveryDate %}
Your preferred delivery date: {{ swpDeliveryDate }}
{% endif %}
For the HTML part:
{% set swpDeliveryDate = order.customFields.delivery_date_six_order|default %}
{% if swpDeliveryDate %}
    <strong>Your preferred delivery date:</strong> {{ swpDeliveryDate }}<br>
    <br>
{% endif %}
The line only appears when the order carries a preferred date; orders without a date (mandatory information off, channel switched off) receive the email unchanged. For the German template replace the text with “Ihr Wunschlieferdatum:”.
The same snippet works in the invoice and delivery note templates under Settings → Documents.
What happens on uninstall
Uninstalling removes the plugin’s settings, the table holding the blocked periods and the text snippets shipped with the plugin. Deactivating leaves all data untouched.
This manual was written for Desired delivery date version 6.7.3.
More manuals
Age Check
Tobacco, spirits, knives: visitors who do not confirm their age never see the restricted items at all. You tick a box per product, the plugin hides it everywhere.
Open manual Shopware 6AI SEO All-in-One: SEO and GEO suite for Shopware 6
Google finds your shop, ChatGPT never mentions it. This plugin checks both in one run, fills empty meta fields from templates and turns the findings into a to-do list.
Open manual Shopware 6Area Calculation
Area calculation on the product page: your customer knows the square metres, not the number of packs. The plugin works it out, adds the offcut and fills the quantity field.
Open manualNeed a team that keeps your shop running?
We have been maintaining Shopware shops for more than 20 years, including updates, hotfixes and the plugins you are configuring right now.